Page 33 of 244

Instruments and warning lights
32
Note
If the battery has been disconnected
and reconnected, the warning light
comes on
after switching on the ignition. The warning light must go out after driving a short distance.Antilock brake system (ABS)
The warning light
shows the functionality of the ABS.
The warning light comes on for a few seconds after the ignition has been switched on or when starting the engine. The warning light goes out after an automatic check sequence has been completed. A fault in the ABS The system is not functioning properly if the ABS warning light
does not go out
within a few seconds after switching on the ignition, does not light up at all or lights up while driving. The vehicle will only be br
aked by the normal brake system. Visit a
specialist garage immediately and adjust your
style of driving appropriately as you will
not know how grea
t the damage is.
Further information about ABS
page 140, “Antilock brake system (ABS)”.
A fault in the entire brake system If the ABS warning light
comes on together with the brake system warning light
(handbrake must be released), there is a fa
ult not only in the ABS but also in another
part of the brake system
.
WARNING
If the brake system warning light
comes on together with the ABS
warning light
stop the vehicle immediately and check the brake fluid level in
the reservoir
page 171, “Brake fluid”. If the fluid level has dropped below the
MIN marking, do not drive any further - risk of accident! Obtain professional assistance.
Pay attention to the following instruct
ions before checking the brake fluid
level and opening the bonnet
page 166, “Working in the engine compart-
ment”.
If the brake fluid is at the correct leve
l, the ABS control function has failed.
The rear wheels may then block very rapi
dly when braking. In certain circum-
stances, this can result in the rear end of the car breaking away - risk of skid-ding! Drive carefully to the nearest sp
ecialist garage and have the fault
rectified.Brake system
The warning light
flashes or comes on if the brake fluid level is too low, if there is a
fault in the ABS or if
the handbrake is applied.
If the warning light
flashes and an audible signal so
unds three times (handbrake is
not applied),
stop
and check the brake fluid level
.
The following text will be displayed in the information display*:
Brake fluid: Owner's manual
If there is a fault in the ABS which also infl
uences the function of the brake system (e.g.
distribution of brake pressure), the ABS warning light
comes on and at the same
time the brake system warning light starts flashing
. Be aware that not only the ABS
but also another part of th brake system is defective
.
An audible signal sounds three times as an additional warning signal.One should get used to high pedal forces, an extended free play of the brake pedal and long braking distances when carefully driving to the specialist garage. For further information on the brake system
page 139, “Brakes”.
Handbrake applied The warning light
also comes on if the handbrake is applied. An audible warning is
also given if you drive the vehicle for at least 3 seconds at a speed of more than 6 km/h. The following text will be displayed in the information display*:
Release parking brake!WARNING (continued)
s3j8.a.book Page 32 Tuesday, April 20, 2010 1:10 PM
Page 34 of 244

Instruments and warning lights
33
Using the system
Safety
Driving Tips
General Maintenance
Breakdown assistance
Technical Data
WARNING
Pay attention to the following instruct
ions before checking the brake fluid
level and opening the bonnet
page 166, “Working in the engine compart-
ment”.
If the brake system warning light
does not go out a few seconds after
switching on the ignition or comes on when driving, stop immediately and check the brake fluid in the reservoir
page 171, “Brake fluid”. If the fluid level
has dropped below the MIN marking, do no
t drive any further - risk of accident!
Obtain professional assistance.Cruise control system*
The warning light
lights up, when operating the speed regulating system.
Airbag system
Monitoring the airbag system The warning light
comes on for a few seconds when the ignition is switched on.
There is a fault in the system if the warning
light does not go out or comes on or flashes
while driving
. This also applies if the warning
light does not come on after the
ignition is switched on. The following text will be displayed in the information display*:
Airbag fault!
The functionality of the airbag system is also monitored electronically when one airbag has been switched off. The following situation applies if the fr
ont, side and head airbags or belt
tensioner have been switched off
using the vehicle system tester:
The warning light
lights up for 3 seconds after switching on the ignition and then
flashes for 12 seconds afterwards in 2 second intervals. The following text will be displayed in the information display*:
Airbag/belt tensioner deactivated!
If the passenger front airbag has been
switched off using the switch (for
switching off airbags)* in the end face of
the dash panel on the front passenger
side:
The warning light
comes on for 4 seconds after the ignition has been switched
on.
switching off the airbag is indicated in the middle of the dash panel by the lighting
up of the yellow indicator light in display
page 129.
WARNING
Have the airbag system checked immediat
ely by a specialist
garage if a fault
exists. Otherwise, there is a
risk of the airbag not bein
g activated in the event of
an accident.
Note
Further information about switching off airbags
page 128, “Deactivating airbags”.
Diesel particle filter*
(diesel engine)
If the warning light
comes on, this means that soot
has accumulated in the diesel
particle filter because of the frequent short distances. In order to clean the diesel particle filter, the vehicle should be driven at an even speed of at least 60 km/h at engine speeds of 1
800 - 2 500 rpm for at least 15 minutes or until
the warning light goes out with the 4th or
5th gear engaged (automatic gearbox: posi-
tion S) when the traffic situation permits it. This increases the exhaust temperature and the soot deposited in the diesel particle filter is burnt. Always pay attention to the valid speed limits
.
The warning light
goes out after the successful cleaning of the diesel particle filter.
If the filter is not properly
cleaned, the warning light
does not go out and the
warning light
begins to flash. In the in
formation display* appears
Diesel-particle
filter! Owner's manual
. Afterwards the engine control unit shifts the engine into the
emergency mode, which only has a reduced po
wer output. After switching the ignition
off and on again the warning light
comes on.
Have the vehicle inspected without
delay by your specialist garage.
s3j8.a.book Page 33 Tuesday, April 20, 2010 1:10 PM
Page 35 of 244

Instruments and warning lights
34
WARNING
If you do not pay attention to the warning light coming on and the corre-
sponding descriptions and warning notes, this may result in injuries or major vehicle damage.
Always adjust your speed to suit weather, road, region and traffic condi-
tions. The route indicated by the warning light must not tempt you to disregard the national regulations for road traffic.
Caution
As long as the warning light
lig hts up, one m us t ta ke i nto acco unt an i ncrea se d fue l
consumption and in certain circumstan
ces a power reduction of the engine.
Note
Further information about
diesel particle filter
page 143, “Diesel particle filter*
(diesel engine)”.Seat belt warning light*
The warning light
comes on after the ignition is sw
itched on as a reminder for the
driver and front passenger to fasten the seat
belt. The warning light only goes out if the
driver or front passenger has fastened his seat belt. If the seat belt has not been fastened by
the driver or front passenger, a permanent
warning signal sounds at vehicle speeds greater than 20 km/h and simultaneously the warning light
flashes.
If the seat belt is not fastened by the dr
iver or front passenger during the next 90
seconds, the warning signal is deactivated and the warning light
lights up perma-
nently. In case of a load on the front passenger se
at e.g. a bag (this is not recommended for
safety reasons) the warning light
indicates that the seat belt is not fastened.
Further information on the seat belts
page 117, “Why seat belts?”.
s3j8.a.book Page 34 Tuesday, April 20, 2010 1:10 PM
Page 36 of 244

Unlocking and locking
35
Using the system
Safety
Driving Tips
General Maintenance
Breakdown assistance
Technical Data
Unlocking and lockingKeyDescriptionFig. 23 Set of keys without remote control / set of keys with remote control keyTwo keys are provided with the vehicle. Depending on the equipment, your vehicle can be equipped with keys without radio remote control
fig. 23
- left, or with radio
remote control*
fig. 23
- right.
WARNING
Always withdraw the key whenever you le
ave the vehicle - even if it is only
for a short time. This is particularly important if children are left in the vehicle. The children might otherwise start the en
gine or operate electrical equipment
(e.g. power windows) - risk of injury!
Do not withdraw the ignition key from the ignition lock until the vehicle has
come to a stop. The steerin
g lock might otherwise enga
ge unintentionally - risk
of accident!
Caution
Each key contains electronic components; therefore protect them against moisture
and severe shocks.
Keep the groove of the keys absolutely clean as impurities (textile fibres, dust etc.)
have a negative effect on the proper operation of the locking cylinder and the ignition lock.
Note
Please approach an authorised Škoda Servic
e Partner if you lose a key since he can
obtain a new one for you.Changing the battery in the remote control keyFig. 24 Remote control key - remove cover / remove batteryEach remote control key contains a batt
ery which is housed under the cover
fig. 24
. If the battery is discharged, the red in
dicator light does not light up after
pressing a button on the remote control
fig. 23
. Change the battery as follows:
– Fold open the key.– Carefully press off the cover at the points of the arrows .– Remove the discharged battery from the key by pressing the battery downwards at
the point of the arrow
fig. 24
.
– Insert the new battery. Ensure that the “+”
symbol on the battery is facing upwards.
The correct polarity is shown on the battery cover.
– Position the battery cover on the key and press on it until it is heard to lock in place.
AB
AA A1
A2
s3j8.a.book Page 35 Tuesday, April 20, 2010 1:10 PM
Page 37 of 244

Unlocking and locking
36
For the sake of the environment
Dispose of a used battery in accord
ance with environmental regulations.
Note
Pay attention to the correct pola
rity when changing the battery.
The replacement battery must have the same specification as the original battery.
If it is still not be possible to unlock or
lock the vehicle with the remote control even
after replacing the battery this means that the system has to be synchronised page 42.Electronic immobiliser The electronic immobiliser prevents
the vehicle being operated by an
unauthorised person.An electronic chip is integrated in the head of the key. The immobiliser is deactivated with the aid of this chip when the key is in
serted in the ignition lock. The electronic
immobiliser is automatically activated when
you withdraw the ignition key from the
lock.
Note
It is only possible to start the engine of
your car with a Genuine Škoda key with the
matching code.Locking / UnlockingValid for vehicles without
a central locking system:
Locking from outside The securing knob will move upwards or downwards in the door when unlocking or locking.
Locking from inside All closed vehicle doors are locked by pressi
ng in the securing knobs from the inside.
The doors cannot be opened from the outs
ide when the securing knobs have been
pressed in. The vehicle d
oors can be opened from the inside as follows:
the door is unlocked by actuating the door-opening lever;
the door opens upon actuating the door-opening lever again.Note
The opened door cannot be locked with
the securing knob. This prevents the
possibility of forgetting the key in the locked vehicle.
The opened doors at the rear and the fron
t passenger door are locked by pressing
in the securing knob and
slamming the door closed.
Please refer to the safety guidelines
in “Description” on page 37.
Child safety lockThe child safety lock prevents the re
ar door from being opened from the
inside.Fig. 25 Switching child safety lock on: for ve
hicles without or with central locking system
The rear doors are equipped with a child safe
ty lock. You can switch the child safety
lock on and off using the vehicle key.
s3j8.a.book Page 36 Tuesday, April 20, 2010 1:10 PM
Page 38 of 244

Unlocking and locking
37
Using the system
Safety
Driving Tips
General Maintenance
Breakdown assistance
Technical Data
Switching child safety lock on– On vehicles without central locking system,
turn the slot of the safety lock on the
left door to the left
page 36, fig. 25
, on the right door turn it to the right.
– On vehicles with central locking system, turn
the slot of the safety lock on the left
door to the right, on the right door turn it to the left
page 36, fig. 25
.
Switching child safety lock off– On vehicles without central locking system,
turn the slot of the safety lock on the
left door to the right, on the right door turn it to the left.
– On vehicles with central locking system, turn
the slot of the safety lock on the left
door to the left, on the right door turn it to the right.
So long as the child safety lock is switched
on it is not possible to open the door from
the inside with the door opening lever. In th
is case the door can be opened only from
the outside.Central locking system*DescriptionUnlocking or locking the vehicle causes
all doors to be unlocked or locked at the same
time by the central locking system. The boot lid is unlocked when opening. It can be opened by pressing the hand grip above the licence plate. Operation of the central locking system is possible:
from the outside using the vehicle key
page 38;
using the buttons for the
central locking system
page 39;
by using the remote control
page 41.
Indicator light in the driver's door After locking the vehicle the indicator light fl
ashes for 2 seconds fast, then more slowly.
If the vehicle is locked and the safe securing system
page 38 is not operating, the
indicator light in the driver door flashes for
about 2 seconds fast, goes out and starts to
flash slowly after about 30 seconds.
If the indicator light first of all flashes fast for about 2 seconds, afterwards lights up for about 30 seconds and then flashes slowly, there is a fault in the system of the central locking or the interior monitor*
page 43. Visit a specialist garage to obtain assist-
ance. Convenience operation of the windows One can open and close the electrically
powered windows when unlocking and
locking the vehicle
page 45.
Opening a single door* This function makes it possible to only unlock the driver's door. The other doors remain locked and are only unlocked when
the command is repeated. The single door
opening function can be first activated by recoding the control unit of the central locking system. This work is undertaken by a specialist garage which can give you more information. Automatic locking* All the doors and the boot lid are locked au
tomatically once the car reaches a speed of
about 15 km/h. If the ignition key is withdrawn, the car is
then automatically unlocked again. The driver
can also unlock the vehicle
by pressing the button
of the central locking system.
If you wish, you can have a specialist gara
ge activate the automatic locking function.
WARNING
Locking the doors prevents involuntary op
ening in an exceptional situation (an
accident). Locked doors prevent unwanted entry into the vehicle from outside, for example at road crossings. Locked do
ors do, however, make it more difficult
for rescuers to get into the vehicle
in an emergency - danger to life!
Note
In the event of an accident in which the airbags are deployed, the locked doors are
automatically unlocked in order to enable
rescuers to gain access to the vehicle.
Only the front door which is fitted with
a locking cylinder can be unlocked and
locked using the key if the central locking sy
stem fails. You can operate the rear doors
manually.
s3j8.a.book Page 37 Tuesday, April 20, 2010 1:10 PM
Page 39 of 244

Unlocking and locking
38
Emergency locking of the door
page 39.
Emergency unlocking of the boot lid
page 40.
Safe securingThe central locking system is equipped with a
safe securing
5) system. Locking the
vehicle from the outside causes the door lo
cks to be automaticall
y blocked. The indi-
cator light in the driver's door flashes. It is
not possible to open the doors with the door
handle ei the r fro m the ins id e or from the outsi de. T hi s a cts as an ef fe cti ve dete rrent for attempts to break into your vehicle. You can deactivate the safe securing system by locking twice within 5 seconds.The safe securing system is again activated
the next time the vehicle is unlocked and
locked again. If the vehicle is locked and the safe securing
system is deactivated, you can open the
vehicle from the inside by pulling on the d
oor opening lever. The door is unlocked and
opened at the same time.
WARNING
If the vehicle is locked from the outside and the safe securing system is acti-vated, there must not be any person and animals in the vehicle as it is then not possible to open either a door or a window from the inside. The locked doors make it more difficult for rescuers to
get into the vehicle
in an emergency -
hazard!
Note
The anti-theft alarm system* is also activated with the deactivated safe securing system when locking the vehicle. The interior monitor* is however not activated.
Unlocking the vehicle using the key– Turn the key in the locking cylinder of the
driver's door in the direction of travel
(unlock position)
fig. 26
.
– Pull on the door handle and open the door.
All the doors are unlocked.
The boot lid is then unlocked.
The switched on interior lights come on over the door contact.
The safe securing system is deactivated.
The windows open provided the key
is held
in the unlock position.
The indicator light in the driver's door stops flashing if the vehicle is not fitted with
an anti-theft alarm system*
page 42.
Note
If the vehicle is equipped with an anti-theft alarm system*, you must insert the key into the ignition lock and switch the ignition on within 15 seconds after unlocking the door in order to deactivate the anti-theft alarm system. The
alarm will be triggered
if you
do not switch on
the ignition within 15 seconds.
Locking the vehicle with the key– Turn the key in the locking cylinder of the driver's door in the opposite direction of
travel (lock position)
fig. 26
.
5)The equipment is only valid for some countries.
Fig. 26 Turning the key for unlocking and locking the vehicle
AAAB
s3j8.a.book Page 38 Tuesday, April 20, 2010 1:10 PM
Page 40 of 244

Unlocking and locking
39
Using the system
Safety
Driving Tips
General Maintenance
Breakdown assistance
Technical Data
All the doors and the boot lid are locked.
The switched on interior lights go out over the door contact.
The windows and the electric sliding/tilting roof* close provided the key is
held
in
the lock position.
The safe securing system is activated immediately.
The indicator light in the driver door begins flashing.Note
The opened front doors cannot be unlocked. It
must be locked separately after closing
it.Button for the central locking system*If the vehicle was not locked from the outsid
e, you can also unlock and lock it with the
rocker switch without th
e ignition switched on.
Locking all doors and the boot lid– Press button
fig. 27
. The symbol
in the button comes on.
Unlocking all doors and the boot lid– Press button
fig. 27
. The symbol
goes out in the button.
The following applies if
you have locked your vehicle using the button :
It is not possible to open the doors or the boot lid from the outside (safety feature,
e.g. when stopping at
traffic lights etc.).
You can unlock the doors individually from
the inside and open them by pulling the
door opening lever.
As long as one door is opened, the doors cannot be locked in order to avoid inad-
vertently locking the key in the vehicle.
In the event of an accident in which the airbags are deployed, the locked doors are
automatically unlocked from the inside in orde
r to enable rescuers to gain access to
the vehicle.
WARNING
The central locking system al
so operates if the ignition is switched off. All the
doors and the boot lid are locked. Children should never be left unattended in the vehicle since it is difficult to prov
ide assistance from the outside when the
doors are locked. Locked doors make it difficult for rescuers to get into the vehicle in an emergency - hazard!
Note
The door opening lever and the button for the central locking system do not operate if the safe securing system is activated.Emergency locking of the doorsAn emergency locking mechanism is located on
the rear side of the doors which have
no locking cylinder; it is only
visible after opening the door.
Fig. 27 Button for the central locking system
A1A2
A1
Fig. 28 Emergency locking of the door
s3j8.a.book Page 39 Tuesday, April 20, 2010 1:10 PM
 1
1 2
2 3
3 4
4 5
5 6
6 7
7 8
8 9
9 10
10 11
11 12
12 13
13 14
14 15
15 16
16 17
17 18
18 19
19 20
20 21
21 22
22 23
23 24
24 25
25 26
26 27
27 28
28 29
29 30
30 31
31 32
32 33
33 34
34 35
35 36
36 37
37 38
38 39
39 40
40 41
41 42
42 43
43 44
44 45
45 46
46 47
47 48
48 49
49 50
50 51
51 52
52 53
53 54
54 55
55 56
56 57
57 58
58 59
59 60
60 61
61 62
62 63
63 64
64 65
65 66
66 67
67 68
68 69
69 70
70 71
71 72
72 73
73 74
74 75
75 76
76 77
77 78
78 79
79 80
80 81
81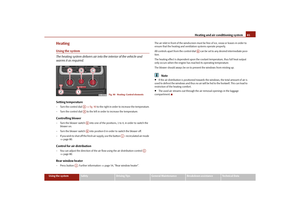 82
82 83
83 84
84 85
85 86
86 87
87 88
88 89
89 90
90 91
91 92
92 93
93 94
94 95
95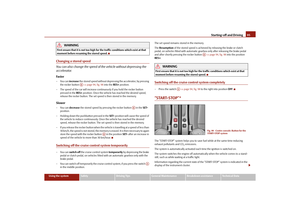 96
96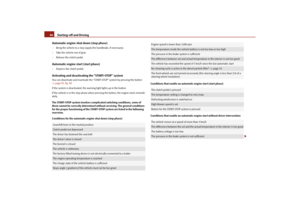 97
97 98
98 99
99 100
100 101
101 102
102 103
103 104
104 105
105 106
106 107
107 108
108 109
109 110
110 111
111 112
112 113
113 114
114 115
115 116
116 117
117 118
118 119
119 120
120 121
121 122
122 123
123 124
124 125
125 126
126 127
127 128
128 129
129 130
130 131
131 132
132 133
133 134
134 135
135 136
136 137
137 138
138 139
139 140
140 141
141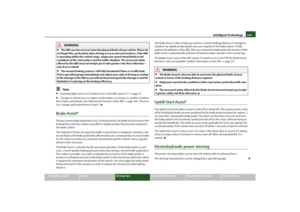 142
142 143
143 144
144 145
145 146
146 147
147 148
148 149
149 150
150 151
151 152
152 153
153 154
154 155
155 156
156 157
157 158
158 159
159 160
160 161
161 162
162 163
163 164
164 165
165 166
166 167
167 168
168 169
169 170
170 171
171 172
172 173
173 174
174 175
175 176
176 177
177 178
178 179
179 180
180 181
181 182
182 183
183 184
184 185
185 186
186 187
187 188
188 189
189 190
190 191
191 192
192 193
193 194
194 195
195 196
196 197
197 198
198 199
199 200
200 201
201 202
202 203
203 204
204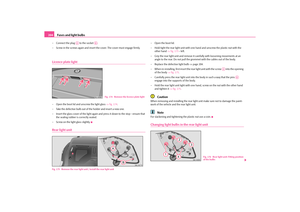 205
205 206
206 207
207 208
208 209
209 210
210 211
211 212
212 213
213 214
214 215
215 216
216 217
217 218
218 219
219 220
220 221
221 222
222 223
223 224
224 225
225 226
226 227
227 228
228 229
229 230
230 231
231 232
232 233
233 234
234 235
235 236
236 237
237 238
238 239
239 240
240 241
241 242
242 243
243