Page 41 of 244

Unlocking and locking
40 Locking– Remove the panel
page 39, fig. 28
.
– Insert the key into the opening under the panel and press the stopping lever as
far as the stop toward the inside.
– Re-insert the panel. After closing the door, you can no
longer open it from outsid
e. If the child safety lock
is not switched on, it is possible to open
the door from the inside by pulling twice on
the door opening lever. If the child safety lock
is activated (only on the rear doors), first
of all it is necessary to pull once on the in
ner door handle and then open the door from
the outside.Boot lid*Fig. 29 Unlock the boot lid / handle of the boot lidOpening the boot lid–
On vehicles with central locking
unlock the boot lid by pressing the button on the
driver door
fig. 29
.
On vehicles with central locking
unlock the boot lid by pressing the hand grip above
the licence plate.Closing the boot lid– Pull the boot lid down and cl
ose it with a slight swing
.
A handle which makes the closing easier is located on the inner paneling of the boot lid.
WARNING
Ensure that the lock is properly enga
ged after closing the boot lid. Other-
wise, the boot lid might open suddenly when
driving even if the boot lid lock is
closed - risk of accident!
Never drive with the boot lid fully open
ed or slightly ajar otherwise exhaust
gases may get into the interior of the vehicle - risk of poisoning!
Do not press on the rear window when closing the boot lid, it could crack -
risk of injury!
Note
After closing the boot lid, it is automatically locked within 1 seconds and the
anti-theft alarm system* is activated.
This applies only if
the vehicle was locked
before closing the boot lid.
The function of the hand grip above the li
cence plate is deactivated when starting
off or as of a speed of more than 6 km/hour
for vehicles with central locking. The func-
tion of the hand grip is activated again
when the vehicle has stopped and a door is
opened.Emergency unlocking of the boot lidIf there is a fault in the central locking, you can open the boot lid as follows:
AA
AB
Fig. 30 Emergency unlocking of the boot lid
s3j8.a.book Page 40 Tuesday, April 20, 2010 1:10 PM
Page 42 of 244

Unlocking and locking
41
Using the system
Safety
Driving Tips
General Maintenance
Breakdown assistance
Technical Data
– Fold one of the outer rear seats forwards. – Move the operating lever with the aid of a
narrow object, e.g. a screwdriver, up to
the stop in the direction of arrow
page 40, fig. 30
and then unlock in the
direction of arrow .
– Open the boot lid from the outside.Remote control*DescriptionYou can use the remote control:
to unlock and lock the vehicle;
unlocking boot lid.
The transmitter with the battery is incorporat
ed in the handle of the master key. The
receiver is located in the interior of the car. The operating range of the remote control key is approx. 10 m. But this range can be reduced if the batteries are weak. The master key has a fold-open key bit which can be used for unlocking and locking the car manually and also for starting the engine. If a lost key is replaced or if the receiver unit has been repaired or a new unit installed, it is then necessary for a specialist garage to adapt the system. Only after this is it possible to again use the remote control.
Note
The remote control is automatically deactivated when the ignition is switched on.
The operation of the remote control may temporarily be affected by interference
from transmitters close to th
e car and which operate in the same frequency range (e.g.
mobile phone, TV transmitter).
The battery must be replaced if the centra
l locking or anti-theft alarm system does
not react to the remote control at less th
an 3 metres away. We recommend having the
battery replaced by
a specialist garage.
Unlocking and locking the vehicleUnlocking the vehicle
– Press the button
fig. 31
for about 1 second.
Locking the vehicle
– Press button for about 1 second.Deactivating safe securing system– Press button twice in 2 seconds. Further information
page 37.
Boot lid remote release
– Press button for about 1 second
fig. 31
.
Folding out of the key– Press button .Folding up of the key– Press button and collapse the key bit in the housing. The turn signal lights flash twice as confir
mation that the vehicl
e has been unlocked.
The vehicle will lock again automatically if
you unlock the vehicle using button but
do not open a door or the boot lid within th
e next 30 seconds. This
function is intended
to prevent the car being unlocked unintentionally.
A1
A2
Fig. 31 Remote control key
A1
A3A3A2A4A4
A1
s3j8.a.book Page 41 Tuesday, April 20, 2010 1:10 PM
Page 43 of 244

Unlocking and locking
42The safe securing system along with the anti-theft alarm system* are, however, deac- tivated during these 30 seconds. When the vehicle is unlocked or locked, the interior lights in the door contact are auto- matically switched on or off. Display of the locking The turn signal lights flash once to confir
m that the vehicle has been correctly locked.
If the vehicle is locked by pr
essing the button and some doors or the boot lid are
not closed, the turn signal lights flash only after closing.
WARNING
If the vehicle is locked from the outside and the safe securing system is acti-vated, there must not be any person in the vehicle as it is then not possible to open either a door or a window from the inside. The locked doors make it more difficult for rescuers to get into th
e vehicle in an emergency - hazard!
Note
Operate the radio remote control only when
the doors and boot lid are closed and
you have visual contact with the vehicle.
Once in the vehicle, you must not press the lock button
of the master key before
inserting the key into the ignition lock in
order to avoid the vehicle being inadvertently
locked and the anti-theft alarm system* being switched on. Should this happen, press the unlock button
of the master key.
Syncronisation of the remote controlIf the vehicle cannot be unlocked by actuatin
g the remote control system then it is
possible that the code in the key and the co
ntrol unit in the vehicle are no longer
synchronised. This can occur when the buttons on the radio-operated key are actuated a number of times outside of the operative
range of the equipment or the battery on
the remote control was replaced. This means it is necessary to
synchronise the code as follows:
press any button on the remote control;
pressing of the button means that the door will unlock with the key within 1
minute.Anti-theft alarm system*DescriptionThe anti-theft alarm system increases the level of protection against people seeking to break into the vehicle. The system triggers audible and visual warning signals if an attempt is made to break into the vehicle. How is the alarm
system activated?
The anti-theft alarm system is activated au
tomatically when the
unlocked vehicle is
locked with the key inserted in the driver's
door or with the remote control key. It is
activated 30 seconds after locking the door. How is the alarm system deactivated? The anti-theft alarm system is deactivated if
the vehicle is unlocked by only using the
radio remote control. The anti-theft alarm system is reactivated if the vehicle is not opened within 30 seconds after transmitting the radio signal. Once you unlock the vehicle by inserting the ke
y into the driver door you then have to
insert the key into the ignition lock and sw
itch the ignition on within 15 seconds after
opening the door in order to deactivate the anti-theft alarm system. The
alarm will be
triggered
if you do
not switch on
the ignition within 15 seconds.
When is the alarm triggered? The following security areas of
the locked vehicle are monitored:
bonnet;
boot lid;
doors;
ignition lock;
vehicle interior*
page 43;
Angle of the vehicle*
page 43;
Decoupling of the attached trailer;
A3
s3j8.a.book Page 42 Tuesday, April 20, 2010 1:10 PM
Page 44 of 244

Unlocking and locking
43
Using the system
Safety
Driving Tips
General Maintenance
Breakdown assistance
Technical Data
A drop in voltage of the on-board power supply.
An alarm is immediately triggered if either of the two battery terminals is disconnected while the anti-theft alarm system is activated. How is the alarm switched off? You switch the alarm off if you unlock the vehi
cle with the radio remote control or if you
switch the ignition on.
Note
The working life of the alarm siren is 5 years. More detailed information is available
by a specialist garage.
Before leaving the car, check that all the doors, windows and the electric
sliding/tilting roof* are properly closed in order to ensure that the anti-theft alarm system is fully operational.
Coding of the radio remote control and th
e receiver unit precludes the use of the
radio remote control from other vehicles.Interior monitor* and Towi
ng protection monitoring*
The interior monitor and the towing protection monitoring detect movements inside the vehicle interior and then trigger the alarm.The interior monitor and the towing protec
tion monitoring are operated with the
button
. You can switch the interior monitor
and the towing protection monitoring
off if there is a possibility that movements from (e.g. children or animals) inside the
vehicle interior or if the vehi
cle must be transported (e.g. by train or ship) or towed,
might trigger the alarm.Switch off the interior monitor and towing protection monitoring– Switch off the ignition. – Open the driver door.– Press the button
on the driver door
fig. 32
.
– Lock the vehicle within 30 seconds. The in
terior monitor and the towing protection
monitoring are switched off.
The interior monitor and the towing protec
tion monitoring are switched on again
automatically the next ti
me the car is locked.
Note
You can also switch off the interior moni
tor and the towing protection monitoring,
by deactivating the sa
fe securing system
page 38.
When the ignition key is removed or a door is opened, the symbol in the button
lights up red.
Lighting up of the symbol in the button
does not confirm that the interior monitor
and the towing protection mo
nitoring are switched on.
Fig. 32 Interior monitor pushbutton
s3j8.a.book Page 43 Tuesday, April 20, 2010 1:10 PM
Page 45 of 244

Unlocking and locking
44Electrical power windows*Buttons for electrical power windowsFig. 33 Buttons on the driver's door / Buttons on the rear doorsThe power windows operate only when ignition is switched on.Opening a window– A window is opened by pressing lightly on
the respective button in the door. The
process stops when one releases the button.
– Additionally you can open the window auto
matically (fully opened) by pressing the
button up to the stop. Renewe
d pressing of the button causes the window to stop
immediately.
Closing a window– A window is closed through pulling lightly on the respective button in the door. The
closing process stops when
one releases the button.
– Additionally you can close the window auto
matically (fully clos
ed) by pulling the
button up to the stop. Renewed pulling of the button causes the window to stop immediately.
The buttons for the individual windows are located in the operating part of the armrest of the driver's door
fig. 33
, front passenger door and on the rear doors*.
Buttons for the power windows in the armrest for the driver Button for the power window in the driver's door
Button for the power window in the front passenger's door Button for the power window in the rear door on the right* Button for the power window in the rear door on the left* Safety pushbutton* Safety pushbutton* You can deactivate the buttons for power wind
ows at rear doors by pressing the safety
pushbutton
fig. 33
. The buttons for power windows at rear doors are activated
again by pressing
the safety pushbutton again.
If the buttons for the rear doors are deactivated, the indicator light
in the safety
switch lights up.
WARNING
If you lock the vehicle from the outside, do not leave any person in the
vehicle since it is no longer possible to open the windows from the inside in an emergency.
The system is fitted with a force limiter
page 45. If there is an obstacle, the
closing process is stopped and the window goes down by several centimeters. You should then take particular care when closing the windows! You may otherwise suffer severe injuries as a re
sult of getting an arm, for example,
jammed in the window!
Caution
It is recommended to deactivate the electr
ically operated power windows in the rear
doors (safety pushbutton)
fig. 33
when children are being transported on the
rear seats.
Note
In the event of a freezing up of the windscreen, first of all eliminate the ice
page 157
and then operate the power windows otherwise the power window mechanism could be damaged.
AA
ABACADAS
AS
AS
AS
AS
s3j8.a.book Page 44 Tuesday, April 20, 2010 1:10 PM
Page 46 of 244

Unlocking and locking
45
Using the system
Safety
Driving Tips
General Maintenance
Breakdown assistance
Technical Data
After switching the ignition off, it is still possible to open or close the windows for a
further 10 minutes. The power windows are
switched off completely once you open
the driver or front passenger door.
When driving always use the existing he
ating, air conditioning and ventilation
system for ventilating the interior of the vehicle. If the windows are opened, dust as well as other dirt can get into the vehicle
and in addition the wind noise is more at
certain speeds.Force limiter of the power windowsThe electrically operated power windows are fitted with a force limiter. It reduces the risk of bruises or injuries when closing the windows. If there is an obstacle, the closing process is stopped and the window goes down by several centimeters. If the obstacle prevents the window from being closed during the next 10 seconds, the closing process is interrupted once agai
n and the window goes down by several
centimeters. You must try to close the window once agai
n within 10 seconds after the window has
gone down twice, even if the obstacle was not yet removed, the closing process is stopped. During this time it is not poss
ible to automatically
close the window. The
force limiter is still switched on. The force limiter is only switched off, if yo
u attempt to close the window within the next
10 seconds -
the window closes now with full strength!
If you wait longer than 10 seconds, the force limiter is switched on again.
WARNING
You should take particular care when closing the windows! You may otherwise suffer severe injuries as a result of getting an arm, for example, jammed in the window!Window convenience operationYou can open and close the electrically po
wered windows as follows when unlocking
and locking the vehicle (only close the sliding/tilting roof):
Opening a window– Hold the key in the locking cylinder of the
driver's door in the
unlock position or
press the unlock button of the radio re
mote control until all the windows are
opened.
Closing a window– Hold the key in the locking cylinder of the driver's door in the lock position or press
the lock button of the radio remote co
ntrol until all the windows are closed.
You can interrupt the opening or closing
operation of the windows immediately by
releasing the key or the lock button.
WARNING
The system is fitted with a force limiter
page 45. If there is an obstacle, the
closing process is stopped and the window goes down by several centimeters. You should then take particular care when closing the windows! You may otherwise suffer severe injuries as a re
sult of getting an arm, for example,
jammed in the window!Operational faultsElectrically operated powe
r windows do not operate
If the battery of the car has been disconnect
ed and then reconnected, the electrically
operated power windows do not operate. Th
e system must be activated. Proceed as
follows in order to re-establish the function:
Switch on the ignition,
slightly pull on the upper edge of the rele
vant button and hold it until the window
is closed,
release the switch,
you must pull the respective switch again in upward direction for approx. 3
seconds.
s3j8.a.book Page 45 Tuesday, April 20, 2010 1:10 PM
Page 47 of 244

Unlocking and locking
46Operation in winter Ice accumulating on the surface of the wi
ndows during the winter may result in a
greater resistance when closing the windows and the window may stop and go down several centimetres Proceed as follows to close the window fully:
Switch on the ignition,
slightly pull on the upper edge of the rele
vant button and hold it until the window
is closed,
if the window goes down/stops, repeat th
e cycle (it is necessary to put the force
limiter out of operation
page 45 - now the window closes with full force!).
WARNING
The system is fitted with a force limiter
page 45. If there is an obstacle, the
closing process is stopped and the window
goes down by several centimeters.
You should then take particular care when closing the windows! You may otherwise suffer severe injuries as a re
sult of getting an arm, for example,
jammed in the window!Electric sliding/tilting roof*Description
The sliding/tilting roof is operated by means of the control dial
fig. 34
and only func-
tions when the ignition is switched on. The control dial has several positions. After switching the ignition off, it is still poss
ible to open, close and
tilt the sliding/tilting
roof for approx. 10 minutes. It is no longer possible to operate the sliding/tilting roof after opening one of the front doors, however.
Note
If the battery has been disc
onnected and reconnected, it is possible that the
sliding/tilting roof does not close fully. He
re you have to set the control dial to the
switch position and press it forward for about 10 seconds.Opening and tiltingComfort position– Turn the switch to position
fig. 34
.
Opening fully– Turn the switch to position and hold it
in this position (spring-tensioned posi-
tion).
Tilting roof– Turn the switch to position . When the sliding/tilting roof is in the comfort position, the intensity of the wind noise is much less. The sun screen is also opened automatically when the roof slides open. You can slide the sun screen into the opened or closed position by hand when the sliding/tilting roof is closed.
Caution
It may be necessary during winter to remove any ice and snow in the area of the sliding/tilting roof before opening it in
order to prevent damaging the opening mech-
anism and the seal.
Fig. 34 Control dial for the power sliding/tilting roof
AA
ACABAD
s3j8.a.book Page 46 Tuesday, April 20, 2010 1:10 PM
Page 48 of 244

Unlocking and locking
47
Using the system
Safety
Driving Tips
General Maintenance
Breakdown assistance
Technical Data
ClosingSliding closed/closing the sliding/tilting roof– Turn the switch to position
page 46, fig. 34
.
Safety closing The sliding/tilting roof is fitted with a force limiter. The sliding/tilting roof stops and moves back several centimetres when it ca
nnot be closed because there is something
in the way (e.g. ice). You can close the sliding/tilting roof completely without force limiter by pressing the sw
itch to the position
page 46, fig. 34
at the front for as
long as it takes for the sliding/
tilting roof to close completely
.
WARNING
Close the sliding/tilting roof carefully - risk of injury!Convenience operationYou can also close an open sliding/tilting roof from the outside. – Hold the key in the locking cylinder of the dr
iver's door in the lo
ck position or press
the lock button of the remote control unt
il the sliding/tilting roof is closed.
The closing operation stops when one re
leases the key or the lock button.
Note
The force limiter also operates for convenience closing.
Emergency operationFig. 35 Detail of the headliner: Points for
positioning screwdriver / opening for positioning
the keyYou can close and/or open the sliding/tiltin
g roof by hand if the system is defect.
– Position the flat blade of a screwdriver carefully against the rear edge of the cover
for the electrical drive at the points of the arrows
fig. 35
on the left.
–Pull the cover down.– Insert an Allen key, Group 4, up to the stop into the opening at the point of the
arrow and close and/or open
the sliding/tilting roof
fig. 35
on the right.
– Press on the cover again by first of all in
serting the plastic lugs and then pushing the
cover up.
– Have the malfunction rectified by a specialist garage.
Note
It is necessary after each emergency op
eration (using Allen key) to move the
sliding/tilting roof into the basic position
. Here you have to tu
rn the control dial
forward to the switch position
page 46, fig. 34
and press for about 10 seconds.
AA
AA
A1
A2
AA
s3j8.a.book Page 47 Tuesday, April 20, 2010 1:10 PM
 1
1 2
2 3
3 4
4 5
5 6
6 7
7 8
8 9
9 10
10 11
11 12
12 13
13 14
14 15
15 16
16 17
17 18
18 19
19 20
20 21
21 22
22 23
23 24
24 25
25 26
26 27
27 28
28 29
29 30
30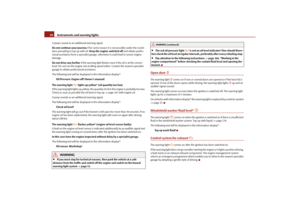 31
31 32
32 33
33 34
34 35
35 36
36 37
37 38
38 39
39 40
40 41
41 42
42 43
43 44
44 45
45 46
46 47
47 48
48 49
49 50
50 51
51 52
52 53
53 54
54 55
55 56
56 57
57 58
58 59
59 60
60 61
61 62
62 63
63 64
64 65
65 66
66 67
67 68
68 69
69 70
70 71
71 72
72 73
73 74
74 75
75 76
76 77
77 78
78 79
79 80
80 81
81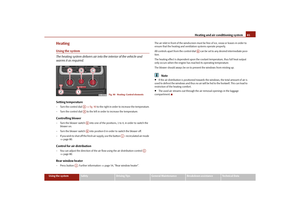 82
82 83
83 84
84 85
85 86
86 87
87 88
88 89
89 90
90 91
91 92
92 93
93 94
94 95
95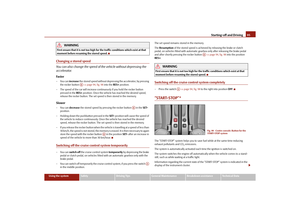 96
96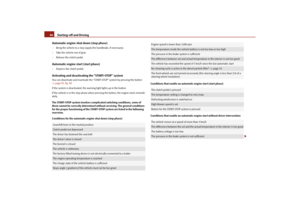 97
97 98
98 99
99 100
100 101
101 102
102 103
103 104
104 105
105 106
106 107
107 108
108 109
109 110
110 111
111 112
112 113
113 114
114 115
115 116
116 117
117 118
118 119
119 120
120 121
121 122
122 123
123 124
124 125
125 126
126 127
127 128
128 129
129 130
130 131
131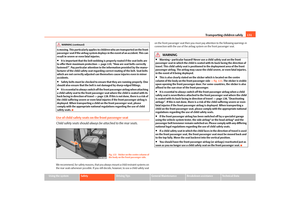 132
132 133
133 134
134 135
135 136
136 137
137 138
138 139
139 140
140 141
141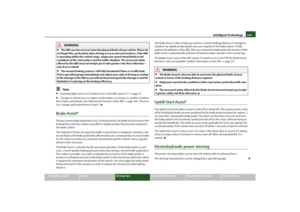 142
142 143
143 144
144 145
145 146
146 147
147 148
148 149
149 150
150 151
151 152
152 153
153 154
154 155
155 156
156 157
157 158
158 159
159 160
160 161
161 162
162 163
163 164
164 165
165 166
166 167
167 168
168 169
169 170
170 171
171 172
172 173
173 174
174 175
175 176
176 177
177 178
178 179
179 180
180 181
181 182
182 183
183 184
184 185
185 186
186 187
187 188
188 189
189 190
190 191
191 192
192 193
193 194
194 195
195 196
196 197
197 198
198 199
199 200
200 201
201 202
202 203
203 204
204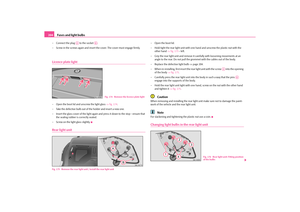 205
205 206
206 207
207 208
208 209
209 210
210 211
211 212
212 213
213 214
214 215
215 216
216 217
217 218
218 219
219 220
220 221
221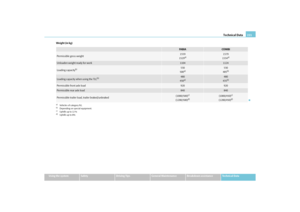 222
222 223
223 224
224 225
225 226
226 227
227 228
228 229
229 230
230 231
231 232
232 233
233 234
234 235
235 236
236 237
237 238
238 239
239 240
240 241
241 242
242 243
243