Page 201 of 244

Fuses and light bulbs
200
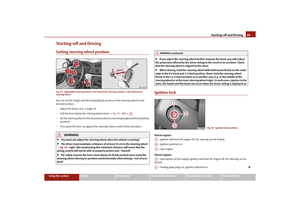
Caution
Observe the following guidelines
in “Replace fuses at the battery (automatic
gearbox)”.BulbsReplacing bulbsThe relevant lamp must always be switch
ed off before a light bulb is replaced.
Do not take hold of the glass bulb with naked fingers (even the smallest amount of dirt reduces the working life of the light bulb).
Use a clean cloth, serviette or something
similar. Defect light bulbs should only be replaced
with light bulbs of the same type. The desig-
nation is located on the ligh
t socket or the glass bulb.
Changing certain bulbs is not something whic
h you can do yourself, but requires to be
done by a specialist. Other parts of the vehicle must be removed in order to change the light bulbs. This applies, in particular, to
bulbs which can only be reached from the
engine compartment. We therefore recommend that you have any
bulbs changed by a specialist garage or,
in exceptional cases, by calling
on other professional assistance.
Please note that the engine compartment is a hazardous area
page 166, “Working
in the engine compartment”. We recommend that you always have a small box of replacement bulbs in your vehicle. You can obtain replacement bulbs from Škoda
original accessories or from a specialist
garage
15).
A stowage place for the bulbs is located in the box in the spare wheel.Bulb - Overview15)The small box with replacement bulbs is part of
the basic equipping of th
e vehicle in some coun-
tries.
Front headlight
Halogen headlight
Halogen projector
headlights
Low beam light
H4
H7
Main beam light
H4
H7
Parking lights
W5W, LED
a)
a)Valid for vehicles Scout.Turn signals
PY21W
Fog lights*
H8/HB4
a)
Daylight driving lights*
P21W, LED
b)
b)Valid for RS vehicles with separate lights* for daylight driving lights.Rear light unit
Bulb
Reversing light
P21W
Turn signals
PY21W
Brake lights
P21W
Rear fog light
P21W
Parking lights
2x W5W
Others
Bulb
Side turn signal lights
WY5W
Licence plate light
C5W / T4W (5W)
3. Brake light
LED
Interior lighting front / rear
C10W
Reading lights
W5W
Luggage compartment light
W5W
Lighting in storage compartment
W5W
s3j8.a.book Page 200 Tuesday, April 20, 2010 1:10 PM
Page 202 of 244

Fuses and light bulbs
201
Using the system
Safety
Driving Tips
General Maintenance
Breakdown assistance
Technical Data
WARNING
Bulbs H7 and H4 are pressurised and
may burst when changing the bulb -
risk of injury!
It is recommended to wear gloves and
safety glasses when changing a bulb.
Note
This Owner's Manual only describes the replacement of bulbs where it is assumed that no major complications will
arise. Other light bulbs should be replaced by your
specialist garage.Front headlightFig. 167 Fitting position of the bulbs: Halo
gen headlights / halogen projector headlights
Positions of the light bulbs in the halogen headlights
fig. 167
on the left and in the
halogen projector headlights
fig. 167
on the right.
- low beam, main beam and side lights - front turn signal light - low beam light - main beam and side lights - front turn signal light
Low beam and main beam (halogen headlights)– Open the bonnet.– Remove the protective cap
fig. 167
.
– Pull off the connector from the lamp, rele
ase the sprung wire clamp and pull out
the lamp towards the rear
fig. 168
.
– Replace the lamp H4, insert into the opening in the reflector (with the fixing lugs in
the recesses), secure with the sprung wi
re clamp, mount the connector and posi-
tion the protective cap.
– We recommend that you have the headli
ght setting checked by a Skoda Service
Partner after replacing the light bulb.
Low beam (halogen projector headlights)– Open the bonnet.
AAABA1A2A3
Fig. 168 Removing the light bulb for the low beam and main beam light
AA
Fig. 169 Removing the light bulb for the low beam light
s3j8.a.book Page 201 Tuesday, April 20, 2010 1:10 PM
Page 203 of 244

Fuses and light bulbs
202
– Remove the protective cap
page 201, fig. 167
on the right.
– Turn the connector with the light bulb up to the stop towards the left
page 201,
fig. 169
and remove.
– Replace the halogen lamp H7, insert the connector with the new halogen lamp and
turn to the right up to the stop.
– Insert the protective cap.– We recommend that you have the headlight setting checked by a Skoda Service
Partner after replacing the light bulb.
Main beam (halogen projector headlights)– Open the bonnet. – Remove the protective cap
page 201, fig. 167
on the right.
– Turn the connector with the light bulb
up to the stop towards the left
fig. 170
and
remove.
– Replace the halogen lamp H7, insert the connector with the new halogen lamp and
turn to the right up to the stop.
– Insert the protective cap.– We recommend that you have the headlight setting checked by a Skoda Service
Partner after replacing the light bulb.
Turn signal light (at the front)– Open the bonnet. – Turn the socket (halogen headlight)
page 201, fig. 167
or the socket
(halogen projector headlight) to the left an
d take it out together with the light bulb
for the turn signal light.
– Replace the defective light bulb.– Insert the lamp holder with light bulb into
the headlight. Secure the lamp holder by
turning it to the right until it locks in place.
Parking light at the front– Open the bonnet. – Remove the protective cap (halogen headlight) or (halogen projector head-
light)
page 201, fig. 167
.
– Grasp the light bulb holder and pull it out of the headlight.– Replace the light bulb in the light bulb
holder and re-insert into the headlight.
Daylight driving lights and fog lightsFig. 171 Front bumper: Protective
grille / removing the fog light
– Switch the ignition and all lights off. – Grasp the grille at the points marked with the arrows
fig. 171
- left and take it out.
A1
Fig. 170 Removing the light bulb for the main beam light
A2
AB
A3
AA
A2
s3j8.a.book Page 202 Tuesday, April 20, 2010 1:10 PM
Page 204 of 244

Fuses and light bulbs
203
Using the system
Safety
Driving Tips
General Maintenance
Breakdown assistance
Technical Data
– Guide your hand into the opening in wh
ich the grille was located and press the
spring bolt
page 202, fig. 171
- right.
– Take out the fog light.– Turn the socket with the bulb for daylight driving light or the socket with the
bulb of the fog light to the left up to stop and take it out.
– Replace the lamp, insert the connector with
the new lamp and turn to the right up
to the stop.
– For the installation, first of all insert the
fog light with the interlock to the side far
away from the marking of the vehicle.
– Press into place the headlight onto the side facing the marking.– First of all put the grille with the latch
in place on the side opposite the marking.
– Press into place the protective grille onto the side facing the marking.Cover of fog lights - Fabia Scout, Fabia RSFig. 172 Front bumper: Fabia Scout / Fabia RSRemoving the cover - Fabia Scout– Switch the ignition and all lights off.– Guide the wire clamp from the vehicle tool
kit into the opening above the fog light
fig. 172
- left and remove the cover.
Removing the cover - Fabia RS– Switch the ignition and all lights off. – Guide one finger into the opening next to the fog light
fig. 172
- right and
remove the cover.
– In order to reinstall the cover, first of all insert one part of the cover starting on the
side opposite the marking. Then press th
e cover closed on the side facing the
marking.
Fog lights Fabia Scout, Fabia RSFig. 173 Front bumper: Fog
lights / changing the bulb
Removing the fog light–Screw out the screws
fig. 173
- left with the aid of the screwdriver*, which is part
of the vehicle tool kit
16).
– Take out the fog light.Changing the bulb and installing the fog light– Press the locking button
fig. 173
of the plug and remove the plug from
the socket .
– Turn the socket with the bulb to the left up to the stop and take it out.– Change the bulb, insert again the socket wi
th the new bulb and turn it to the right
up to the stop.
AA
AB
16)Valid for Fabia Scout and Fabia RS.
A1
AA
AB
AB
s3j8.a.book Page 203 Tuesday, April 20, 2010 1:10 PM
Page 205 of 244

Fuses and light bulbs
204
– Connect the plug to the socket . – Screw in the screws again and insert the cover. The cover must engage firmly.Licence plate light– Open the boot lid and unscrew the light glass
fig. 174
.
– Take the defective bulb out of the holder and insert a new one.– Insert the glass cover of the light again and
press it down to the stop - ensure that
the sealing rubber is
correctly seated.
– Screw on the light glass slightly.Rear light unitFig. 175 Remove the rear light unit / install the rear light unit
– Open the boot lid.– Hold tight the rear light unit with one hand and unscrew the plastic nut with the
other hand
fig. 175
- left.
– Grip the rear light unit and remove it carefully with loosening movements at an
angle to the rear. Do not pull the gro
mmet with the cables out of the body.
– Replace the defective light bulb
page 204.
– When re-installing, first insert the rear light unit with the screw into the opening
of the body
fig. 175
.
– Carefully press the rear light unit into
the body in such a way that the pins
engage into the supports of the body.
– Hold the rear light unit tight with one hand, screw on the nut with the other hand
and tighten it
fig. 175
.
Caution
When removing and installing the rear ligh
t unit make sure not to damage the paint-
work of the vehicle and the rear light unit.
Note
For slackening and tightening the plastic nut use a coin.Changing light bulbs in the rear light unit
AA
AB
Fig. 174 Remove the licence plate light
AA
AB
Fig. 176 Rear light un
it: Fitting position
of the bulbs
s3j8.a.book Page 204 Tuesday, April 20, 2010 1:10 PM
Page 206 of 244

Fuses and light bulbs
205
Using the system
Safety
Driving Tips
General Maintenance
Breakdown assistance
Technical Data
– To replace a light bulb, turn the bulb connector of the light bulb to the left (in the
direction of the arrows on the hous
ing) and take it out of the housing.
– Replace the light bulb, put the bulb connect
or back into the housing and turn it to
the right up to the stop (in the opposite
direction of the arrows on the housing).
Fitting position of the light
bulbs in the rear light unit
page 204, fig. 176
.
- Rear fog light / Reversing light - Turn signal lights - Brake lights - Parking lightsLuggage compartment light– Open the boot lid.– Insert a screwdriver into the slot below the light
fig. 177
. Lever out the light care-
fully.
– Disconnect the plug connector. – Replace the defective light bulb.– Recreate the plug connection.– Position the light first of all on the side
of the plug connection and then press it in
on the other side up to the stop.
A1A2A3A4
Fig. 177 Remove the luggage compart- ment light
s3j8.a.book Page 205 Tuesday, April 20, 2010 1:10 PM
Page 207 of 244
Fuses and light bulbs
206
s3j8.a.book Page 206 Tuesday, April 20, 2010 1:10 PM
Page 208 of 244

Technical Data
207
Using the system
Safety
Driving Tips
General Maintenance
Breakdown assistance
Technical Data
Te c h n i c a l D a t aTechnical DataGeneral informationThe details given in the official vehicle regi
stration documents always take precedence
over the details in the Owner's Manual. Please refer to the official vehicle registration documents or consult a specialist garage
concerning the engine with which your
vehicle is equipped.Used abbreviations
PerformancesThe listed performance values were de
termined without performance-reducing
equipment, e.g. air
conditioning system.
WeightThe loading capacity is reduced in line with the range of the special equipment. The unloaden weight contains a fuel tank topped up to 90%. The listed value and the value of the loading capacity
also include a weight of 75 kg for the driver.
Identification detailsVehicle data sticker The vehicle data sticker
fig. 178
is located on the floor of the luggage compartment
and is also stated in the Service schedule. The vehicle data sticker co
ntains the following data:
Vehicle identification number (VIN) Vehicle type
Abbreviation
Importance
kW
Kilowatt, measuring unit for the engine output
rpm
Engine revolutions per minute
Nm
Newton meter, measuring
unit for the engine torque
g/km
discharged quantity of carbon dioxide in grams per driven kilometer
TSI
Petrol engine with a turbocharger and a direct fuel injection system
TDI CR
Diesel engine with turbocharger and injection system Com- mon Rail
M5
5-speed manual gearbox
AQ6
6-speed automatic gearbox
DQ7
7-speed automatic gearbox DSG
DPF
Diesel particle filter
Fig. 178 Vehicle data sticker
A1A2
s3j8.a.book Page 207 Tuesday, April 20, 2010 1:10 PM