Page 161 of 244

Taking care of your vehicle and cleaning the vehicle
160
Upholstery cloth and cloth trim on the d
oors, luggage compartment cover, headliner
etc. are best treated with special cleaning products, using if necessary a
dry foam
and
a soft sponge or brush. We recommend using a cleaning product from Škoda genuine accessories offered by your Škoda dealer.
Caution
Solvent-free cleaners attack th
e material and can damage it.
Fabric covers of elec
trically heated seats
Do
not clean
the seat covers moist as this may re
sult in damage to the seat heating
system. Clean such covers using specia
l agents, for example dry foam.
We recommend using a cleaning product from Škoda genuine accessories offered by your Škoda dealer.Natural leather Natural leather requires quite particular care and attention.Leather should be treated from time to time according the following guidelines depending on how much it is used.Normal cleaning– Clean soiled areas of the leather with
slightly moistened co
tton or woollen cloth.
Severe soiling– Clean severely soiled areas with a cloth
dipped in a mild soap
y solution (2 spoon-
fuls of natural soap to 1 litre of water).
– Ensure that the leather is not soaked through at any point and that no water gets
into the stitching of the seams.
– Dry off the leather with a soft, dry cloth.
Removing stains– Remove fresh stains which are
water-based
(e.g. coffee, tea, juices, blood etc.)
with an absorbent cloth or household pape
r or use the cleaner from the care set
for a stain which has already dried in.
– Remove fresh stains on a
fat base
(e.g. butter, mayonnaise, chocolate etc.) with an
absorbent cloth or household
cleaning paper or with the
cleaner from the care set
if the stain has not yet pe
netrated into the surface.
– Use a grease dissolver for
grease stains which have dried in
.
–Eliminate
special stains
(e.g. ball-point pens, felt pe
n, nail varnish, dispersion
paint, shoe cream etc.) with a special stain remover suitable for leather.
Leather care– Treat the leather every six months with
the leather care product available from
specialist garages.
– Apply only a small amount of the care product.– Dry the leather off with a soft cloth We recommend that you consult your Škoda Se
rvice Partner, if you have any questions
regarding cleaning and care of the leather interior. We recommend using a cleaning product fr
om Škoda genuine accessories offered by
your Škoda dealer.
Caution
You must on no account treat the leather wi
th solvents (e.g. gasoline, turpentine),
floor wax, shoe cream or such like.
Avoid leaving your vehicle for lengthy period
s in bright sunlight in order to avoid
bleaching the leather. If you
leave your vehicle parked in the open for lengthy periods,
protect the leather from the direct ra
ys of the sun by covering it over.
Sharp-edged objects on items of clothing su
ch as zip fasteners, rivets, sharp-edged
belts may leave permanent scratches or signs of rubbing on the surface.
s3j8.a.book Page 160 Tuesday, April 20, 2010 1:10 PM
Page 162 of 244

Taking care of your vehicle and cleaning the vehicle
161
Using the system
Safety
Driving Tips
General Maintenance
Breakdown assistance
Technical Data
Note
Use a care cream with light blocker and impregnation effect regularly and each
time after cleaning th
e leather. The cream nourishes the
leather, allows it to breathe
and keeps it supple and also provides moisture. It also creates surface protection.
Clean the leather every 2 to 3 months, remove fresh soiling each time this occurs.
Remove fresh stains such as those from
ball-point pens, ink, lipstick, shoe cream
etc., as quickly as possible.
Care also for the leather dye. Refreshen ar
eas which have lost their colour with a
special coloured leather cream as required.
The leather is a natural material with specific properties. During the use of the
vehicle, minor optical changes can occur on
the leather parts of the covers (e. g wrin-
kles or creases as a result
of the stress of the covers).
Seat belts– Keep the seat belts clean! – Wash seat belts which have become
soiled using a mild soapy solution.
– Inspect the seat belts regularly to
ensure they are in good condition.
Belt webbing which has become severely so
iled may prevent the inertia reel from
reeling up the belt properly.
WARNING
The seat belts must not be removed for cleaning.
Never clean the seat belts chemically as
dry cleaning may destroy the fabric.
The seat belts must also not be allowed to come into contact with corrosive liquids (such as acids etc.).
Seat belts which have damage to the
webbing, the connections, the inertia
reel or the lock should be re
placed by a specialist garage.
Inertia reel belts
must be completely dried before being reeled up.
s3j8.a.book Page 161 Tuesday, April 20, 2010 1:10 PM
Page 163 of 244

Fuel
162
FuelPetrolGrades of petrolYour vehicle can only be operated with
unleaded petrol
, which complies with the
standard
EN 228
. The individual grades of petrol
are distinguished by their octane
number (RON). On the inside of the fuel
filler flap, you will find the information
regarding the RON required by your engine
page 163.
Prescribed fuel - unleaded petrol 95/91 RON Use unleaded petrol
95 RON. You can also use unleaded petrol
91 RON, but this leads
to a slight loss in performance. If, in case of necessity, the vehicle must
be refuelled with petrol of a lower octane
number than the one prescribed, you must co
ntinue driving at me
dium engine speeds
and low engine load. Driving at high engine speeds or a high engine load can severely damage the engine! Refuel as soon as possib
le with petrol of the prescribed octane
number. Prescribed fuel - unleaded petrol min. 95 RON Use unleaded petrol
95 RON.
In case of necessity, you can refuel with petrol
91 RON
if petrol
95 RON
is not avail-
able. You must continue driving at medium
engine speeds and minimum engine load.
Driving at high engine speeds or a high engine load can severely damage the engine! Refuel as soon as possib
le with petrol of the prescribed octane number.
Even in case of necessity, you must not
use petrol of a lower octane number than
91,
otherwise the engine can be severely damaged! You can find further information on refuelling
page 163, “Refuelling”.
Unleaded petrol with higher octane number You can make unlimited use of unleaded pe
trol which has a higher octane number
than the one prescribed.
On vehicles with prescribed unleaded petrol
95/91 RON
, the use of petrol with a
higher octane number than
95 does not result in a noticeable power increase or a
lower fuel consumption. On vehicles with prescribed unleaded petrol
min. 95 RON
, the use of petrol with a
higher octane number than
95 does not result in a power increase or a lower fuel
consumption.
Caution
All Škoda vehicles with petrol engines are equipped with a catalytic converter and
must be only driven with unleaded petrol. Fi
lling the tank even only once with leaded
petrol will result in the cata
lytic converter being destroyed!
Only use unleaded petrol which
complies with the standard
EN 228
.
If you use petrol with a lower octane num
ber than the one prescribed, the engine
can be severely damaged!
Note
The handling, performance and life of your
engine are determined to a significant
extent by the quality of the fuel. Do not use any petrol additives.DieselDiesel fuelYour vehicle can only be operated with
diesel fuel
, which complies with the standard
EN 590
(standard
DIN 51628
in Germany, standard
ÖNORM C 1590
in Austria).
Fuel additives You must not use fuel additives, so-called “flow improvers” (petrol and similar prod- ucts) in diesel fuel. You can find information on refuelling
page 163, “Refuelling”.
s3j8.a.book Page 162 Tuesday, April 20, 2010 1:10 PM
Page 164 of 244

Fuel
163
Using the system
Safety
Driving Tips
General Maintenance
Breakdown assistance
Technical Data
Caution
Therefore, your vehicle can only be operated with diesel fuel which complies with
the standard
EN 590
(standard
DIN 51628
in Germany, standard
ÖNORM C 1590
in
Austria). Filling the tank even only once wi
th diesel fuel which does not comply with
the standard, can result in damage to the engine parts, the lubrication system, the fuel and exhaust system.
If by mistake you have refuelled with a different fuel other than the diesel fuel
which complies to the above mentioned standards (e.g. petrol), do not start the engine or switch on the ignition! This can result in
severe engine damage! Contact a specialist
garage and have the fuel sy
stem of the engine cleaned.
Water which has collected in the fuel fi
lter can result in engine problems.
Your vehicle is not adapted for use of biofue
l (RME), therefore this fuel must not be
refuelled and driven. The use of biofuel (RME) can lead to damage to the engine or the fuel system.Operation in winterWinter-grade diesel fuel A different grade of diesel fuel is available at
filling stations in winter than during the
summer. Using “summer-grade diesel fuel” at temperatures below 0°C can result in operational problems because th
e diesel becomes viscous as a result of paraffin sepa-
ration. It is therefore the case that the standard
EN 590
(standard
DIN 51628
in Germany,
standard
ÖNORM C 1590
in Austria) is the diesel fuel class prescribed for certain
periods of the year which can also be purc
hased at the correspond
ing time during the
year. “Winter-grade diesel fuel” will still operate properly even at a temperature of - 20°C. It is often the case in countries with different climatic conditions that diesel fuels avail- able have a different temperature characte
ristic. The authorised Škoda Service Part-
ners and filling stations in the country concer
ned will be able to provide you with infor-
mation regarding the diesel fuels available. Prewarming fuel The vehicle is fitted with a fuel filter prewarming system. This secures operation of a vehicle using diesel fuel down to an environmental temperature of -25°C.
Caution
It is not permitted to add the various fuel
additives on the market, including petrol, to
diesel fuel in order to improve its flow properties.RefuellingFig. 137 Right rear side of the vehicle: Fuel
filler flap / fuel filler
flap with cap unscrewed
Opening the fuel filler cap– Open the fuel filler flap with the hand
fig. 137
- left.
– Unlock the fuel filler cap on the fuel fi
ller tube to the left using the vehicle key.
– Unscrew the fuel filler ca
p anti-clockwise and place the fuel filler cap from above
on the fuel filler flap
fig. 137
- right.
Closing fuel filler cap– Screw on the cap by turning it to the right until it is heard to lock. – Lock the fuel filler cap on the fuel filler tube by turning the vehicle key to the right
and withdraw the key.
– Press the fuel tank flap closed. The correct grades of fuel for your vehicle are stated on a sticker affixed to the inside of the fuel filler flap. Further information on fuel
page 162.
s3j8.a.book Page 163 Tuesday, April 20, 2010 1:10 PM
Page 165 of 244

Fuel
164
WARNING
Pay attention to any legal requirements if you do carry a spare canister in the vehicle. We do not recommend carrying any fuel canisters in your vehicle for safety reasons. The canister can be damaged
in the event of an accident and fuel
may leak out.
Caution
Remove any fuel which has spilled onto th
e paintwork of your vehicle immediately
- risk of paint damage!
On vehicles fitted with a catalytic converte
r, never let the fuel tank run completely
empty. An irregular supply of fuel to the engine can result in misfiring and unburnt fuel may get into the exhaust system, which may
result in overheating and damage to the
catalytic converter.
Make sure that the valve is not pressed into the filler tube when inserting the pump
nozzle into the filler tube.
Otherwise you are unintentiona
lly filling up the volume,
which in case of heat can caus
e an expansion of the fuel. This can lead to an overflow
of fuel or damage to parts of the fuel reservoir.
The fuel tank is full just as soon as th
e pump nozzle switches off for the first time,
provided the nozzle has been operated prop
erly. Do not continue refuelling - other-
wise the expansion volume is filled up.
Note
The fuel tank has a
capacity of about
45 litres
, containing a reserve of
7litres
.
s3j8.a.book Page 164 Tuesday, April 20, 2010 1:10 PM
Page 166 of 244

Inspecting and replenishing
165
Using the system
Safety
Driving Tips
General Maintenance
Breakdown assistance
Technical Data
Inspecting and replenishingEngine compartmentBonnet remote releaseBonnet remote release– Pull the unlocking lever on the left below the dash panel
fig. 138
.
The bonnet jumps out of its lock as a result of the spring force.Opening and closing the bonnet.Fig. 139 Radiator grille: Locking lever / se
curing the bonnet with the bonnet support
Opening the bonnet– Unlock the bonnet
fig. 138
.
– Ensure that the arms of the windscreen wipers are correctly in place against the
windscreen
before opening
the bonnet otherwise damage could occur to the
paintwork.
– Pull on the locking lever
fig. 139
- left, the bonnet is then unlocked.
– Grip the bonnet and lift it up.– Take the bonnet support out of its holder and set it in the opening designed for it
fig. 139
- right.
Closing the bonnet– Lift the bonnet slightly and unhook the bonnet support. Press the bonnet support
into the holder designed to hold it.
– Allow the bonnet to drop from a height
of about 30 cm into the lock - bonnet
do
not press down on it
!
WARNING
Never open the bonnet if you see that steam or coolant is flowing out of the
engine compartment - risk of scalding!
Wait long enough until the steam or
coolant has stopped escaping.
For safety reasons, the bonnet must always be properly closed when
driving. One should therefore check that
the lock has in fact engaged properly
after closing the bonnet.
Stop your vehicle immediately while driving if you notice that the lock is not
properly engaged and close the bonnet
properly - risk of an accident!
Caution
Before opening the bonnet, ensure that the arms of the windscreen wipers are
correctly in place against the windscreen. Othe
rwise, there is a risk of damage to the
paintwork.
Fig. 138 Bonnet release lever
s3j8.a.book Page 165 Tuesday, April 20, 2010 1:10 PM
Page 167 of 244

Inspecting and replenishing
166
Working in the engine compartment Particular care is required when carrying out any work in the engine compartment!There is a risk of injuries, scalding, acci
dents and fire when working in the engine
compartment, e.g. inspecting and replenishing oil and other fluids. For this reason, it is essential to comply with the warning instructions stated below and with the general applicable rules of safe
ty. The engine compartment of your car
is a hazardous area
.
WARNING
Never open the bonnet if
you see that steam or coolant is flowing out of the
engine compartment - risk of scalding!
Wait long enough until the steam or
coolant has stopped escaping.
Switch off the engine and pull out the ignition key.
Apply the handbrake firmly.
If your vehicle is fitted with a manual
gearbox, move the gearshift lever into
Neutral, or if it is fitted with automatic gearbox, move the selector lever into position P.
Allow the engine to cool down.
Keep children clear of the engine compartment.
Do not touch any hot engine parts - risk of burns!
Never spill oil and other fluids over the hot engine. Such fluids (e.g. the anti-
freeze contained in the wash liquid) may ignite!
Avoid short circuits in the electrical system - particularly on the battery.
Never place your hand into the radiator fan as long as the engine is still
warm. The fan might suddenly start running!
Never open the cap of the coolant expans
ion bottle as long as the engine is
still warm. The cooling
system is pressurized!
Cover over the cap of the coolant expansion reservoir with a large cloth
when opening it as protection for your
face, hands and arms from hot steam or
hot coolant.
Do not let objects, such as e.g cleaning cloth or tools lie in the engine
compartment.
If you wish to work under the vehicl
e, you must secure the vehicle from
rolling away and support it with suitable supporting blocks: the car jack is not sufficient for this - risk of injury!
In cases where it be necessary to carry out inspection work when the engine
is running there is an additional risk fr
om rotating parts (e.g. the V-ribbed belt,
alternator, radiator fan) and from the high-voltage ignition system. Please observe in addition the following:
Never touch the electrical cabl
es of the ignition system.
Absolutely avoid any jewellery, loose it
ems of clothing or long hair from
getting into the rotating parts of the
engine - Hazard! Therefore remove any
jewellery beforehand, tie up your hair and wear tight fitting clothing.
Please also comply with the warnin
g instructions st
ated below when
carrying out any essential work on the fu
el system or on th
e electrical system:
Always separate the car battery from the electrical system. Do not smoke. Never carry out any work close to naked flames. Always keep a working fire
extinguisher at hand.
Caution
When replenishing fluids in the engine, always
ensure that the fluids are on no account
mixed up. This may result in major oper
ating problems and also vehicle damage!
WARNING (continued)
s3j8.a.book Page 166 Tuesday, April 20, 2010 1:10 PM
Page 168 of 244

Inspecting and replenishing
167
Using the system
Safety
Driving Tips
General Maintenance
Breakdown assistance
Technical Data
Overview of the engine compartment The main inspection points.Fig. 140 Diesel engine 1.6 ltr./77 kW
Coolant expansion bottle . . . . . . . . . . . . . . . . . . . . . . . . . . . . . . . . . . . . . . . Windshield washer fluid reservoir . . . . . . . . . . . . . . . . . . . . . . . . . . . . . . . Engine oil filler opening . . . . . . . . . . . . . . . . . . . . . . . . . . . . . . . . . . . . . . . .Engine oil dipstick . . . . . . . . . . . . . . . . . . . . . . . . . . . . . . . . . . . . . . . . . . . . . . Brake fluid reservoir . . . . . . . . . . . . . . . . . . . . . . . . . . . . . . . . . . . . . . . . . . . . Battery (below a cover) . . . . . . . . . . . . . . . . . . . . . . . . . . . . . . . . . . . . . . . . .Note
The location of the inspection points in th
e engine compartment of petrol and diesel
engines is practically identical.
Engine oilCheck engine oil level The dipstick indicates the le
vel of oil in the engine.
Checking the oil level– Ensure that the vehicle is po
sitioned on a level surface.
– Switch the engine off.– Open the bonnet
in “Working in the engine compartment” on page 166.
– Wait a few minutes and pull out the oil dipstick
.
– Wipe off the dipstick with a clea
n cloth and insert it again fully.
– Then withdraw the dipstick again and read off the oil level.Oil level within range –You must
not
top up the oil.
Oil level within range –You
may
top up the oil. It is possible that the oil level may then be within range
after doing this.
Oil level within range –You
must
top up the oil. It is ideal, once this
is done, to keep the oil level within
range .
A1
170
A2
176
A3
168
A4
167
A5
171
A6
172
Fig. 141 Dipstick
AaAb
Aa
Ac
Ab
s3j8.a.book Page 167 Tuesday, April 20, 2010 1:10 PM
 1
1 2
2 3
3 4
4 5
5 6
6 7
7 8
8 9
9 10
10 11
11 12
12 13
13 14
14 15
15 16
16 17
17 18
18 19
19 20
20 21
21 22
22 23
23 24
24 25
25 26
26 27
27 28
28 29
29 30
30 31
31 32
32 33
33 34
34 35
35 36
36 37
37 38
38 39
39 40
40 41
41 42
42 43
43 44
44 45
45 46
46 47
47 48
48 49
49 50
50 51
51 52
52 53
53 54
54 55
55 56
56 57
57 58
58 59
59 60
60 61
61 62
62 63
63 64
64 65
65 66
66 67
67 68
68 69
69 70
70 71
71 72
72 73
73 74
74 75
75 76
76 77
77 78
78 79
79 80
80 81
81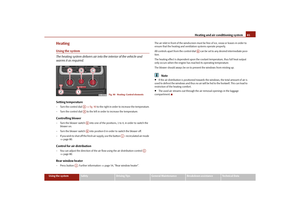 82
82 83
83 84
84 85
85 86
86 87
87 88
88 89
89 90
90 91
91 92
92 93
93 94
94 95
95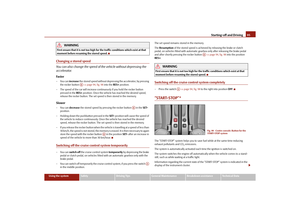 96
96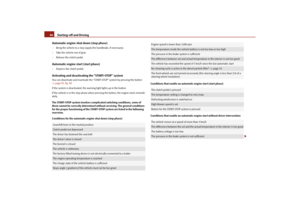 97
97 98
98 99
99 100
100 101
101 102
102 103
103 104
104 105
105 106
106 107
107 108
108 109
109 110
110 111
111 112
112 113
113 114
114 115
115 116
116 117
117 118
118 119
119 120
120 121
121 122
122 123
123 124
124 125
125 126
126 127
127 128
128 129
129 130
130 131
131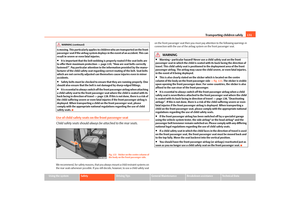 132
132 133
133 134
134 135
135 136
136 137
137 138
138 139
139 140
140 141
141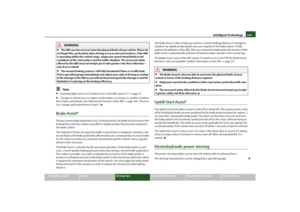 142
142 143
143 144
144 145
145 146
146 147
147 148
148 149
149 150
150 151
151 152
152 153
153 154
154 155
155 156
156 157
157 158
158 159
159 160
160 161
161 162
162 163
163 164
164 165
165 166
166 167
167 168
168 169
169 170
170 171
171 172
172 173
173 174
174 175
175 176
176 177
177 178
178 179
179 180
180 181
181 182
182 183
183 184
184 185
185 186
186 187
187 188
188 189
189 190
190 191
191 192
192 193
193 194
194 195
195 196
196 197
197 198
198 199
199 200
200 201
201 202
202 203
203 204
204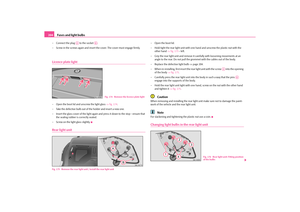 205
205 206
206 207
207 208
208 209
209 210
210 211
211 212
212 213
213 214
214 215
215 216
216 217
217 218
218 219
219 220
220 221
221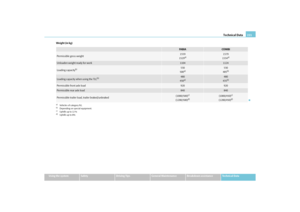 222
222 223
223 224
224 225
225 226
226 227
227 228
228 229
229 230
230 231
231 232
232 233
233 234
234 235
235 236
236 237
237 238
238 239
239 240
240 241
241 242
242 243
243