2010 MERCEDES-BENZ SLS COUPE display
[x] Cancel search: displayPage 126 of 361
Automatic read-aloud function
You can have the TMC traffic reports along
the route read aloud automatically.
Announcements will be made as you
approach traffic incidents.
X To activate/deactivate the function:
select Navi0004Read TMC traffic mes‐
sages automatically.
The function is switched on 0019or off 0004
depending on the previous status. Navigation system (destination mem-
ory) My address
i The destination memory always contains
an entry named My addresswhich is at the
top of the list .You may wish to assign your
home address to this entry, for example. If
the My address (¤icon) entry already
contains data that can be used for naviga-
tion, you can select it for route guidance.
Assigning dataf or the first time/editing
My address X
Switch to navigation mode and display the
menu system (Y page 82).
X Select Destination 0004From memory .
If more than eight entries are listed in the
destination memory, the destination list
appears with the input speller; otherwise,
the destination list appears without the
input speller.
If the list appears without the input speller,
the My address entry is highlighted auto-
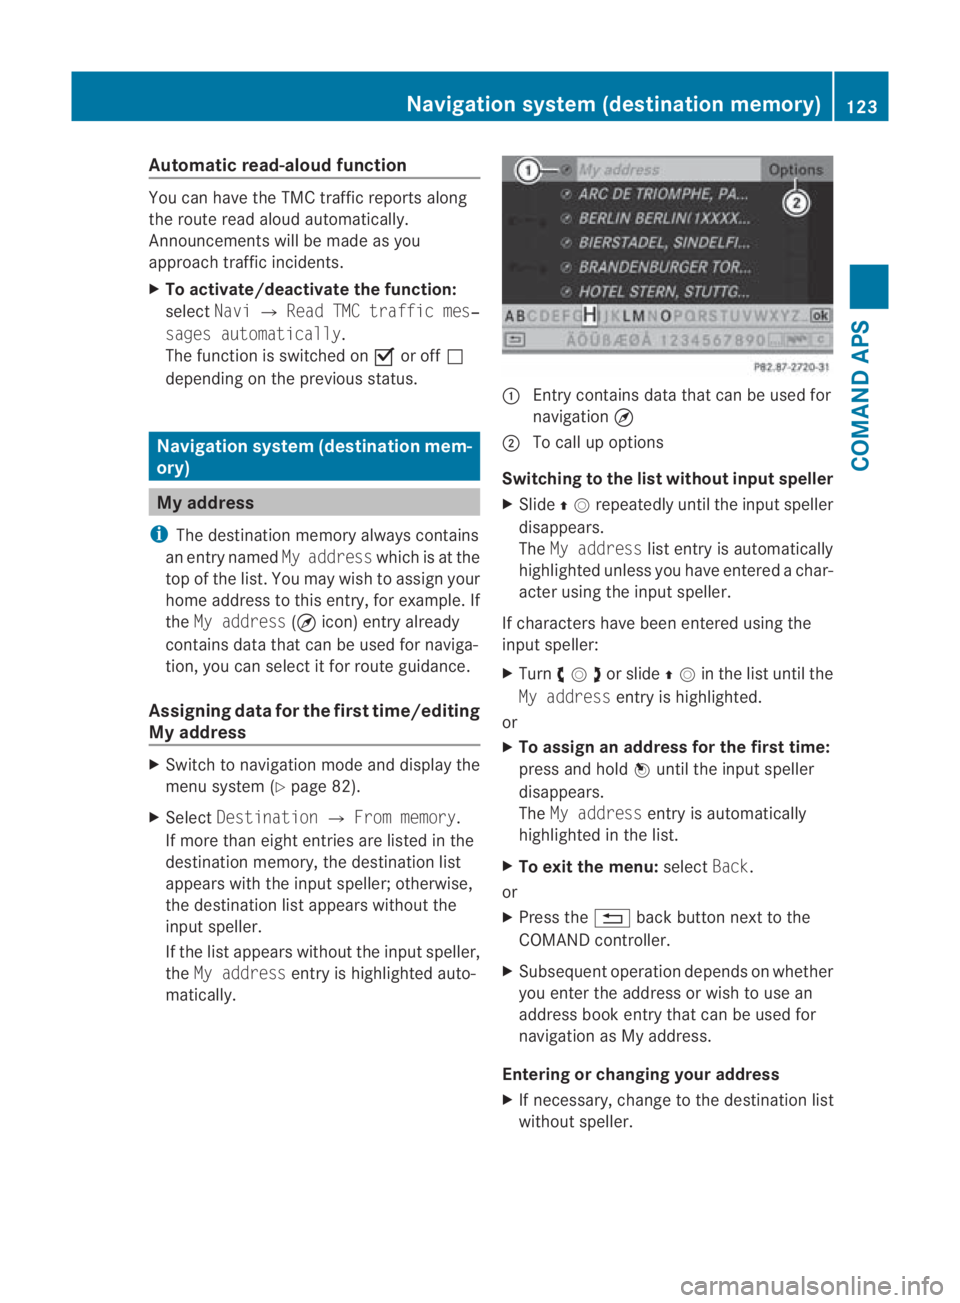
matically. 0001
Entry contains data that can be used for
navigation ¤
0002 To call up options
Switching to the list without input speller
X Slide 001F0013repeatedly until the inpu tspeller
disappears.
The My address list entry is automatically
highlighted unless you have entered a char-
acter using the input speller.
If characters have been entered using the
input speller:
X Turn 002800130029or slide 001F0013in the list until the
My address entry is highlighted.
or
X To assign an address for the first time:
press and hold 0017until the input speller
disappears.
The My address entry is automatically
highlighted in the list.
X To exit the menu: selectBack.
or
X Press the 0001back button next to the
COMAND controller.
X Subsequent operation depends on whether
you enter the address or wish to use an
address book entry that can be used for
navigation as My address.
Entering or changing your address
X If necessary, change to the destination list
without speller. Navigation system (destination memory)
123COMAND APS
BA 197 ECE RE 2010/6a; 1; 2, en-GB
sabbaeu Version: 3.0.3.6 2010-05-07T14:19:43+02:00 - Seite123 Z
Page 127 of 361
X
To enter the address for the first time:
press 0017and select New entry.
X To change the address: selectOptions
0004 New entry.
In both cases, the address input menu
appears.
X Enter the address. Proceed in the same way
as you would ente radestination as descri-
bed in the "Entering adestination by
address" section (Y page 93).
X Select Saveafter you have entered the
address.
COMAND then stores the entry. You will
see a message and then the address menu
with the selected address. Startis high-
lighted automatically.
Using an address book entry for My
address
X If necessary, change to the destination list
without input speller (Y page 123).
X To assign an address for the first time:
press 0017and select Assign to address
book entry.
X Select HomeorWork.
X To edit My address: selectOptions 0004
Assign to address book entry.
X Select HomeorWork.
In both cases, you will see either a list or,
for more than eight address book entries,
the search menu with the smart speller.
X Select the desired address book entry. Pro-
ceed as described in the "Searching for an
address book entry" section
(Y page 152).
i Information on how to link address book
entries with navigation data can be found
in "Assigning a destination to an address
book entry" (Y page 126).
X To confirm your selection: press0017.
An address is assigned for the first time:
COMAND stores the entry. You will see a
message and then the address menu with the selected address.
Startis highlighted
automatically.
The address is changed:
Ap rompt appears, asking if you really wish
to overwrite My address.
X Select YesorNo.
If you select Yes, COMAND overwrites the
destination. You will see a message and
then the address menu with the selected
address. Startis highlighted automati-
cally.
If you select No, the list will reappear.
Selecting My address for route guid-
ance i
If the My address (¤icon) entry already
contains data that can be used for naviga-
tion, you can select it for route guidance. If
not, then first assign adestination to this
entry (Y page 123).
X Switch to navigation mode and display the
menu system (Y page 82).
X Select Destination 0004From memory.
If more than eight entries are listed in the
destination memory, the destination list
appears with the input speller; otherwise,
the destination list appears without the
input speller.
X Destination memory with input
speller: slide001F0013repeatedly until the list
appears without the inpu tspeller.
or
X Select 0005on the bottom right in the input
speller.
X Destination memory list without input
speller: press0017. 124
Navigation system (destination memory)COMAND APS
BA 197 ECE RE 2010/6a; 1; 2, en-GB
sabbaeu
Version: 3.0.3.6 2010-05-07T14:19:43+02:00 - Seite 124
Page 128 of 361
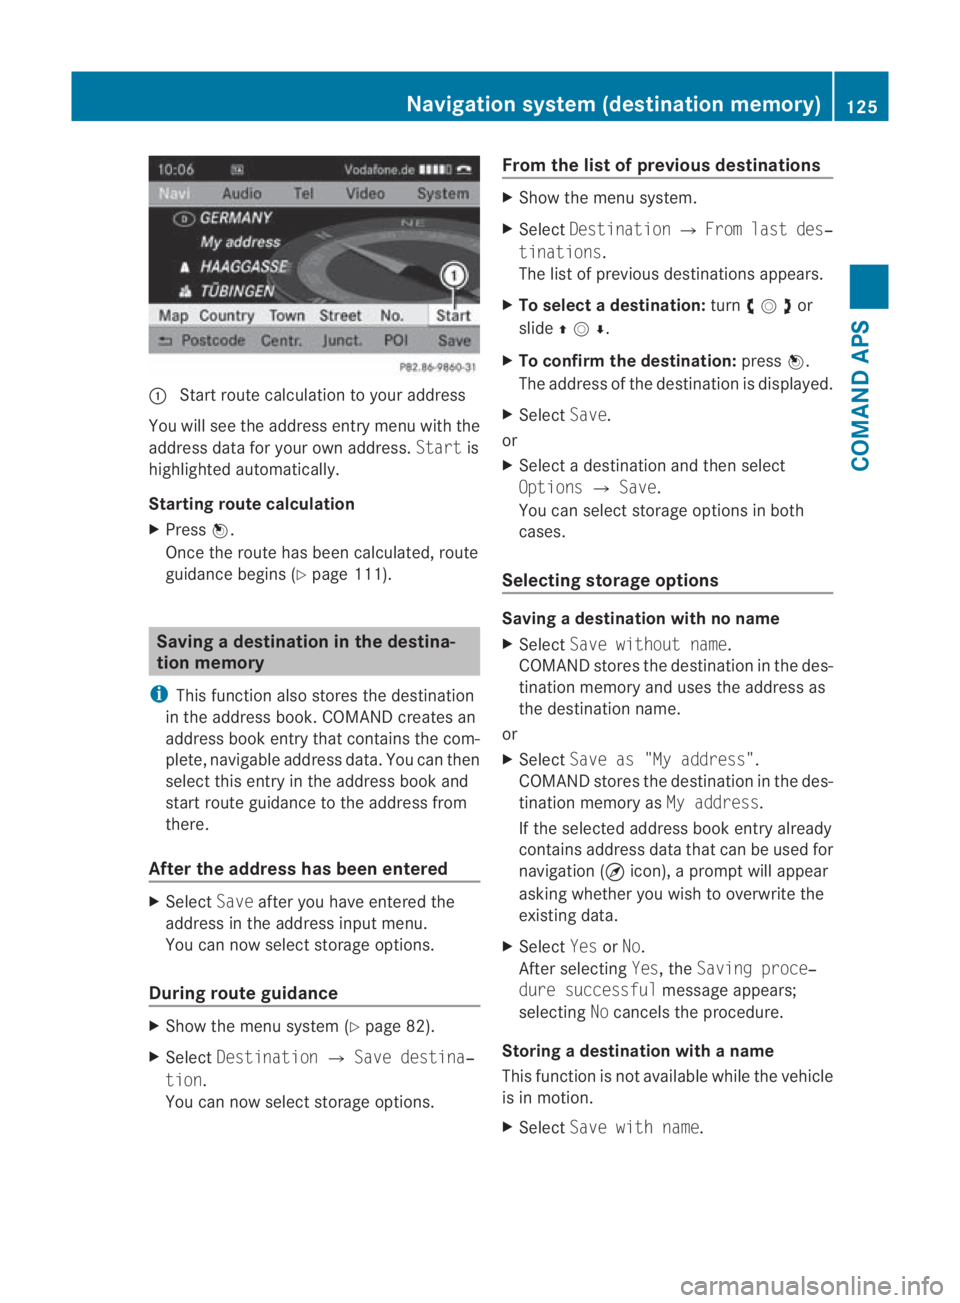
0001
Start route calculation to your address
You will see the address entry menu with the
address data for your ow naddress. Startis
highlighted automatically.
Starting route calculation
X Press 0017.
Once the route has been calculated, route
guidance begins (Y page 111). Saving
adestination in th edestina-
tion memory
i This function also stores the destination
in the address book .COMAND creates an
address book entry that contains the com-
plete, navigable address data. You can then
select this entry in the address book and
start route guidance to the address from
there.
After the address has been entered X
Select Saveafter you have entered the
address in the address input menu.
You can now select storage options.
During route guidance X
Show the menu system (Y page 82).
X Select Destination 0004Save destina‐
tion.
You can now select storage options. From the list of previous destinations X
Show the menu system.
X Select Destination 0004From last des‐
tinations.
The list of previous destinations appears.
X To select adestination: turn002800130029or
slide 001F0013000D .
X To confirm the destination: press0017.
The address of the destination is displayed.
X Select Save.
or
X Select a destination and then select
Options 0004Save.
You can select storage options in both
cases.
Selecting storage options Saving
adestination with no name
X Select Save without name.
COMAND stores the destination in the des-
tinatio nmemory and uses the address as
the destination name.
or
X Select Save as "My address".
COMAND stores the destination in the des-
tination memory as My address.
If the selected address book entry already
contains address data that can be used for
navigation (¤ icon), a prompt will appear
asking whether you wish to overwrite the
existing data.
X Select YesorNo.
After selecting Yes, theSaving proce‐
dure successful message appears;
selecting Nocancels the procedure.
Storing a destination with a name
This function is not available while the vehicle
is in motion.
X Select Save with name. Navigation system (destination memory)
125COMAND APS
BA 197 ECE RE 2010/6a; 1; 2, en-GB
sabbaeu Version: 3.0.3.6 2010-05-07T14:19:43+02:00 - Seite 125 Z
Page 129 of 361
X
Select the category desired, e.g. Home.
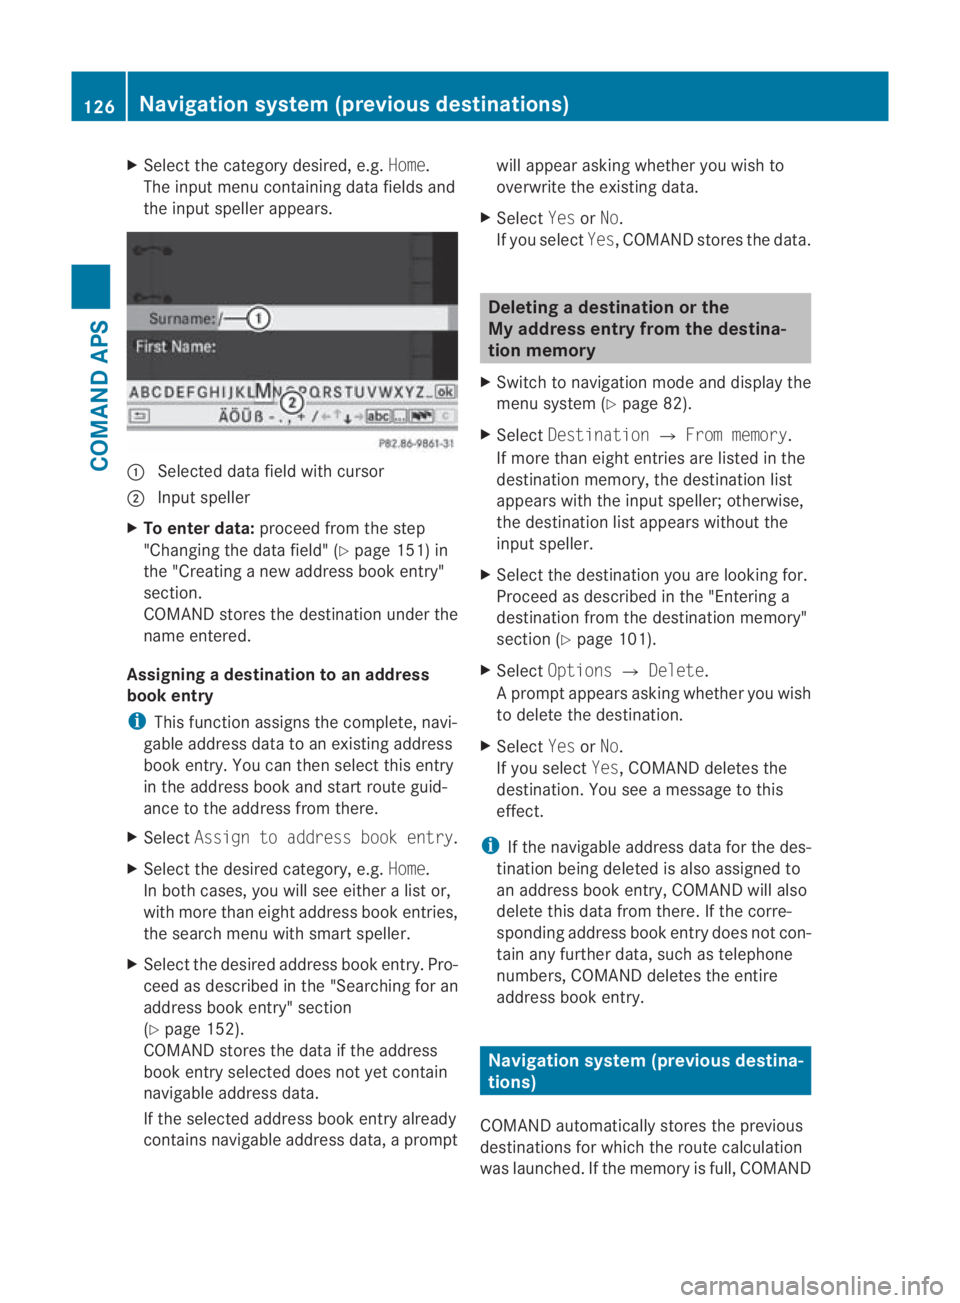
The input menu containing data fields and
the input speller appears. 0001
Selected data field with cursor
0002 Inpu tspeller
X To enter data: proceed from the step
"Changing the data field" (Y page 151) in
the "Creating a new address book entry"
section.
COMAND stores the destination under the
name entered.
Assigning adestination to an address
book entry
i This function assigns the complete, navi-
gable address data to an existing address
book entry. You can then select this entry
in the address book and start route guid-
ance to the address fro mthere.
X Select Assign to address book entry .
X Select the desired category, e.g. Home.
In both cases, you will see either a list or,
with more than eight address book entries,
the search menu with smart speller.
X Select the desired address book entry. Pro-
ceed as described in the "Searching for an
address book entry" section
(Y page 152).
COMAND stores the data if the address
book entry selected does not yet contain
navigable address data.
If the selected address book entry already
contains navigable address data, a prompt will appeara
sking whether you wish to
overwrite the existing data.
X Select YesorNo.
If you select Yes, COMAND stores the data. Deleting
adestination or the
My address entry from th edestina-
tion memory
X Switch to navigation mode and display the
menu system (Y page 82).
X Select Destination 0004From memory .
If more than eight entries are listed in the
destination memory, the destination list
appears with the input speller; otherwise,
the destination list appears without the
input speller.
X Select the destination you are looking for.
Proceed as described in the "Entering a
destination from the destination memory"
sectio n(Ypage 101).
X Select Options 0004Delete .
Ap rompt appears asking whethe ryou wish
to delete the destination.
X Select YesorNo.
If you select Yes, COMAND deletes the
destination .You see a message to this
effect.
i If the navigable address data for the des-
tination being deleted is also assigned to
an address book entry, COMAND will also
delete this data from there. If the corre-
sponding address book entryd oes not con-
tain any further data, such as telephone
numbers, COMAND deletes the entire
address book entry. Navigation system (previous destina-
tions)
COMAND automatically stores the previous
destinations for which the route calculation
was launched. If the memory is full, COMAND 126
Navigation system (previous destinations)COMAND APS
BA 197 ECE RE 2010/6a; 1; 2, en-GB
sabbaeu
Version: 3.0.3.6 2010-05-07T14:19:43+02:00 - Seite 126
Page 130 of 361
deletes the oldest destination. You can also
store one destination from the list of previous
destinations in the destination memory. It will
be stored there permanently. Storing
adestination permanently in
the destination memory
X Proceed as described in the "From the list
of previous destinations" section
(Y page 125). Storing the vehicle position in the list
of previous destinations
X Switch to navigation mode and display the
menu system (Y page 82).
X Select Position 0004Save vehicle
position.
COMAND stores the curren tvehicle posi-
tion as a destination in the list of previous
destinations. Storing the crosshair position in the
list of previous destinations
i Acrosshair appears on the map if you
have moved the map manually.Y ou can
store the crosshair position as a destina-
tion in the list of previous destinations.
X To display the menu system: press0017.
X Select Position 0004Save crosshair
position.
COMAND stores the crosshair position as
a destination in the list of previous desti-
nations. Deleting one of the previous destina-
tions
X Switch to navigation mode and display the
menu system (Y page 82). X
Select Destination 0004From last des‐
tinations.
The list of previous destinations appears.
X Select the desired destination.
X Select Options 0004Delete.
Aq uery appears.
X Select YesorNo.
If you select Yes, COMAND deletes the
destination .You see a message to this
effect. Telephone
General notes
COMAND offers you dual-level telephone
functions.
The basic version, when used in conjunction
with a Bluetooth ®
-capable mobile phone,
offers telephony via the Bluetooth ®
interface.
With a suitable mobile phone, you can use the
hands-free system and receive electronic
vCards via the Bluetooth ®
interface.
If your vehicle is equipped with convenience
telephony*, you can obtain mobile phone
brackets* for specific mobile phones at your
Mercedes-Benz Service Centre and have
them installed in the centre armrest.
In the bracket*, the mobile phone battery is
charged and a connection is made to the
vehicle's exterior aerial.
When using a suitable mobile phone, the con-
venience telephony* function offers, in addi-
tion to the hands-free function, the ability to
load the phone book from your mobile phone
and to use the text message function (SMS).
i If your vehicle is equipped with conveni-
ence telephony*, you can also connect a
Bluetooth ®
-capable mobile phone to
COMAND via the Bluetooth ®
interface.
You can obtain more detailed information
about suitable mobile phones and about con-
necting Bluetooth ®
-capable mobile phones to Telephone
127COMAND APS
*optional
BA 197 ECE RE 2010/6a; 1; 2, en-GB
sabbaeu
Version: 3.0.3.6 2010-05-07T14:19:43+02:00 - Seite 127 Z
Page 133 of 361
You can register more than one mobile
phone.
Aconnection is always established to
the most recently connected mobile phone
within range.
i If no connection can be made to the most
recently connected mobile phone, the sys-
tem searches for the mobile phone which
was connected before that one.
If you authorise a new mobile phone, it will be
activated automatically.
X Press the 0008function button on COMAND.
X Select Telephone0004Bluetooth tele‐
phones0004Update.
COMAND looks for Bluetooth ®
telephones
within range and adds them to the phone
list.
The duration of the search depends on the
number of Bluetooth ®
telephones within
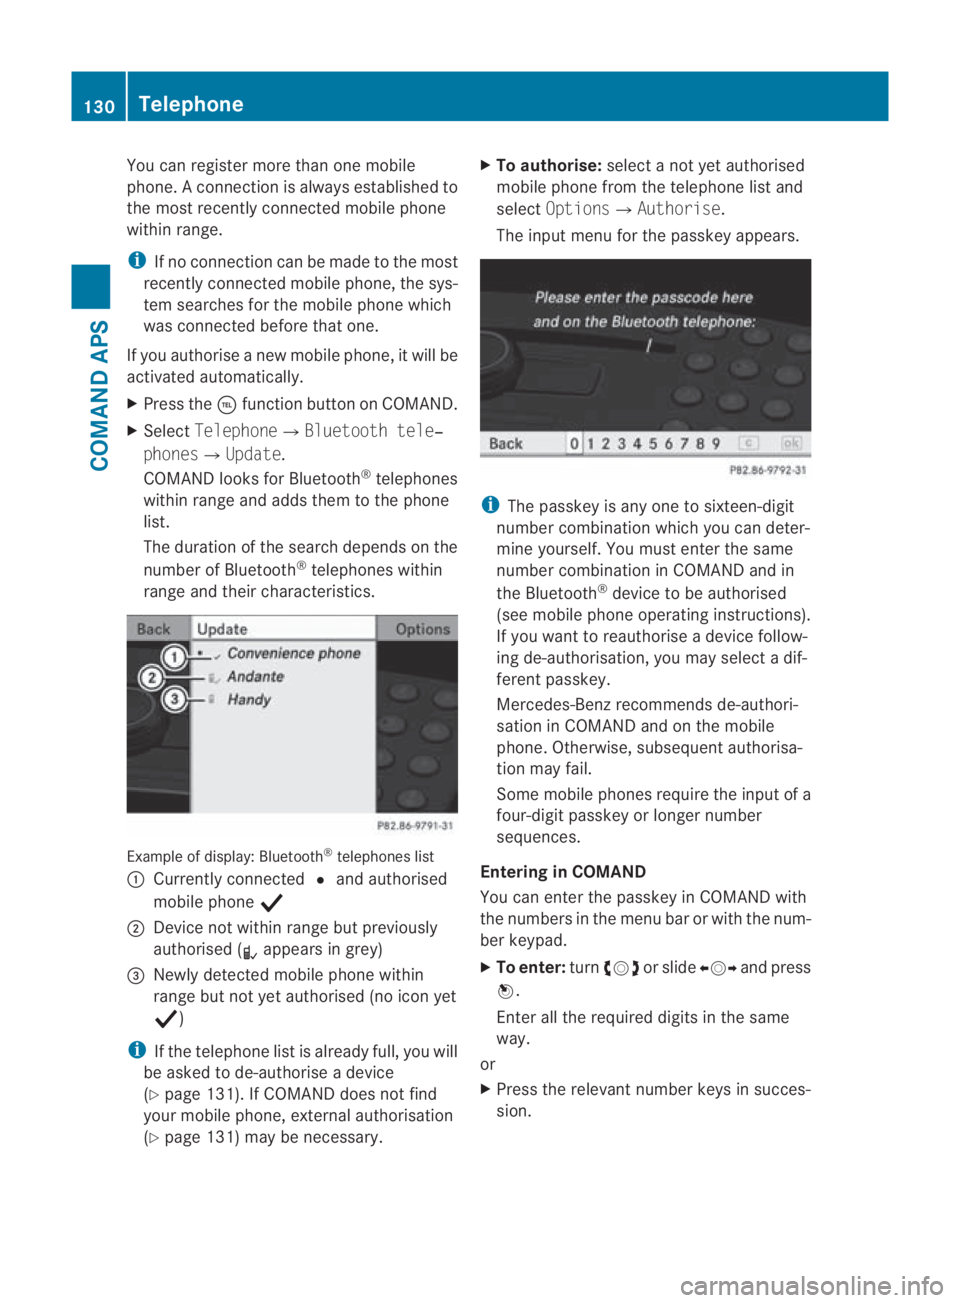
range and their characteristics. Example of display: Bluetooth
®
telephones list
0001 Currently connected 0023and authorised
mobile phone 0011
0002 Device not within range but previously
authorised ( 0018appears in grey)
0015 Newly detected mobile phone within
range but not yet authorised (no icon yet
0011)
i If the telephone list is already full, you will
be asked to de-authorise a device
(Y page 131). If COMAND does not find
your mobile phone, external authorisation
(Y page 131) may be necessary. X
To authorise: select a not yet authorised
mobile phone from the telephone list and
select Options0004Authorise.
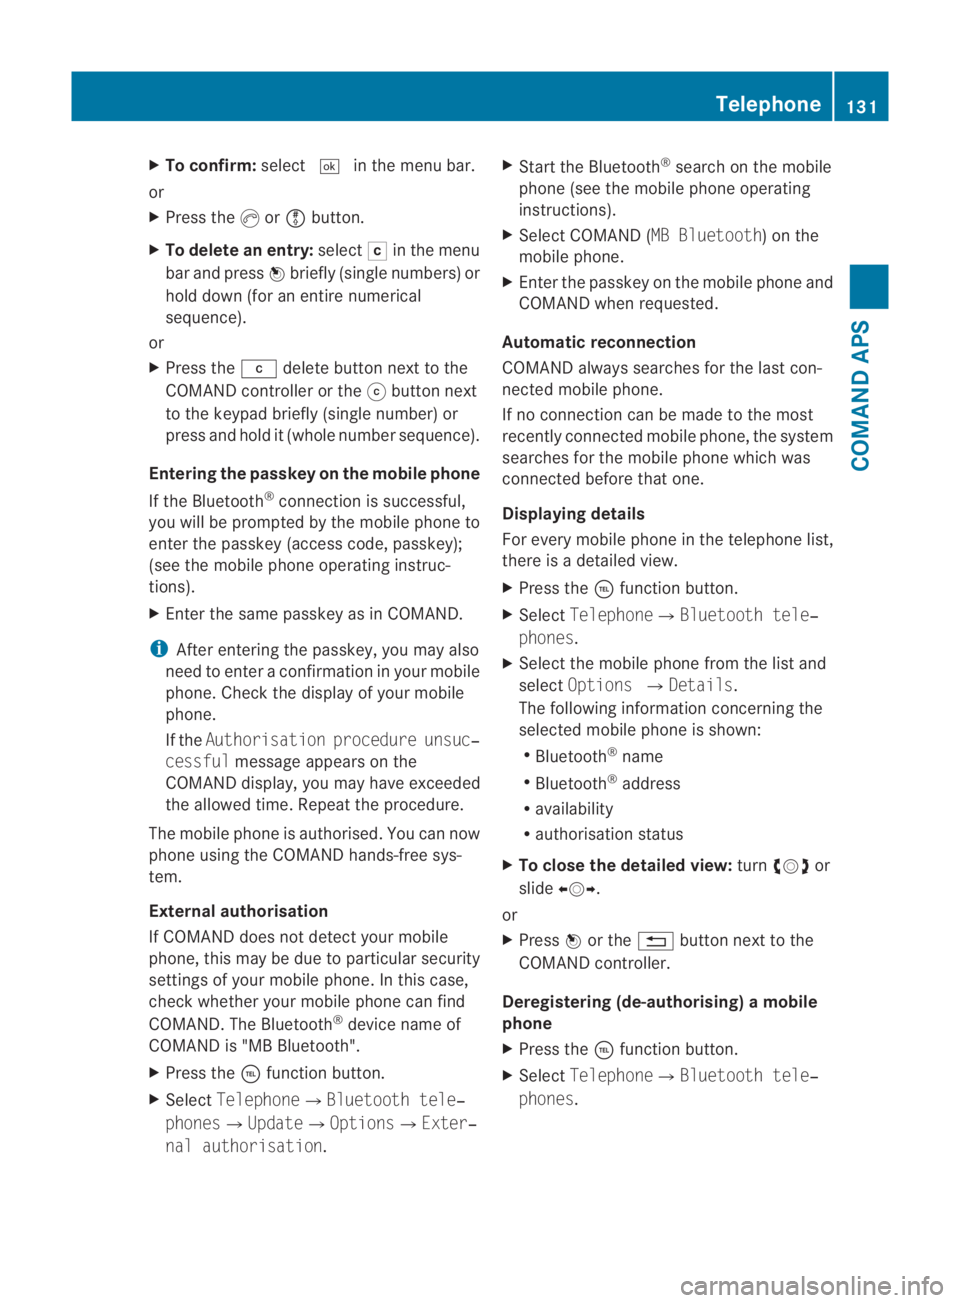
The input menu for the passkey appears. i
The passkey is any one to sixteen-digit
number combination which you can deter-
mine yourself. You must enter the same
number combination in COMAND and in
the Bluetooth ®
device to be authorised
(see mobile phone operating instructions).
If you want to reauthorise a device follow-
ing de-authorisation, you may select a dif-
ferent passkey.
Mercedes-Benz recommends de-authori-
sation in COMAND and on the mobile
phone. Otherwise, subsequent authorisa-
tion may fail.
Some mobile phones require the input of a
four-digit passkey or longer number
sequences.
Entering in COMAND
You can enter the passkey in COMAND with
the numbers in the menu bar or with the num-
ber keypad.
X To enter: turn002800130029 or slide 002B0013002Cand press
0017.
Enter all the required digits in the same
way.
or
X Press the relevant number keys in succes-
sion. 130
TelephoneCOMAND APS
BA 197 ECE RE 2010/6a; 1; 2, en-GB
sabbaeu
Version: 3.0.3.6 2010-05-07T14:19:43+02:00 - Seite 130
Page 134 of 361
X
To confirm: select0005in the menu bar.
or
X Press the 0016or0009 button.
X To delete an entry: select0004in the menu
ba rand press 0017briefly (single numbers) or
hold down (fo ranentire numerical
sequence).
or
X Press the 0013delete button next to the
COMAND controller or the 001Fbutton next
to the keypad briefly (single number) or
press and hold it (whole numbe rsequence).
Entering the passkey on the mobile phone
If the Bluetooth ®
connection is successful,
you will be prompted by the mobile phone to
enter the passkey (access code, passkey);
(see the mobile phone operating instruc-
tions).
X Enter the same passkey as in COMAND.
i After entering the passkey, you may also
need to enter a confirmation in your mobile
phone. Check the display of your mobile
phone.
If the Authorisation procedure unsuc‐
cessful message appears on the
COMAND display, you may have exceeded
the allowed time. Repeat the procedure.
The mobile phone is authorised. You can now
phone using the COMAND hands-free sys-
tem.
External authorisation
If COMAND does not detec tyour mobile
phone, this may be due to particular security
settings of your mobile phone. In this case,
check whether your mobile phone can find
COMAND. The Bluetooth ®
device name of
COMAND is "MB Bluetooth".
X Press the 0008function button.
X Select Telephone0004Bluetooth tele‐
phones0004Update0004Options0004Exter‐
nal authorisation. X
Start the Bluetooth ®
search on the mobile
phone (see the mobile phone operating
instructions).
X Select COMAND (MB Bluetooth) on the
mobile phone.
X Enter the passkey on the mobile phone and
COMAND when requested.
Automatic reconnection
COMAND always searches for the last con-
nected mobile phone.
If no connection can be made to the most
recently connected mobile phone, the system
searches for the mobile phone which was
connected before that one.
Displaying details
For every mobile phone in the telephone list,
there is a detailed view.
X Press the 0008function button.
X Select Telephone0004Bluetooth tele‐
phones.
X Select the mobile phone from the list and
select Options 0004Details.
The following information concerning the
selected mobile phone is shown:
R Bluetooth ®
name
R Bluetooth ®
address
R availability
R authorisation status
X To close the detailed view: turn002800130029 or
slide 002B0013002C.
or
X Press 0017or the 0001button next to the
COMAND controller.
Deregistering (de-authorising) amobile
phone
X Press the 0008function button.
X Select Telephone 0004Bluetooth tele‐
phones . Telephone
131COMAND APS
BA 197 ECE RE 2010/6a; 1; 2, en-GB
sabbaeuV ersion: 3.0.3.6
2010-05-07T14:19:43+02:00 - Seite 131 Z
Page 135 of 361
X
Select the mobile phone from the list and
select Options0004De-authorise.
Ap rompt appears asking whethe ryou
really wish to revoke authorisation for this
Bluetooth ®
device.
X Select YesorNo.
If you select Yes, the Bluetooth ®
device will
be deleted from the telephones list.
i Before re-authorising the mobile phone,
you should also delete the device name MB
Bluetooth from your mobile phone's Blue-
tooth ®
list.
Connecting another mobile phone
If you have authorised several mobile phones,
you can switch between the individual
phones.
i You can only switch to another authorised
mobile phone if no phone call is active.
X Press the 0008function button.
X Select Telephone0004Bluetooth tele‐
phones.
X Select the mobile phone from the list.
X Press the 0017COMAND controller.
If the selected mobile phone is within Blue-
tooth ®
range and Bluetooth ®
is activated,
a search is started and the phone is con-
nected.
Only one mobile phone can be connected
at a time. The currently connected mobile
phone is indicated by the 0023dot in the
phone list.
Telephone basic menu (Bluetooth ®
interface) X
Press the 0008function button.
If the mobile phone is ready for use, the fol-
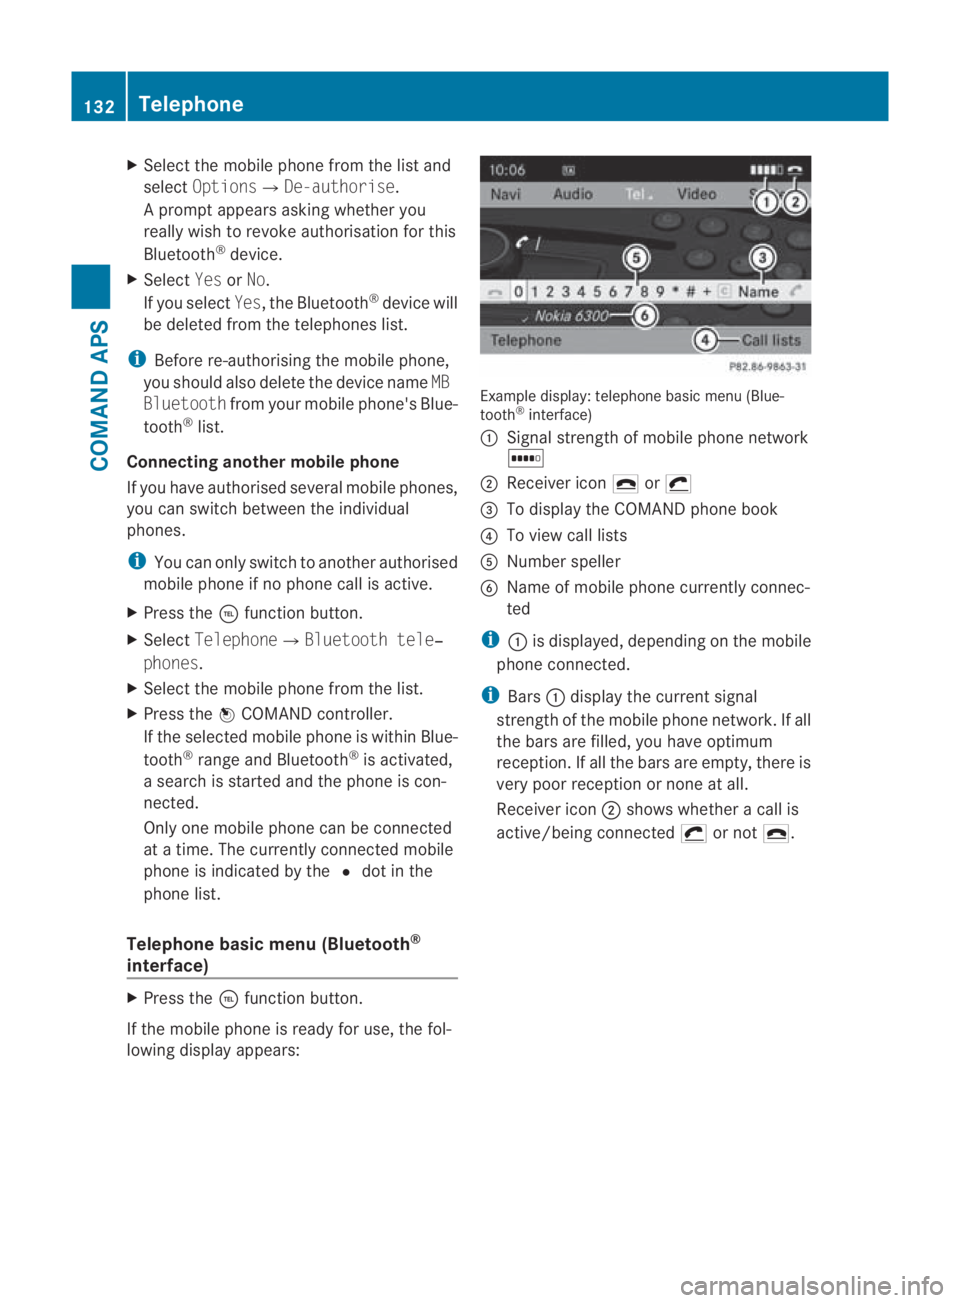
lowing display appears: Example display: telephone basic menu (Blue-
tooth
®
interface)
0001 Signal strength of mobile phone network
0003
0002 Receiver icon 002Dor0011
0015 To display the COMAND phone book
0014 To view call lists
0012 Number speller
0013 Name of mobile phone currently connec-
ted
i 0001is displayed, depending on the mobile
phone connected.
i Bars 0001display the current signal
strength of the mobile phone network .Ifall
the bars are filled, you have optimum
reception. If all the bars are empty, there is
very poor receptio nornone at all.
Receiver icon 0002shows whether a call is
active/being connected 0011or not 002D. 132
TelephoneCOMAND APS
BA 197 ECE RE 2010/6a; 1; 2, en-GB
sabbaeu
Version: 3.0.3.6 2010-05-07T14:19:43+02:00 - Seite 132