2010 MERCEDES-BENZ SLS COUPE tire pressure
[x] Cancel search: tire pressurePage 12 of 361
F
Fast forward/rewind ................176, 194
Faul tmessage
see Display message .....................289
Fire extinguisher ............................... 289
First-aid kit ......................................... 289
Flat tyre Equipment ..................................... 325
Preparing the vehicle .....................325
TIREFIT kit ...................................... 326
Floormat ............................................ .264
Folders Selecting (MP3 mode )................... 176
Fording ............................................... 278
Frequencies Telephone ...................................... 347
Frequency entry
Manual .......................................... .162
Front airbag ......................................... 38
Front-passenger airbag ....................... 38
Fron tpassenge rkneebag ................... 39
Fuel ..................................................... 349
Loss ............................................... 314
Petrol ............................................. 267
Fuel consumption
Current (on-board computer) .........233
Notes ............................................. 349
Fuel filler flap
Opening/closing ............................ 266
Fuel gauge ............................................ 25
Fuel level Calling up the range (on-board
computer) ...................................... 233
Gauge .............................................. 25
Fuel line
Malfunction ................................... .314
Fuel tank
Defect ............................................ 314
Function restrictions
Addres sbook ........................ 151, 154
Music Register ............................... 183
Using the telephone ....................... 128
Video DVD mode ........................... 191
Fuse allocation chart ........................342
Fuse box Front-passenger footwell ...............342
Rea r............................................... 342Fuses
.................................................. 342 G
Garage door Opening/closing (with the remote
control) .......................................... 263
Garage door opener ..........................262
Clearing the memory .....................264
Programming the remote control ...262
Gear indicator .................................... 227
Gearshift program SETUP (on-board computer) ..........241
Genuine parts .................................... 346
Glove compartment ..........................257
Locking and unlocking (sepa-
rately) ............................................ 257
Gracenote ®
Media Database ............177 H
Hands-free microphone Switching on/off ........................... 146
Headbag ............................................... 40
Headlamp cleaning system ..............270
Headlamps Cleaning ......................................... 283
Cleaning system ............................ 217
Misting up ...................................... 317
Heating
see Air conditioning
High-pressure cleaners ....................282
Hill start assist .................................. 221
Home address see My address
HomeLink ®
see Garage door opener
House number
Entering ........................................... 99 I
Ignition lock ............................... 203, 258
Immobiliser .......................................... 49
Indicator and warning lamps ...........308
Air conditioning (malfunction) ........307
Automatic child sea trecognition
(malfunction) ................................. 307
Engine diagnostics .........................310 Index
9 BA 197 ECE RE 2010/6a; 1; 2, en-GB
sabbae uV ersion: 3.0.3.6
2010-05-07T14:19:43+02:00 - Seite 9
Page 275 of 361
the standard valve cap or other valve caps
approved by Mercedes-Benz for your vehi-
cle.
R You should regularly check the pressure of
all your tyres, particularly prior to long trips,
and correct the pressure as necessary
(Y page 272).
Notes on driving R
While driving, pay attentio nto vibrations,
noises and unusual handling characteris-
tics, e.g. pulling to one side. This may indi-
cate that the wheels or tyres are damaged.
If you suspect that a tyre is defective,
reduce your speed immediately. Stop the
vehicle as soon as possible to check the
wheels and tyres for damage. Hidden tyre
damage could also be causing the unusual
handling characteristics. If you find no
signs of damage, have the wheels and tyres
examined at a specialist workshop, for
example at a Mercedes-Benz Service
Centre.
R When parking your vehicle, make sure that
the tyres do not get deformed by the kerb
or other obstacles. If it is necessary to drive
over kerbs, speed humps or similar eleva-
tions, try to do so slowly and at an obtuse
angle. Otherwise, the tyres, particularly the
sidewalls, can get damaged. Direction of rotation
Tyres with a specified direction of rotation
have additional benefits, e.g. if there is a risk
of aquaplaning. You will only gain these ben-
efits if the correct direction of rotation is
observed.
An arrow on the tyre wall indicates its correct
direction of rotation. Tyre tread
G
Risk of accident
Bear in mind that:
R tyre grip decreases rapidly on wet roads
when the tread depth is less than 3mm.
Thus, you should replace tyres that have
insufficient tread.
R winter tyres should be replaced when the
tread depth is 4mmorless as they will no
longer provide adequate grip.
R the tread on a tyre may not wear evenly.
Thus, you should regularly check the tread
depth and the condition of the tread across
the entire width of all tyres. If necessary,
turn the steering wheel so that you can see
the tyre tread more easily.
You could otherwise lose control of the vehi-
cle and cause an acciden tdue to the reduced
grip of the tyres on the road. Tyre pressures
i You will find a table of tyre pressures for
various operating conditions on the inside
of your vehicle's fuel fille rflap.
The value specified in the technical data is
valid for the collapsible emergency spare
wheel* 18
. G
Risk of accident
Tyre pressure that is either too high or too low
has a negative effect on vehicle safety, which
could lead you to cause an accident .There-
fore, you should regularly check the pressure
of all the tyres, particularly prior to long trips,
and correct the pressure as necessary.
Use a suitable tyre pressure gauge to do this.
The outer appearance of a tyre does not per-
mit any reliable conclusion about the tyre
pressure. You can also check the tyre pres-
sure using the on-board computer.
18 Only for certain countries. 272
Tyres and wheelsOperation
*o
ptional
BA 197 ECE RE 2010/6a; 1; 2, en-GB
sabbaeu
Version: 3.0.3.6 2010-05-07T14:19:43+02:00 - Seite 272
Page 329 of 361
X
Get all occupants out of the vehicle .Make
sure that they are no tendangered as they
ge to ut of the vehicle.
X Make sure that no one is near the danger
area whils tawheel is being changed. Any-
one who is not directly assisting in the
wheel change should, for example, stand
behind the barrier.
X Switch off the engine.
X Remove the key from the ignition lock.
X Get out of the vehicle.
X Close the driver’s door.
X Place the warning triangle ( Ypage 288) at
a suitable distance. Observe legal require-
ments. Using the TIREFIT kit
You can use the TIREFI Tkit to seal small
punctures, particularly those in the tyre tread.
You can use TIREFIT at outside temperatures
down to -40 †. G
Risk of accident
In the following situations ,your safety is at
particular risk and tyre sealant is unable to
provide breakdown assistance if:
R there are cuts or punctures in the tyre
greater than 4 mm
R the wheel rim is damaged
R you have driven at very low tyre pressures
or on a flat tyre
Do not drive any further. Consult a qualified
specialist workshop which has the necessary
specialist knowledge and tools to carry out
the work required.
Mercedes-Benz recommends that you use a
Mercedes-Benz Service Centre for this pur-
pose. In particular, work relevant to safety or
on safety-related systems must be carried out
at a qualified specialist workshop. X
Do not remove any foreign objects which
have penetrated the tyre, e.g. screws or
nails.
X Take the TIREFIT kit out of the boot
(Y page 288). X
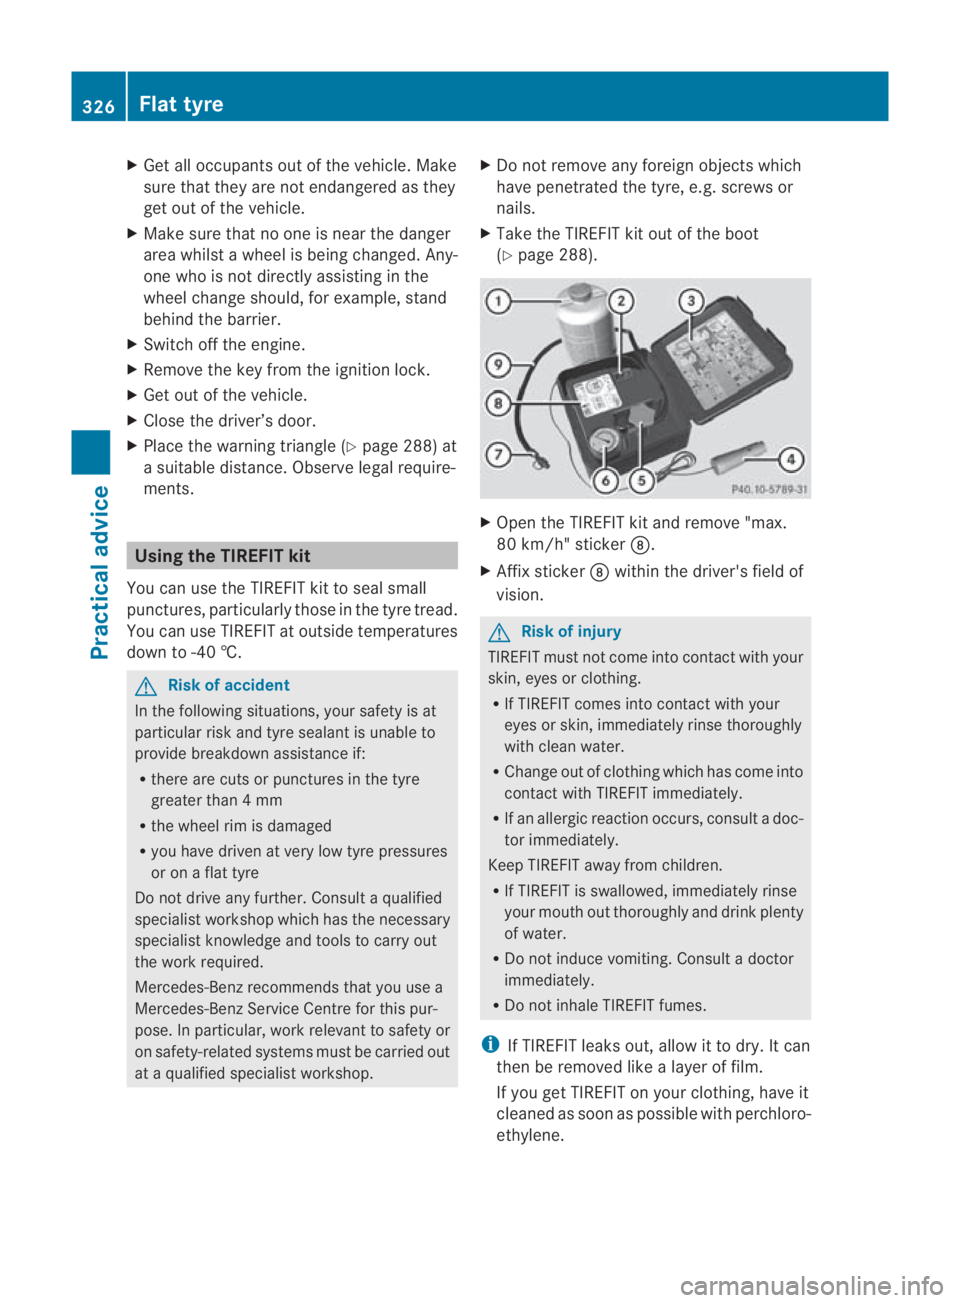
Open the TIREFIT kit and remove "max.
80 km/h" sticker 000B.
X Affix sticker 000Bwithin the driver's field of
vision. G
Risk of injury
TIREFIT must not come into contact with your
skin, eyes or clothing.
R If TIREFIT comes into contact with your
eyes or skin, immediately rinse thoroughly
with clean water.
R Change out of clothing which has come into
contact with TIREFIT immediately.
R If an allergic reaction occurs, consult a doc-
tor immediately.
Keep TIREFIT away from children.
R If TIREFIT is swallowed, immediately rinse
your mouth out thoroughly and drink plenty
of water.
R Do not induce vomiting. Consult a doctor
immediately.
R Do not inhale TIREFIT fumes.
i If TIREFIT leaks out, allow it to dry. It can
then be removed like a layer of film.
If you get TIREFIT on your clothing, have it
cleaned as soon as possible with perchloro-
ethylene. 326
Flat tyrePractical advice
BA 197 ECE RE 2010/6a; 1; 2, en-GB
sabbaeu
Version: 3.0.3.6 2010-05-07T14:19:43+02:00 - Seite 326
Page 330 of 361
Comply with the manufacturer's safety
instructions on the tyr
einflatio ncompressor
label and on the TIREFIT filler bottle.
i You will also find operating instructions
0015 in the lid of the TIREFIT kit.
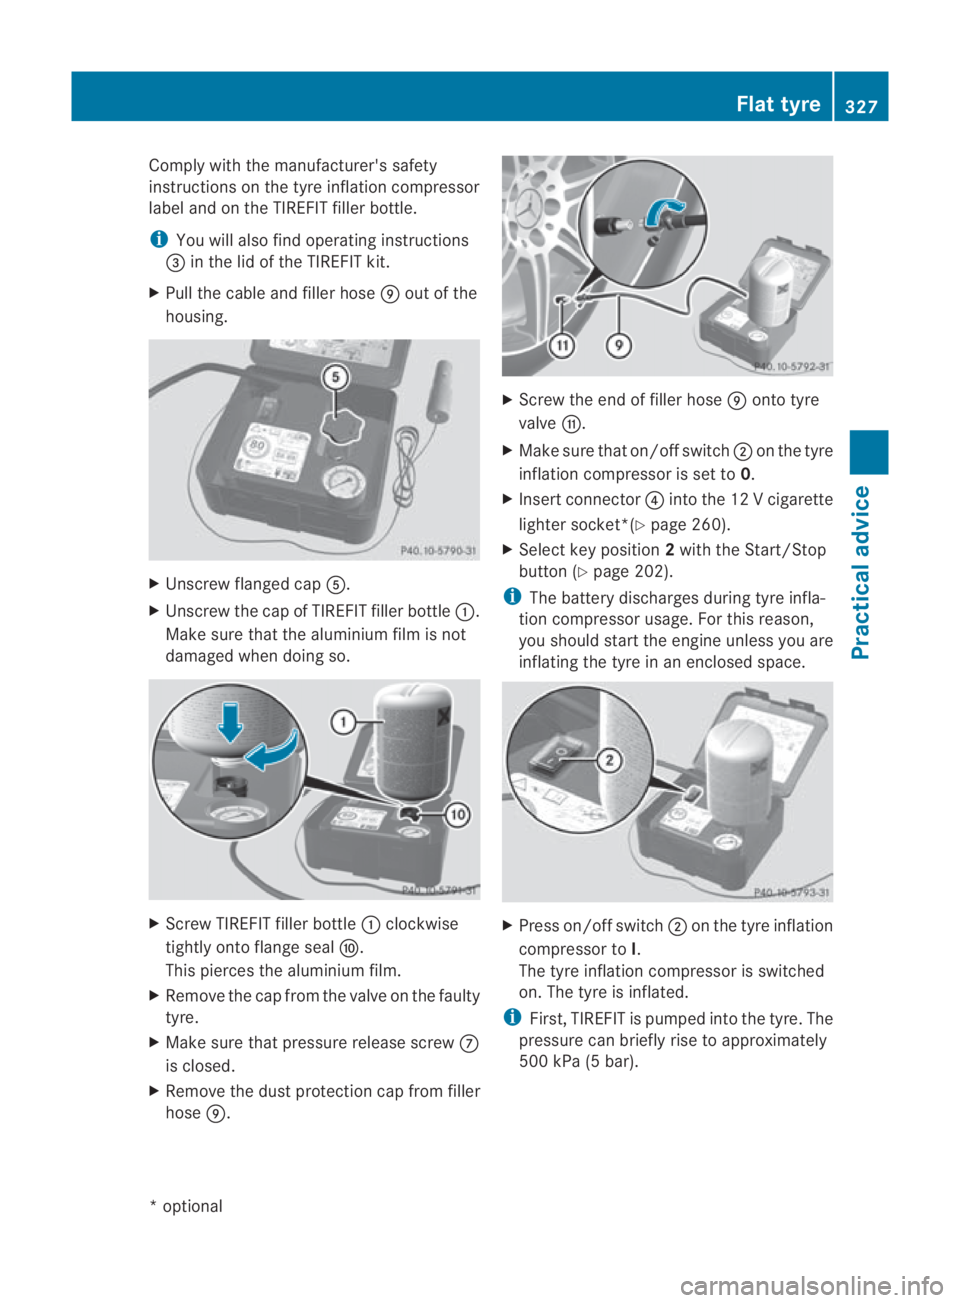
X Pull the cable and filler hose 000Cout of the
housing. X
Unscrew flanged cap 0012.
X Unscrew the cap of TIREFIT filler bottle 0001.
Make sure that the aluminium film is not
damaged when doing so. X
Screw TIREFIT filler bottle 0001clockwise
tightly onto flange seal 000D.
This pierces the aluminium film.
X Remove the cap from the valve on the faulty
tyre.
X Make sure that pressure release screw 000A
is closed.
X Remove the dust protection cap from filler
hose 000C. X
Screw the end of filler hose 000Conto tyre
valve 000E.
X Make sure that on/offs witch0002on the tyre
inflatio ncompressor is set to 0.
X Insert connector 0014into the 12 V cigarette
lighter socket*(Y page 260).
X Select key position 2with the Start/Stop
button (Y page 202).
i The battery discharges during tyre infla-
tion compressor usage. For this reason,
you should start the engine unless you are
inflating the tyre in an enclosed space. X
Press on/offs witch0002on the tyre inflation
compressor to I.
The tyre inflatio ncompressor is switched
on. The tyre is inflated.
i First, TIREFIT is pumped into the tyre. The
pressure can briefly rise to approximately
500 kPa (5 bar). Flat tyre
327Practical advice
*optional
BA 197 ECE RE 2010/6a; 1; 2, en-GB
sabbaeu
Version: 3.0.3.6 2010-05-07T14:19:43+02:00 - Seite 327 Z
Page 331 of 361
Do not switch off the tyre inflation com-
pressor during this phase.
X Let the tyre inflation compressor run for a
maximum of te nminutes. The tyre should
the nhave a pressure of at least
180 kPa (1.8 bar) (maximum
350 kPa (3.5 bar)).
Switch the tyre inflation compressor off
briefly to read the correct value from pres-
sure gauge 0013.
! Do not operate the tyre inflation com-
pressor for longer than ten minutes at a
time without a break .Itmay otherwise
overheat.
The tyre inflation compressor can be oper-
ated again once it has cooled down.
If a pressure of 180 kPa (1.8 bar) is not
reached after ten minutes:
X Switch off and disconnect the tyre inflation
compressor and drive the vehicle forwards
or backwards approximately 10 m.
This distributes the TIREFIT more evenly.
X Leave TIREFIT fille rbottle 0001attached to
the flange.
X Pump up the tyre again. G
Risk of accident
If the tyre pressure is less than 130 kPa
(1.3 bar), the tyre is too severely damaged. Do
not drive any further. Consult a qualified spe-
cialist workshop which has the necessary
specialist knowledge and tools to carry out
the work required. Mercedes-Benz recom-
mends that you use a Mercedes-Benz Service
Centre for this purpose. In particular, work
relevant to safety or on safety-related sys-
tems must be carried out at a qualified spe-
cialist workshop. If the tyre pressure is at least
180 kPa (1.8 bar):
X
Press on/offs witch0002on the tyre inflation
compressor to 0.
The tyre inflatio ncompressor is switched
off.
X Remove connector 0014from the 12 V
socket.
X Remove filler hose 000Cfrom tyre valve 000E
and refit the dust protection cap. Screw the
valve cap onto the valve again.
Leave TIREFIT filler bottle 0001attached to
flange 000D.
X Stow the TIREFIT kit in a safe and accessi-
ble place in the vehicle.
X Pull away immediately.
! After use, excess TIREFIT may run out of
the filler hose. This could cause stains. G
Risk of accident
The vehicle's handling characteristics may be
affected if you drive with a tyre that is inflated
with TIREFIT. This could cause an accident.
Therefore, do not exceed amaximum speed
of 80 km/h.
Affix th e"max. 80 km/h" sticker within the
driver's field of vision.
X Stop after driving for approximately three
kilometres or ten minutes and check the
tyre pressure using the tyre inflation com-
pressor.
i On tyres that are equipped with a tyre
pressure sensor (tyre pressure monitor),
the use of sealant can leadt o error mes-
sages and incorrect displays. Therefore,
use pressure gauge 0013in the TIREFIT kit to
check and correct the tyre pressure. G
Risk of accident
If the tyre pressure is less than 130 kPa
(1.3 bar), the tyre is too severely damaged. Do
not drive any further. Consult a qualified spe-
cialist workshop which has the necessary
specialist knowledge and tools to carry out 328
Flat tyrePractical advice
BA 197 ECE RE 2010/6a; 1; 2, en-GB
sabbaeu
Version: 3.0.3.6 2010-05-07T14:19:43+02:00 - Seite 328
Page 332 of 361
the work required. Mercedes-Benz recom-
mends tha
tyou use a Mercedes-Benz Service
Centre for this purpose. In particular, work
relevant to safety or on safety-related sys-
tems must be carried out at a qualified spe-
cialist workshop.
X Correct the tyre pressure if it is at least
130 kPa (1.3 bar) (see fuel filler flap for val-
ues).
To increase the tyre pressure: switch on
the tyre inflation compressor.
To reduce the tyre pressure: open
release screw 000A.
! The manufacturer does not guarantee
that all tyre damage can be repaired using
the TIREFIT kit, particularly in the case of
cuts and punctures with a diameter of more
than four millimetres or on the sidewall. The
manufacturer is not responsible for dam-
age caused by inappropriate use of the
TIREFIT kit.
X Drive to the nearest workshop and have the
tyre changed there.
X Have the TIREFIT kit replaced as soon as
possible at a qualified specialist workshop,
e.g. at a Mercedes-Benz Service Centre. H
Environmental note
Have the used TIREFIT kit disposed of profes-
sionally, e.g. at a Mercedes-Benz Service
Centre.
X Have the TIREFIT kit replaced every four
years at a qualified specialist workshop,
e.g. a Mercedes-Benz Service Centre. Changing
awheel
Preparing the vehicle i
You rvehicle is not fitted with wheel-
changing tools at the factory. Some of the
tools required to perform awheel change, e.g. wheel chock, jack, centring pin or
wheel wrench are vehicle-specific. For
more information on which tools are
required to perform a wheel change on your
vehicle, consult a Mercedes-Ben
zService
Centre.
X Prepare the vehicle as described
(Y page 325).
X Bring the wheels into the straight-ahead
position.
X Take the following objects from the left-
hand stowage compartment and the left-
hand stowage space in the boot:
R
the jack 24
R the wheel-changing tools*
R the folding wheel chock 24
X Use the folding wheel choc kto prevent the
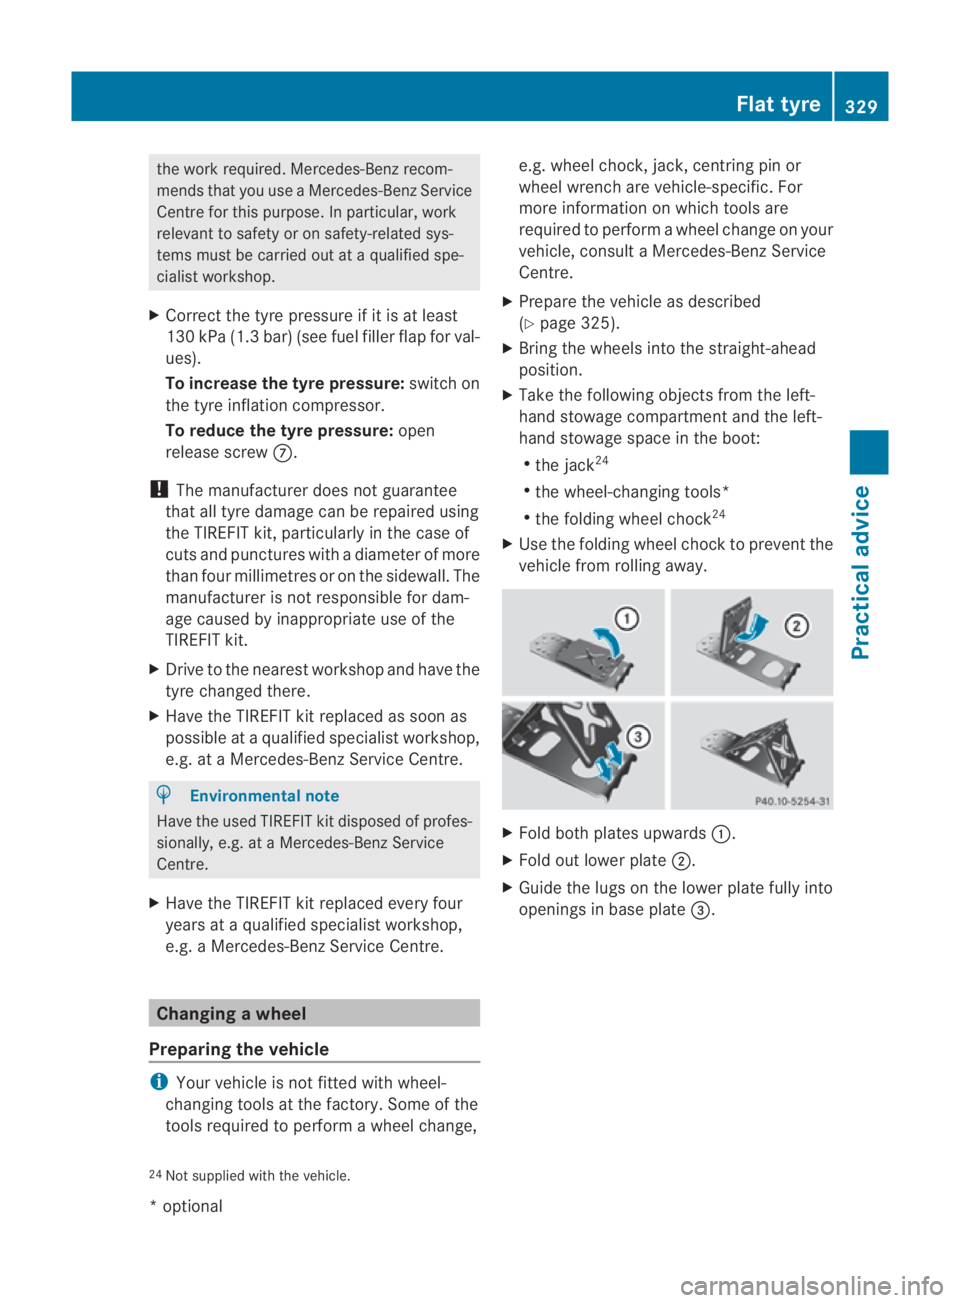
vehicle from rolling away. X
Fold both plates upwards 0001.
X Fold out lower plate 0002.
X Guide the lugs on the lower plate fully into
openings in base plate 0015.
24 Not supplied with the vehicle. Flat tyre
329Practical advice
*optional
BA 197 ECE RE 2010/6a; 1; 2, en-GB
sabbaeu
Version: 3.0.3.6 2010-05-07T14:19:43+02:00 - Seite 329 Z
Page 336 of 361
X
Turn the jack back to the out-of-use posi-
tion and stow it in the boot again with the
rest of the wheel-changing tools. Emergency spare wheel*
G
Risk of accident
The wheel dimensions and tyre size of the
emergency spare wheel differ from those of
the standard wheels.
Your vehicle's handling characteristics will
change when driving with a collapsible emer-
gency spare wheel. Adapt your style of driving
accordingly.
The collapsible emergency spare wheel may
only be used for a short time. Do not exceed
the maximum speed of 80 km/h and do not
deactivate ESP ®
. G
Risk of accident
Have the collapsible emergenc yspare wheel
replaced as soon as possible at a qualified
specialist workshop which has the necessary
specialist knowledge and tools to carry out
the work required. Mercedes-Benz recom-
mends that you use a Mercedes-Benz Service
Centre for this purpose. In particular, work
relevant to safety or on safety-related sys-
tems must be carried out at a qualified spe-
cialist workshop.
Never drive the vehicle with more than one
collapsible emergency spare wheel fitted.
Inflating the collapsible emergency
spare wheel 25 G
Risk of accident
Pump up the collapsible emergency spare
wheel before lowering the vehicle. You could
otherwise damage the wheel rim.
X Remove the electric air pump from the boot
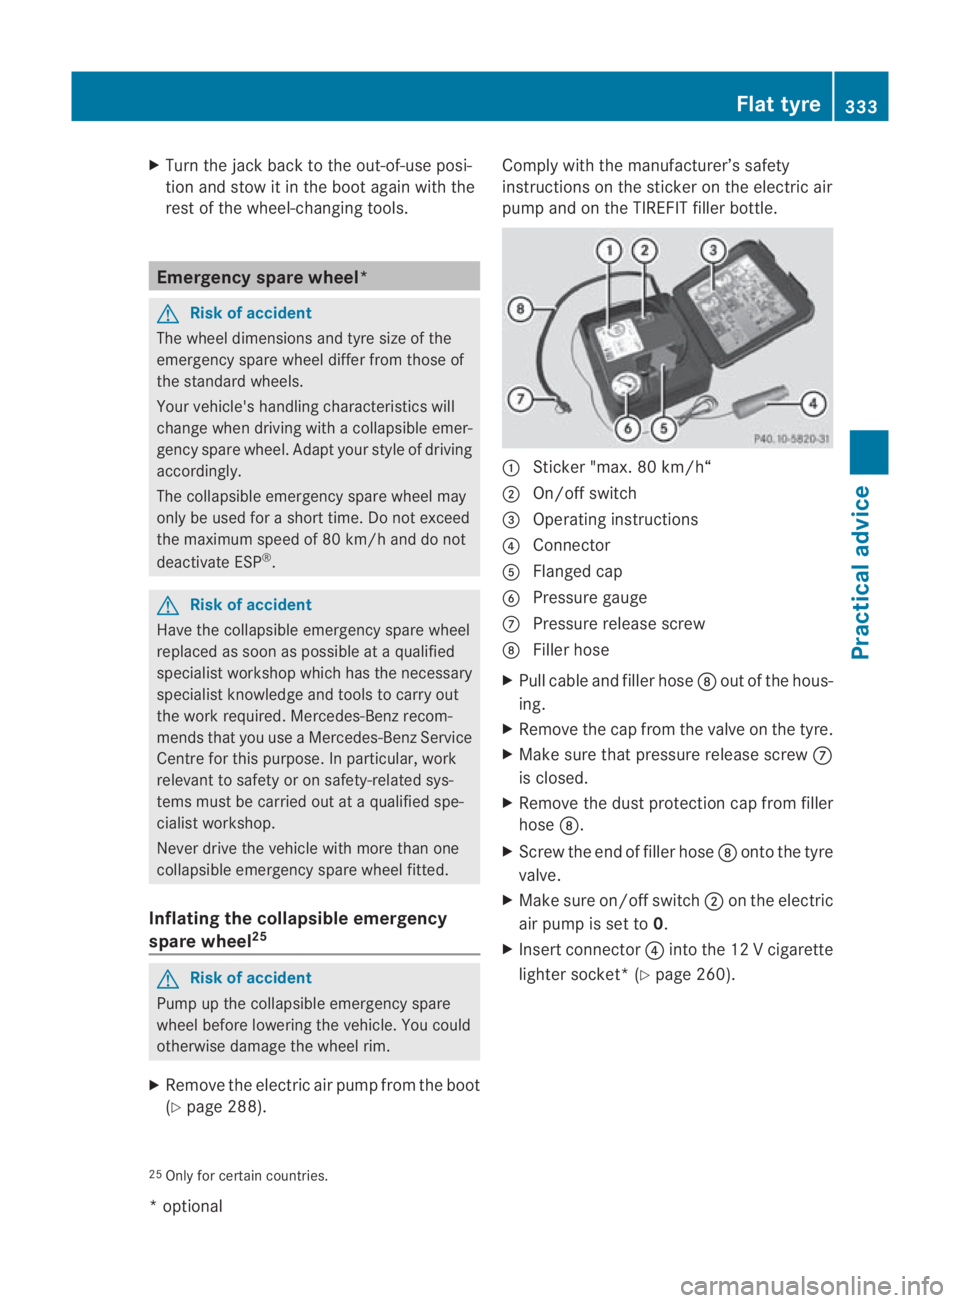
(Y page 288). Comply with the manufacturer’s safety
instructions on the sticker on the electric air
pump and on the TIREFIT filler bottle.
0001
Sticker "max. 80 km/h“
0002 On/off switch
0015 Operating instructions
0014 Connector
0012 Flanged cap
0013 Pressure gauge
000A Pressure release screw
000B Filler hose
X Pull cable and filler hose 000Bout of the hous-
ing.
X Remove the cap from the valve on the tyre.
X Make sure that pressure release screw 000A
is closed.
X Remove the dust protection cap from filler
hose 000B.
X Screw the end of filler hose 000Bonto the tyre
valve.
X Make sure on/off switch 0002on the electric
air pump is set to 0.
X Insert connector 0014intothe 12 V cigarette
lighter socket*( Ypage 260).
25 Only for certain countries. Flat tyre
333Practical advice
*optional
BA 197 ECE RE 2010/6a; 1; 2, en-GB
sabbaeu Version: 3.0.3.6 2010-05-07T14:19:43+02:00 - Seite 333 Z