2010 JAGUAR XFR lock
[x] Cancel search: lockPage 2559 of 3039
Published: 11-May-2011
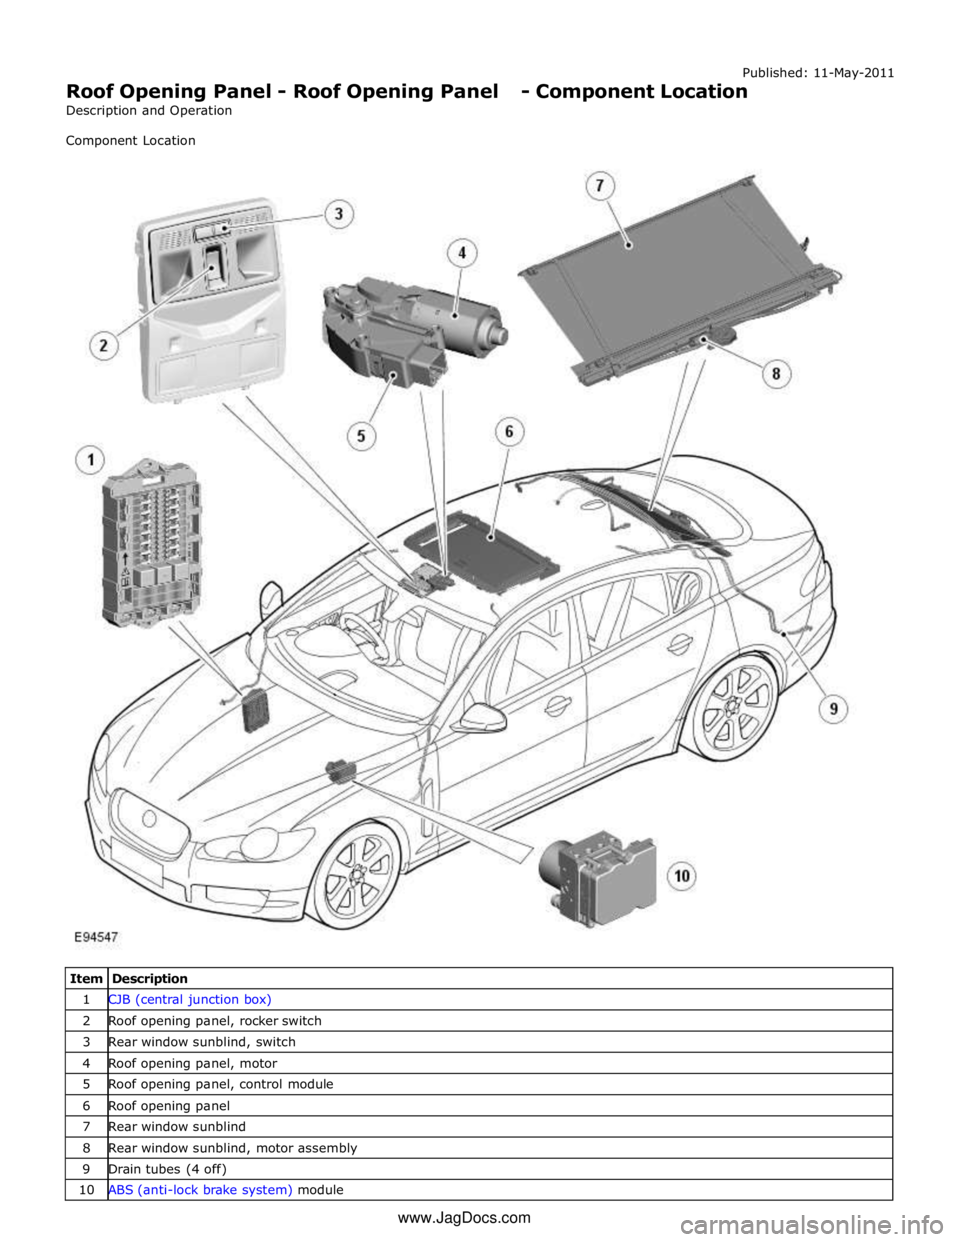
Roof Opening Panel - Roof Opening Panel - Component Location
Description and Operation
Component Location
Item Description 1 CJB (central junction box) 2 Roof opening panel, rocker switch 3 Rear window sunblind, switch 4 Roof opening panel, motor 5 Roof opening panel, control module 6 Roof opening panel 7 Rear window sunblind 8 Rear window sunblind, motor assembly 9 Drain tubes (4 off) 10 ABS (anti-lock brake system) module www.JagDocs.com
Page 2561 of 3039
Published: 11-May-2011
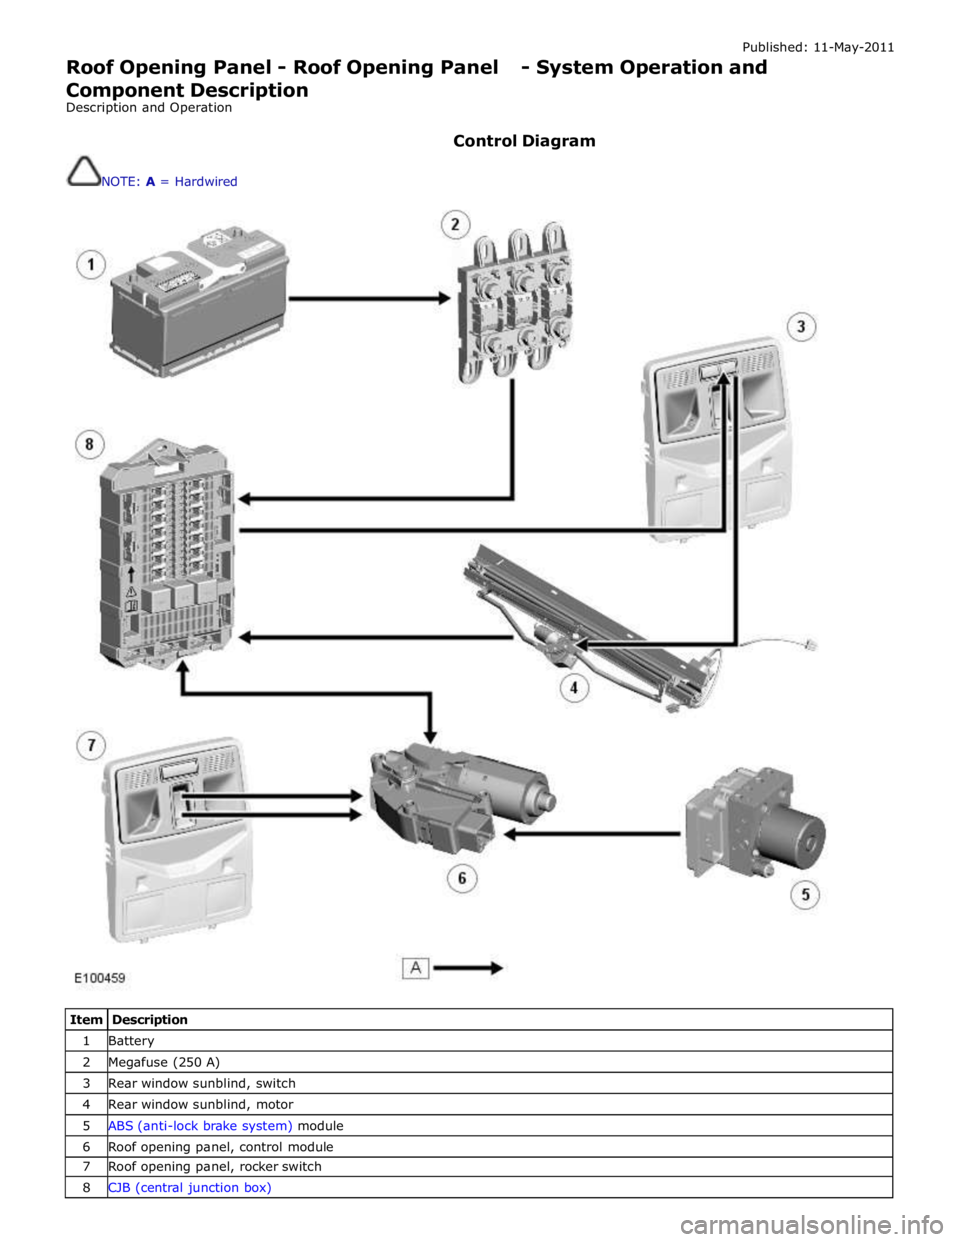
Roof Opening Panel - Roof Opening Panel - System Operation and
Component Description
Description and Operation
Control Diagram
NOTE: A = Hardwired
Item Description 1 Battery 2 Megafuse (250 A) 3 Rear window sunblind, switch 4 Rear window sunblind, motor 5 ABS (anti-lock brake system) module 6 Roof opening panel, control module 7 Roof opening panel, rocker switch 8 CJB (central junction box)
Page 2593 of 3039

Safety Belt System - Safety Belt System - Overview
Description and Operation
Authoring Template
OVERVIEW Published: 11-May-2011
A three point safety belt is fitted to all seating positions. Each safety belt retractor incorporates an emergency locking feature.
The emergency locking retractor incorporates 2 mechanical inertia devices. One inertia device activates if the safety belt is
subjected to a sharp pull. The second inertia device activates if the vehicle is subject to a sudden deceleration or is on a
severe incline.
North American Specification (NAS) safety belt retractors also include an automatic locking feature. The Automatic Locking
Retractor (ALR) is fitted to all passenger seating positions and allows the safety belt to be tensioned to aid the safe fitment
of child or booster seats. For additional information, refer to the Owners Handbook.
NAS vehicles are also fitted with a belt tension sensor on the front passenger seat. The belt tension sensor is incorporated
into the seat belt lower anchorage and is attached to the seat frame by an M10 Torx head bolt. The belt tension sensor forms
part of the SRS (supplemental restraint system) occupancy detection and classification feature.
The center rear safety belt features a mini-buckle lower anchorage. The mini-buckle is disengaged by inserting a suitable tool
into the small aperture on the front face of the housing.
To aid the fitment of child seats, 3 tethers are located on the rear parcel shelf. Each tether is attached to the parcel shelf with
an M10 Torx head bolt.
A safety belt warning indicator is located in the instrument cluster to remind front seat passengers to fasten their safety belts.
The warning indicator will illuminate if the safety belt of an occupied front seat is not fastened.
Refer to: Instrument Cluster (413-01, Description and Operation).
Page 2596 of 3039
For a complete list of all diagnostic trouble codes that could be logged on this vehicle, please refer to section 100-00.
REFER to: Supplemental Restraint System (SRS) Health and Safety Precautions (100-00 General Information, Description and Operation) /
Diagnostic Trouble Code (DTC) Index - DTC: Restraints Control Module (RCM) (100-00, Description and Operation).
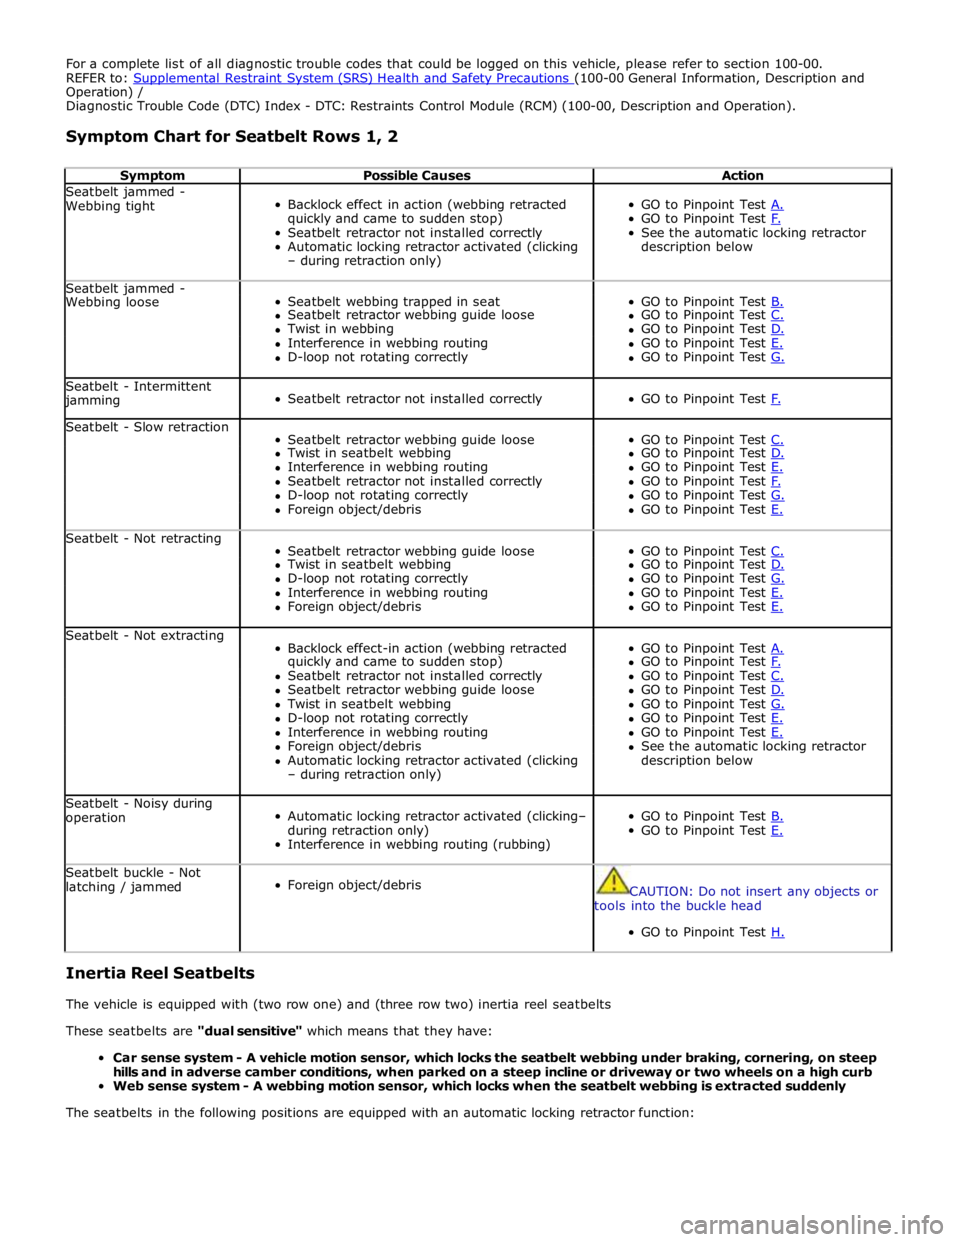
Symptom Chart for Seatbelt Rows 1, 2
Symptom Possible Causes Action Seatbelt jammed -
Webbing tight
Backlock effect in action (webbing retracted
quickly and came to sudden stop)
Seatbelt retractor not installed correctly
Automatic locking retractor activated (clicking
– during retraction only)
GO to Pinpoint Test A. GO to Pinpoint Test F. See the automatic locking retractor
description below Seatbelt jammed -
Seatbelt webbing trapped in seat
GO to Pinpoint Test B. Webbing loose Seatbelt retractor webbing guide loose GO to Pinpoint Test C. Twist in webbing GO to Pinpoint Test D. Interference in webbing routing GO to Pinpoint Test E. D-loop not rotating correctly GO to Pinpoint Test G. Seatbelt - Intermittent jamming
Seatbelt retractor not installed correctly
GO to Pinpoint Test F. Seatbelt - Slow retraction
Seatbelt retractor webbing guide loose
GO to Pinpoint Test C. Twist in seatbelt webbing GO to Pinpoint Test D. Interference in webbing routing GO to Pinpoint Test E. Seatbelt retractor not installed correctly GO to Pinpoint Test F. D-loop not rotating correctly GO to Pinpoint Test G. Foreign object/debris GO to Pinpoint Test E. Seatbelt - Not retracting
Seatbelt retractor webbing guide loose
GO to Pinpoint Test C. Twist in seatbelt webbing GO to Pinpoint Test D. D-loop not rotating correctly GO to Pinpoint Test G. Interference in webbing routing GO to Pinpoint Test E. Foreign object/debris GO to Pinpoint Test E. Seatbelt - Not extracting
Backlock effect-in action (webbing retracted
GO to Pinpoint Test A. quickly and came to sudden stop) GO to Pinpoint Test F. Seatbelt retractor not installed correctly GO to Pinpoint Test C. Seatbelt retractor webbing guide loose GO to Pinpoint Test D. Twist in seatbelt webbing GO to Pinpoint Test G. D-loop not rotating correctly GO to Pinpoint Test E. Interference in webbing routing GO to Pinpoint Test E. Foreign object/debris See the automatic locking retractor Automatic locking retractor activated (clicking description below – during retraction only) Seatbelt - Noisy during
operation
Automatic locking retractor activated (clicking–
during retraction only)
Interference in webbing routing (rubbing)
GO to Pinpoint Test B. GO to Pinpoint Test E. Seatbelt buckle - Not
latching / jammed
Foreign object/debris
CAUTION: Do not insert any objects or
tools into the buckle head
GO to Pinpoint Test H.
Inertia Reel Seatbelts
The vehicle is equipped with (two row one) and (three row two) inertia reel seatbelts
These seatbelts are "dual sensitive" which means that they have:
Car sense system - A vehicle motion sensor, which locks the seatbelt webbing under braking, cornering, on steep
hills and in adverse camber conditions, when parked on a steep incline or driveway or two wheels on a high curb
Web sense system - A webbing motion sensor, which locks when the seatbelt webbing is extracted suddenly
The seatbelts in the following positions are equipped with an automatic locking retractor function:
Page 2597 of 3039
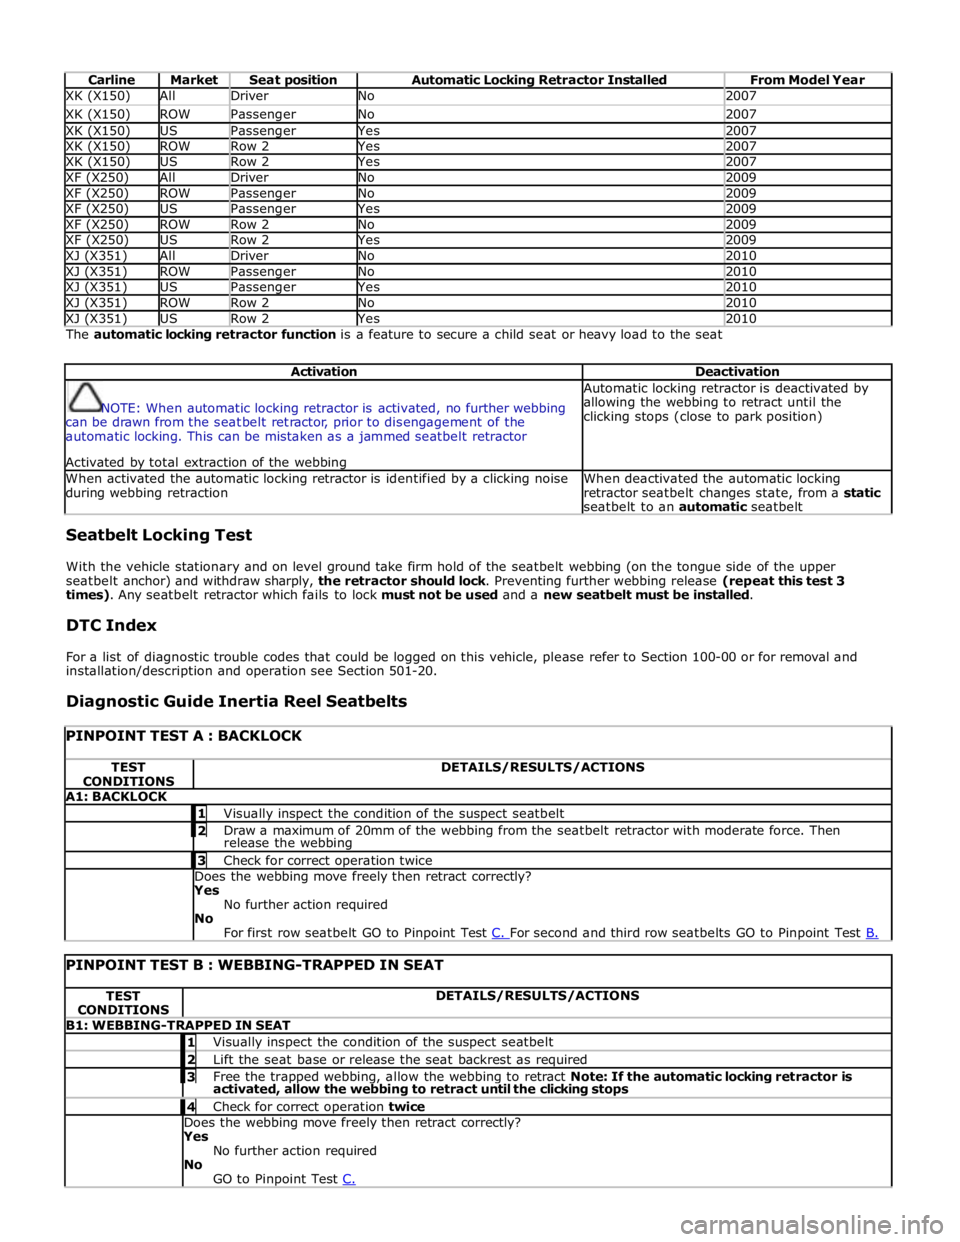
Carline Market Seat position Automatic Locking Retractor Installed From Model Year XK (X150) All Driver No 2007 XK (X150) ROW Passenger No 2007 XK (X150) US Passenger Yes 2007 XK (X150) ROW Row 2 Yes 2007 XK (X150) US Row 2 Yes 2007 XF (X250) All Driver No 2009 XF (X250) ROW Passenger No 2009 XF (X250) US Passenger Yes 2009 XF (X250) ROW Row 2 No 2009 XF (X250) US Row 2 Yes 2009 XJ (X351) All Driver No 2010 XJ (X351) ROW Passenger No 2010 XJ (X351) US Passenger Yes 2010 XJ (X351) ROW Row 2 No 2010 XJ (X351) US Row 2 Yes 2010 The automatic locking retractor function is a feature to secure a child seat or heavy load to the seat
Activation Deactivation
NOTE: When automatic locking retractor is activated, no further webbing
can be drawn from the seatbelt retractor, prior to disengagement of the
automatic locking. This can be mistaken as a jammed seatbelt retractor
Activated by total extraction of the webbing Automatic locking retractor is deactivated by
allowing the webbing to retract until the
clicking stops (close to park position) When activated the automatic locking retractor is identified by a clicking noise
during webbing retraction When deactivated the automatic locking
retractor seatbelt changes state, from a static
seatbelt to an automatic seatbelt Seatbelt Locking Test
With the vehicle stationary and on level ground take firm hold of the seatbelt webbing (on the tongue side of the upper
seatbelt anchor) and withdraw sharply, the retractor should lock. Preventing further webbing release (repeat this test 3
times). Any seatbelt retractor which fails to lock must not be used and a new seatbelt must be installed.
DTC Index
For a list of diagnostic trouble codes that could be logged on this vehicle, please refer to Section 100-00 or for removal and
installation/description and operation see Section 501-20.
Diagnostic Guide Inertia Reel Seatbelts
PINPOINT TEST A : BACKLOCK TEST
CONDITIONS DETAILS/RESULTS/ACTIONS A1: BACKLOCK 1 Visually inspect the condition of the suspect seatbelt 2 Draw a maximum of 20mm of the webbing from the seatbelt retractor with moderate force. Then release the webbing 3 Check for correct operation twice Does the webbing move freely then retract correctly?
Yes
No further action required
No
For first row seatbelt GO to Pinpoint Test C. For second and third row seatbelts GO to Pinpoint Test B.
PINPOINT TEST B : WEBBING-TRAPPED IN SEAT TEST
CONDITIONS DETAILS/RESULTS/ACTIONS B1: WEBBING-TRAPPED IN SEAT 1 Visually inspect the condition of the suspect seatbelt 2 Lift the seat base or release the seat backrest as required 3 Free the trapped webbing, allow the webbing to retract Note: If the automatic locking retractor is activated, allow the webbing to retract until the clicking stops 4 Check for correct operation twice Does the webbing move freely then retract correctly?
Yes
No further action required
No
GO to Pinpoint Test C.
Page 2598 of 3039
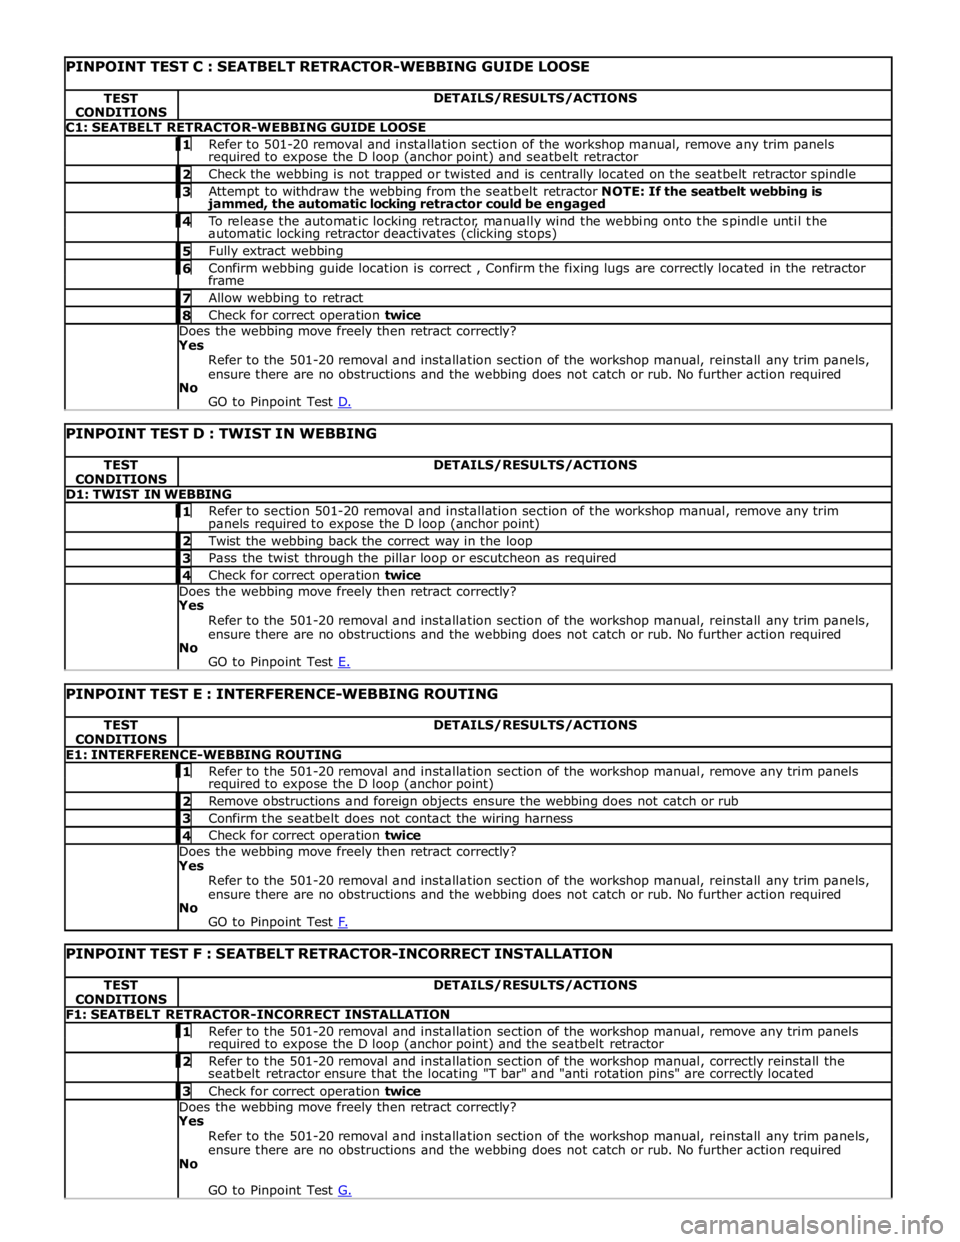
TEST
CONDITIONS DETAILS/RESULTS/ACTIONS C1: SEATBELT RETRACTOR-WEBBING GUIDE LOOSE 1 Refer to 501-20 removal and installation section of the workshop manual, remove any trim panels required to expose the D loop (anchor point) and seatbelt retractor 2 Check the webbing is not trapped or twisted and is centrally located on the seatbelt retractor spindle 3 Attempt to withdraw the webbing from the seatbelt retractor NOTE: If the seatbelt webbing is jammed, the automatic locking retractor could be engaged 4 To release the automatic locking retractor, manually wind the webbing onto the spindle until the automatic locking retractor deactivates (clicking stops) 5 Fully extract webbing 6 Confirm webbing guide location is correct , Confirm the fixing lugs are correctly located in the retractor frame 7 Allow webbing to retract 8 Check for correct operation twice Does the webbing move freely then retract correctly?
Yes
Refer to the 501-20 removal and installation section of the workshop manual, reinstall any trim panels,
ensure there are no obstructions and the webbing does not catch or rub. No further action required
No
GO to Pinpoint Test D.
PINPOINT TEST D : TWIST IN WEBBING TEST
CONDITIONS DETAILS/RESULTS/ACTIONS D1: TWIST IN WEBBING 1 Refer to section 501-20 removal and installation section of the workshop manual, remove any trim panels required to expose the D loop (anchor point) 2 Twist the webbing back the correct way in the loop 3 Pass the twist through the pillar loop or escutcheon as required 4 Check for correct operation twice Does the webbing move freely then retract correctly?
Yes
Refer to the 501-20 removal and installation section of the workshop manual, reinstall any trim panels,
ensure there are no obstructions and the webbing does not catch or rub. No further action required
No
GO to Pinpoint Test E.
PINPOINT TEST E : INTERFERENCE-WEBBING ROUTING TEST
CONDITIONS DETAILS/RESULTS/ACTIONS E1: INTERFERENCE-WEBBING ROUTING 1 Refer to the 501-20 removal and installation section of the workshop manual, remove any trim panels required to expose the D loop (anchor point) 2 Remove obstructions and foreign objects ensure the webbing does not catch or rub 3 Confirm the seatbelt does not contact the wiring harness 4 Check for correct operation twice Does the webbing move freely then retract correctly?
Yes
Refer to the 501-20 removal and installation section of the workshop manual, reinstall any trim panels,
ensure there are no obstructions and the webbing does not catch or rub. No further action required
No
GO to Pinpoint Test F.
PINPOINT TEST F : SEATBELT RETRACTOR-INCORRECT INSTALLATION TEST
CONDITIONS DETAILS/RESULTS/ACTIONS F1: SEATBELT RETRACTOR-INCORRECT INSTALLATION 1 Refer to the 501-20 removal and installation section of the workshop manual, remove any trim panels required to expose the D loop (anchor point) and the seatbelt retractor 2 Refer to the 501-20 removal and installation section of the workshop manual, correctly reinstall the seatbelt retractor ensure that the locating "T bar" and "anti rotation pins" are correctly located 3 Check for correct operation twice Does the webbing move freely then retract correctly?
Yes
Refer to the 501-20 removal and installation section of the workshop manual, reinstall any trim panels,
ensure there are no obstructions and the webbing does not catch or rub. No further action required
No
GO to Pinpoint Test G.
Page 2608 of 3039

Passenger air bag module retaining nuts 6 - 55 Passenger air bag earth lead retaining bolt 9 - 80 Restraints control module (RCM) retaining nuts 10 - 89 Side air curtain module inflator retaining bolts 9 - 80 Side air curtain module tether straps retaining bolts 9 - 80 Side air bag module retaining nuts 7 - 62 Side impact sensor retaining bolt 10 - 89 Front crash sensor retaining bolt 10 - 89 Clock spring retaining screws 5 - 44
Page 2614 of 3039
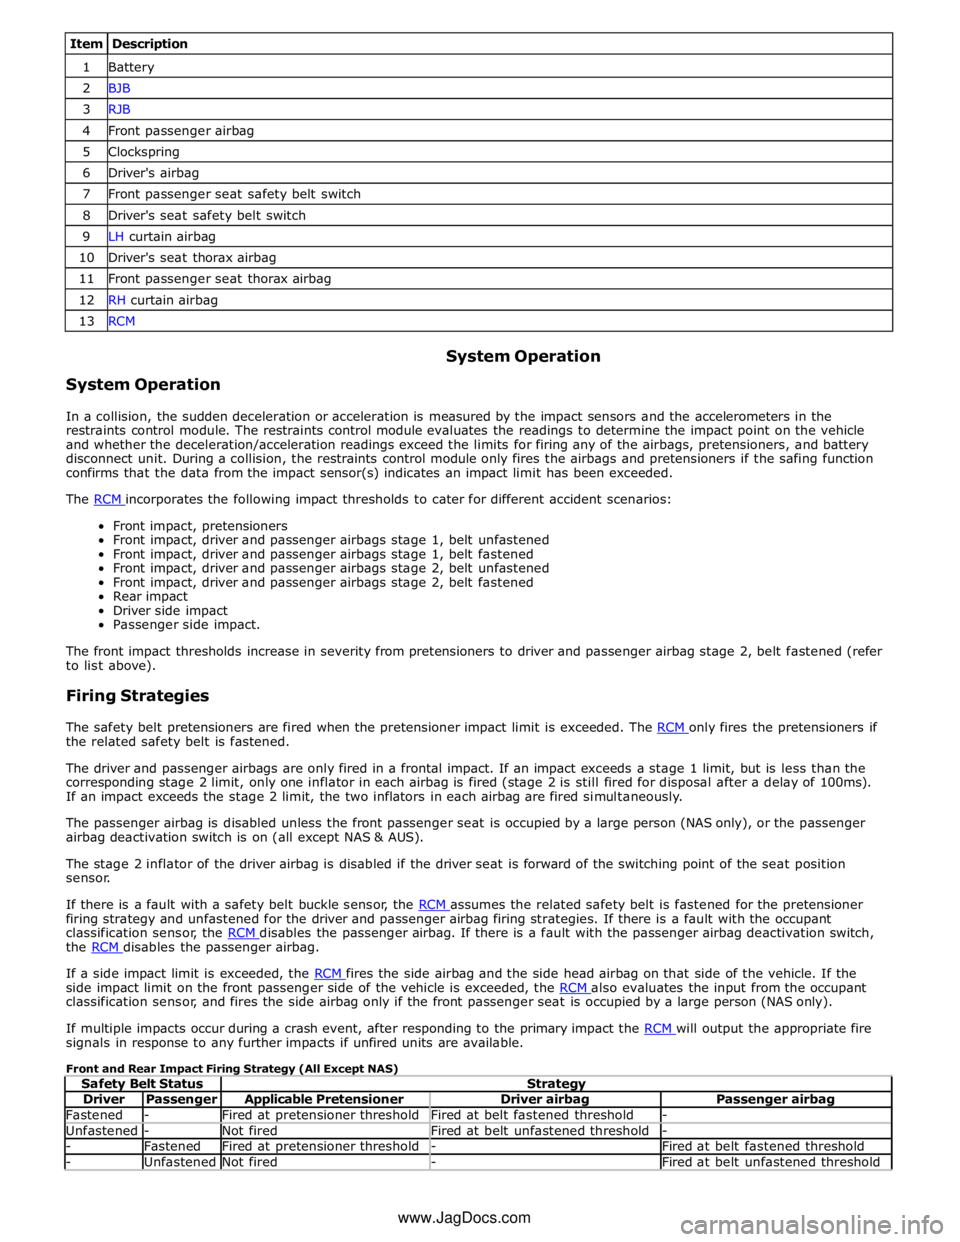
Item Description 1 Battery 2 BJB 3 RJB 4 Front passenger airbag 5 Clockspring 6 Driver's airbag 7 Front passenger seat safety belt switch 8 Driver's seat safety belt switch 9 LH curtain airbag 10 Driver's seat thorax airbag 11 Front passenger seat thorax airbag 12 RH curtain airbag 13 RCM
System Operation System Operation
In a collision, the sudden deceleration or acceleration is measured by the impact sensors and the accelerometers in the
restraints control module. The restraints control module evaluates the readings to determine the impact point on the vehicle
and whether the deceleration/acceleration readings exceed the limits for firing any of the airbags, pretensioners, and battery
disconnect unit. During a collision, the restraints control module only fires the airbags and pretensioners if the safing function
confirms that the data from the impact sensor(s) indicates an impact limit has been exceeded.
The RCM incorporates the following impact thresholds to cater for different accident scenarios: Front impact, pretensioners
Front impact, driver and passenger airbags stage 1, belt unfastened
Front impact, driver and passenger airbags stage 1, belt fastened
Front impact, driver and passenger airbags stage 2, belt unfastened
Front impact, driver and passenger airbags stage 2, belt fastened
Rear impact
Driver side impact
Passenger side impact.
The front impact thresholds increase in severity from pretensioners to driver and passenger airbag stage 2, belt fastened (refer
to list above).
Firing Strategies
The safety belt pretensioners are fired when the pretensioner impact limit is exceeded. The RCM only fires the pretensioners if the related safety belt is fastened.
The driver and passenger airbags are only fired in a frontal impact. If an impact exceeds a stage 1 limit, but is less than the
corresponding stage 2 limit, only one inflator in each airbag is fired (stage 2 is still fired for disposal after a delay of 100ms).
If an impact exceeds the stage 2 limit, the two inflators in each airbag are fired simultaneously.
The passenger airbag is disabled unless the front passenger seat is occupied by a large person (NAS only), or the passenger
airbag deactivation switch is on (all except NAS & AUS).
The stage 2 inflator of the driver airbag is disabled if the driver seat is forward of the switching point of the seat position
sensor.
If there is a fault with a safety belt buckle sensor, the RCM assumes the related safety belt is fastened for the pretensioner firing strategy and unfastened for the driver and passenger airbag firing strategies. If there is a fault with the occupant
classification sensor, the RCM disables the passenger airbag. If there is a fault with the passenger airbag deactivation switch, the RCM disables the passenger airbag.
If a side impact limit is exceeded, the RCM fires the side airbag and the side head airbag on that side of the vehicle. If the side impact limit on the front passenger side of the vehicle is exceeded, the RCM also evaluates the input from the occupant classification sensor, and fires the side airbag only if the front passenger seat is occupied by a large person (NAS only).
If multiple impacts occur during a crash event, after responding to the primary impact the RCM will output the appropriate fire signals in response to any further impacts if unfired units are available.
Front and Rear Impact Firing Strategy (All Except NAS)
Safety Belt Status Strategy Driver Passenger Applicable Pretensioner Driver airbag Passenger airbag Fastened - Fired at pretensioner threshold Fired at belt fastened threshold - Unfastened - Not fired Fired at belt unfastened threshold - - Fastened Fired at pretensioner threshold - Fired at belt fastened threshold - Unfastened Not fired - Fired at belt unfastened threshold www.JagDocs.com