Page 1580 of 2453
FU(H6DO)-19
Camshaft Position Sensor
FUEL INJECTION (FUEL SYSTEMS)
6. Camshaft Position Sensor
A: REMOVAL
1) Remove the collector cover.
2) Disconnect the ground cable from battery.
3) Remove the generator harness from fuel pipe
protector LH.
4) Remove the fuel pipe protector LH.
5) Disconnect the connector from camshaft posi-
tion sensor LH.
6) Remove the camshaft position sensor LH.
7) Remove the camshaft position sensor RH in the
same procedure as LH.
B: INSTALLATION
Install in the reverse order of removal.
Tightening torque:
Camshaft position sensor
6.4 N·m (0.65 kgf-m, 4.7 ft-lb)
Fuel pipe protector
19 N·m (1.9 kgf-m, 14 ft-lb)
FU-02117
FU-02129
FU-02130
Page 1582 of 2453
FU(H6DO)-21
Throttle Position Sensor
FUEL INJECTION (FUEL SYSTEMS)
8. Throttle Position Sensor
A: SPECIFICATION
Throttle body is a non-disassembled part, so do not
remove the throttle position sensor from throttle
body.
Refer to “Throttle Body” for removal and installation
procedure.
Throttle Body.>
LATION, Throttle Body.>
Page 1598 of 2453
FU(H6DO)-37
Fuel
FUEL INJECTION (FUEL SYSTEMS)
21.Fuel
A: PROCEDURE
1. RELEASING OF FUEL PRESSURE
WARNING:
•Place “NO FIRE” signs near the working area.
•Be careful not to spill fuel on the floor.
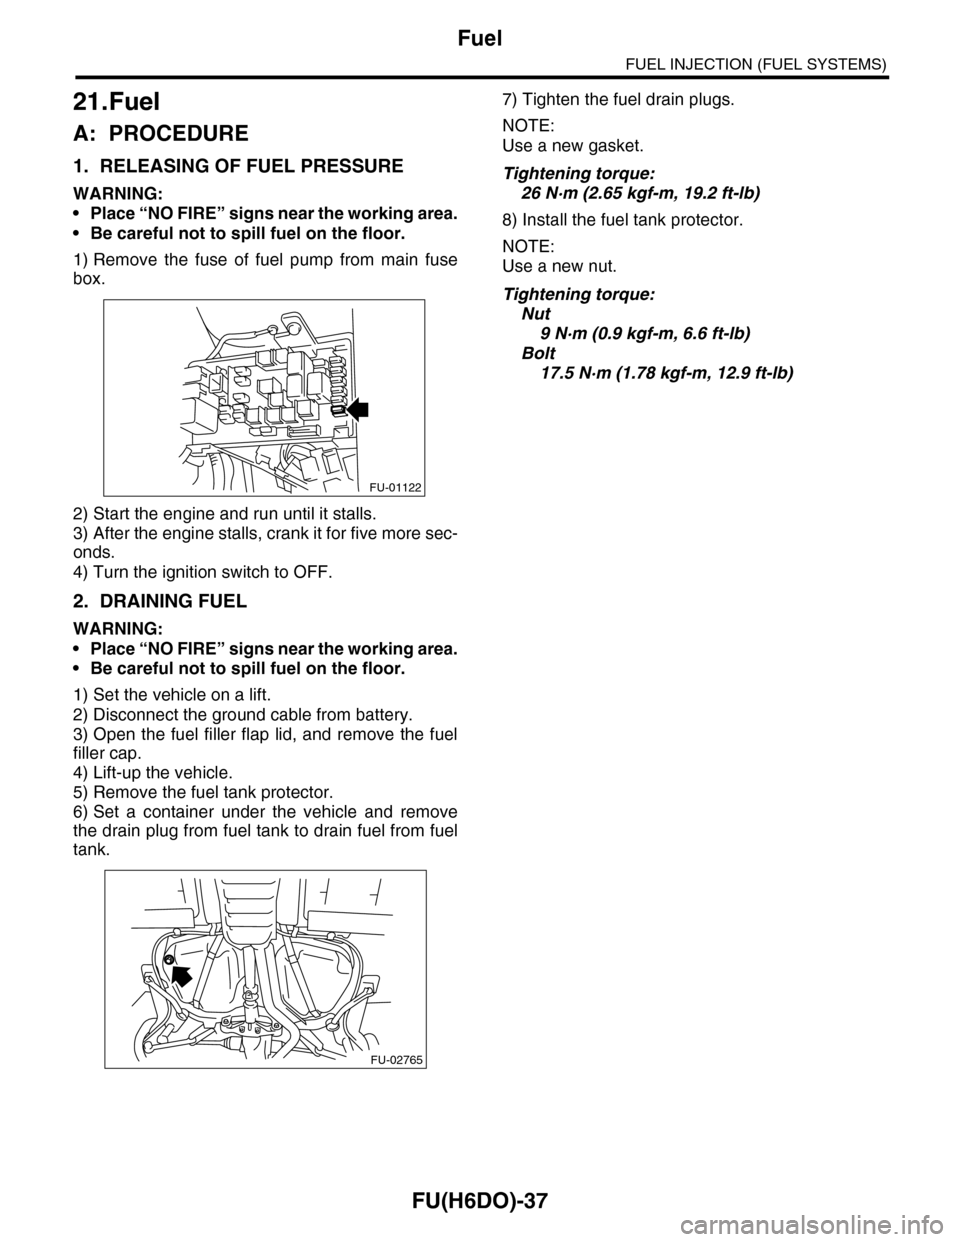
1) Remove the fuse of fuel pump from main fuse
box.
2) Start the engine and run until it stalls.
3) After the engine stalls, crank it for five more sec-
onds.
4) Turn the ignition switch to OFF.
2. DRAINING FUEL
WARNING:
•Place “NO FIRE” signs near the working area.
•Be careful not to spill fuel on the floor.
1) Set the vehicle on a lift.
2) Disconnect the ground cable from battery.
3) Open the fuel filler flap lid, and remove the fuel
filler cap.
4) Lift-up the vehicle.
5) Remove the fuel tank protector.
6) Set a container under the vehicle and remove
the drain plug from fuel tank to drain fuel from fuel
tank.
7) Tighten the fuel drain plugs.
NOTE:
Use a new gasket.
Tightening torque:
26 N·m (2.65 kgf-m, 19.2 ft-lb)
8) Install the fuel tank protector.
NOTE:
Use a new nut.
Tightening torque:
Nut
9 N·m (0.9 kgf-m, 6.6 ft-lb)
Bolt
17.5 N·m (1.78 kgf-m, 12.9 ft-lb)
FU-01122
FU-02765
Page 1602 of 2453
FU(H6DO)-41
Fuel Filler Pipe
FUEL INJECTION (FUEL SYSTEMS)
23.Fuel Filler Pipe
A: REMOVAL
WARNING:
•Place “NO FIRE” signs near the working area.
•Be careful not to spill fuel on the floor.
1) Disconnect the ground cable from battery.
2) Open the fuel filler flap lid, and remove the filler
cap.
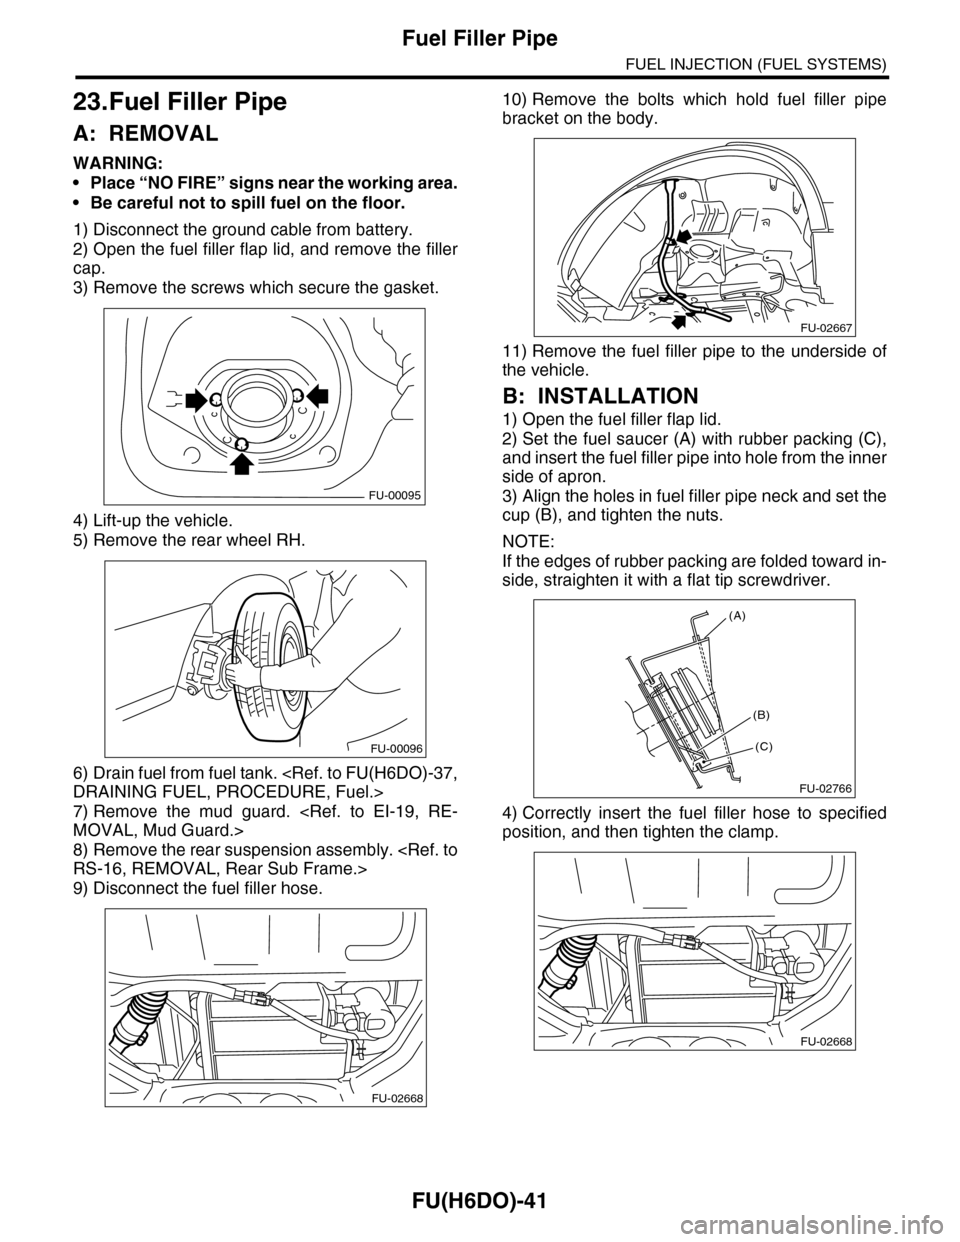
3) Remove the screws which secure the gasket.
4) Lift-up the vehicle.
5) Remove the rear wheel RH.
6) Drain fuel from fuel tank.
DRAINING FUEL, PROCEDURE, Fuel.>
7) Remove the mud guard.
MOVAL, Mud Guard.>
8) Remove the rear suspension assembly.
RS-16, REMOVAL, Rear Sub Frame.>
9) Disconnect the fuel filler hose.
10) Remove the bolts which hold fuel filler pipe
bracket on the body.
11) Remove the fuel filler pipe to the underside of
the vehicle.
B: INSTALLATION
1) Open the fuel filler flap lid.
2) Set the fuel saucer (A) with rubber packing (C),
and insert the fuel filler pipe into hole from the inner
side of apron.
3) Align the holes in fuel filler pipe neck and set the
cup (B), and tighten the nuts.
NOTE:
If the edges of rubber packing are folded toward in-
side, straighten it with a flat tip screwdriver.
4) Correctly insert the fuel filler hose to specified
position, and then tighten the clamp.
FU-00095
FU-00096
FU-02668
FU-02667
FU-02766
(A)
(C)
(B)
FU-02668
Page 1604 of 2453
FU(H6DO)-43
Fuel Pump
FUEL INJECTION (FUEL SYSTEMS)
24.Fuel Pump
A: REMOVAL
WARNING:
•Place “NO FIRE” signs near the working area.
•Be careful not to spill fuel on the floor.
NOTE:
Fuel pump assembly consists of fuel pump and fuel
level sensor.
1) Release the fuel pressure.
37, RELEASING OF FUEL PRESSURE, PROCE-
DURE, Fuel.>
2) Drain fuel.
FUEL, PROCEDURE, Fuel.>
3) Remove the second seat.
MOVAL, Second-row Seats.>
4) Remove the service hole cover.
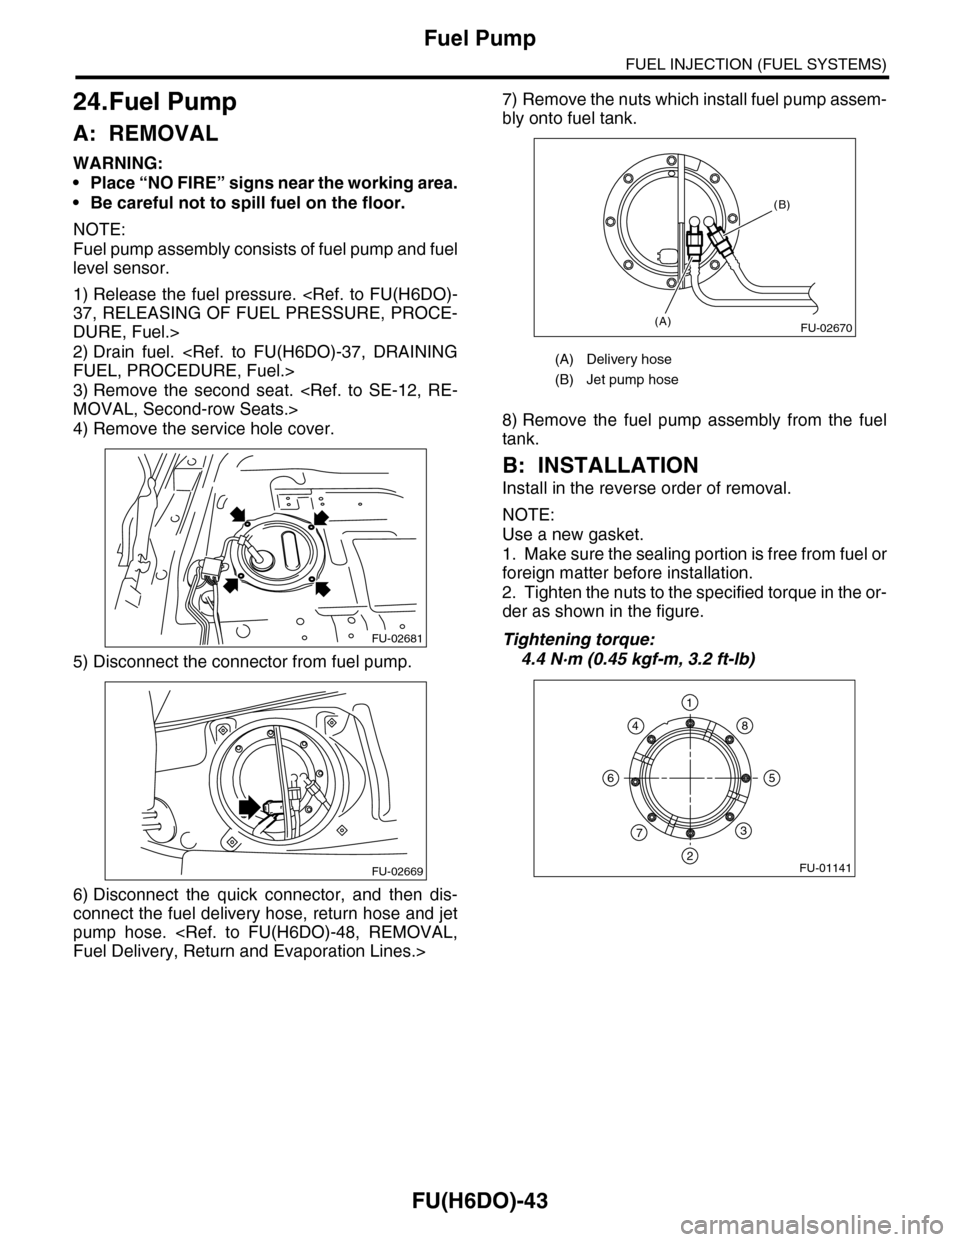
5) Disconnect the connector from fuel pump.
6) Disconnect the quick connector, and then dis-
connect the fuel delivery hose, return hose and jet
pump hose.
Fuel Delivery, Return and Evaporation Lines.>
7) Remove the nuts which install fuel pump assem-
bly onto fuel tank.
8) Remove the fuel pump assembly from the fuel
tank.
B: INSTALLATION
Install in the reverse order of removal.
NOTE:
Use a new gasket.
1. Make sure the sealing portion is free from fuel or
foreign matter before installation.
2. Tighten the nuts to the specified torque in the or-
der as shown in the figure.
Tightening torque:
4.4 N·m (0.45 kgf-m, 3.2 ft-lb)
FU-02681
FU-02669
(A) Delivery hose
(B) Jet pump hose
FU-02670(A)
(B)
FU-01141
1
2
3
4
56
7
8
Page 1607 of 2453
FU(H6DO)-46
Fuel Sub Level Sensor
FUEL INJECTION (FUEL SYSTEMS)
26.Fuel Sub Level Sensor
A: REMOVAL
WARNING:
•Place “NO FIRE” signs near the working area.
•Be careful not to spill fuel on the floor.
1) Drain fuel.
FUEL, PROCEDURE, Fuel.>
2) Remove the second seat.
MOVAL, Second-row Seats.>
3) Remove the service hole cover.
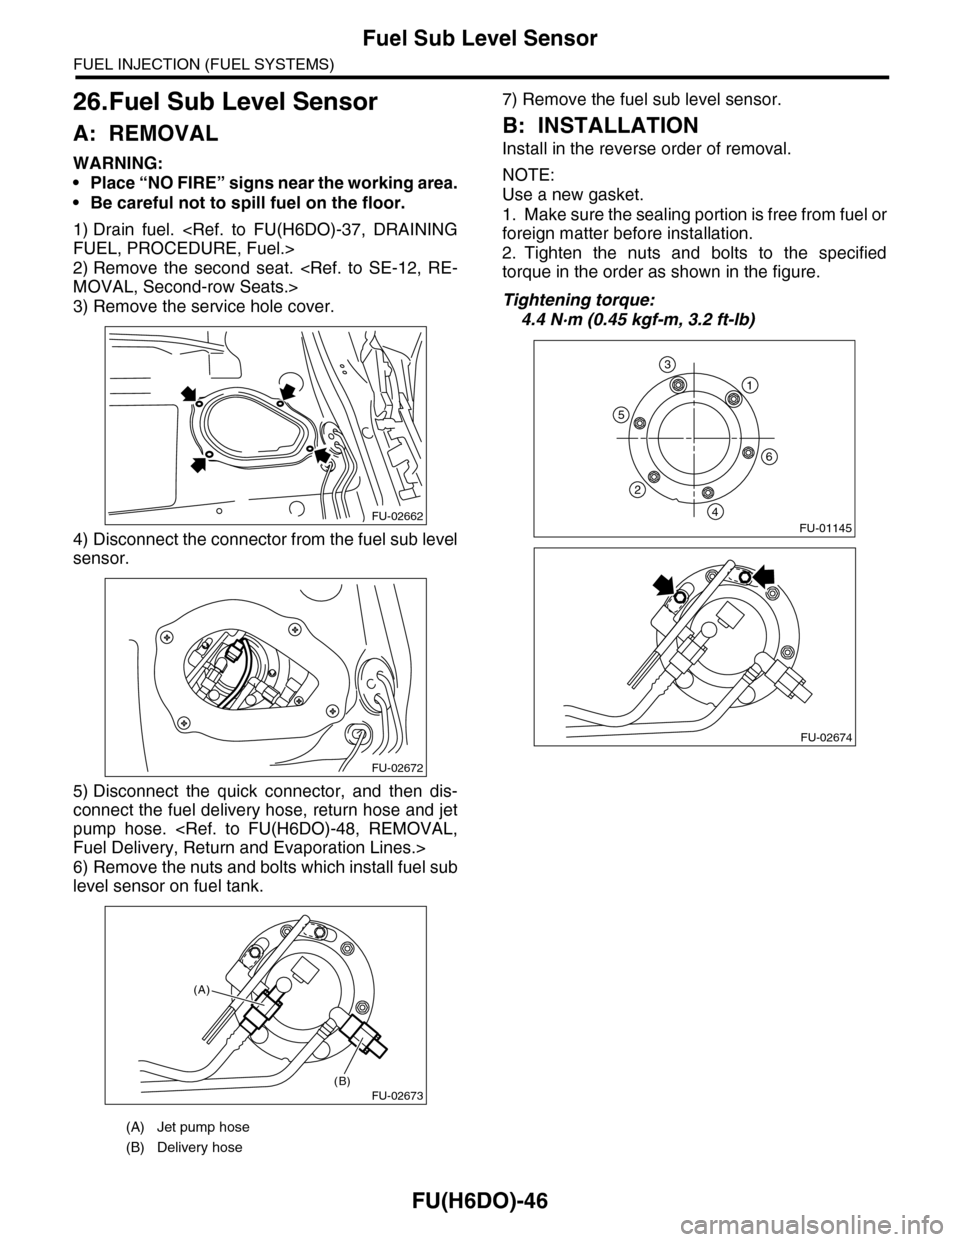
4) Disconnect the connector from the fuel sub level
sensor.
5) Disconnect the quick connector, and then dis-
connect the fuel delivery hose, return hose and jet
pump hose.
Fuel Delivery, Return and Evaporation Lines.>
6) Remove the nuts and bolts which install fuel sub
level sensor on fuel tank.
7) Remove the fuel sub level sensor.
B: INSTALLATION
Install in the reverse order of removal.
NOTE:
Use a new gasket.
1. Make sure the sealing portion is free from fuel or
foreign matter before installation.
2. Tighten the nuts and bolts to the specified
torque in the order as shown in the figure.
Tightening torque:
4.4 N·m (0.45 kgf-m, 3.2 ft-lb)
(A) Jet pump hose
(B) Delivery hose
FU-02662
FU-02672
FU-02673(B)
(A)
FU-01145
1
6
5
2
4
3
FU-02674
Page 1609 of 2453
FU(H6DO)-48
Fuel Delivery, Return and Evaporation Lines
FUEL INJECTION (FUEL SYSTEMS)
28.Fuel Delivery, Return and Evaporation Lines
A: REMOVAL
1) Set the vehicle on a lift.
2) Release the fuel pressure.
Fuel.>
3) Open the fuel filler flap lid, and remove the fuel filler cap.
4) Remove the floor mat.
5) Disconnect the fuel delivery pipe and hose and the evaporation pipe and hose.
6) In the engine compartment, disconnect the fuel
delivery hoses and evaporation hose.
(1) Disconnect the quick connector of the fuel
delivery line by pushing the ST in the direction
of the arrow.
ST 42099AE000 CONNECTOR REMOVER
(2) Remove the clip, and disconnect the evapo-
ration hose from the pipe.
WARNING:
•Be careful not to spill fuel.
•Catch the fuel from hoses using a container
or cloth.
7) Lift-up the vehicle.
8) Remove the fuel tank.
REMOVAL, Fuel Tank.>
FU-02675
Page 1623 of 2453
GD(H6DO)-11
Diagnostic Trouble Code (DTC) Detecting Criteria
GENERAL DESCRIPTION
6. DTC CLEAR CONDITION
•When the OK idling cycle is completed 40 times in a row
•When “Clear Memory” is performed
7. MALFUNCTION INDICATOR LIGHT CLEAR CONDITIONS
•When the OK driving cycle is completed 3 times in a row
•When “Clear Memory” is performed
8. FAIL SAFE
Make the oil flow control solenoid valve driving duty a predetermined value (9.36%).
9. ECM OPERATION AT DTC SETTING
Memorize the freeze frame data. (For test mode $02)
B: DTC P0016 CRANKSHAFT POSITION - CAMSHAFT POSITION CORRELA-
TION (BANK 1)
NOTE:
For the diagnostic procedure, refer to DTC P0011.
POSITION TIMING - OVER-ADVANCED (BANK 1), Diagnostic Trouble Code (DTC) Detecting Criteria.>
C: DTC P0018 CRANKSHAFT POSITION - CAMSHAFT POSITION CORRELA-
TION (BANK 2)
NOTE:
For the diagnostic procedure, refer to DTC P0011.
POSITION TIMING - OVER-ADVANCED (BANK 1), Diagnostic Trouble Code (DTC) Detecting Criteria.>
D: DTC P0021 INTAKE CAMSHAFT POSITION TIMING - OVER-ADVANCED
(BANK 2)
NOTE:
For the diagnostic procedure, refer to DTC P0011.
POSITION TIMING - OVER-ADVANCED (BANK 1), Diagnostic Trouble Code (DTC) Detecting Criteria.>