2009 SUBARU TRIBECA power steering
[x] Cancel search: power steeringPage 919 of 2453

PS-39
Pipe Assembly
POWER ASSISTED SYSTEM (POWER STEERING)
C: INSPECTION
Check all disassembled parts for wear, damage or other problems. Repair or replace the defective parts as
necessary.
CAUTION:
Although the surface layer materials of rubber hoses have excellent weathering resistance, heat re-
sistance and resistance for low temperature brittleness, they are likely to be damaged chemically by
brake fluid, battery electrolyte, engine oil and automatic transmission fluid and their service lives are
to be very shortened. Wipe off hoses immediately if any of these come into contact with the hoses.
Since resistances for heat or low temperature brittleness are gradually declining according to time
accumulation of hot or cold conditions for the hoses and their service lives are shortening accord-
ingly, it is necessary to perform careful inspection frequently when the vehicle is used in hot weather
areas, cold weather areas and a driving condition in which many steering operations are required in
short time.
Particularly continuous work of relief valve over 5 seconds causes to reduce service lives of the hos-
es, the oil pump, the fluid, etc. due to over heat.
Par t Maintenance par ts Corrective action
Pipe
•O–ring fitting surface damage
•Nut damage
•Pipe damage
Replace with a new part.
Clamp • Loose clamps Replace with a new part.
Hose
•Flare surface damage
•Flare nut damage
•Outer surface cracks
•Outer surface wear
•Clip damage
•End coupling or adapter for deformation
Replace with a new part.
Tr o u b l e P o s s i b l e c a u s e C o r r e c t i v e a c t i o n
Pressure hose burst
Excessive holding time of relief status Instruct customers.
Malfunction of the relief valve Replace the oil pump.
Poor cold character istic of fluid R eplace fluid.
Disconnection of the return
hose
Improper connection Repair.
Loosening of the clip Retighten.
Poor cold character istic of fluid R eplace fluid.
Fluid slightly leaking out of
hose
Wrong layout, tensioned Replace the hose.
Excessive play of engine due to deterioration of
engine mounting rubberReplace the parts if defective.
Improper stop position of pitching stopper Replace the parts if defective.
Crack on hose
Excessive holding time of relief statusReplace.
Instruct customers.
Excessive tightening torque for return hose clip Replace.
Power steer ing fluid, engine oil, electrolyte adhere
on the hose surface
Replace.
Be careful during service work.
To o m a n y u s e s i n e x t r e m e l y c o l d w e a t h e rReplace.
Instruct customers.
Page 920 of 2453
PS-40
Pipe Assembly
POWER ASSISTED SYSTEM (POWER STEERING)
NOTE:
There are conditions in which a fluid leak is diagnosed, but is not actually leaking. This is because the fluid
spilt during the last maintenance was not completely wiped off. Be sure to wipe off spilt fluid thoroughly after
maintenance.
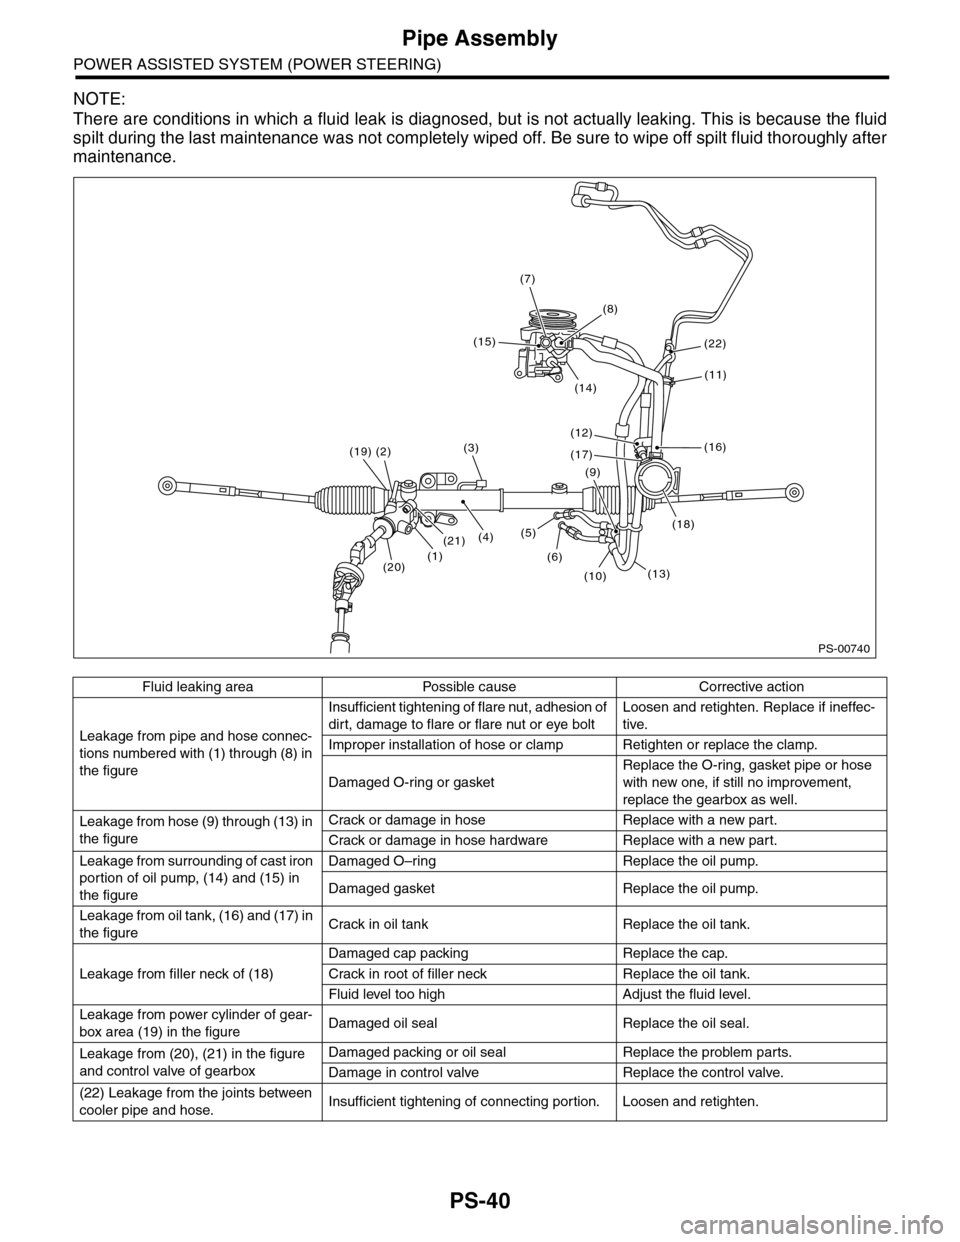
Fluid leaking area Possible cause Corrective action
Leakage from pipe and hose connec-
tions numbered with (1) through (8) in
the figure
Insufficient tightening of flare nut, adhesion of
dirt, damage to flare or flare nut or eye bolt
Loosen and retighten. Replace if ineffec-
tive.
Improper installation of hose or clamp Retighten or replace the clamp.
Damaged O-ring or gasket
Replace the O-ring, gasket pipe or hose
with new one, if still no improvement,
replace the gearbox as well.
Leakage from hose (9) through (13) in
the figure
Crack or damage in hose Replace with a new part.
Crack or damage in hose hardware Replace with a new part.
Leakage from surrounding of cast iron
portion of oil pump, (14) and (15) in
the figure
Damaged O–ring Replace the oil pump.
Damaged gasket Replace the oil pump.
Leakage from oil tank, (16) and (17) in
the figureCrack in oil tank Replace the oil tank.
Leakage from filler neck of (18)
Damaged cap packing Replace the cap.
Crack in root of filler neck Replace the oil tank.
Fluid level too high Adjust the fluid level.
Leakage from power cylinder of gear-
box area (19) in the figureDamaged oil seal Replace the oil seal.
Leakage from (20), (21) in the figure
and control valve of gearbox
Damaged packing or oil seal Replace the problem parts.
Damage in control valve Replace the control valve.
(22) Leakage from the joints between
cooler pipe and hose.Insufficient tightening of connecting portion. Loosen and retighten.
PS-00740
(1)
(19)
(4)
(2)
(7)
(20)
(3)
(21)
(15)
(8)
(14)
(12)
(17)
(9)
(5)
(6)
(10)(13)
(18)
(16)
(11)
(22)
Page 921 of 2453
PS-41
Oil Pump
POWER ASSISTED SYSTEM (POWER STEERING)
7. Oil Pump
A: REMOVAL
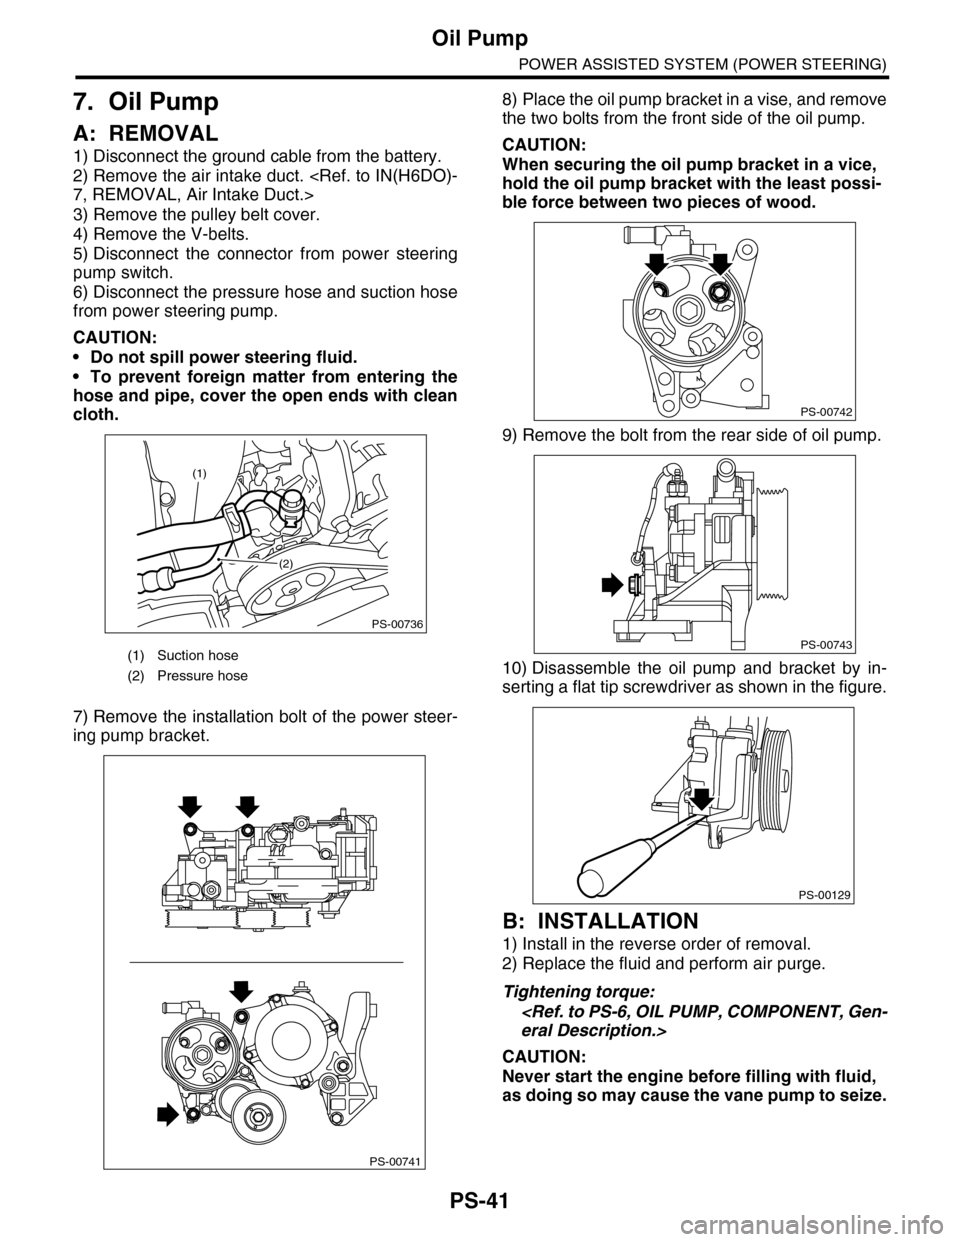
1) Disconnect the ground cable from the battery.
2) Remove the air intake duct.
3) Remove the pulley belt cover.
4) Remove the V-belts.
5) Disconnect the connector from power steering
pump switch.
6) Disconnect the pressure hose and suction hose
from power steering pump.
CAUTION:
•Do not spill power steering fluid.
•To prevent foreign matter from entering the
hose and pipe, cover the open ends with clean
cloth.
7) Remove the installation bolt of the power steer-
ing pump bracket.
8) Place the oil pump bracket in a vise, and remove
the two bolts from the front side of the oil pump.
CAUTION:
When securing the oil pump bracket in a vice,
hold the oil pump bracket with the least possi-
ble force between two pieces of wood.
9) Remove the bolt from the rear side of oil pump.
10) Disassemble the oil pump and bracket by in-
serting a flat tip screwdriver as shown in the figure.
B: INSTALLATION
1) Install in the reverse order of removal.
2) Replace the fluid and perform air purge.
Tightening torque:
CAUTION:
Never start the engine before filling with fluid,
as doing so may cause the vane pump to seize.
(1) Suction hose
(2) Pressure hose
PS-00736
(1)
(2)
PS-00741
PS-00742
PS-00743
PS-00129
Page 922 of 2453
PS-42
Oil Pump
POWER ASSISTED SYSTEM (POWER STEERING)
C: DISASSEMBLY
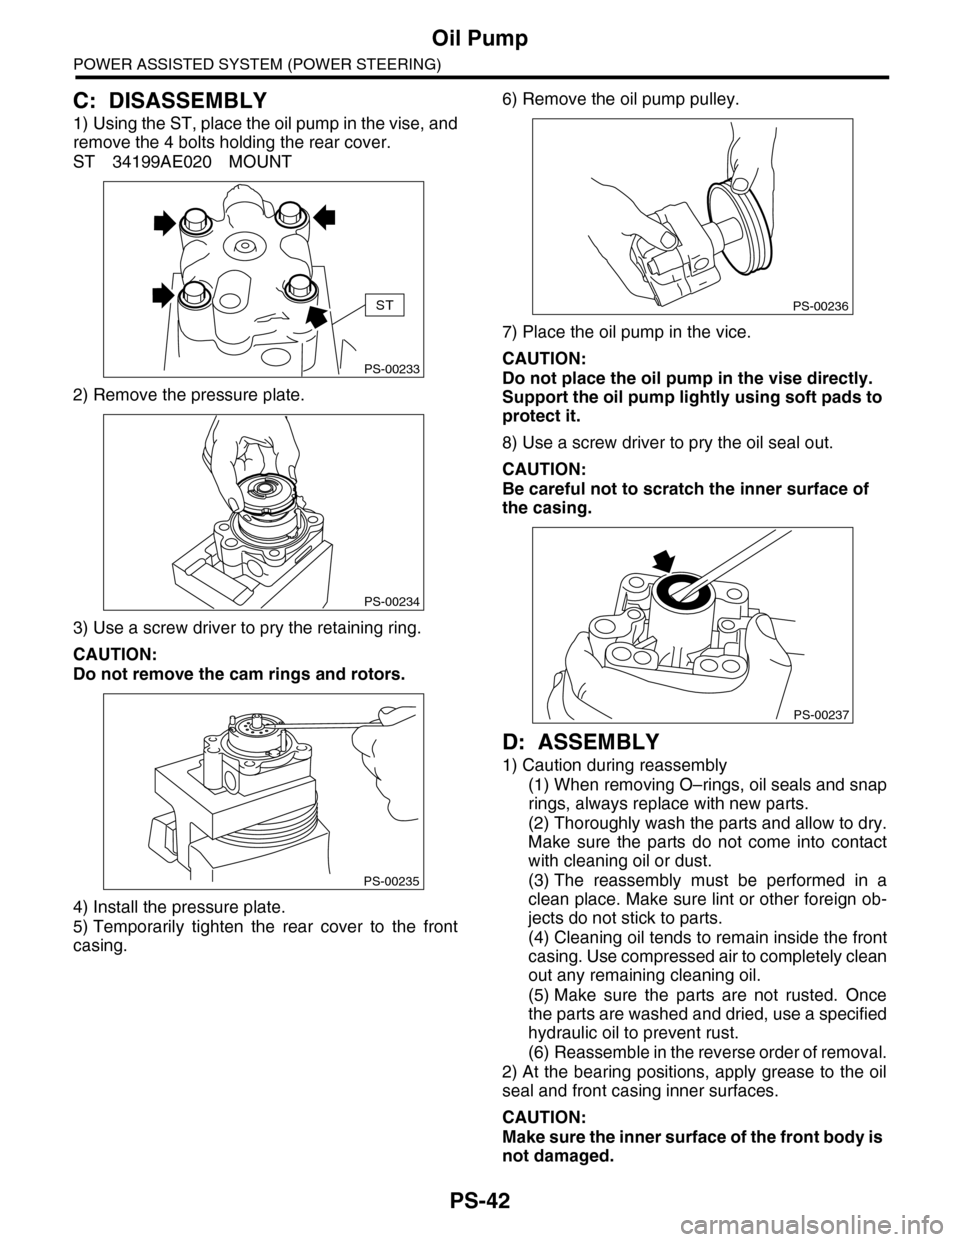
1) Using the ST, place the oil pump in the vise, and
remove the 4 bolts holding the rear cover.
ST 34199AE020 MOUNT
2) Remove the pressure plate.
3) Use a screw driver to pry the retaining ring.
CAUTION:
Do not remove the cam rings and rotors.
4) Install the pressure plate.
5) Temporarily tighten the rear cover to the front
casing.
6) Remove the oil pump pulley.
7) Place the oil pump in the vice.
CAUTION:
Do not place the oil pump in the vise directly.
Support the oil pump lightly using soft pads to
protect it.
8) Use a screw driver to pry the oil seal out.
CAUTION:
Be careful not to scratch the inner surface of
the casing.
D: ASSEMBLY
1) Caution during reassembly
(1) When removing O–rings, oil seals and snap
rings, always replace with new parts.
(2) Thoroughly wash the parts and allow to dry.
Make sure the parts do not come into contact
with cleaning oil or dust.
(3) The reassembly must be performed in a
clean place. Make sure lint or other foreign ob-
jects do not stick to parts.
(4) Cleaning oil tends to remain inside the front
casing. Use compressed air to completely clean
out any remaining cleaning oil.
(5) Make sure the parts are not rusted. Once
the parts are washed and dried, use a specified
hydraulic oil to prevent rust.
(6) Reassemble in the reverse order of removal.
2) At the bearing positions, apply grease to the oil
seal and front casing inner surfaces.
CAUTION:
Make sure the inner surface of the front body is
not damaged.
PS-00233
ST
PS-00234
PS-00235
PS-00236
PS-00237
Page 923 of 2453
PS-43
Oil Pump
POWER ASSISTED SYSTEM (POWER STEERING)
3) Temporarily tighten the rear cover to the front
body.
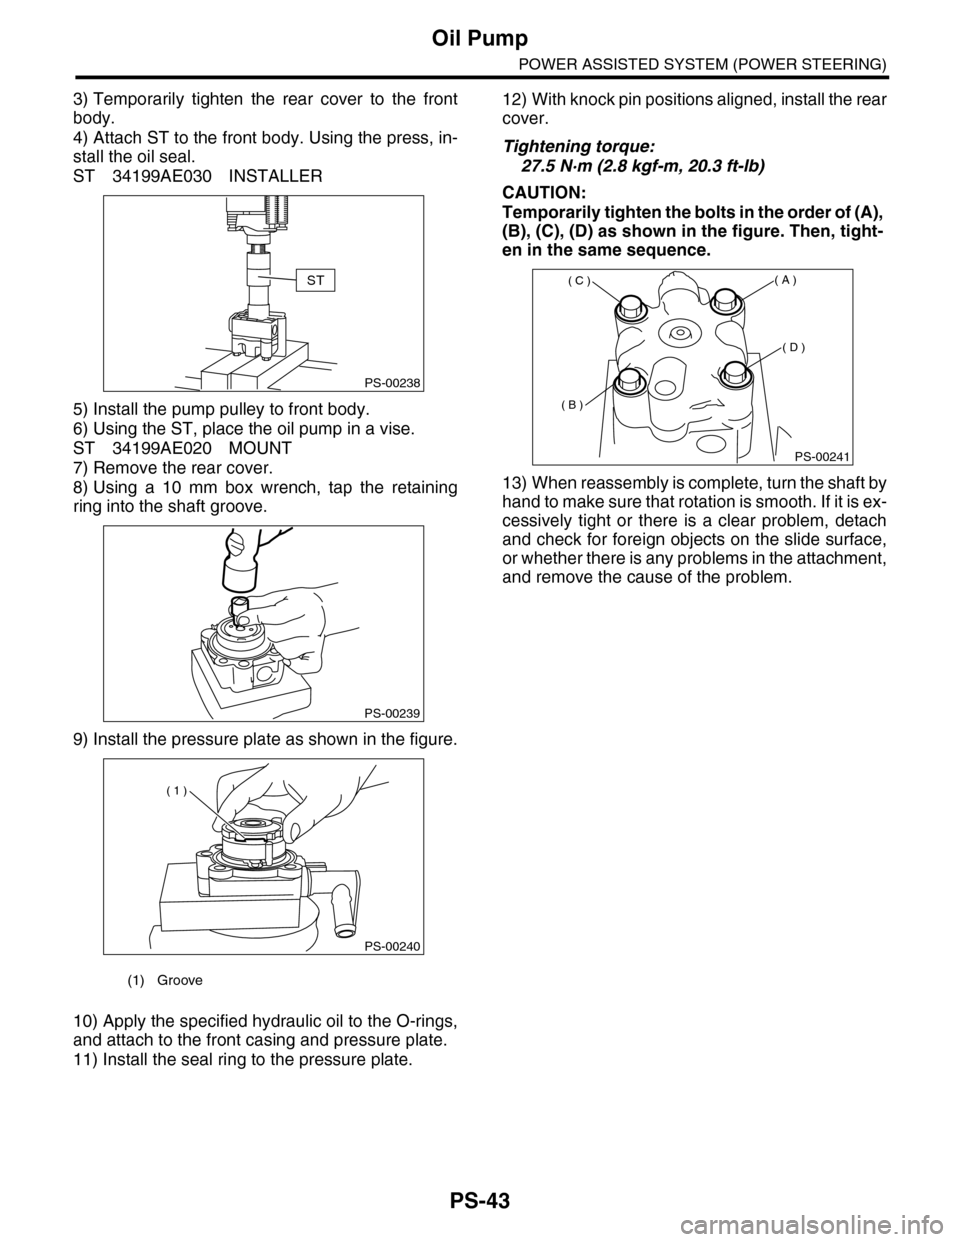
4) Attach ST to the front body. Using the press, in-
stall the oil seal.
ST 34199AE030 INSTALLER
5) Install the pump pulley to front body.
6) Using the ST, place the oil pump in a vise.
ST 34199AE020 MOUNT
7) Remove the rear cover.
8) Using a 10 mm box wrench, tap the retaining
ring into the shaft groove.
9) Install the pressure plate as shown in the figure.
10) Apply the specified hydraulic oil to the O-rings,
and attach to the front casing and pressure plate.
11) Install the seal ring to the pressure plate.
12) With knock pin positions aligned, install the rear
cover.
Tightening torque:
27.5 N·m (2.8 kgf-m, 20.3 ft-lb)
CAUTION:
Temporarily tighten the bolts in the order of (A),
(B), (C), (D) as shown in the figure. Then, tight-
en in the same sequence.
13) When reassembly is complete, turn the shaft by
hand to make sure that rotation is smooth. If it is ex-
cessively tight or there is a clear problem, detach
and check for foreign objects on the slide surface,
or whether there is any problems in the attachment,
and remove the cause of the problem.
(1) Groove
PS-00238
ST
PS-00239
PS-00240
( 1 )
PS-00241
( A )
( B )
( C )
( D )
Page 924 of 2453

PS-44
Oil Pump
POWER ASSISTED SYSTEM (POWER STEERING)
E: INSPECTION
1. BASIC INSPECTION
Perform the following inspection procedures and replace faulty parts.
2. SERVICE LIMIT
Make a measurements as follows. If it exceeds the
service limit, replace with a new one.
CAUTION:
•When securing the oil pump on a vise, hold
the oil pump with the least possible force be-
tween two pieces of wood.
•Do not set the outside of flow control valve or
pulley on a vise; otherwise outside or pulley
might be deformed. Select properly sized wood
pieces.
1) Play of the pulley shaft
Condition:
P: When applying the force of 9.8 N (1.0 kgf,
2.2 lb)
Service limit:
Play in the radial direction (Direction )
Less than 0.2 mm (0.008 in)
Axial play (Direction )
Less than 0.6 mm (0.024 in)
2) Deflection of the pulley groove
Service limit:
Less than 1.0 mm (0.039 in)
NOTE:
Read the value for one surface of V ditch, and then
the value for another off the dial.
No. Parts Inspection Corrective action
1Oil pump
(Exterior)
(1) Crack, damage or oil leakage Replace the oil pump with a new one.
(2) Play of pulley shaft
Measure the radial play and axial play.
If any of these exceeds the service limit, replace the oil pump
with a new one.
2Pulley
(1) Damage Replace with a new part.
(2) BendMeasure the V groove deflection.
If it exceeds the service limit, replace the pulley with a new one.
3Oil pump
(Interior)
(1) Faulty or seized of vane pumpCheck the rotating resistance of pulley.
If it exceeds the service limit, replace the oil pump with new one.
(2) Bend in the shaft or damage
to bearing
If the a string is wrapped on the pulley and rotated, and the oil
pump emits a noise that is markedly different in tone and loud-
ness from a sound of a new oil pump, replace the oil pump with
a new one.
4O–ring Cracking or deterioration Replace with a new part.
5Bracket Cracking Replace with a new part.
(1) Dial gauge
PS-00145P
(1)
(1) Dial gauge
(1) Dial gauge
PS-00146P
(1)
PS-00147
Page 925 of 2453
PS-45
Oil Pump
POWER ASSISTED SYSTEM (POWER STEERING)
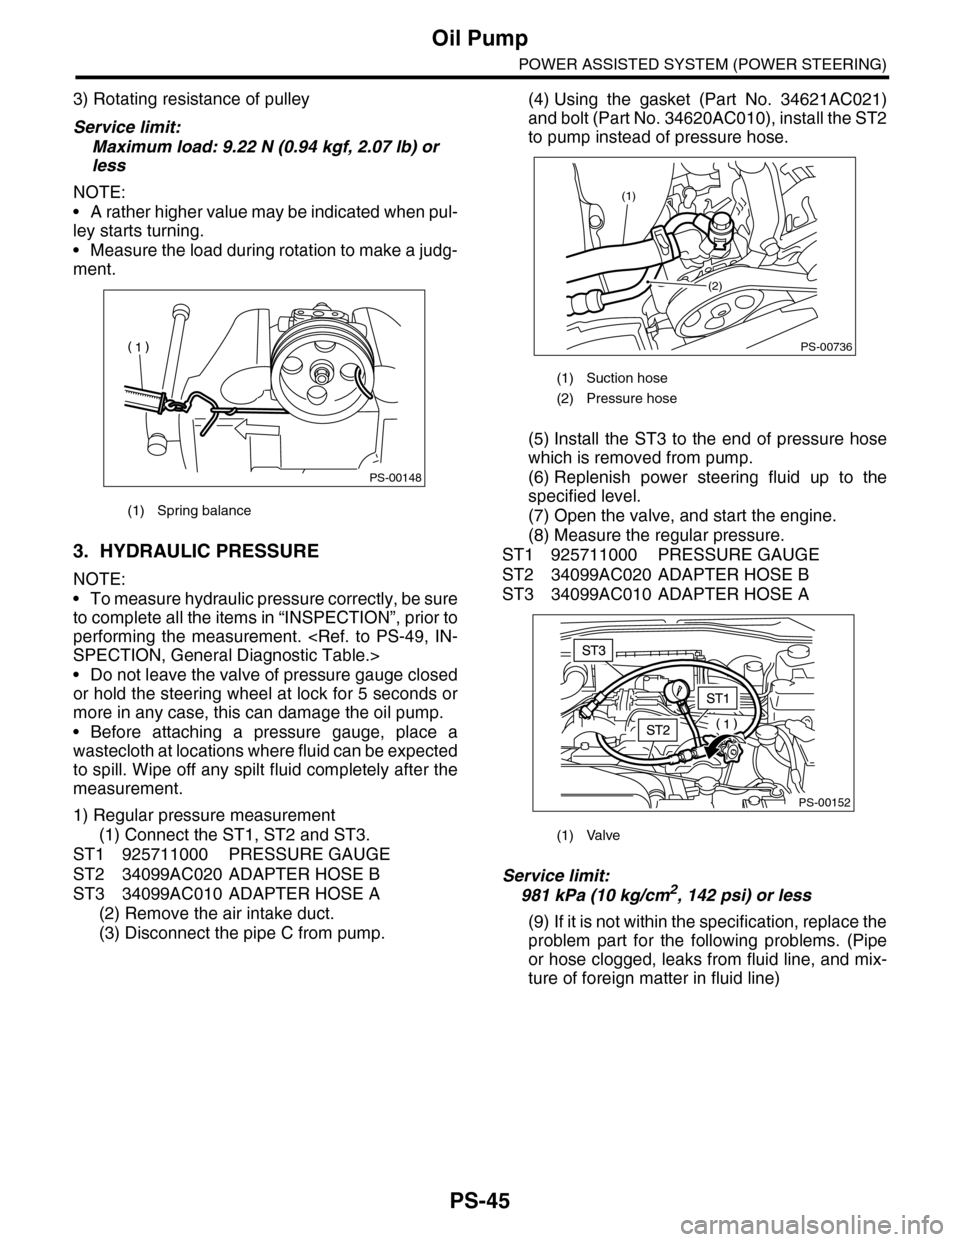
3) Rotating resistance of pulley
Service limit:
Maximum load: 9.22 N (0.94 kgf, 2.07 lb) or
less
NOTE:
•A rather higher value may be indicated when pul-
ley starts turning.
•Measure the load during rotation to make a judg-
ment.
3. HYDRAULIC PRESSURE
NOTE:
•To measure hydraulic pressure correctly, be sure
to complete all the items in “INSPECTION”, prior to
performing the measurement.
•Do not leave the valve of pressure gauge closed
or hold the steering wheel at lock for 5 seconds or
more in any case, this can damage the oil pump.
•Before attaching a pressure gauge, place a
wastecloth at locations where fluid can be expected
to spill. Wipe off any spilt fluid completely after the
measurement.
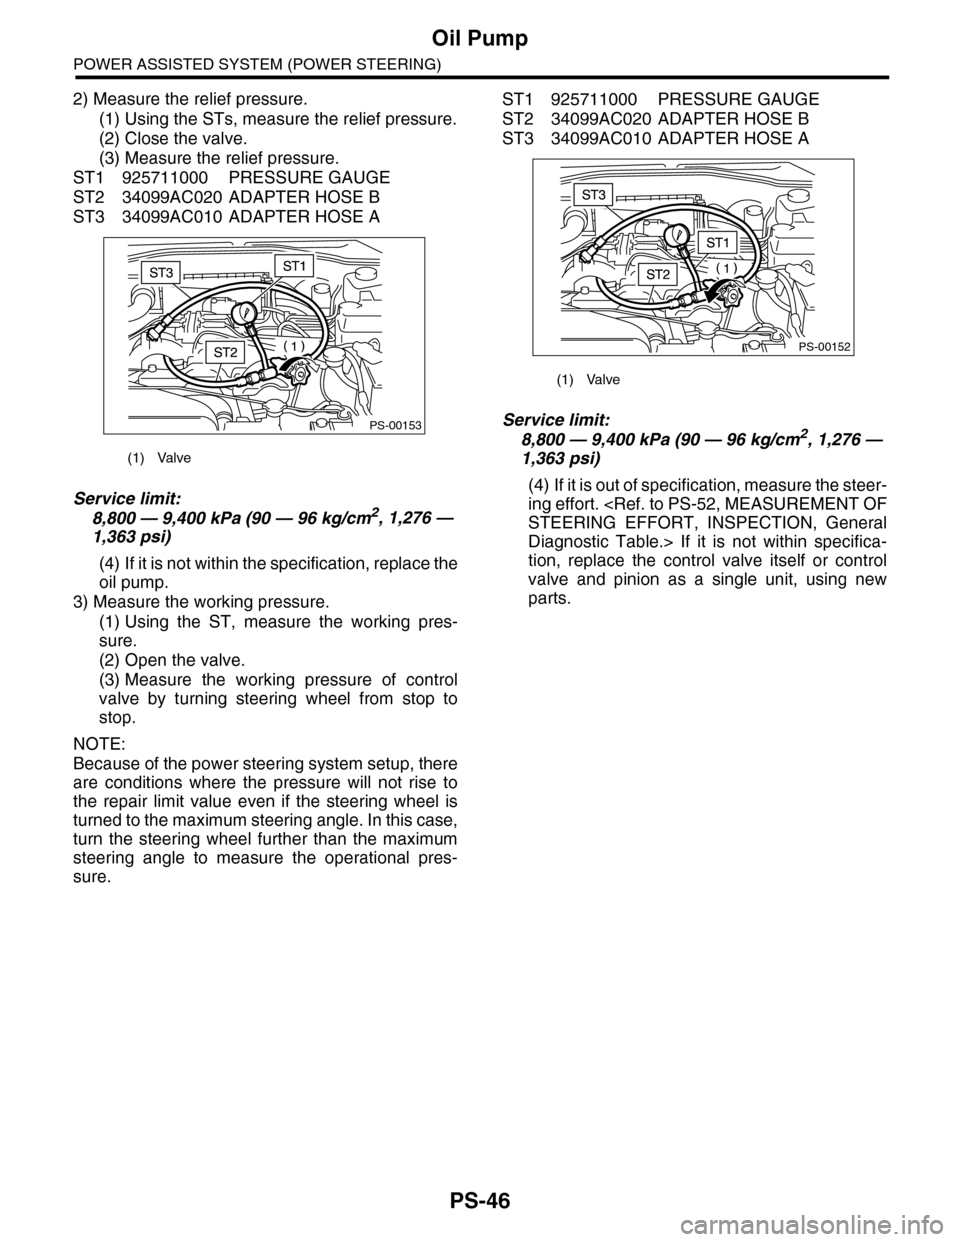
1) Regular pressure measurement
(1) Connect the ST1, ST2 and ST3.
ST1 925711000 PRESSURE GAUGE
ST2 34099AC020 ADAPTER HOSE B
ST3 34099AC010 ADAPTER HOSE A
(2) Remove the air intake duct.
(3) Disconnect the pipe C from pump.
(4) Using the gasket (Part No. 34621AC021)
and bolt (Part No. 34620AC010), install the ST2
to pump instead of pressure hose.
(5) Install the ST3 to the end of pressure hose
which is removed from pump.
(6) Replenish power steering fluid up to the
specified level.
(7) Open the valve, and start the engine.
(8) Measure the regular pressure.
ST1 925711000 PRESSURE GAUGE
ST2 34099AC020 ADAPTER HOSE B
ST3 34099AC010 ADAPTER HOSE A
Service limit:
981 kPa (10 kg/cm2, 142 psi) or less
(9) If it is not within the specification, replace the
problem part for the following problems. (Pipe
or hose clogged, leaks from fluid line, and mix-
ture of foreign matter in fluid line)
(1) Spring balance
PS-00148
(1) Suction hose
(2) Pressure hose
(1) Valve
PS-00736
(1)
(2)
PS-00152
Page 926 of 2453
PS-46
Oil Pump
POWER ASSISTED SYSTEM (POWER STEERING)
2) Measure the relief pressure.
(1) Using the STs, measure the relief pressure.
(2) Close the valve.
(3) Measure the relief pressure.
ST1 925711000 PRESSURE GAUGE
ST2 34099AC020 ADAPTER HOSE B
ST3 34099AC010 ADAPTER HOSE A
Service limit:
8,800 — 9,400 kPa (90 — 96 kg/cm2, 1,276 —
1,363 psi)
(4) If it is not within the specification, replace the
oil pump.
3) Measure the working pressure.
(1) Using the ST, measure the working pres-
sure.
(2) Open the valve.
(3) Measure the working pressure of control
valve by turning steering wheel from stop to
stop.
NOTE:
Because of the power steering system setup, there
are conditions where the pressure will not rise to
the repair limit value even if the steering wheel is
turned to the maximum steering angle. In this case,
turn the steering wheel further than the maximum
steering angle to measure the operational pres-
sure.
ST1 925711000 PRESSURE GAUGE
ST2 34099AC020 ADAPTER HOSE B
ST3 34099AC010 ADAPTER HOSE A
Service limit:
8,800 — 9,400 kPa (90 — 96 kg/cm2, 1,276 —
1,363 psi)
(4) If it is out of specification, measure the steer-
ing effort.
Diagnostic Table.> If it is not within specifica-
tion, replace the control valve itself or control
valve and pinion as a single unit, using new
parts.
(1) Valve
PS-00153
(1) Valve
PS-00152