2009 SUBARU TRIBECA Oil spec
[x] Cancel search: Oil specPage 2018 of 2453
5AT-2
General Description
AUTOMATIC TRANSMISSION
1. General Description
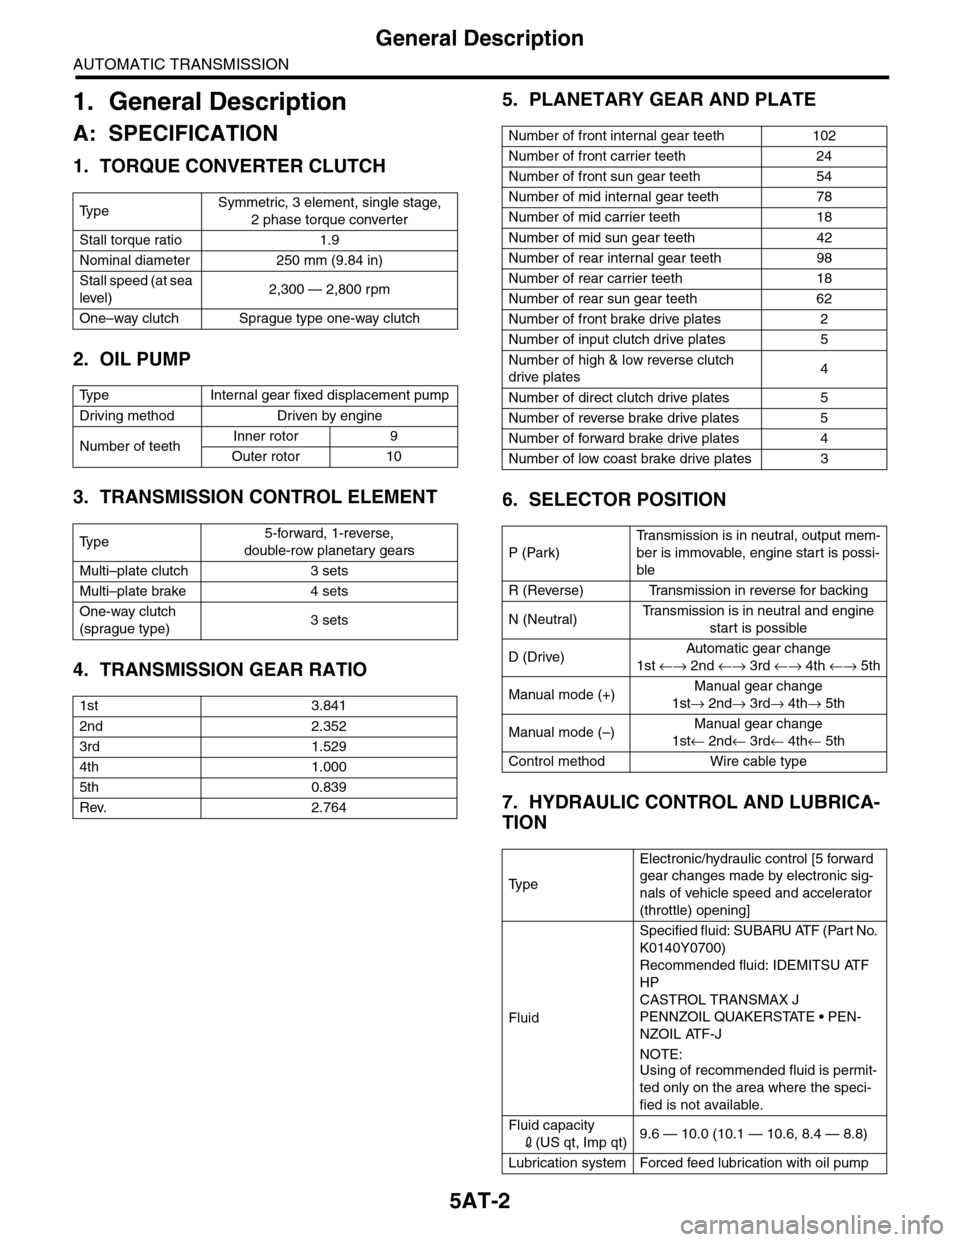
A: SPECIFICATION
1. TORQUE CONVERTER CLUTCH
2. OIL PUMP
3. TRANSMISSION CONTROL ELEMENT
4. TRANSMISSION GEAR RATIO
5. PLANETARY GEAR AND PLATE
6. SELECTOR POSITION
7. HYDRAULIC CONTROL AND LUBRICA-
TION
Ty p eSymmetric, 3 element, single stage,
2 phase torque converter
Stall torque ratio 1.9
Nominal diameter 250 mm (9.84 in)
Stall speed (at sea
level)2,300 — 2,800 rpm
One–way clutch Sprague type one-way clutch
Ty p e I n t e r n a l g e a r f i x e d d i s p l a c e m e n t p u m p
Driving method Driven by engine
Number of teethInner rotor 9
Outer rotor 10
Ty p e5-forward, 1-reverse,
double-row planetary gears
Multi–plate clutch 3 sets
Multi–plate brake 4 sets
One-way clutch
(sprague type)3 sets
1st 3.841
2nd 2.352
3rd 1.529
4th 1.000
5th 0.839
Rev. 2.764
Number of front internal gear teeth 102
Number of front carrier teeth 24
Number of front sun gear teeth 54
Number of mid internal gear teeth 78
Number of mid carrier teeth 18
Number of mid sun gear teeth 42
Number of rear internal gear teeth 98
Number of rear carrier teeth 18
Number of rear sun gear teeth 62
Number of front brake drive plates 2
Number of input clutch drive plates 5
Number of high & low reverse clutch
drive plates4
Number of direct clutch drive plates 5
Number of reverse brake drive plates 5
Number of forward brake drive plates 4
Number of low coast brake drive plates 3
P (Park)
Tr a n s m i s s i o n i s i n n e u t r a l , o u t p u t m e m -
ber is immovable, engine start is possi-
ble
R (Reverse) Transmission in reverse for backing
N (Neutral)Tr a n s m i s s i o n i s i n n e u t r a l a n d e n g i n e
start is possible
D (Drive)Automatic gear change
1st ←→ 2nd ←→ 3rd ←→ 4th ←→ 5th
Manual mode (+)Manual gear change
1st→ 2nd→ 3rd→ 4th→ 5th
Manual mode (–)Manual gear change
1st← 2nd← 3rd← 4th← 5th
Control method Wire cable type
Ty p e
Electronic/hydraulic control [5 forward
gear changes made by electronic sig-
nals of vehicle speed and accelerator
(throttle) opening]
Fluid
Specified fluid: SUBARU ATF (Part No.
K0140Y0700)
Recommended fluid: IDEMITSU ATF
HP
CASTROL TRANSMAX J
PENNZOIL QUAKERSTATE • PEN-
NZOIL ATF-J
NOTE:
Using of recommended fluid is permit-
ted only on the area where the speci-
fied is not available.
Fluid capacity
2(US qt, Imp qt)9.6 — 10.0 (10.1 — 10.6, 8.4 — 8.8)
Lubrication system Forced feed lubrication with oil pump
Page 2033 of 2453
5AT-17
General Description
AUTOMATIC TRANSMISSION
C: CAUTION
•Wear work clothing, including a cap, protective goggles and protective shoes during operation.
•Remove contamination including dirt and corrosion before removal, installation or disassembly.
•Keep the disassembled parts in order and protect them from dust and dirt.
•Until the oil pan is removed, do not place with the oil pan side facing up to prevent foreign matter from en-
tering the valve body.
•Before removal, installation or disassembly, be sure to clarify the failure. Avoid unnecessary removal, dis-
assembly and replacement.
•When disassembling the case and other light alloy parts, disassemble them by slightly tapping with a plas-
tic hammer. Do not pry apart with screwdrivers or other tools.
•Be careful not to burn yourself, because each part on the vehicle is hot after running.
•Use SUBARU genuine gear oil, grease or the equivalent. Do not mix them with that of another grade or
from other manufacturers.
•Be sure to tighten bolts and nuts to the specified torque.
•Place shop jacks or rigid racks at the specified points.
•Apply gear oil onto sliding or revolution surfaces before installation.
•Replace deformed or damaged snap rings with new parts.
•Before installing O-rings or oil seals, apply sufficient amount of ATF fluid to avoid damage and deforma-
tion.
•Be careful not to incorrectly install or fail to install O-rings, snap rings and other such parts.
•Before securing a part on a vise, place cushioning material such as wood blocks, aluminum plate, or cloth
between the part and the vise.
•Avoid damaging the mating surface of the case.
•Before applying liquid gasket, completely remove the old seal.
D: PREPARATION TOOL
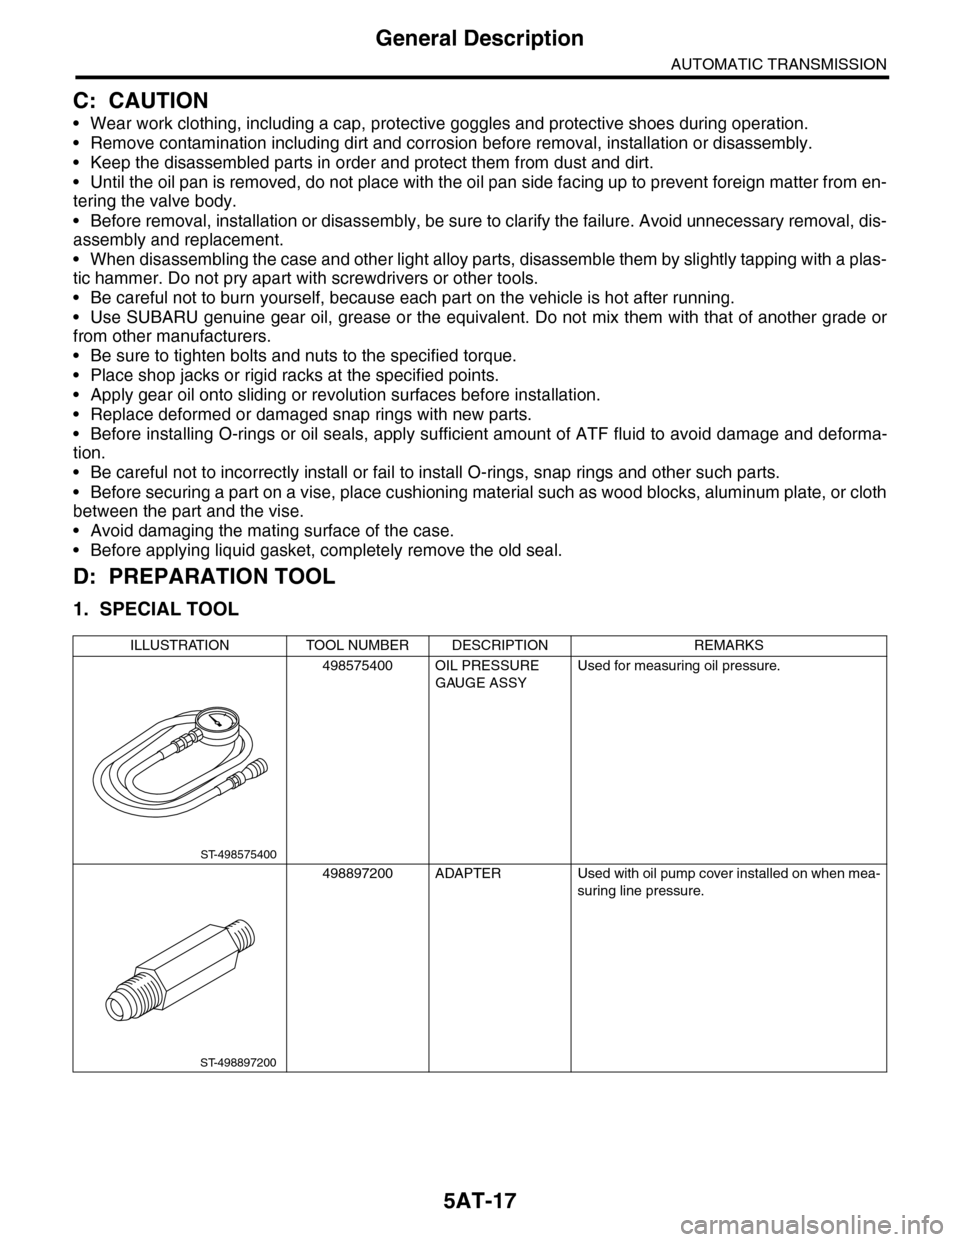
1. SPECIAL TOOL
ILLUSTRATION TOOL NUMBER DESCRIPTION REMARKS
498575400 OIL PRESSURE
GAUGE ASSY
Used for measuring oil pressure.
498897200 ADAPTER Used with oil pump cover installed on when mea-
suring line pressure.
ST-498575400
ST-498897200
Page 2040 of 2453
5AT-24
General Description
AUTOMATIC TRANSMISSION
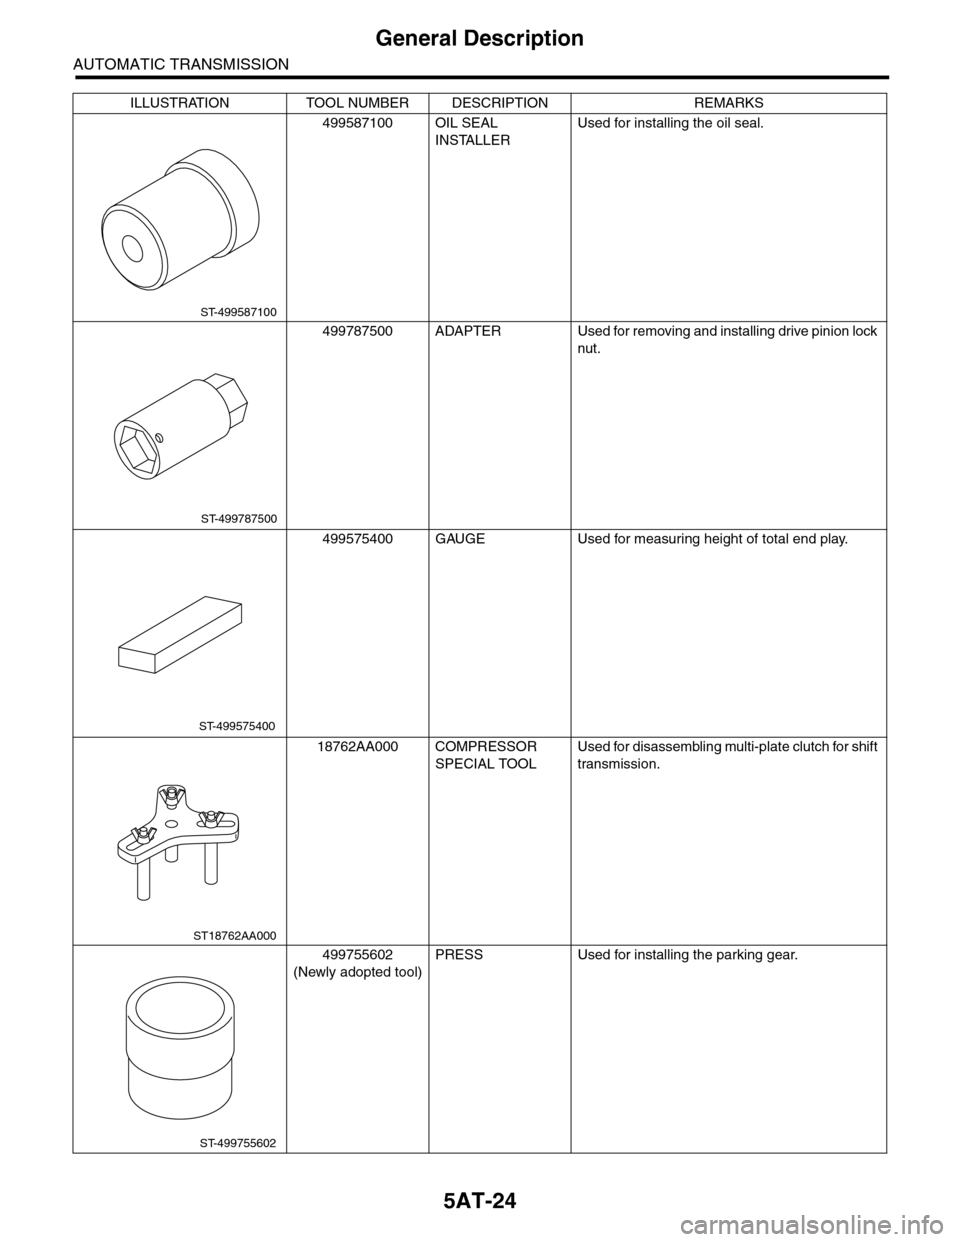
499587100 OIL SEAL
INSTALLER
Used for installing the oil seal.
499787500 ADAPTER Used for removing and installing drive pinion lock
nut.
499575400 GAUGE Used for measuring height of total end play.
18762AA000 COMPRESSOR
SPECIAL TOOL
Used for disassembling multi-plate clutch for shift
transmission.
499755602
(Newly adopted tool)
PRESS Used for installing the parking gear.
ILLUSTRATION TOOL NUMBER DESCRIPTION REMARKS
ST-499587100
ST-499787500
ST-499575400
ST18762AA000
ST-499755602
Page 2042 of 2453
5AT-26
Automatic Transmission Fluid
AUTOMATIC TRANSMISSION
2. Automatic Transmission Fluid
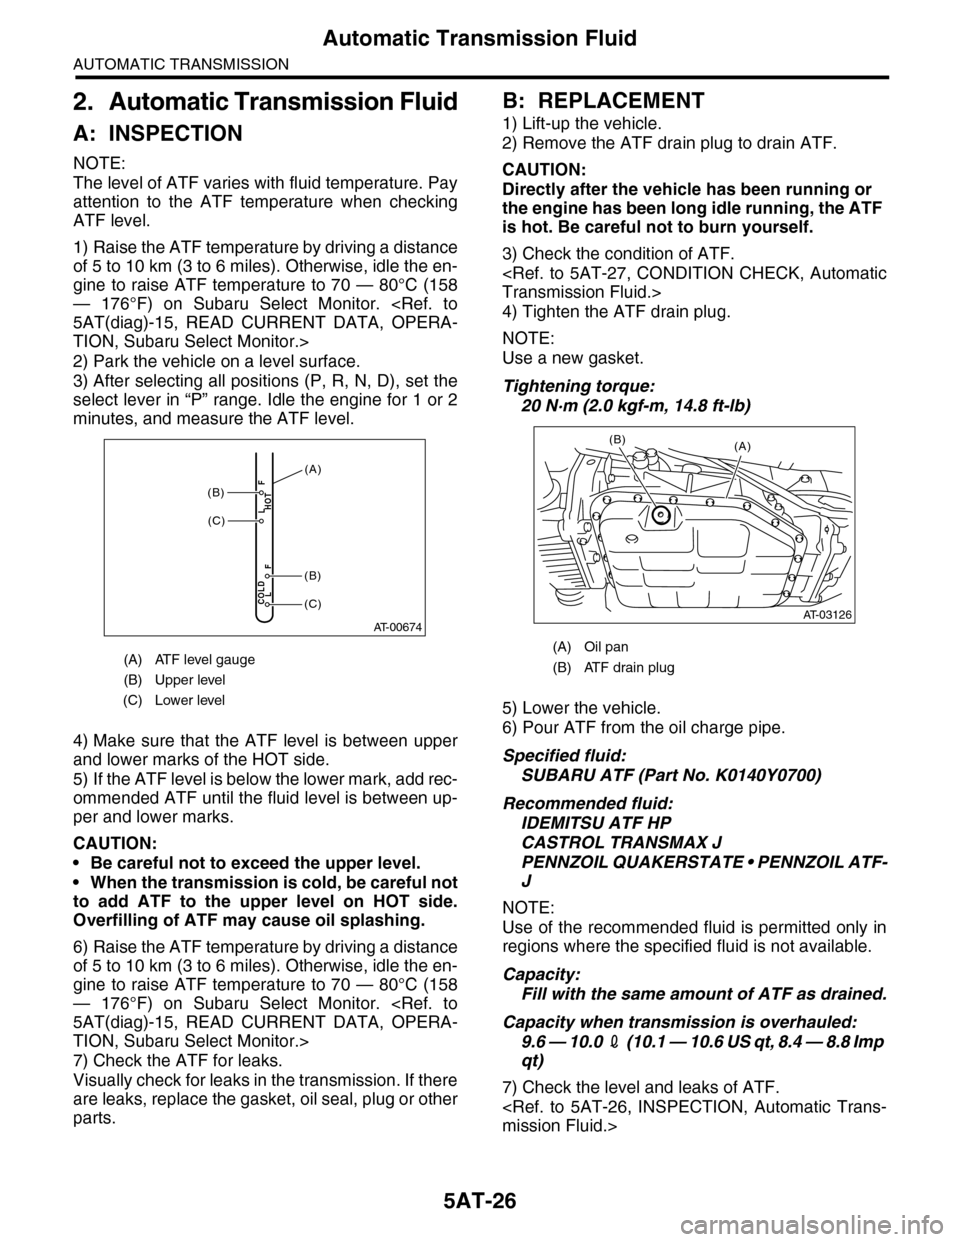
A: INSPECTION
NOTE:
The level of ATF varies with fluid temperature. Pay
attention to the ATF temperature when checking
ATF level.
1) Raise the ATF temperature by driving a distance
of 5 to 10 km (3 to 6 miles). Otherwise, idle the en-
gine to raise ATF temperature to 70 — 80°C (158
— 176°F) on Subaru Select Monitor.
TION, Subaru Select Monitor.>
2) Park the vehicle on a level surface.
3) After selecting all positions (P, R, N, D), set the
select lever in “P” range. Idle the engine for 1 or 2
minutes, and measure the ATF level.
4) Make sure that the ATF level is between upper
and lower marks of the HOT side.
5) If the ATF level is below the lower mark, add rec-
ommended ATF until the fluid level is between up-
per and lower marks.
CAUTION:
•Be careful not to exceed the upper level.
•When the transmission is cold, be careful not
to add ATF to the upper level on HOT side.
Overfilling of ATF may cause oil splashing.
6) Raise the ATF temperature by driving a distance
of 5 to 10 km (3 to 6 miles). Otherwise, idle the en-
gine to raise ATF temperature to 70 — 80°C (158
— 176°F) on Subaru Select Monitor.
TION, Subaru Select Monitor.>
7) Check the ATF for leaks.
Visually check for leaks in the transmission. If there
are leaks, replace the gasket, oil seal, plug or other
parts.
B: REPLACEMENT
1) Lift-up the vehicle.
2) Remove the ATF drain plug to drain ATF.
CAUTION:
Directly after the vehicle has been running or
the engine has been long idle running, the ATF
is hot. Be careful not to burn yourself.
3) Check the condition of ATF.
4) Tighten the ATF drain plug.
NOTE:
Use a new gasket.
Tightening torque:
20 N·m (2.0 kgf-m, 14.8 ft-lb)
5) Lower the vehicle.
6) Pour ATF from the oil charge pipe.
Specified fluid:
SUBARU ATF (Part No. K0140Y0700)
Recommended fluid:
IDEMITSU ATF HP
CASTROL TRANSMAX J
PENNZOIL QUAKERSTATE • PENNZOIL ATF-
J
NOTE:
Use of the recommended fluid is permitted only in
regions where the specified fluid is not available.
Capacity:
Fill with the same amount of ATF as drained.
Capacity when transmission is overhauled:
9.6 — 10.0 2 ( 1 0 . 1 — 1 0 . 6 U S q t , 8 . 4 — 8 . 8 I m p
qt)
7) Check the level and leaks of ATF.
(A) ATF level gauge
(B) Upper level
(C) Lower level
AT-00674
COLDLF
HOTLF(C)
(C)
(B)
(B)
(A)
(A) Oil pan
(B) ATF drain plug
(A)
AT-03126
(B)
Page 2044 of 2453
5AT-28
Differential Gear Oil
AUTOMATIC TRANSMISSION
3. Differential Gear Oil
A: INSPECTION
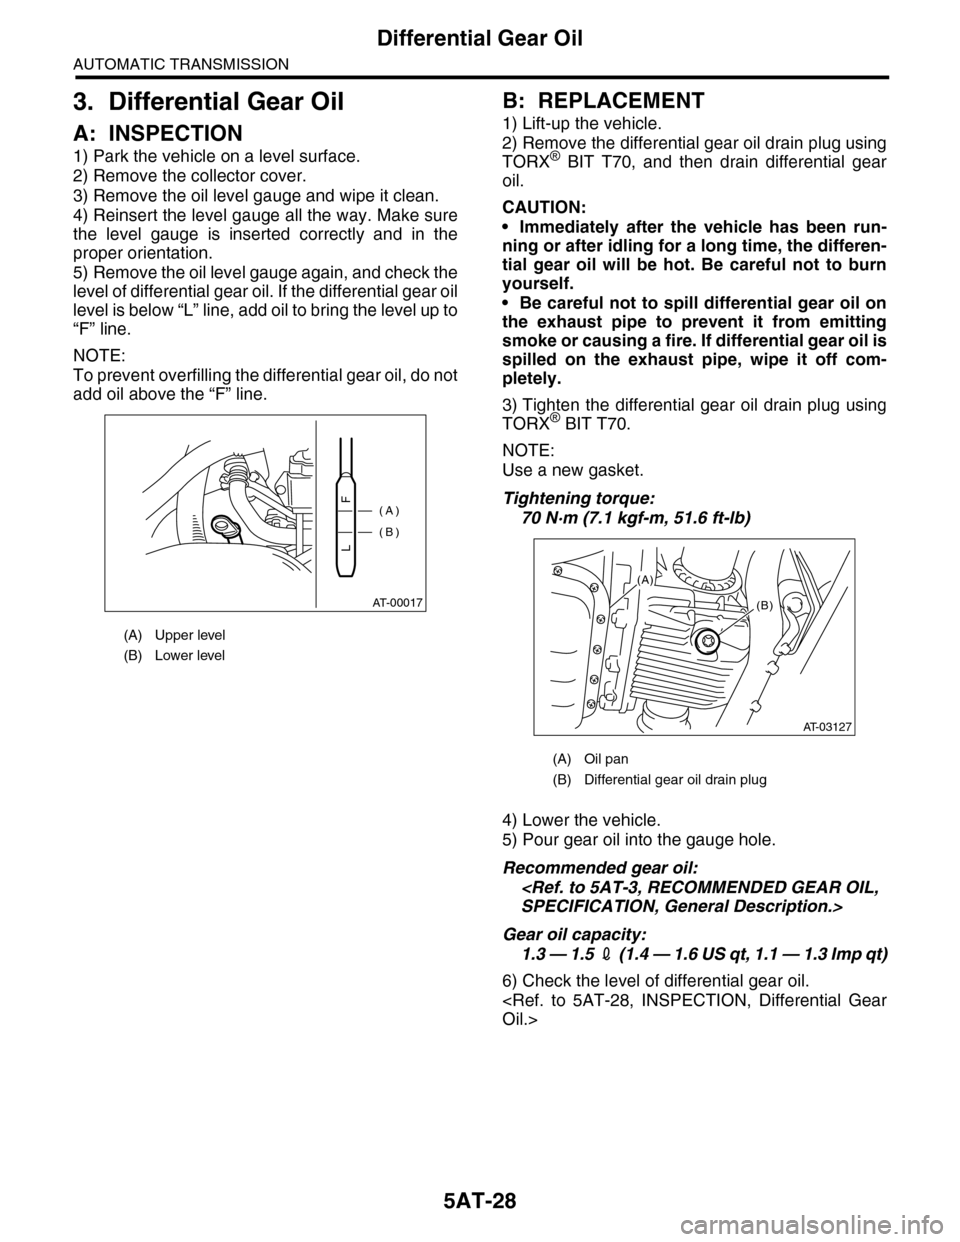
1) Park the vehicle on a level surface.
2) Remove the collector cover.
3) Remove the oil level gauge and wipe it clean.
4) Reinsert the level gauge all the way. Make sure
the level gauge is inserted correctly and in the
proper orientation.
5) Remove the oil level gauge again, and check the
level of differential gear oil. If the differential gear oil
level is below “L” line, add oil to bring the level up to
“F” line.
NOTE:
To prevent overfilling the differential gear oil, do not
add oil above the “F” line.
B: REPLACEMENT
1) Lift-up the vehicle.
2) Remove the differential gear oil drain plug using
TORX® BIT T70, and then drain differential gear
oil.
CAUTION:
•Immediately after the vehicle has been run-
ning or after idling for a long time, the differen-
tial gear oil will be hot. Be careful not to burn
yourself.
•Be careful not to spill differential gear oil on
the exhaust pipe to prevent it from emitting
smoke or causing a fire. If differential gear oil is
spilled on the exhaust pipe, wipe it off com-
pletely.
3) Tighten the differential gear oil drain plug using
TORX® BIT T70.
NOTE:
Use a new gasket.
Tightening torque:
70 N·m (7.1 kgf-m, 51.6 ft-lb)
4) Lower the vehicle.
5) Pour gear oil into the gauge hole.
Recommended gear oil:
Gear oil capacity:
1.3 — 1.5 2 ( 1 . 4 — 1 . 6 U S q t , 1 . 1 — 1 . 3 I m p q t )
6) Check the level of differential gear oil.
(A) Upper level
(B) Lower level
AT-00017
(A)
(B)LF
(A) Oil pan
(B) Differential gear oil drain plug
(B)
AT-03127
(A)
Page 2045 of 2453
5AT-29
Road Test
AUTOMATIC TRANSMISSION
4. Road Test
A: INSPECTION
1. GENERAL PRECAUTION
Road tests should be conducted to properly diag-
nose the condition of automatic transmission.
NOTE:
When performing the test, do not exceed posted
speed limit.
2. D RANGE SHIFT FUNCTION
Check shifting between 1st ←→ 2nd ←→ 3rd ←→
4th ←→ 5th while driving on normal city streets.
3. D RANGE SHIFT SHOCK
Check the shock level when shifting up during nor-
mal driving.
4. KICK–DOWN FUNCTION
Check kick–down for each gear. Check the shock
level during kick–down at the same time.
5. ENGINE BRAKE OPERATION
•Check the 4th gear engine brake when shifting
down from 5th to 4th range while driving in 5th gear
of manual mode [50 to 60 km/h (31 to 37 MPH)].
•Check the 3rd gear engine brake when shifting
down from 4th to 3rd range while driving in 4th gear
of manual mode [50 — 60 km/h (31 — 37 MPH)].
•Check the 2nd gear engine brake when shifting
down from 3rd to 2nd range while driving in 3rd
gear of manual mode [40 — 50 km/h (25 — 31
MPH)].
•Check the 1st gear engine brake when shifting
down from 2nd to 1st range while driving in 2nd
gear of manual mode [20 — 30 km/h (12 — 19
MPH)].
6. P RANGE OPERATION
Stop the vehicle on an uphill grade of 5% or more
and shift to the “P” range. Check that the vehicle
does not move when the parking brake is released.
7. NOISE AND VIBRATION
Check for noise and vibration while driving and dur-
ing shifting.
8. OIL LEAKAGE
After the driving test, inspect for oil leaks from the
transmission body.
Page 2046 of 2453
5AT-30
Stall Test
AUTOMATIC TRANSMISSION
5. Stall Test
A: INSPECTION
NOTE:
The stall test is extremely important in diagnosing
the condition of an automatic transmission and en-
gine. It should be conducted to measure the engine
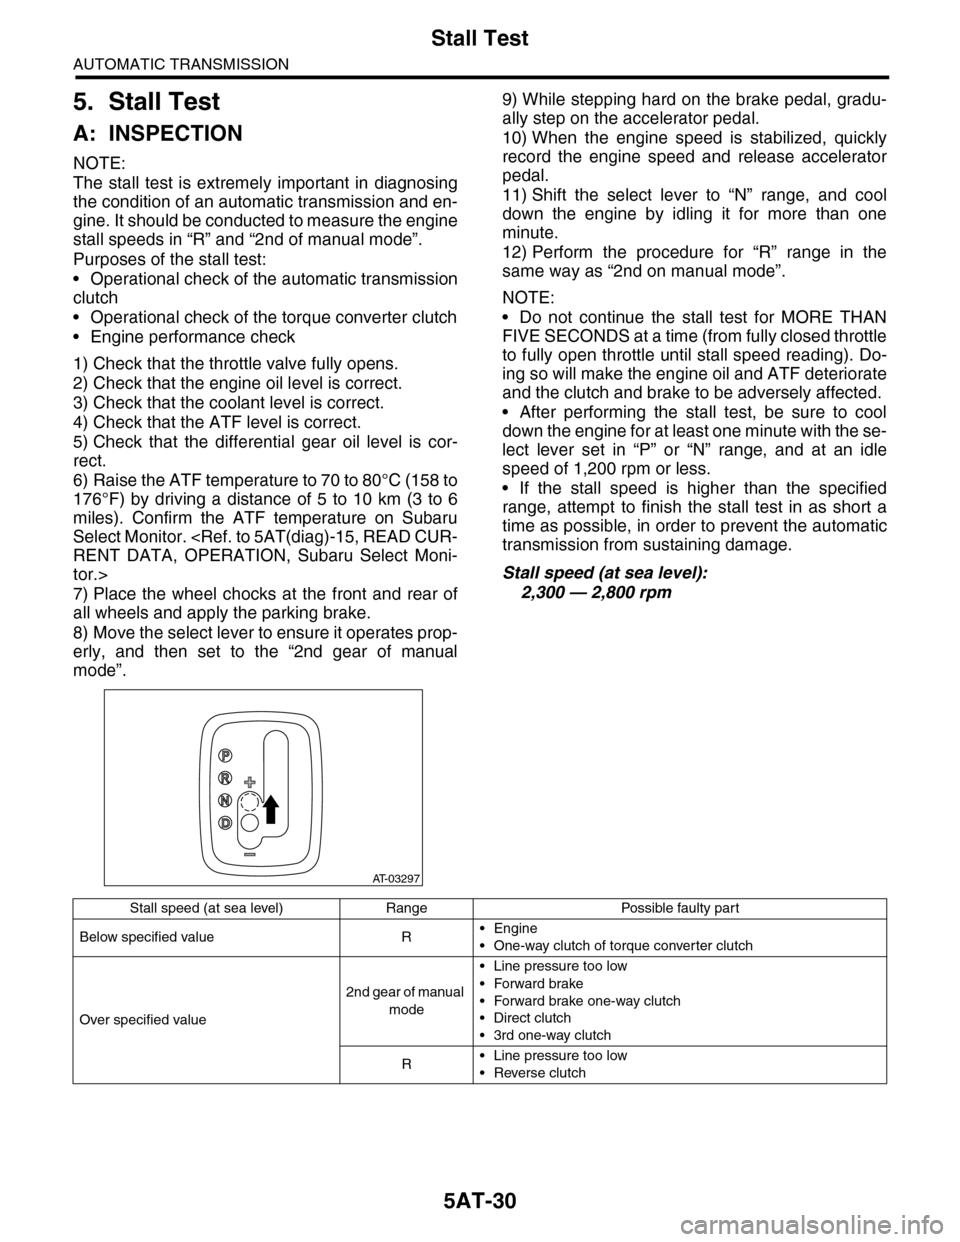
stall speeds in “R” and “2nd of manual mode”.
Purposes of the stall test:
•Operational check of the automatic transmission
clutch
•Operational check of the torque converter clutch
•Engine performance check
1) Check that the throttle valve fully opens.
2) Check that the engine oil level is correct.
3) Check that the coolant level is correct.
4) Check that the ATF level is correct.
5) Check that the differential gear oil level is cor-
rect.
6) Raise the ATF temperature to 70 to 80°C (158 to
176°F) by driving a distance of 5 to 10 km (3 to 6
miles). Confirm the ATF temperature on Subaru
Select Monitor.
tor.>
7) Place the wheel chocks at the front and rear of
all wheels and apply the parking brake.
8) Move the select lever to ensure it operates prop-
erly, and then set to the “2nd gear of manual
mode”.
9) While stepping hard on the brake pedal, gradu-
ally step on the accelerator pedal.
10) When the engine speed is stabilized, quickly
record the engine speed and release accelerator
pedal.
11) Shift the select lever to “N” range, and cool
down the engine by idling it for more than one
minute.
12) Perform the procedure for “R” range in the
same way as “2nd on manual mode”.
NOTE:
•Do not continue the stall test for MORE THAN
FIVE SECONDS at a time (from fully closed throttle
to fully open throttle until stall speed reading). Do-
ing so will make the engine oil and ATF deteriorate
and the clutch and brake to be adversely affected.
•After performing the stall test, be sure to cool
down the engine for at least one minute with the se-
lect lever set in “P” or “N” range, and at an idle
speed of 1,200 rpm or less.
•If the stall speed is higher than the specified
range, attempt to finish the stall test in as short a
time as possible, in order to prevent the automatic
transmission from sustaining damage.
Stall speed (at sea level):
2,300 — 2,800 rpm
AT-03297
Stall speed (at sea level) Range Possible faulty part
Below specified value R•Engine
•One-way clutch of torque converter clutch
Over specified value
2nd gear of manual
mode
•Line pressure too low
•Forward brake
•Forward brake one-way clutch
•Direct clutch
•3rd one-way clutch
R•Line pressure too low
•Reverse clutch
Page 2049 of 2453
5AT-33
Transfer Clutch Pressure Test
AUTOMATIC TRANSMISSION
8. Transfer Clutch Pressure
Test
A: INSPECTION
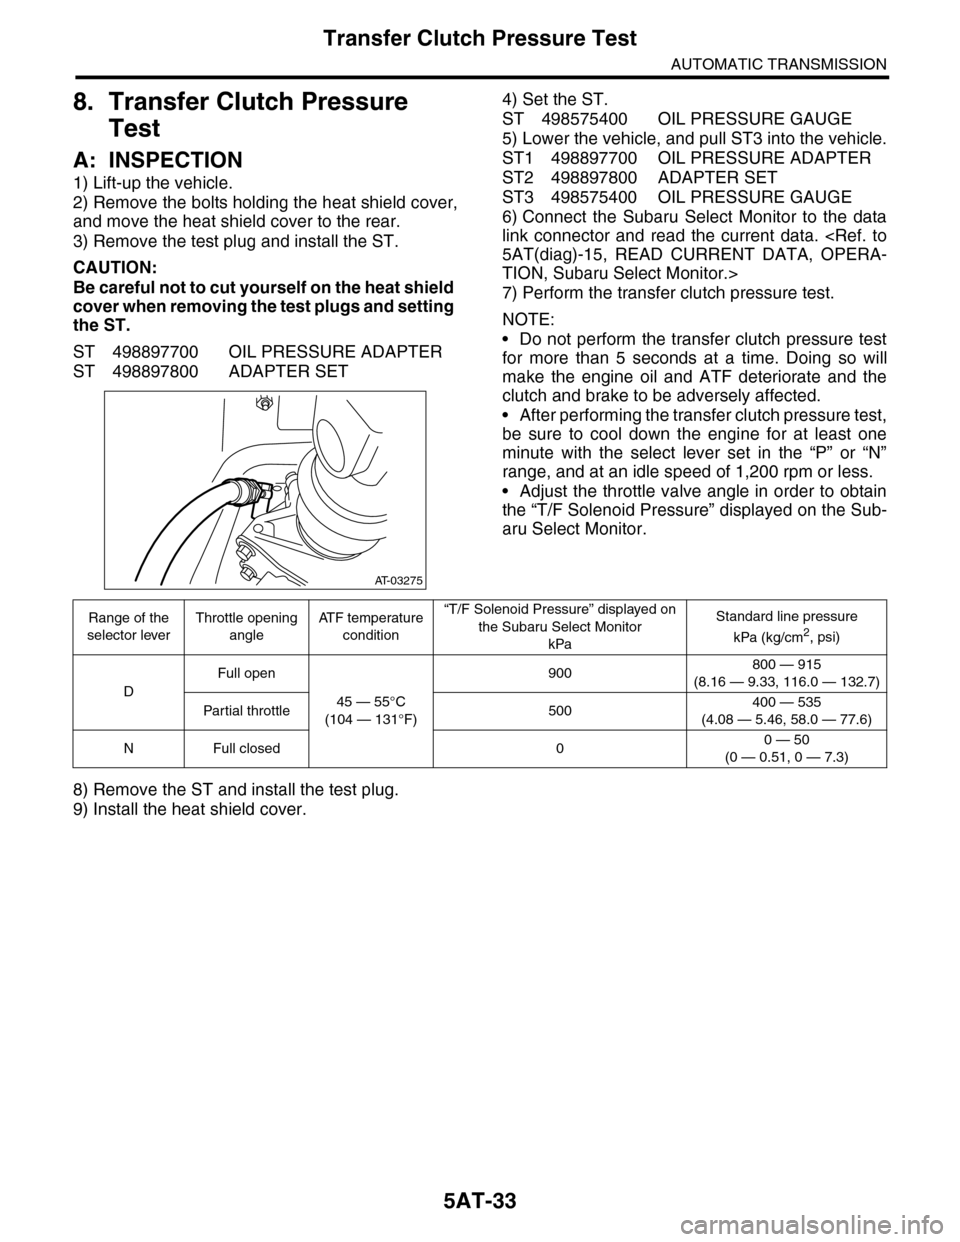
1) Lift-up the vehicle.
2) Remove the bolts holding the heat shield cover,
and move the heat shield cover to the rear.
3) Remove the test plug and install the ST.
CAUTION:
Be careful not to cut yourself on the heat shield
cover when removing the test plugs and setting
the ST.
ST 498897700 OIL PRESSURE ADAPTER
ST 498897800 ADAPTER SET
4) Set the ST.
ST 498575400 OIL PRESSURE GAUGE
5) Lower the vehicle, and pull ST3 into the vehicle.
ST1 498897700 OIL PRESSURE ADAPTER
ST2 498897800 ADAPTER SET
ST3 498575400 OIL PRESSURE GAUGE
6) Connect the Subaru Select Monitor to the data
link connector and read the current data.
TION, Subaru Select Monitor.>
7) Perform the transfer clutch pressure test.
NOTE:
•Do not perform the transfer clutch pressure test
for more than 5 seconds at a time. Doing so will
make the engine oil and ATF deteriorate and the
clutch and brake to be adversely affected.
•After performing the transfer clutch pressure test,
be sure to cool down the engine for at least one
minute with the select lever set in the “P” or “N”
range, and at an idle speed of 1,200 rpm or less.
•Adjust the throttle valve angle in order to obtain
the “T/F Solenoid Pressure” displayed on the Sub-
aru Select Monitor.
8) Remove the ST and install the test plug.
9) Install the heat shield cover.
AT-03275
Range of the
selector lever
Throttle opening
angle
AT F t e m p e r a t u r e
condition
“T/F Solenoid Pressure” displayed on
the Subaru Select Monitor
kPa
Standard line pressure
kPa (kg/cm2, psi)
D
Full open
45 — 55°C
(104 — 131°F)
900800 — 915
(8.16 — 9.33, 116.0 — 132.7)
Par tial throttle 500400 — 535
(4.08 — 5.46, 58.0 — 77.6)
NFull closed 00 — 50
(0 — 0.51, 0 — 7.3)