Page 97 of 224

Starting-off and Driving
96
Starting the engine after the fuel tank has run dry It may take longer than normal to start the
engine after refuelling
if the fuel tank has
run completely dry - up to one minute. This is because the fuel system must first of all be filled while the attempting to start the engine.Switching off the engine– The engine can be swit
ched off by turning the ignition key from posi-
tion into
⇒
page 94, fig. 105
.
WARNING
•
Never switch off the engine before the
vehicle is stationary - risk of acci-
dent!•
The brake booster only operates when the engine is running. Greater
physical effort for braking is required
when engine is switched off. Because
if you do not stop as normal, this can cause an accident and severe injuries.
Caution
you should not switch the engine off right
away at the end of your journey after the
engine has been operated fo
r a lengthy period at high
loads but should be allowed
it to run at idling speed for about 2 minutes
. This prevents any accumulation of heat
when the engine is switched off.
Note
•
The radiator fan may continue running fo
r a further 10 minutes or so after the
engine and the ignition have been switched
off. The coolant fan may, however, also
switch on again after some time if the coolant temperature rises because of an accumulation of heat in the engine or
if the engine is warm and the engine
compartment is additionally
heated by strong sunlight.
•
This is why particular care is required when carrying out any work in the engine
compartment
⇒page 160, “Working in the engine compartment”.
ShiftingShift into reverse only when the vehicle is
stationary. Depress the clutch pedal and
hold it fully depressed. Wa
it a moment before engaging reverse gear in order to
avoid any shift noises. The reversing lights will come on once reverse gear is engaged, provided the igni- tion is on.
WARNING
Never engage the reverse gear when driving - risk of accident!
Note
•
One should not lay the hand on the shift lever while driving the vehicle. The
pressure of the hand will be transferred to
the gearshift forks in the gearbox. This
can, over a period of time, lead to
early wear of the gearshift forks.
•
Depress the clutch pedal fully when chan
ging gears, in order to avoid unneces-
sary wear and damage.
A1
Fig. 106 Shift pattern on models fitted with 5-speed manual gearbox
s2g8.b.book Page 96 Tuesday, April 7, 2009 8:53 AM
Page 98 of 224

Starting-off and Driving
97
Using the system
Safety
Driving Tips
General Maintenance
Breakdown assistance
Technical Data
HandbrakeApplying the handbrake – Pull the handbrake lever up fully. Releasing the handbrake – Pull the handbrake lever up slightly and
at the same time
press in the
locking button
⇒
fig. 107
.
– Hold the button pressed and push the handbrake lever down fully
⇒
.
The handbrake warning light
lights up when the handbrake is applied, provided
the ignition is on. A warning signal sounds and the following text appears in the display* if you have inadvertently driven off with the handbrake applied:
HANDBRAKE ON
The handbrake warning is activated if you drive at a speed of more than 6 km/h for more than 3 seconds.
WARNING
•
Please note that the handbrake must be fully released. A handbrake
which is only partially released can re
sult in the rear brakes overheating
which will have a negative effect on th
e operation of the brake system - risk
of accident! In addition this can result in premature wear of the rear brake pads.•
Never leave children unattended in the vehicle. The children might, for
example, release the handbrake or take
the vehicle out of gear. The vehicle
might then move off - risk of accident!
Caution
Each time the vehicle is parked, first of
all apply the handbrake and then addition-
ally engage the 1st gear.Rear parking aid*The parking aid provides a warning of obstacles behind the vehicle.The audible parking aid determines the distance between the rear bumper and an obstacle located behind the vehicle with th
e aid of ultrasound sensors. The sensors
are integrated in the rear bumper.
Fig. 107 Centre console: Handbrake
Fig. 108 Parking aid: Detec-tion range of rear sensors
s2g8.b.book Page 97 Tuesday, April 7, 2009 8:53 AM
Page 99 of 224

Starting-off and Driving
98
Range of sensors The clearance warning begins at a distance of about 160 cm from the obstacle (area ⇒page 97, fig. 108
). The interval between the warning signals becomes shorter
as the clearance is reduced. A continuous tone
sounds from a distance of approx. 30 cm (area ) - danger
area.
You should not reverse any further after this signal sounds!
Activating The parking aid is activated automatically when
reverse gear
is engaged and the
ignition is turned on. This is confir
med by a brief acknowledgement signal.
Deactivating The parking aid is deactivated by removing the reverse gear.
WARNING
•
The parking aid is not a substitute fo
r the driver paying proper attention
and it is always the driver's responsibility to take care when parking the vehicle or carrying ou
t similar manoeuvres.
•
You should therefore satisfy yourself, before reversing, that there is no
small obstacle, such as a rock, thin post, trailer drawbar etc., behind your vehicle. Such an obstacle might not be within the range detected by the sensors.
Note
•
The parking aid does not operate if you
are towing a trailer (applies to models
which feature a factory-fitted towing device*).•
If a warning signal sounds for about 3 seconds after switching the ignition on
and engaging reverse gear, and there is no ob
stacle close to your vehicle, this indi-
cates a system fault. Have the fault rectified by a specialist workshop.•
The sensors must be kept clean and free
of ice to enable the parking aid to
operate properly.
Cruise control system (CCS)*IntroductionThe cruise control system (CCS) maintains a constant speed, more than 30 km/h (20 mph), once it has been set, without you
having to depress the accelerator pedal.
This is only possible within the range wh
ich is permitted by
the power output and
braking power of the engine. The cruise control system makes it possible - particu- larly on long journeys - for you to rest your “accelerator foot”.
WARNING
•
The cruise control system must not, for safety reasons, be used in dense
traffic or on unfavourable road surfaces
(such as icy roads, slippery roads or
loose chippings) - risk of accident!•
In order to prevent unintentional use of
the cruise control system, always
switch off the system after use.
Note
•
Models fitted with a manual gearbox: Al
ways depress the clutch pedal if you
switch on the cruise control system when
the gearbox is in Neutral. Otherwise the
engine can rev up unintentionally.•
The cruise control system is not able to maintain a constant speed when driving
on steep downhill sections. The weight of the vehicle increases the speed at which it travels. One should shift down in good
time to a lower gear or slow the vehicle
down by applying the foot brake.
AA
AB
s2g8.b.book Page 98 Tuesday, April 7, 2009 8:53 AM
Page 100 of 224

Starting-off and Driving
99
Using the system
Safety
Driving Tips
General Maintenance
Breakdown assistance
Technical Data
Storing a speedThe cruise control system is operated
by means of the slide switch and
rocker button in the left lever of the multi-functional switch. – Switch on the cruise control system by sliding the switch
⇒
fig. 109
into the
ON
position.
– After the desired speed has been
reached, briefly press the rocker
button in the
SET
position.
After releasing the rocker button from the
SET
position, the speed you have
stored (above 30 km/hour 20 mph) is ma
intained at a constant speed without
having to depress the accelerator. Yo u c a n
increase
the speed by depressi
ng the accelerator. Releasing the acceler-
ator will cause the speed to
drop
again to the set speed.
This does not apply, however, if you drive at a speed which is more than 10 km/h higher than the set speed for a period of longer than 5 minutes. The stored speed will be cancelled in the memory. You th
en have to re-store the desired speed.
One can
reduce
the speed in the usual manner. The system is switched off tempo-
rarily by actuating the brake or clutch pedal
⇒page 100.
WARNING
First ensure that it is not too high for the traffic conditions which exist at that moment before resuming the stored speed.Changing a stored speed You can also change the speed of
the vehicle without depressing the
accelerator.Fa s t er –You can
increase
the stored speed without depressing the acceler-
ator, by pressing the rocker button
⇒
fig. 109
in the
RES
position.
– The speed of the vehicle will incr
ease continuously if you hold the
button pressed in the
RES
position. Once the vehicle has reached
the desired speed, release the rocker button. The set speed is then stored in the memory.
Slower –You can
decrease
the stored speed by pressing the rocker button
in the
SET
position.
– Holding down the rocker button pressed in the
SET
position will cause
the speed of the vehicle to reduce
continuously. Once the vehicle has
reached the desired speed, release the rocker button. The set speed is then stored in the memory.
– If you release the rocker button wh
en the vehicle is travelling at a
speed of less than 30 km/h, the speed is not stored, the memory is erased. It is then necessary to again store the speed with the rocker button in the position
SET
after an increase in speed of the vehicle
to more than 30 km/hour.
Fig. 109 Operating lever: Rocker button and switch of cruise control system
AA
AB
AA
AB
AB
AB
AB
AB
AB
s2g8.b.book Page 99 Tuesday, April 7, 2009 8:53 AM
Page 101 of 224
Starting-off and Driving
100
Switching off the cruise control system temporarily– You can
switch off temporarily
the cruise control system, if you
depress the brake or clutch pedal.
– You can likewise switch off the cruise control system by sliding the
switch to the right - into the
OFF
position.
The set speed remains stored in the memory. You can
resume the stored speed
by releasing the brake pedal or clutch pedal and
by briefly pressing the rocker button
⇒page 99, fig. 109
in the
RES
position.
WARNING
First ensure that it is not too high for the traffic conditions which exist at that moment before resuming the stored speed.Switching off the cruise control system completely– Move the slide switch
⇒
page 99, fig. 109
into the
OFF
position.
AA
AB
AA
s2g8.b.book Page 100 Tuesday, April 7, 2009 8:53 AM
Page 102 of 224

Communication
101
Using the system
Safety
Driving Tips
General Maintenance
Breakdown assistance
Technical Data
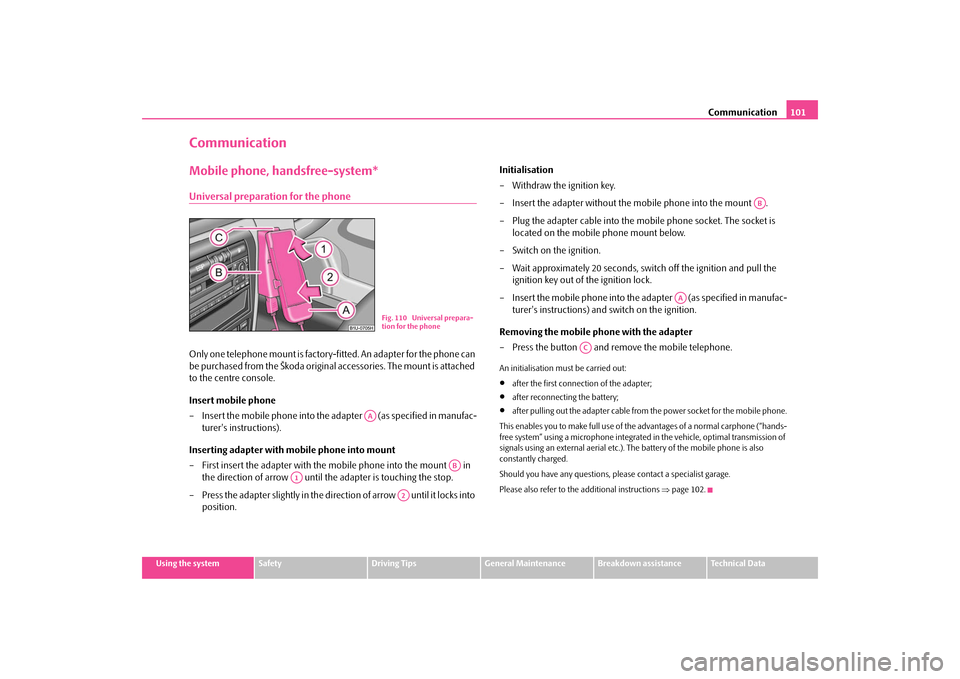
CommunicationMobile phone, handsfree-system*Universal preparation for the phoneOnly one telephone mount is factory-
fitted. An adapter for the phone can
be purchased from the Škoda original accessories. The mount is attached to the centre console. Insert mobile phone – Insert the mobile phone into the adapter (as specified in manufac-
turer's instructions).
Inserting adapter with mobile phone into mount – First insert the adapter with the mobile phone into the mount in
the direction of arrow until the adapter is touching the stop.
– Press the adapter slightly in the direction of arrow until it locks into
position.
Initialisation – Withdraw the ignition key. – Insert the adapter without the mobile phone into the mount . – Plug the adapter cable into the mobile phone socket. The socket is
located on the mobile phone mount below.
– Switch on the ignition.– Wait approximately 20 seconds, swit
ch off the ignition and pull the
ignition key out of the ignition lock.
– Insert the mobile phone into the adapter (as specified in manufac-
turer's instructions) and switch on the ignition.
Removing the mobile phone with the adapter – Press the button and remove the mobile telephone.An initialisation must be carried out:•
after the first connection of the adapter;
•
after reconnecting the battery;
•
after pulling out the adapter cable from
the power socket for the mobile phone.
This enables you to make full use of the advantages of a normal carphone (“hands- free system” using a microphone integrated in the vehicle, optimal transmission of signals using an external aerial etc.).
The battery of the mobile phone is also
constantly charged. Should you have any questions, pl
ease contact a specialist garage.
Please also refer to the additional instructions
⇒page 102.
Fig. 110 Universal prepara- tion for the phone
AA
AB
A1
A2
AB
AA
AC
s2g8.b.book Page 101 Tuesday, April 7, 2009 8:53 AM
Page 103 of 224

Communication
102
Mobile phones and two-way radio systemsThe installation of a mobile phone and two-way radio system in a vehicle should be carried out by a specialist garage. Škoda Auto permits the operation of mobile phones and two-way radio systems with a professionally installed external aerial and a maximum transmission power of up to 10 watts. It is essential that you inform a specialist garage about the possibilites to assemble and operate mobile phones and two-way radio sets which have a power output of more than 10 W. They will inform you which technical possibilities exist for retrofit- ting mobile telephones and radio transmitters. Operation of mobile phones or two-way radio systems may interfere with func- tioning of the electronic systems of your vehicle. The reasons for this may be:•
no external aerial,
•
external aerial incorrectly installed,
•
transmission power gr
eater than 10 watts.
You should therefore
not operate a mobile phone or two-way radio system
inside the vehicle
without the use of an external aerial, or with an external aerial
which has been incorrectly installed. You should also be aware of
the fact that only an
external
aerial makes it possible
to achieve the optimal range of such equipment.
WARNING
•
If a mobile phone or two-way radio sy
stem is operated inside the vehicle
without using an external aerial, or with an external aerial which has been incorrectly installed, the result can
be excessive electromagnetic fields
which may cause harm to your health.•
Please concentrate fully at all times on your driving.
•
You must not install two-way radio systems, mobile phones or mounts
on the covers of the airbags or within the immediate deployment range of airbags. This might result in injuries to the occupants in the event of an acci- dent.
Note
Please also refer to the operating instru
ctions of the mobile phones and two-way
radio systems.
s2g8.b.book Page 102 Tuesday, April 7, 2009 8:53 AM
Page 104 of 224

Passive Safety
103
Using the system
Safety
Driving Tips
General Maintenance
Breakdown assistance
Technical Data
SafetyPassive SafetyBasic informationDriving the safe way Passive safety measures reduce the risk of injury in accident situa- tions.In this section you will find important inform
ation, tips and notes on the subject of
passive safety in your vehicle. We ha
ve combined everything here which you
should be familiar with, for
example, regarding seat belts, airbags, child seats and
safety of children. It is therefore importan
t, in particular, to comply with the notes
and warnings in this section for your own interest and in the interest of those trav- elling with you.
WARNING
•
This chapter contains important information on how to use the vehicle
for the driver and his occupants. You will find further information on safety, which concerns you and those travelling with you, in the following chapters of this Owner's Manual.•
The complete on-board literature should always be in the vehicle. This
applies in particular, if you rent out or sell the vehicle.Safety equipment The safety equipment is part of the occupant protection and it can reduce the risk of injuries in accident situations.“Do not put at risk” your safety and the safety of those travelling with you . In the event of an accident, the safety equipmen
t can reduce the risk of injuries. The
following list contains part of th
e safety equipment in your vehicle:
•
Three-point seat belts for all the seats*,
•
belt force limiter for front seats*,
•
belt tensioner fo
r front seats*,
•
seat belt height adjuster for front seats,
•
front airbags*,
•
side airbags*,
•
anchoring points for child seat using the “ISOFIX” system,
•
head restraint adjustable for height,
•
adjustable steering column.
The specified safety equipment works toge
ther, in order to optimally protect you
and those travelling with you in accident
situations. The safety
equipment does not
protect you or the people travelling with
you, if you or your occupants adopt an
incorrect seated position or the equipmen
t is not correctly
adjusted or used.
Fo r t h i s re a s o n y o u w i l l b e p ro v i d e d w i th i n fo rm a ti o n o n w hy t h i s e q u i p m e nt i s v e r y important, how it protects you and the o
ccupants, what should be observed when
using the equipment and how you and the pe
ople travelling with you can make full
use of the existing safety equipment.
This Owner's Manual contains important
warning notes, which you and those travelli
ng with you should pay attention to in
order to reduce a risk of injury. Safety concerns everybody!Before setting off The driver is always fully responsible for his occupants and for the operating safety of the vehicle.For your own safety and the safety of the
people travelling with you, please pay
attention to the following points before setting off:
s2g8.b.book Page 103 Tuesday, April 7, 2009 8:53 AM
 1
1 2
2 3
3 4
4 5
5 6
6 7
7 8
8 9
9 10
10 11
11 12
12 13
13 14
14 15
15 16
16 17
17 18
18 19
19 20
20 21
21 22
22 23
23 24
24 25
25 26
26 27
27 28
28 29
29 30
30 31
31 32
32 33
33 34
34 35
35 36
36 37
37 38
38 39
39 40
40 41
41 42
42 43
43 44
44 45
45 46
46 47
47 48
48 49
49 50
50 51
51 52
52 53
53 54
54 55
55 56
56 57
57 58
58 59
59 60
60 61
61 62
62 63
63 64
64 65
65 66
66 67
67 68
68 69
69 70
70 71
71 72
72 73
73 74
74 75
75 76
76 77
77 78
78 79
79 80
80 81
81 82
82 83
83 84
84 85
85 86
86 87
87 88
88 89
89 90
90 91
91 92
92 93
93 94
94 95
95 96
96 97
97 98
98 99
99 100
100 101
101 102
102 103
103 104
104 105
105 106
106 107
107 108
108 109
109 110
110 111
111 112
112 113
113 114
114 115
115 116
116 117
117 118
118 119
119 120
120 121
121 122
122 123
123 124
124 125
125 126
126 127
127 128
128 129
129 130
130 131
131 132
132 133
133 134
134 135
135 136
136 137
137 138
138 139
139 140
140 141
141 142
142 143
143 144
144 145
145 146
146 147
147 148
148 149
149 150
150 151
151 152
152 153
153 154
154 155
155 156
156 157
157 158
158 159
159 160
160 161
161 162
162 163
163 164
164 165
165 166
166 167
167 168
168 169
169 170
170 171
171 172
172 173
173 174
174 175
175 176
176 177
177 178
178 179
179 180
180 181
181 182
182 183
183 184
184 185
185 186
186 187
187 188
188 189
189 190
190 191
191 192
192 193
193 194
194 195
195 196
196 197
197 198
198 199
199 200
200 201
201 202
202 203
203 204
204 205
205 206
206 207
207 208
208 209
209 210
210 211
211 212
212 213
213 214
214 215
215 216
216 217
217 218
218 219
219 220
220 221
221 222
222 223
223


