2009 NISSAN LATIO light
[x] Cancel search: lightPage 3044 of 4331

EM
NP
O
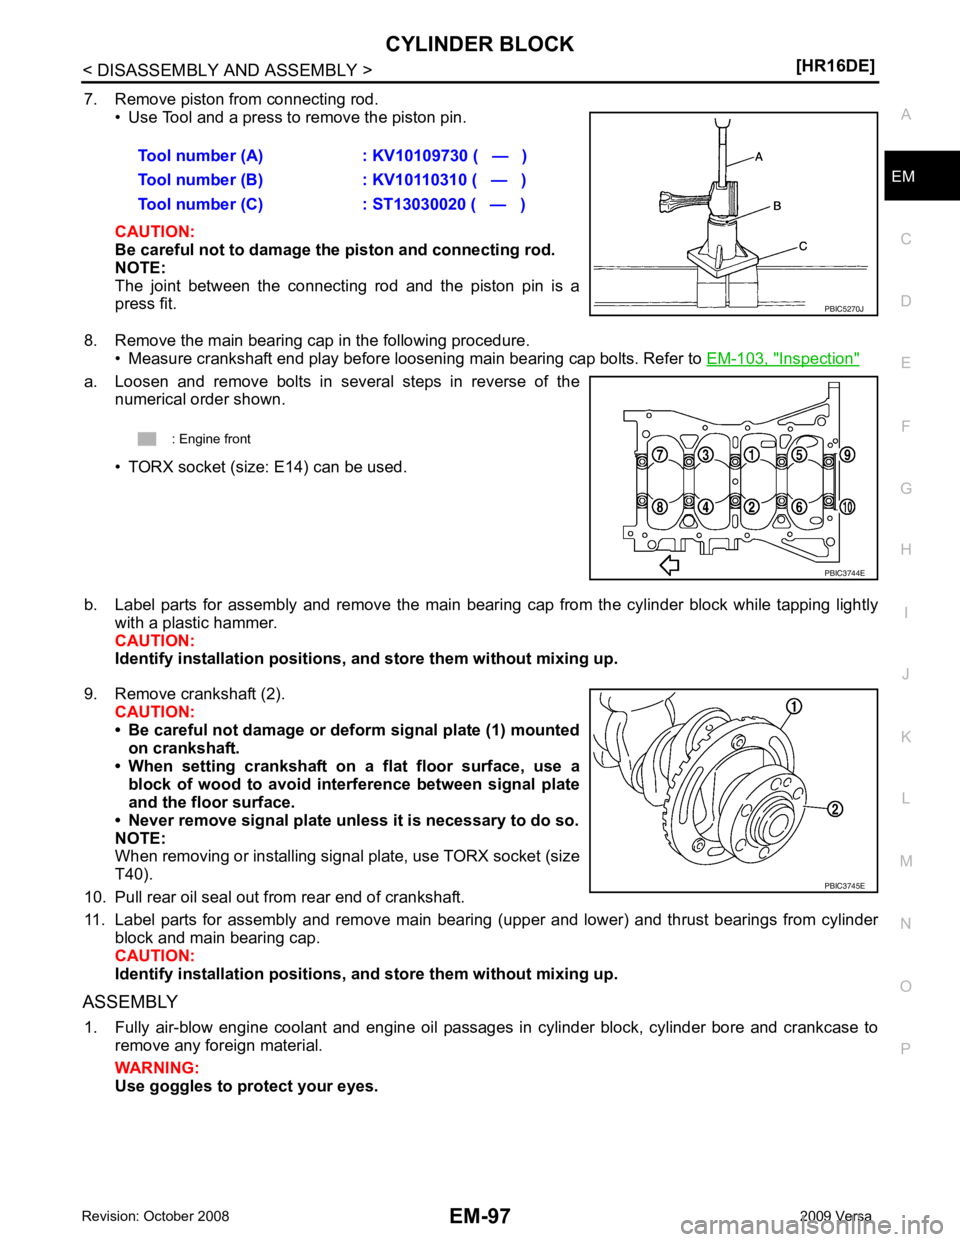
7. Remove piston from connecting rod.
• Use Tool and a press to remove the piston pin.
CAUTION:
Be careful not to damage the piston and connecting rod.
NOTE:
The joint between the connecting rod and the piston pin is a
press fit.
8. Remove the main bearing cap in the following procedure. • Measure crankshaft end play before loosening main bearing cap bolts. Refer to EM-103, " Inspection "
a. Loosen and remove bolts in several steps in reverse of the
numerical order shown.
• TORX socket (size: E14) can be used.
b. Label parts for assembly and remove the main beari ng cap from the cylinder block while tapping lightly
with a plastic hammer.
CAUTION:
Identify installation positions, and store th em without mixing up.
9. Remove crankshaft (2). CAUTION:
• Be careful not damage or deform signal plate (1) mounted on crankshaft.
• When setting crankshaft on a flat floor surface, use a
block of wood to avoid inte rference between signal plate
and the floor surface.
• Never remove signal plate unl ess it is necessary to do so.
NOTE:
When removing or installing signal plate, use TORX socket (size
T40).
10. Pull rear oil seal out from rear end of crankshaft.
11. Label parts for assembly and remove main bearing (upper and lower) and thrust bearings from cylinder block and main bearing cap.
CAUTION:
Identify installation positions, and store th em without mixing up.
ASSEMBLY 1. Fully air-blow engine coolant and engine oil passages in cylinder block, cylinder bore and crankcase to remove any foreign material.
WARNING:
Use goggles to protect your eyes. Tool number (A) : KV10109730 ( — )
Tool number (B) : KV10110310 ( — )
Tool number (C) : ST13030020 ( — )
Page 3055 of 4331

Disassembly and Assembly " .
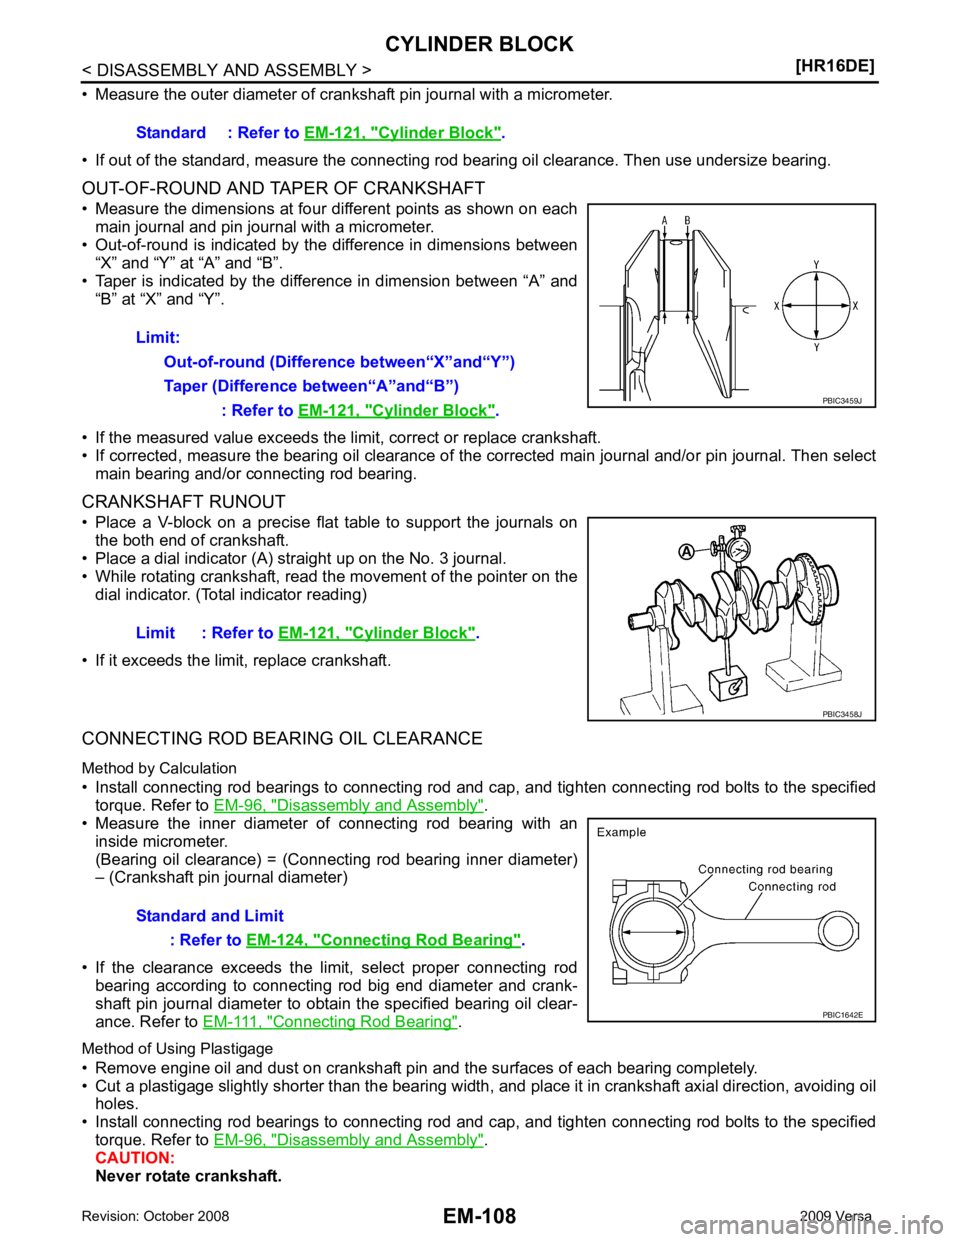
• Measure the inner diameter of connecting rod bearing with an
inside micrometer.
(Bearing oil clearance) = (Connecting rod bearing inner diameter)
– (Crankshaft pin journal diameter)
• If the clearance exceeds the limit, select proper connecting rod bearing according to connecting rod big end diameter and crank-
shaft pin journal diameter to obtain the specified bearing oil clear-
ance. Refer to EM-111, " Connecting Rod Bearing " .
Method of Using Plastigage
• Remove engine oil and dust on crankshaft pin and the surfaces of each bearing completely.
• Cut a plastigage slightly shorter than the bearing width, and place it in crankshaft axial direction, avoiding oil
holes.
• Install connecting rod bearings to connecting rod and c ap, and tighten connecting rod bolts to the specified
torque. Refer to EM-96, " Disassembly and Assembly " .
CAUTION:
Never rotate crankshaft. Standard : Refer to
EM-121, " Cylinder Block " .
Limit: Out-of-round (Difference between“X”and“Y”)
Taper (Difference between“A”and“B”) : Refer to EM-121, " Cylinder Block " .
Cylinder Block " .
Connecting Rod Bearing " .
Page 3056 of 4331

EM
NP
O
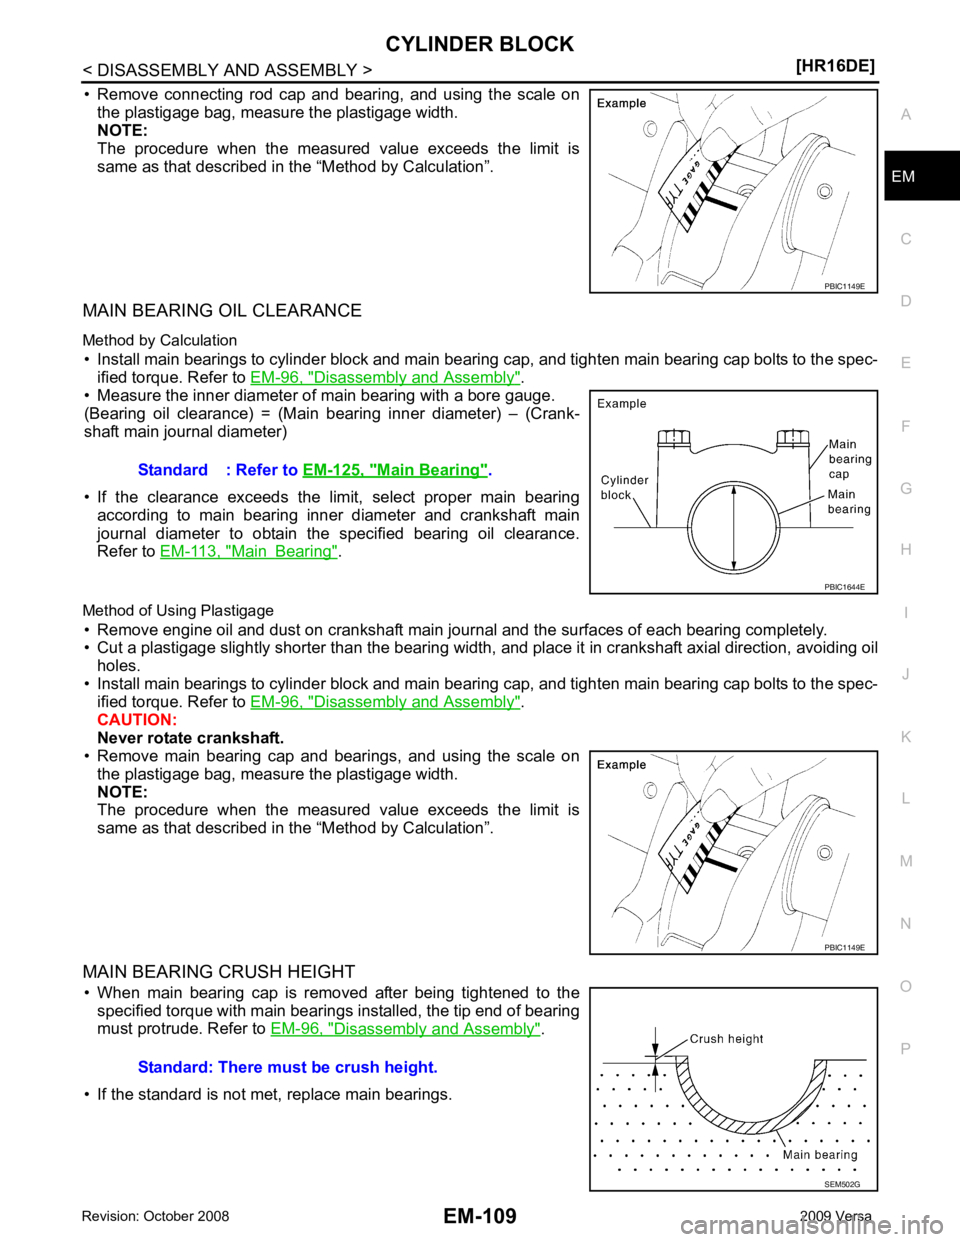
• Remove connecting rod cap and bearing, and using the scale on
the plastigage bag, measure the plastigage width.
NOTE:
The procedure when the measured value exceeds the limit is
same as that described in the “Method by Calculation”.
MAIN BEARING OIL CLEARANCE
Method by Calculation • Install main bearings to cylinder block and main bearing cap, and tighten main bearing cap bolts to the spec- ified torque. Refer to EM-96, " Disassembly and Assembly " .
• Measure the inner diameter of main bearing with a bore gauge.
(Bearing oil clearance) = (Main bearing inner diameter) – (Crank-
shaft main journal diameter)
• If the clearance exceeds the limit, select proper main bearing according to main bearing inner diameter and crankshaft main
journal diameter to obtain the specified bearing oil clearance.
Refer to EM-113, " Main Bearing " .
Method of Using Plastigage • Remove engine oil and dust on crankshaft main journal and the surfaces of each bearing completely.
• Cut a plastigage slightly shorter than the bearing width, and place it in crankshaft axial direction, avoiding oil
holes.
• Install main bearings to cylinder block and main bearing cap, and tighten main bearing cap bolts to the spec- ified torque. Refer to EM-96, " Disassembly and Assembly " .
CAUTION:
Never rotate crankshaft.
• Remove main bearing cap and bearings, and using the scale on
the plastigage bag, measure the plastigage width.
NOTE:
The procedure when the measured value exceeds the limit is
same as that described in the “Method by Calculation”.
MAIN BEARING CRUSH HEIGHT • When main bearing cap is removed after being tightened to the specified torque with main bearings installed, the tip end of bearing
must protrude. Refer to EM-96, " Disassembly and Assembly " .
• If the standard is not met, replace main bearings. Main Bearing " .
Page 3075 of 4331
![NISSAN LATIO 2009 Service Repair Manual EM-128< SERVICE INFORMATION >
[MR18DE]
PRECAUTIONS
Parts Requiring Angular Tightening INFOID:0000000004307117
• Use an angle wrench for the final tightening of the following engine parts:
- Cylinde NISSAN LATIO 2009 Service Repair Manual EM-128< SERVICE INFORMATION >
[MR18DE]
PRECAUTIONS
Parts Requiring Angular Tightening INFOID:0000000004307117
• Use an angle wrench for the final tightening of the following engine parts:
- Cylinde](/manual-img/5/57359/w960_57359-3074.png)
EM-128< SERVICE INFORMATION >
[MR18DE]
PRECAUTIONS
Parts Requiring Angular Tightening INFOID:0000000004307117
• Use an angle wrench for the final tightening of the following engine parts:
- Cylinder head bolts
- Camshaft sprocket (INT)
- Main bearing cap bolts
- Connecting rod cap nuts
- Crankshaft pulley bolt (No angle wrench is required as the bolt flange is provided with notches for angular
tightening)
• Do not use a torque value for final tightening.
• The torque value for these parts are for a preliminary step.
• Ensure thread and seat surfaces are clean and coated with engine oil.
Precaution for Liquid Gasket INFOID:0000000004307118
REMOVAL OF LIQUID GASKET SEALING
• After removing the bolts and nuts, separate the mating surface and remove the sealant using Tool.
CAUTION:
Be careful not to damage the mating surfaces.
• In areas where the cutter is difficult to use, use a plastic hammer to
lightly tap (1) the cutter where the RTV Silicone Sealant is applied.
Use a plastic hammer to slide the cutter (2) by tapping on the side.
CAUTION:
If for some unavoidable reason a tool such as a flat-bladed
screwdriver is used, be careful not to damage the mating sur-
faces.
LIQUID GASKET APPLICATION PROCEDURE
1. Using a scraper, remove the old Silicone RTV Sealant adhering to the gasket application surface and the mating surface.
• Remove the sealant completely from the groove of the gasket application surface, bolts, and bolt holes.
2. Thoroughly clean the gasket application surface and the mating surface and remove adhering moisture, grease and foreign
materials.
3. Attach the sealant t ube to the tube presser.
Use Genuine Silicone RTV Seal ant or equivalent. Refer to
GI-42, " Recommended Chemical
Product and Sealant " .
4. Apply the sealant without breaks to the specified location using Tool.
• If there is a groove for the s ealant application, apply the seal-
ant to the groove.
• As for the bolt holes, normally apply the sealant inside the holes. If specified, it should be applied outside the holes. Make
sure to read the text of this manual.
• Within five minutes of the seal ant application, install the mat-
ing component.
• If the sealant protrudes, wipe it off immediately.
• Do not retighten after the installation. Tool number : KV10112100 (BT-8653-A)
Tool number : KV10111100 (J-37228) WBIA0566E
PBIC0003E
Tool number WS39930000 ( – )
WBIA0567E
Page 3112 of 4331

EM
NP
O
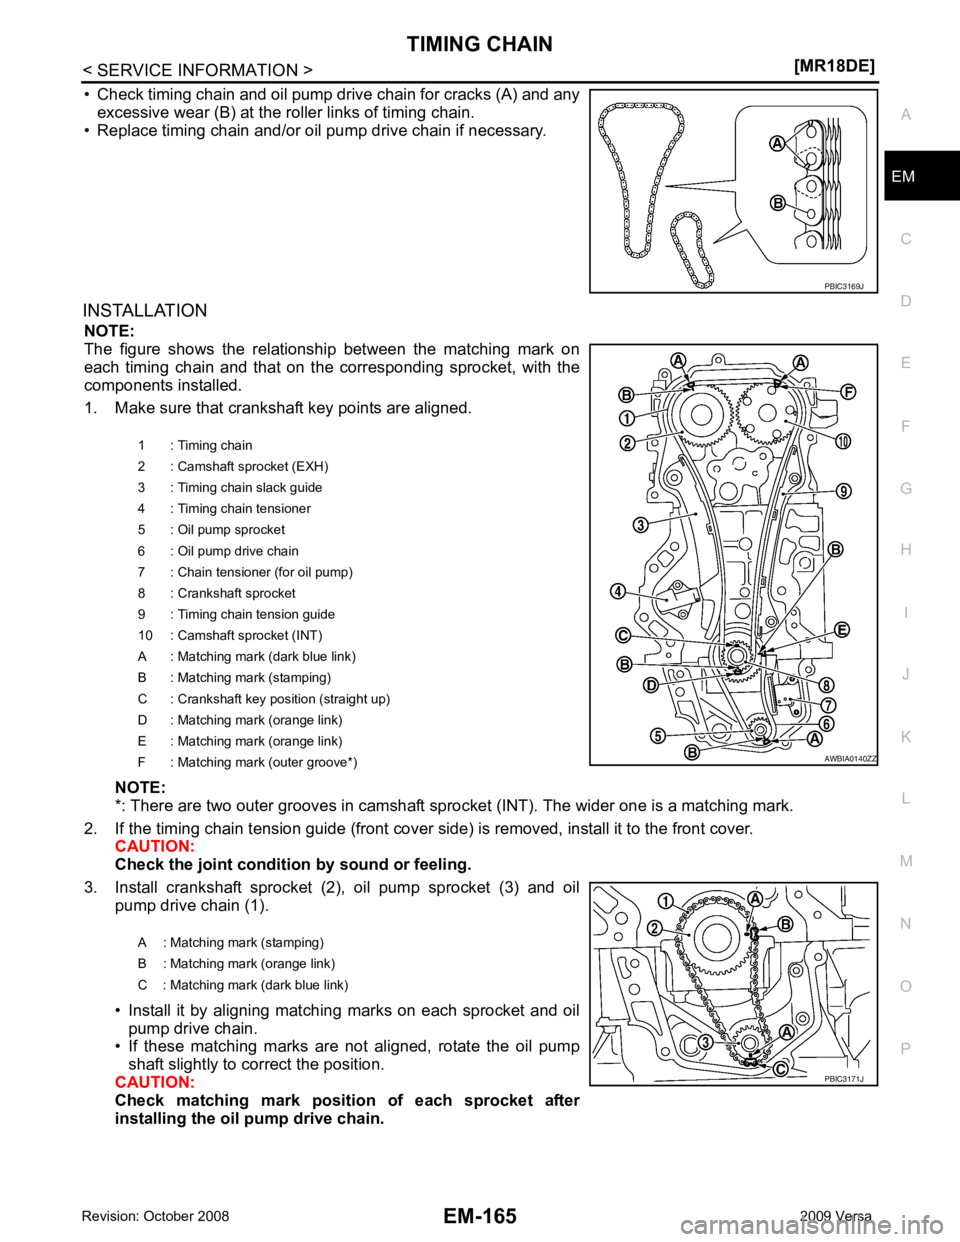
• Check timing chain and oil pump drive chain for cracks (A) and any
excessive wear (B) at the roller links of timing chain.
• Replace timing chain and/or oil pump drive chain if necessary.
INSTALLATION NOTE:
The figure shows the relationship between the matching mark on
each timing chain and that on the corresponding sprocket, with the
components installed.
1. Make sure that crankshaft key points are aligned.
NOTE:
*: There are two outer grooves in camshaft spro cket (INT). The wider one is a matching mark.
2. If the timing chain tension guide (front cover si de) is removed, install it to the front cover.
CAUTION:
Check the joint condition by sound or feeling.
3. Install crankshaft sprocket (2), oil pump sprocket (3) and oil pump drive chain (1).
• Install it by aligning matching marks on each sprocket and oil pump drive chain.
• If these matching marks are not aligned, rotate the oil pump
shaft slightly to correct the position.
CAUTION:
Check matching mark position of each sprocket after
installing the oil pump drive chain. PBIC3171J
Page 3113 of 4331
![NISSAN LATIO 2009 Service Repair Manual EM-166< SERVICE INFORMATION >
[MR18DE]
TIMING CHAIN
4. Hold the WAF part of oil pump shaft (A), and then tighten the oil
pump sprocket bolt.
CAUTION:
• Secure the oil pump shaft with the WAF part ( NISSAN LATIO 2009 Service Repair Manual EM-166< SERVICE INFORMATION >
[MR18DE]
TIMING CHAIN
4. Hold the WAF part of oil pump shaft (A), and then tighten the oil
pump sprocket bolt.
CAUTION:
• Secure the oil pump shaft with the WAF part (](/manual-img/5/57359/w960_57359-3112.png)
EM-166< SERVICE INFORMATION >
[MR18DE]
TIMING CHAIN
4. Hold the WAF part of oil pump shaft (A), and then tighten the oil
pump sprocket bolt.
CAUTION:
• Secure the oil pump shaft with the WAF part (A).
• Never loosen the oil pump sp rocket bolt by tightening the
oil pump drive chain.
5. Install chain tensioner (for oil pump) (1). 1. Fix the plunger at the most compressed position using a
stopper pin (A), and then install it.
2. Securely pull out ( ) the stopper pin after installing the chain tensioner (for oil pump).
3. Check matching mark position of oil pump drive chain and each sprocket again.
6. Align the matching marks of each sprocket with the matching marks of timing chain.
NOTE:
*: There are 2 outer grooves in camshaft sprocket (INT). The
wider one is a matching mark.
• If these matching marks are not aligned, rotate the camshaft slightly by holding the hexagonal portion to correct the posi-
tion.
CAUTION:
Check matching mark position of each sprocket and timing
chain again after instal ling the timing chain.
1 : Oil pan (upper)
2 : Oil pump
: Engine front PBIC3539J
AWBIA0139ZZ
1 : Camshaft sprocket (EXH)
2 : Camshaft sprocket (INT)
3 : Timing chain
A : Matching mark (dark blue link)
B : Matching mark (stamping)
C : Matching mark (outer groove*)
D : Matching mark (orange link)
E : Matching mark (stamping) PBIC3172J
Page 3130 of 4331
![NISSAN LATIO 2009 Service Repair Manual OIL SEAL
EM-183
< SERVICE INFORMATION >
[MR18DE] C
D E
F
G H
I
J
K L
M A EM
NP
O
• Drive belt; Refer to
EM-136, " Component " .
• Crankshaft pulley; Refer to EM-160, " Component " .
2. Remove fr NISSAN LATIO 2009 Service Repair Manual OIL SEAL
EM-183
< SERVICE INFORMATION >
[MR18DE] C
D E
F
G H
I
J
K L
M A EM
NP
O
• Drive belt; Refer to
EM-136, " Component " .
• Crankshaft pulley; Refer to EM-160, " Component " .
2. Remove fr](/manual-img/5/57359/w960_57359-3129.png)
OIL SEAL
EM-183
< SERVICE INFORMATION >
[MR18DE] C
D E
F
G H
I
J
K L
M A EM
NP
O
• Drive belt; Refer to
EM-136, " Component " .
• Crankshaft pulley; Refer to EM-160, " Component " .
2. Remove front oil seal using a suitable tool. CAUTION:
Be careful not to damage front cover and crankshaft.
INSTALLATION 1. Apply new engine oil to new front oil seal joint surface and seal lip.
2. Install front oil seal so that each seal lip is oriented as shown.
• Install front oil seal (2) using a suitable tool with outer diameter57 mm (2.24 in) and inner diameter 45 mm (1.77 in) (A) to the
dimension as shown.
CAUTION:
• Be careful not to damage front cover and crankshaft.
• Press-fit oil seal straight to avoid causing burrs or tilting.
• Do not touch grease applied on oil seal lip.
3. Installation of the remaining components is in the reverse order of removal.
Removal and Installation of Rear Oil Seal INFOID:0000000004307149
REMOVAL 1. Remove transaxle assembly. Refer to MT-58 (M/T models),
AT-232 (A/T models),
CVT-182 or
CVT-354 (CVT models).
2. Remove clutch cover and clutch disk (M/T models). Refer to CL-15 .
3. Remove drive plate (A/T or CVT models) or flywheel (M/T models). Refer to EM-199, " Component " .
4. Remove rear oil seal with a suitable tool. CAUTION:
Be careful not to damage crankshaft and cylinder block.
INSTALLATION 1. Apply the liquid gasket lightly to entire outside area of new rear oil seal. Use Genuine Silicone RTV Seal ant or equivalent. Refer to GI-42, " Recommended Chemical Prod-
uct and Sealant " .
A : Dust seal lip
B : Oil seal lip
: Engine front
: Engine rear PBIC3485J
1 : Front cover
: Engine front
Within 0.3 mm (0.012 in) toward engine front
Within 0.5 mm (0.020 in) toward engine rear PBIC3729E
Page 3137 of 4331
![NISSAN LATIO 2009 Service Repair Manual EM-190< SERVICE INFORMATION >
[MR18DE]
CYLINDER HEAD
3. Install valve oil seal. • Install with a valve oil seal using Tool (A) to match dimensionas shown.
NOTE:
Dimension (H) is height NISSAN LATIO 2009 Service Repair Manual EM-190< SERVICE INFORMATION >
[MR18DE]
CYLINDER HEAD
3. Install valve oil seal. • Install with a valve oil seal using Tool (A) to match dimensionas shown.
NOTE:
Dimension (H) is height](/manual-img/5/57359/w960_57359-3136.png)
EM-190< SERVICE INFORMATION >
[MR18DE]
CYLINDER HEAD
3. Install valve oil seal. • Install with a valve oil seal using Tool (A) to match dimensionas shown.
NOTE:
Dimension (H) is height that measured before installing valve
spring (with valve spring seat).
4. Install valve. • Install larger diameter to intake side.
5. Install valve spring (with valve spring seat). • Install smaller pitch (valve spring seat side) to cylinder head
side (B).
• Confirm identification color (A) of valve spring.
6. Install valve spring retainer.
7. Install valve collet. • Compress valve spring using Tool (A). Install valve collet with a magnet hand.
CAUTION:
When working, be careful not to damage valve lifter holes.
• Tap valve stem edge lightly with a plastic hammer after instal- lation to check its installed condition.
8. Install valve lifter. • Install it in the original position.
9. Install spark plug using suitable tool.
Inspection After Disassembly INFOID:0000000004307155
VALVE DIMENSIONS
• Check dimensions of each valve. For dimensions, refer to EM-227, " Standard and Limit " .
• If dimensions are out of the standard, replace valve.
VALVE GUIDE CLEARANCE
Valve Stem Diameter Tool number : KV10115600 (J-38958)
Height (H) : 15.1 - 15.7 mm (0.594 - 0.618 in) PBIC3211J
1 : Valve spring seat (Do not remove from valve spring.)
Intake : White
Exhaust : Orange PBIC3462J
Tool number : KV101092S0 (J-26336 B)
PBIC3209J