Page 129 of 321
![KIA AMANTI 2009 Owners Manual 3117
Knowing your vehicle
1. iPod Selection ButtonIf iPod is connected, it turns to iPod mode.2. Automatic Track Selection Button Press the [TRACK ] button for lessthan 0.8 seconds to play from the
be KIA AMANTI 2009 Owners Manual 3117
Knowing your vehicle
1. iPod Selection ButtonIf iPod is connected, it turns to iPod mode.2. Automatic Track Selection Button Press the [TRACK ] button for lessthan 0.8 seconds to play from the
be](/manual-img/2/57931/w960_57931-128.png)
3117
Knowing your vehicle
1. iPod Selection ButtonIf iPod is connected, it turns to iPod mode.2. Automatic Track Selection Button Press the [TRACK ] button for lessthan 0.8 seconds to play from the
beginning of the song currently played.
Press the button for less than 0.8 sec-
onds and press it again within 1 sec-
onds to move and play the previous
track. Press the button for 0.8 seconds
or longer to play the song in reverse
direction in fast speed.
Press the [SEEK ] button for less than 0.8 seconds to move to the next
track. Press the button for 0.8 seconds
or longer to play the song in forward
direction in fast speed.3. RANDOM Play Button Press this button for less than 0.8 sec-
onds to activate 'RDM ' mode and more
than 0.8 seconds to activate 'ALBUM
RDM 'mode.
RDM : All songs in the current catego-ry are played back at random.
ALBUM RDM: An album in the iPod is selected at random and is played back
in the album song order.
4. REPEAT Play ButtonA single song is repeatedly played back.5. INFORMATION ButtonDisplays the information of the file cur-
rently played back as below when the
button is pressed each time.
TITLE
➟ARTIST
➟ALBUM
➟...
6. Category Search ButtonMoves to the upper category from current-
ly played category of the iPod. To move to
the category displayed, press [File Search
/ENTER] Button. You will be able to search
through the lower category of the selected
category. The order of iPod’s category is
PLAYLISTS, COMPOSERS, SONGS, AL-
BUMES, ARTISTS, GENRES.
7. File Search/ENTER Button When you turn the button clockwise, itwill display the songs(category) next to
the song currently played(category in
the same level). Also, when you turn
the button counterclockwise, it will dis-
play the songs(category) before the
song currently played(category in the
same level).
If you want to listen to the song dis-
played in the song category, press the
button, then it will skip to the selected
song and play.
When you turn the button, it will display the categorys next to the categorys
currently displayed. you can narrow
down your search as shown in the
table below.
1 STEP 2 STEP 3 STEP 4 STEP 5 STEPPlaylist Playlists Songs --
Artist Artists Albums Songs -
Album Albums Songs --
Song Songs -- -
Genre Genres Artists Albums Songs
Composer Composers Albums Songs -
Page 130 of 321

Knowing your vehicle118
3✽
✽
NOTICE -
Using iPod device
• Some iPod models might not support
the communication protocol and the
files will not be played. (iPod models
supported: Mini, 4G, Photo, Nano,
5G)
• The order of search or playback of songs in the iPod can be different
from the order searched in the audio
system.
• If the iPod crashes due to its own trou- ble, reset iPod. (Reset: Refer to iPod
manual)
• iPod may not operate normally on low battery.
(Continued)
When the iPod cable is connected, the system can be switched to theAUX mode even without the iPoddevice and can cause noise. Disconnect iPod cable when youare not using the iPod device.
CAUTION
- Using iPod device
You need the power cable exclu-
sive for iPod in order to operateiPod with the buttons on the audio system. The PC cable provided byApple may cause malfunction and do not use it for vehicle use.
When connecting the device with iPod cable, push in the jack fullynot to interfere with communica-tion.
When adjusting the sound effects of iPod and the audio system, thesound effects of both devices willoverlap each and might causereduce or distort the quality of thesound.
Deactivate (turn off) the equalizer function of iPod when adjustingthe audio system’s volume, andturn off the equalizer of the audio system when using the equalizerof iPod.
(Continued)
Page 131 of 321
3119
Knowing your vehicle
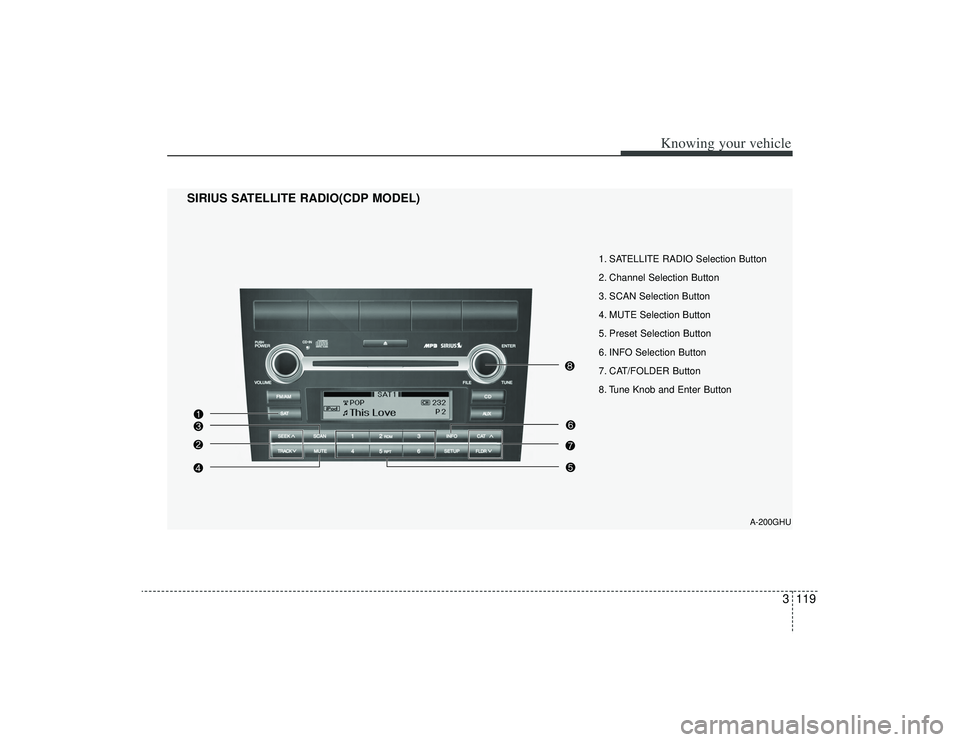
1. SATELLITE RADIO Selection Button
2. Channel Selection Button
3. SCAN Selection Button
4. MUTE Selection Button
5. Preset Selection Button
6. INFO Selection Button
7. CAT/FOLDER Button
8. Tune Knob and Enter Button
SIRIUS SATELLITE RADIO(CDP MODEL)
A-200GHU
Page 132 of 321
Knowing your vehicle120
3
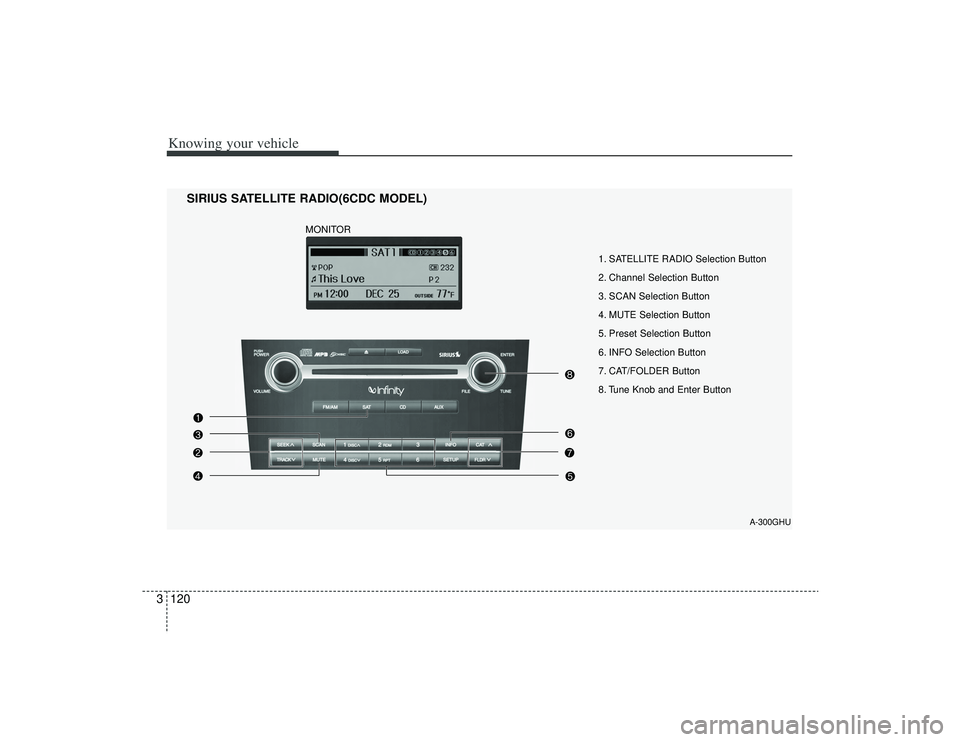
1. SATELLITE RADIO Selection Button
2. Channel Selection Button
3. SCAN Selection Button
4. MUTE Selection Button
5. Preset Selection Button
6. INFO Selection Button
7. CAT/FOLDER Button
8. Tune Knob and Enter Button
SIRIUS SATELLITE RADIO(6CDC MODEL)
A-300GHU
MONITOR
Page 133 of 321

3121
Knowing your vehicle
How to Use SIRIUS Satellite
RadioYour new Kia vehicle is equipped with 3
months complimentary period of SIRIUS
Satellite Radio so you have access to
over 130 channels of music, information
and entertainment programming.ActivationIn order to extend or reactivate your sub-
scription to SIRIUS Satellite Radio, you
will need to contact SIRIUS Customer
Care at 888-539-7474. Have your 12 digit
SID(Sirius Identification Number)/ESN
(Electronic Serial Number) ready. To
retrieve the SID/ESN, turn on the radio,
press the [SAT] button and tune to chan-
nel zero. please note that the vehicle will
need to be turned on, in Sirius mode, and
have an unobstructed view of the sky in
order for the radio to receive the activation
signal.1. SATELLITE RADIO SelectionButton(SIRIUS Satellite Radio)Press the [SAT] button to switch to SIR-
IUS Satellite Radio. It cycles through the
different bands as noted below.
SAT1
➟SAT2
➟SAT3
➟SAT1
➟...
2. Channel Selection Button Press [TRACK ] or [SEEK ] but-
ton for less than 0.8 seconds to select
previous or next channel.
Press [TRACK ] or [SEEK ] but- ton for 0.8 or longer to continuously
move to previous or next channel.
if "CATEGORY" Icon is displayed at the top of the screen, channel up/down is
done through the channels within cur-
rent category.3. SCAN Selection Button When the button is pressed, it automat-ically scans the radio stations upwards.
The SCAN feature steps through each channel, starting from the initial chan-
nel, for ten seconds. Press the [SCAN]
button again to stop the scan feature
and to listen to the currently selected
channel.4. MUTE Selection ButtonPress this button to temporarily cut off
the Sound. "MUTE" is displayed on the
LCD. Press the button once again to can-
cel MUTE mode.
5. Preset Selection Button Press [1]~[6] buttons less than 0.8seconds to play the Channel saved in
each button.
Press [1]~[6] button for 0.8 seconds or longer to save current Channel to the
respective button with a beep.6. INFO Selection ButtonDisplays the information of the channel
currently played by in the order of CATE-
GORY NAME
➟ARTIST NAME
➟COM-
POSER NAME
➟...(CH/TITLE Selection)
Displays the information of the channel
currently played in the order of SONG
TITLE
➟ARTIST NAME
➟COMPOSER
NAME
➟... (CAT/CH Selection) (If there is
no information of COMPOSER NAME, it
returns to main display.)
Page 134 of 321
![KIA AMANTI 2009 Owners Manual Knowing your vehicle122
37. CAT/FOLDER Button Press [CAT ] or [FLDR ] button to
enter the Category list Mode, it dis-
plays cateogry items and highlights the
category that currently tuned channel
belo KIA AMANTI 2009 Owners Manual Knowing your vehicle122
37. CAT/FOLDER Button Press [CAT ] or [FLDR ] button to
enter the Category list Mode, it dis-
plays cateogry items and highlights the
category that currently tuned channel
belo](/manual-img/2/57931/w960_57931-133.png)
Knowing your vehicle122
37. CAT/FOLDER Button Press [CAT ] or [FLDR ] button to
enter the Category list Mode, it dis-
plays cateogry items and highlights the
category that currently tuned channel
belongs to.
On Category List Mode, press these buttons to navigate category list.
Press [ENTER] Button to select the lowest channel in highlighted category.
If channel is selected by selecting cat- egory CATEGORY Icon is displayed at
the top of the screen.8. Tune Knob and Enter Button Rotate clockwise to increase the chan-nel number or to down the category in
the category list.
Rotate counterclockwise to decrease the channel number or to up the cate-
gory in the category list.
Press this button to make selection of channels or items.
❈ ❈ Troubleshooting1. Antenna Error
If this message is displayed, the antenna
or antenna cable is broken or unplugged.
Please consult with your Kia dealership.
2. Acquiring Signal
If this message is displayed, it means that
the antenna is covered and that the SIR-
IUS Satellite Radio signal is not available.
Ensure the antenna is uncovered and has
a clear view of the sky.
Page 135 of 321
3123
Knowing your vehicle
1. DISPLAY ON/OFF
2. CLOCK Function
3. Time/Date Increase/Reduce Function
4. RESET Function
5. DATE Function
KEY BOARD
A-300GHU
Page 136 of 321
![KIA AMANTI 2009 Owners Manual Knowing your vehicle124
31. DISPLAY ON/OFF This is the display window ON/OFF
function.
Each time the [DISP] button is pressed, the display window will be turned
ON/OFF.2. CLOCK Function This is the KIA AMANTI 2009 Owners Manual Knowing your vehicle124
31. DISPLAY ON/OFF This is the display window ON/OFF
function.
Each time the [DISP] button is pressed, the display window will be turned
ON/OFF.2. CLOCK Function This is the](/manual-img/2/57931/w960_57931-135.png)
Knowing your vehicle124
31. DISPLAY ON/OFF This is the display window ON/OFF
function.
Each time the [DISP] button is pressed, the display window will be turned
ON/OFF.2. CLOCK Function This is the clock adjustment function.
Each time [CLOCK] is pressed, thesecond
➟minute will blink once every
0.5 seconds and switch modes.
Pressing the [CLOCK] again while the "minute" mode is blinking or waiting 10
seconds will turn off time adjustment
mode and save the set time.
The clock can be set in 12 hour or 24 hour modes. The 12 hour system is the
default and can be changed to 24 hour
system within the SET-UP menu.
3. Time/Date Increase/Decrease Function While in Time/Date mode, pressing the
[ ], [ ] buttons will increase/
decrease the time/date.
This function will operate only after pressing the time/date button and the
hour/minute/month/day is blinking.
4. RESET Function The RESET function can be usedwhen adjusting the time.
If the [RESET] is pressed while adjust- ing the "hour", the hour will display
"AM12" when using 12 hour clock
mode and "00" when using 24 hour
clock mode.
If the RESET is pressed while adjust- ing the "min", the minute display will be
changed to "00".
The RESET function can be used while adjusting the date.
If the [RESET] is pressed while adjust- ing the "month/day", the corresponding
display will be changed to "01month/
01day".
5. DATE Function This is used to adjust the date.
Each time [DATE] is pressed, the mon-th
➟day will blink once every 0.5 sec-
onds and switch modes.
Pressing the [DATE] again while the "day" is blinking or waiting 10 seconds
will turn off date adjustment mode and
save the set date.
❈Slight differences with actual time may
occur. Please readjust the time upon
the occurrence of such differences.