Page 25 of 191
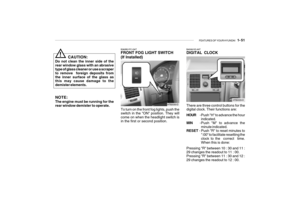
1- 14 FEATURES OF YOUR HYUNDAI
HTB025-D
B080F01S-AAT Seat Cushion Height Adjustment (Driver's Seat Only) (If Installed) To raise or lower the front part of the seat cushion, turn the front knob for- ward or rearward. To raise or lower therear part of the seat cushion, turn the rear knob forward or rearward.
B080G01A-GAT Adjusting Armrest Angle (Driver's side only)
The armrest will be raised or lowered manually. To raise the armrest, pull it up.To lower it, press the armrest down. HTB2049-D
HTB027-D
B080E01O-AAT Lumbar Support Control
(Driver's Seat Only) (If Installed) To adjust the lumbar support, turn the handle on the outboard or left side ofthe seat. To increase the amount of lumbar support, pull the lever forward. To decrease it, push the lever towardthe rear.
Page 26 of 191

FEATURES OF YOUR HYUNDAI 1- 15
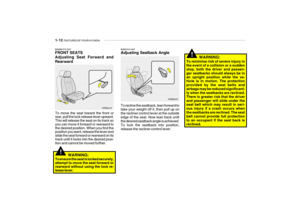
To recline the seatback, push the seatback folding lever toward the head-rest, and release it after the desired seatback angle is achieved.
!
B080I01TB
Seatback folding lever
B080I02FC-GAT REAR SEAT Adjusting Seatback Angle
HTB294
B099A02F-DAT BEFORE FOLDING THE REAR SEATS Outboard Rear Seat Belt
Rear Seat Centre's 3 Point Type Seat Belt.
B130A01A-AAT REAR SEAT ENTRY (For 3-door model) The front passenger seatback should be tilted to enter the rear seat. By pulling up on the recliner controllever (1) at the outside of the front passenger seat, the seatback will tilt forward and the seat will automaticallyslide forward. Rear seat occupants can tilt the front passenger seatback by depressing thefoot lever (2) as shown in the illustra- tion.
HTB258-D
(1)
(2) CAUTION:
The seatback angle should only be reclined when the seat is unoccu-pied.
!WARNING:
Passengers sitting in the rear seat should be careful not to acciden-tally press the foot lever (2) while the vehicle is moving, as this may cause the seatback to move for-ward and injure a front seat occu- pant. When you recline the seatback to de-sired position, always be sure it has locked into position.
Page 27 of 191
1- 16 FEATURES OF YOUR HYUNDAI
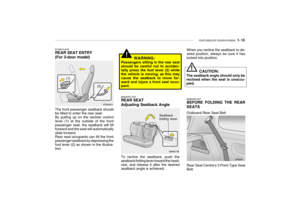
3. A Type: Pull the seat cushion re-
lease handle rearward, then lift up the entire seat cushion.B Type: Pull the seat cushion re- lease handle rearward, then lift up a desired seat cushion.
A Type B Type HTB030
Seat cushion release handle
HTB030A
Seat cushion release handle
Securing Strap Securing Strap
B090B01TBSeatback folding lever
B090B03TB-GAT Folding Rear Seatback and Seat Cushion For greater convenience, the entire seatback and seat cushion may be folded down and up.
1. Push the headrest down to the low-
est position.
2. To fold down the seatback , push and hold the seatback folding lever toward the headrest, then push down the seatback.
!
In order to prevent the shoulder belt from being damaged while folding therear seat, the shoulder belt must be passed through the hanger to keep it out of the way.
CAUTION:
Seat belts must be removed fromthe hanger when in use.
OTB038146
Page 28 of 191

FEATURES OF YOUR HYUNDAI 1- 17
!
WARNING:
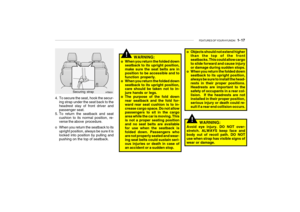
o When you return the folded down seatback to its upright position, make sure the seat belts are inposition to be accessible and to function properly.
o When you return the folded down seatback to its upright position,care should be taken not to in- jure hands or legs.
o The purpose of the fold down rear seatback and the fold for-ward rear seat cushion is to in-crease cargo space. Do not allow passengers to sit in the cargo area while the car is moving. Thisis not a proper seating position and no seat belts are available for use when the seatback isfolded down. Passengers who are not properly seated and wear- ing seat belts could sustain seri-ous injuries or death in case of an accident or a sudden stop. o Objects should not extend higher
than the top of the front seatbacks. This could allow cargo to slide forward and cause injury or damage during sudden stops.
o When you return the folded down seatback to its upright position,always be sure to install the head-rests in their proper positions. Headrests are important to the safety of occupants in a rear col-lision. If the headrests are not installed in their proper position, serious injury or death could re- sult if a rear end collision occurs.
4. To secure the seat, hook the secur-
ing strap under the seat back to the headrest stay of front driver and passenger seat.
5. To return the seatback and seat
cushion to its normal position, re-verse the above procedure.
o When you return the seatback to its upright position, always be sure it is locked into position by pulling andpushing on the top of seatback.
HTB031Securing strap
!
WARNING:
Avoid eye injury. DO NOT over- stretch. ALWAYS keep face andbody out of recoil path. DO NOT use when strap has visible signs of wear or damage.
Page 29 of 191

1- 18 FEATURES OF YOUR HYUNDAI
!
!
B150A01A-DAT SEAT BELTS The use of seat belts reduces the risk of accident injury by avoiding collisionwith the interior of the car and by preventing the occupants from being thrown out of the car. This make it themost important safety feature avail- able for you and your passengers. Adequate protection is achieved onlywhen the belt is worn correctly. You should always fasten and adjust your belts before the car is put in motion andencourage your passengers to do the same. A slack belt will greatly reduce the protection afforded to the water. Care should be taken to avoid con- tamination of the webbing withpolishes, oils and chemicals, and particularly battery acid. Cleaning may safely be carried out usingmild soap and water. The belt should be replaced if webbing becomes frayed, contaminated or damaged.It is essential to replace the entire assembly after it has been worn in a severe impact even if damage tothe assembly is not obvious. Belts should not be worn with straps twisted. Each seat belt assemblymust only be used by one occu- pant; it is dangerous to put a belt around a child being carried on theoccupant's lap.
WARNING:
Seat belts are designed to bear upon the bony structure of the body, and should be worn low across the frontof the pelvis or the pelvis, chest and shoulders as applicable; wearing the lap section of the belt across theabdominal area must be avoided. Seat belts should be adjusted as firmly as possible, consistent withcomfort, to provide the protection for which they have been designed. WARNING:
No modifications or additions shouldbe made by the user which will either prevent the seat belt adjusting de-vices from operating to remove slack, or prevent the seat belt assembly from being adjusted to remove slack.B140A01B-GAT REAR SEAT WARNING
For the safety of all passengers, lug- gage or other cargo should not be piled higher than the top of the seatback. B140A01TB
Page 30 of 191

FEATURES OF YOUR HYUNDAI 1- 19
B150B01A-DAT
Maintenance of Seat Belts When cleaning the seat belts, as recommended, avoid getting solutions into the buckle where they may attack the lubricant or cause corrosion. Donot attempt to bleach or re-dye belts, as this may affect the webbing strength. NOTE: Do not attempt any form of modifi- cations or repairs to seat belt com- ponents. If the retractor or othercomponents do not operate cor- rectly, call an authorised Hyundai Dealer, who will take the necessarycorrective action. Your authorised dealer will inspect all seat belt com- ponents at regular intervals andadvise if replacement is required. Between these inspections you should make regular checks to en-sure that foreign objects are not preventing complete buckle en- gagement. B160B01A-AAT Periodic Inspection It is recommended that all seat belts be inspected periodically for wear ordamage of any kind. Parts of the sys- tem that are damaged should be re- placed as soon as possible. B160C01A-AAT Keep Belts Clean and Dry Seat belts should be kept clean and dry. If belts become dirty, they can be cleaned by using a mild soap solutionand warm water. Bleach, dye, strong detergents or abrasives should not be used because they may damage andweaken the fabric. B160D01A-DAT When to Replace Seat Belts Complete seat belt assembly or as- semblies should be replaced if the vehicle has been involved in an acci-dent. This should be done even if no damage is visible. Additional ques- tions concerning seat belt operationshould be directed to your Hyundai Dealer.B170A04A-AAT HEIGHT ADJUSTABLE FRONT SEAT SHOULDER BELT(If Installed)
B170A01L
You can adjust the height of the shoul- der belt anchor to one of the 4 posi- tions.If the height of the adjusting seat belt is too near your neck, you will not be getting the most effective protection.The shoulder portion should be ad- justed so that it lies across your chest and midway over your shoulder near-est the door and not your neck. To adjust the height of the seat belt anchor, lower or raise the height ad-juster into an appropriate position. To raise the height adjuster, pull it up. To
Page 31 of 191

1- 20 FEATURES OF YOUR HYUNDAI
will also lock if you try to lean forward too quickly. Check to make sure that the belt is properly locked and that thebelt is not twisted. NOTE: If you are not able to pull out the seat belt from the retractor, firmly pull the belt out and release it. Then you will be able to pull the belt out smoothly.
B180A03A-GAT SEAT BELTS 3-Point System with Emergency Locking Retrac-
tor (If Installed)To Fasten Your Belt To fasten your seat belt, pull it out of the retractor and insert the metal tab intothe buckle. There will be an audible "click" when the tab locks into the buckle.The seat belt automatically adjusts to the proper length only after the lap belt is adjusted manually so that it fitssnugly around your hips. If you lean forward in a slow, easy motion, the belt will extend and let you move around. Ifthere is a sudden stop or impact, how- ever, the belt will lock into position. It
!
lower it, push it down while pressing the height adjuster button. Release the button to lock the anchorinto position. Try sliding the release button to make sure that it has locked into the position.
WARNING:
o The height adjuster must be in the locked position when the vehicle is moving.
o The misadjustment of height of the shoulder belt could reducethe effectiveness of the seat belt in a crash.
*1) When the ignition key is turned from"OFF" position to "ON" within 1minute.
The seat belt warning light and chimewill activate to the following table.
B265E01TB-DAT Seat Belt Warning Light and Chime
B180A01NF
Sat Belt WarningLight
Seat Belt Ignition Switch
Unbuckled ON Stay on until buckled up
Buckled O N Come on for 6 seconds
Unbuckled ON * 1
Blink until buckled up
ON Blink until buckled up* 2
Buckled
Unbuckled User (Driver) Condition
Page 32 of 191

FEATURES OF YOUR HYUNDAI 1- 21
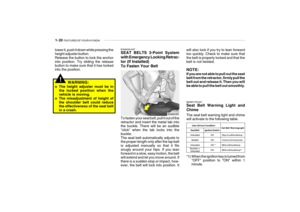
B200A01S-GAT Adjusting Your Seat Belt B210A02A-DATTo Release the Seat Belt
The seat belt is released by pressing the release button in the locking buckle. When it is released, the belt shouldautomatically draw back into the re- tractor. If this does not happen, check the beltto be sure it is not twisted, then try again. If the seat belt does not draw back intothe retractor after checking for any twists have the belt inspected by a Hyundai dealer.
B200A02NF
You should place the belt as low as possible on your hips, not on your waist. If the belt is located too high onyour body, you could slide under it in case of an accident or a sudden stop. This could result of death, seriousinjury or property damage. Both arms should not be under or over the belt. Rather, one should be over and theother under, as shown in the illustration. Never wear the seat belt under the arm nearest to the door.
*2) If the vehicle speed exceeds 9km/
h, the seat belt chime also soundsfor about 1~2 minutes.If the vehicle speed is below 9km/h, 1 minute later the seat belt chime also sounds for about 1~2 minutes.
NOTE: If the driver's seat belt is operated in this order "unbuckled
buckled
unbuckled
buckled
unbuckled"
within 9 seconds after the seat belt isbuckled, the seat belt warning lightand chime will not activate.
B210A01NF