Page 1888 of 5121

DRIVE BELT
EM-13
< ON-VEHICLE MAINTENANCE >
C
D
E
F
G
H
I
J
K
L
MA
EM
N
P O
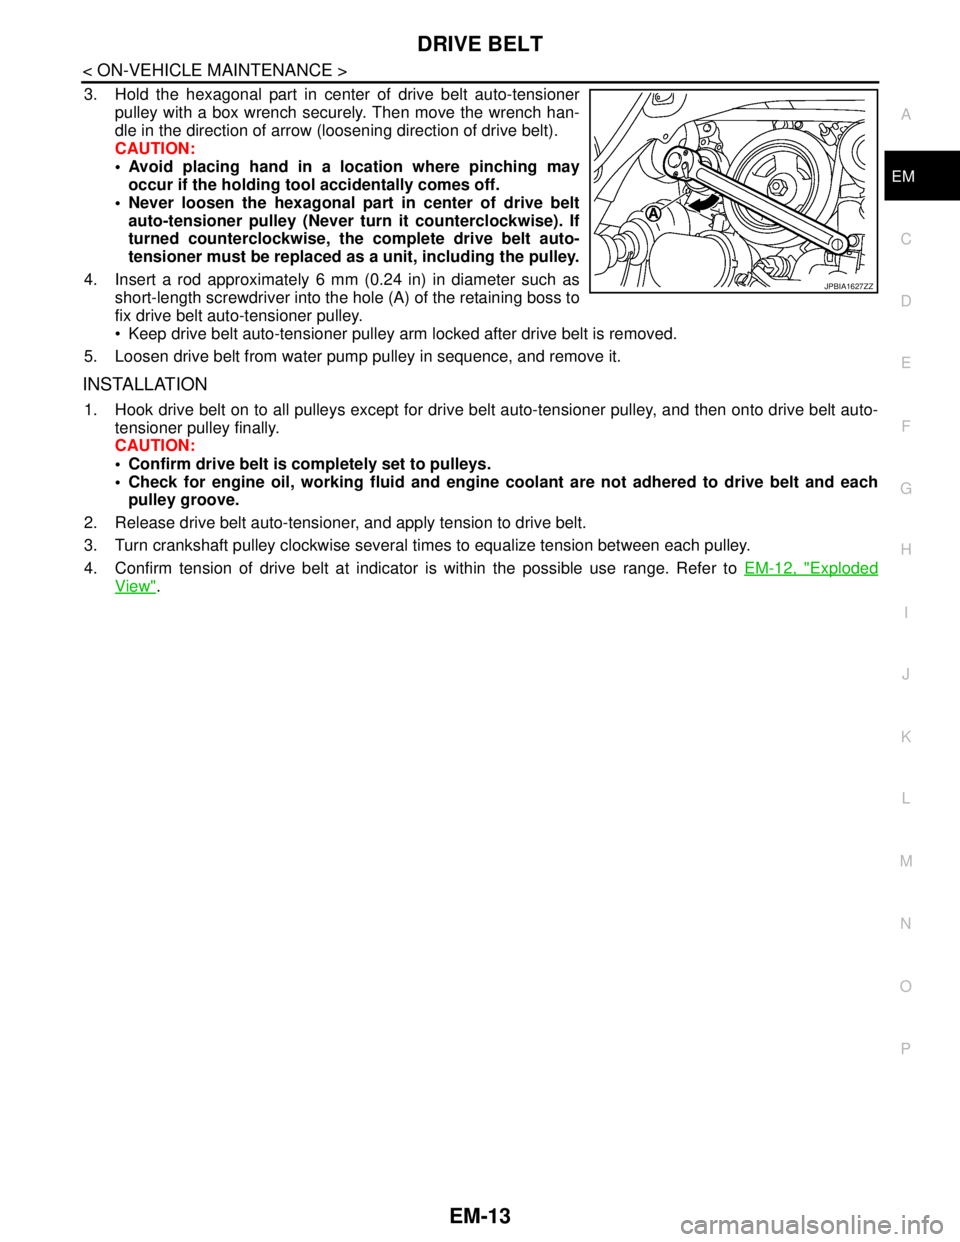
3. Hold the hexagonal part in center of drive belt auto-tensioner
pulley with a box wrench securely. Then move the wrench han-
dle in the direction of arrow (loosening direction of drive belt).
CAUTION:
Avoid placing hand in a location where pinching may
occur if the holding tool accidentally comes off.
Never loosen the hexagonal part in center of drive belt
auto-tensioner pulley (Never turn it counterclockwise). If
turned counterclockwise, the complete drive belt auto-
tensioner must be replaced as a unit, including the pulley.
4. Insert a rod approximately 6 mm (0.24 in) in diameter such as
short-length screwdriver into the hole (A) of the retaining boss to
fix drive belt auto-tensioner pulley.
Keep drive belt auto-tensioner pulley arm locked after drive belt is removed.
5. Loosen drive belt from water pump pulley in sequence, and remove it.
INSTALLATION
1. Hook drive belt on to all pulleys except for drive belt auto-tensioner pulley, and then onto drive belt auto-
tensioner pulley finally.
CAUTION:
Confirm drive belt is completely set to pulleys.
Check for engine oil, working fluid and engine coolant are not adhered to drive belt and each
pulley groove.
2. Release drive belt auto-tensioner, and apply tension to drive belt.
3. Turn crankshaft pulley clockwise several times to equalize tension between each pulley.
4. Confirm tension of drive belt at indicator is within the possible use range. Refer to EM-12, "
Exploded
View".
JPBIA1627ZZ
Page 1889 of 5121
EM-14
< ON-VEHICLE MAINTENANCE >
AIR CLEANER FILTER
AIR CLEANER FILTER
Removal and InstallationINFOID:0000000003802240
REMOVAL
1. Unhook air cleaner case (lower) side clips and lift up air cleaner case (upper).
2. Remove air cleaner filter from air cleaner case (lower).
INSTALLATION
Note the following, and install in the reverse order of removal.
Install the air cleaner filter by aligning the seal with the notch of air cleaner case.
PBIC1165E
Page 1890 of 5121

SPARK PLUG
EM-15
< ON-VEHICLE MAINTENANCE >
C
D
E
F
G
H
I
J
K
L
MA
EM
N
P O
SPARK PLUG
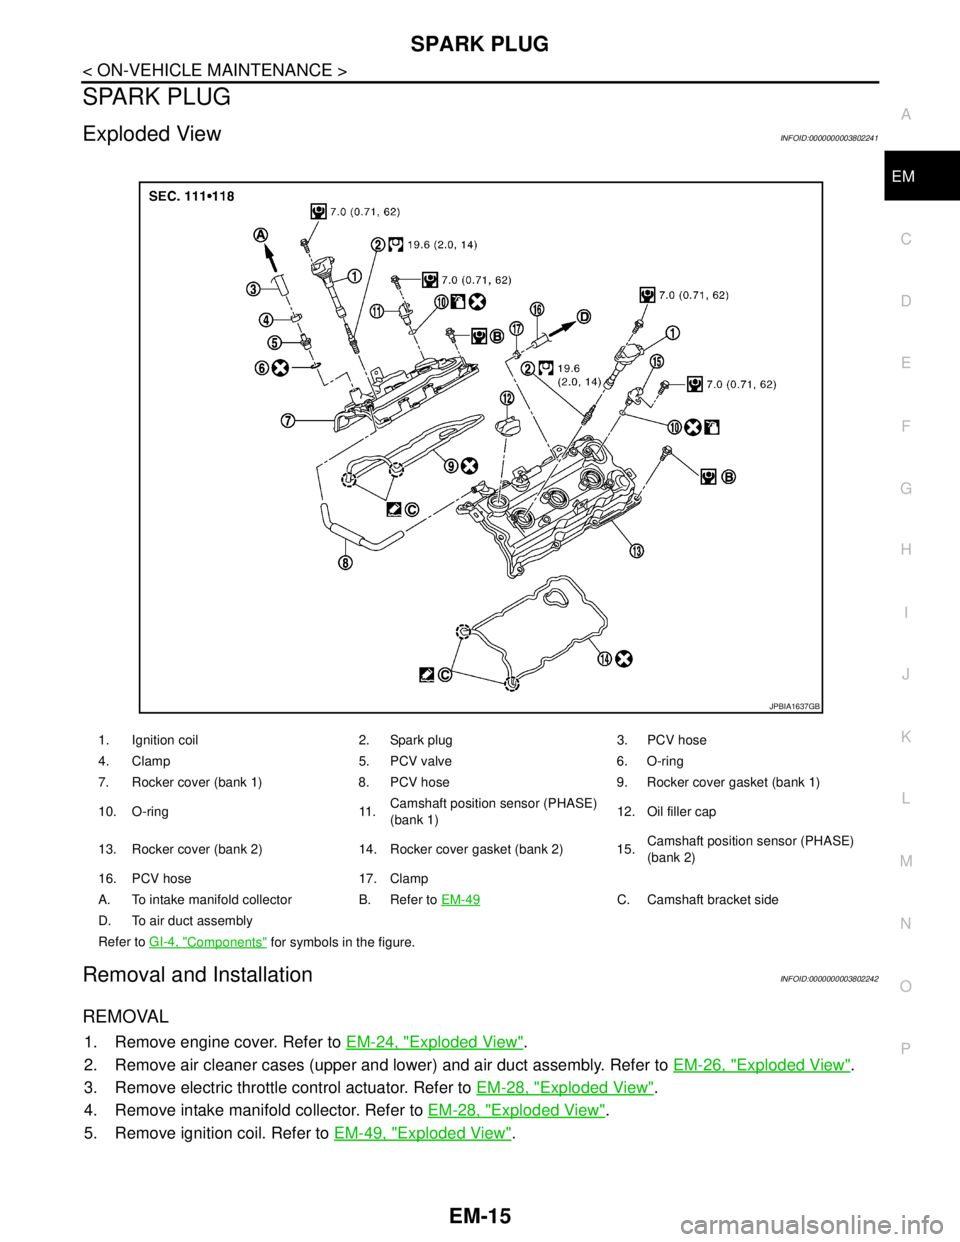
Exploded ViewINFOID:0000000003802241
Removal and InstallationINFOID:0000000003802242
REMOVAL
1. Remove engine cover. Refer to EM-24, "Exploded View".
2. Remove air cleaner cases (upper and lower) and air duct assembly. Refer to EM-26, "
Exploded View".
3. Remove electric throttle control actuator. Refer to EM-28, "
Exploded View".
4. Remove intake manifold collector. Refer to EM-28, "
Exploded View".
5. Remove ignition coil. Refer to EM-49, "
Exploded View".
1. Ignition coil 2. Spark plug 3. PCV hose
4. Clamp 5. PCV valve 6. O-ring
7. Rocker cover (bank 1) 8. PCV hose 9. Rocker cover gasket (bank 1)
10. O-ring 11.Camshaft position sensor (PHASE)
(bank 1)12. Oil filler cap
13. Rocker cover (bank 2) 14. Rocker cover gasket (bank 2) 15.Camshaft position sensor (PHASE)
(bank 2)
16. PCV hose 17. Clamp
A. To intake manifold collector B. Refer to EM-49
C. Camshaft bracket side
D. To air duct assembly
Refer to GI-4, "
Components" for symbols in the figure.
JPBIA1637GB
Page 1891 of 5121
EM-16
< ON-VEHICLE MAINTENANCE >
SPARK PLUG
6. Remove spark plug with a spark plug wrench (commercial ser-
vice tool).
INSTALLATION
Installation is the reverse order of removal.
InspectionINFOID:0000000003802243
INSPECTION AFTER REMOVAL
Use the standard type spark plug for normal condition.
CAUTION:
Never drop or shock spark plug.
Never use a wire brush for cleaning.
If plug tip is covered with carbon, spark plug cleaner may be
used.
Spark plug gap adjustment is not required between replace-
ment intervals.
Measure spark plug gap. When it exceeds the limit, replace
spark plug even if it is within the specified replacement mile-
age. Refer to EM-136, "
Spark Plug".
a : 14 mm (0.55 in)
JPBIA0030ZZ
Spark plug (Standard type) : Refer to EM-136, "Spark Plug".
Cleaner air pressure: Less than 588 kPa (6 bar, 6 kg/
cm
2, 85 psi)
Cleaning time: Less than 20 seconds
SMA773C
JPBIA0031ZZ
Page 1892 of 5121

CAMSHAFT VALVE CLEARANCE
EM-17
< ON-VEHICLE MAINTENANCE >
C
D
E
F
G
H
I
J
K
L
MA
EM
N
P O
CAMSHAFT VALVE CLEARANCE
Inspection and AdjustmentINFOID:0000000003802244
INSPECTION
Perform inspection as follows after removal, installation or replacement of camshaft or valve-related parts, or if
there is unusual engine conditions regarding valve clearance.
In cases of removing/installing or replacing camshaft and valve-
related parts, or of unusual engine conditions due to changes in
valve clearance (found malfunctions during stating, idling or causing
noise), perform inspection as follows:
1. Remove rocker covers (bank 1 and bank 2). Refer to EM-49, "
Exploded View".
2. Measure the valve clearance as follows:
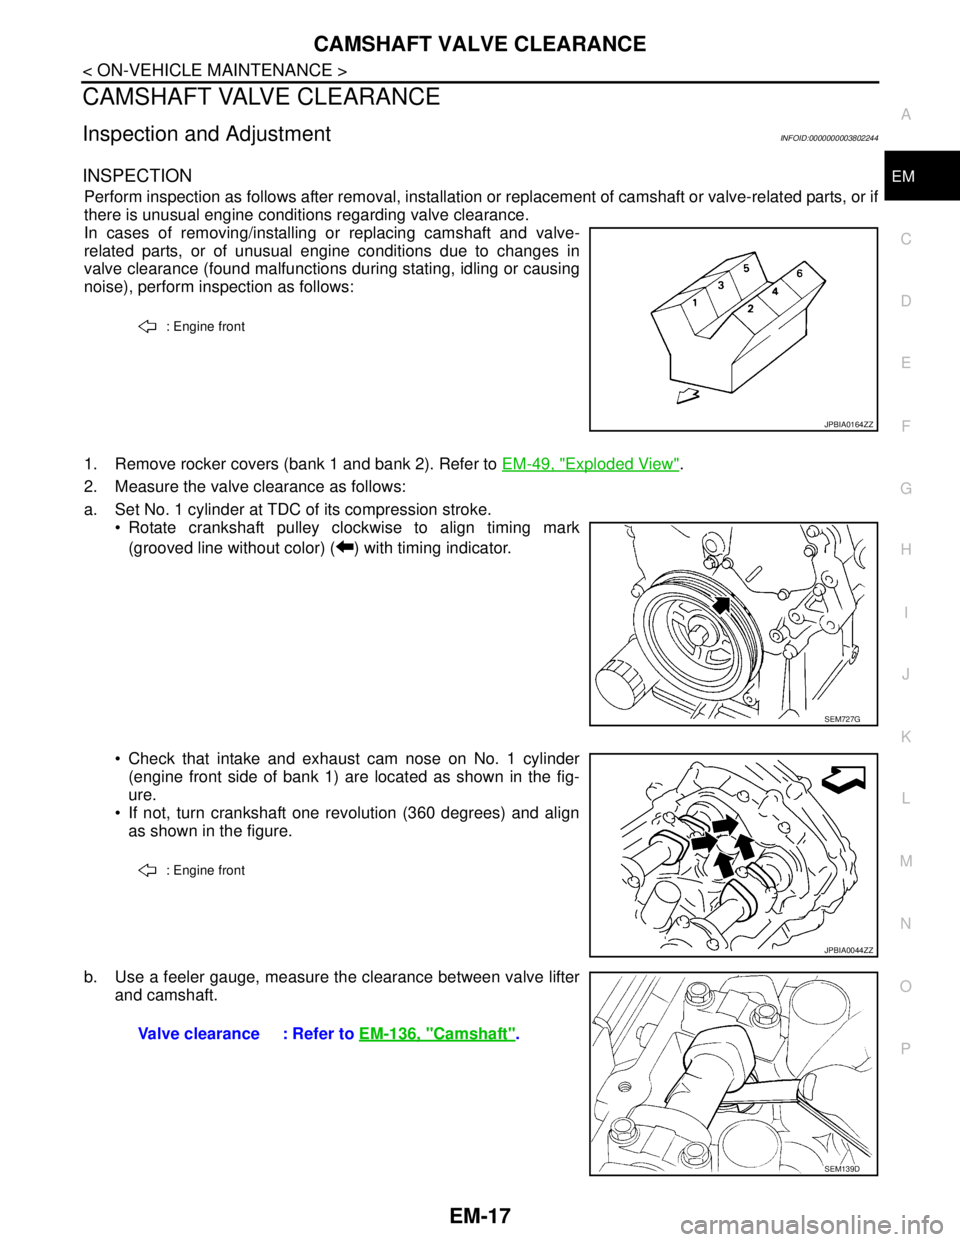
a. Set No. 1 cylinder at TDC of its compression stroke.
Rotate crankshaft pulley clockwise to align timing mark
(grooved line without color) ( ) with timing indicator.
Check that intake and exhaust cam nose on No. 1 cylinder
(engine front side of bank 1) are located as shown in the fig-
ure.
If not, turn crankshaft one revolution (360 degrees) and align
as shown in the figure.
b. Use a feeler gauge, measure the clearance between valve lifter
and camshaft.
: Engine front
JPBIA0164ZZ
SEM727G
: Engine front
JPBIA0044ZZ
Valve clearance : Refer to EM-136, "Camshaft".
SEM139D
Page 1893 of 5121
EM-18
< ON-VEHICLE MAINTENANCE >
CAMSHAFT VALVE CLEARANCE
By referring to the figure, measure the valve clearances at
locations marked “×” as shown in the table below (locations
indicated in the figure).
No. 1 cylinder at compression TDC
c. Rotate crankshaft by 240 degrees clockwise (when viewed from engine front) to align No. 3 cylinder at
TDC its compression stroke.
NOTE:
Mark a position 240 degrees (b) from a corner of the hexagonal
part of crankshaft pulley mounting bolt as shown in the figure.
Use the hexagonal part as a guide.
: Engine front
Measuring position [bank 1 (A)] No. 1 CYL. No. 3 CYL. No. 5 CYL.
No. 1 cylinder at com-
pression TDCEXH (C)× (B)
INT (D)× (E)
Measuring position [bank 2 (H)] No. 2 CYL. No. 4 CYL. No. 6 CYL.
No. 1 cylinder at com-
pression TDCINT (D)× (F)
EXH (C)× (G)
JPBIA0165ZZ
1 : Crankshaft pulley
A : Paint mark
JPBIA0166ZZ
Page 1894 of 5121
CAMSHAFT VALVE CLEARANCE
EM-19
< ON-VEHICLE MAINTENANCE >
C
D
E
F
G
H
I
J
K
L
MA
EM
N
P O
By referring to the figure, measure the valve clearances at
locations marked “×” as shown in the table below (locations
indicated in the figure).
No. 3 cylinder at compression TDC
d. Rotate crankshaft by 240 degrees clockwise (when viewed from engine front) to align No. 5 cylinder at
TDC of compression stroke.
NOTE:
Mark a position 240 degrees (b) from a corner of the hexagonal
part of crankshaft pulley mounting bolt as shown in the figure.
Use the hexagonal part as a guide.
: Engine front
Measuring position [bank 1 (A)] No. 1 CYL. No. 3 CYL. No. 5 CYL.
No. 3 cylinder at com-
pression TDCEXH (C)× (B)
INT (D)× (E)
Measuring position [bank 2 (H)] No. 2 CYL. No. 4 CYL. No. 6 CYL.
No. 3 cylinder at com-
pression TDCINT (D)× (F)
EXH (C)× (G)
JPBIA0167ZZ
1 : Crankshaft pulley
A : Paint mark
JPBIA0166ZZ
Page 1895 of 5121

EM-20
< ON-VEHICLE MAINTENANCE >
CAMSHAFT VALVE CLEARANCE
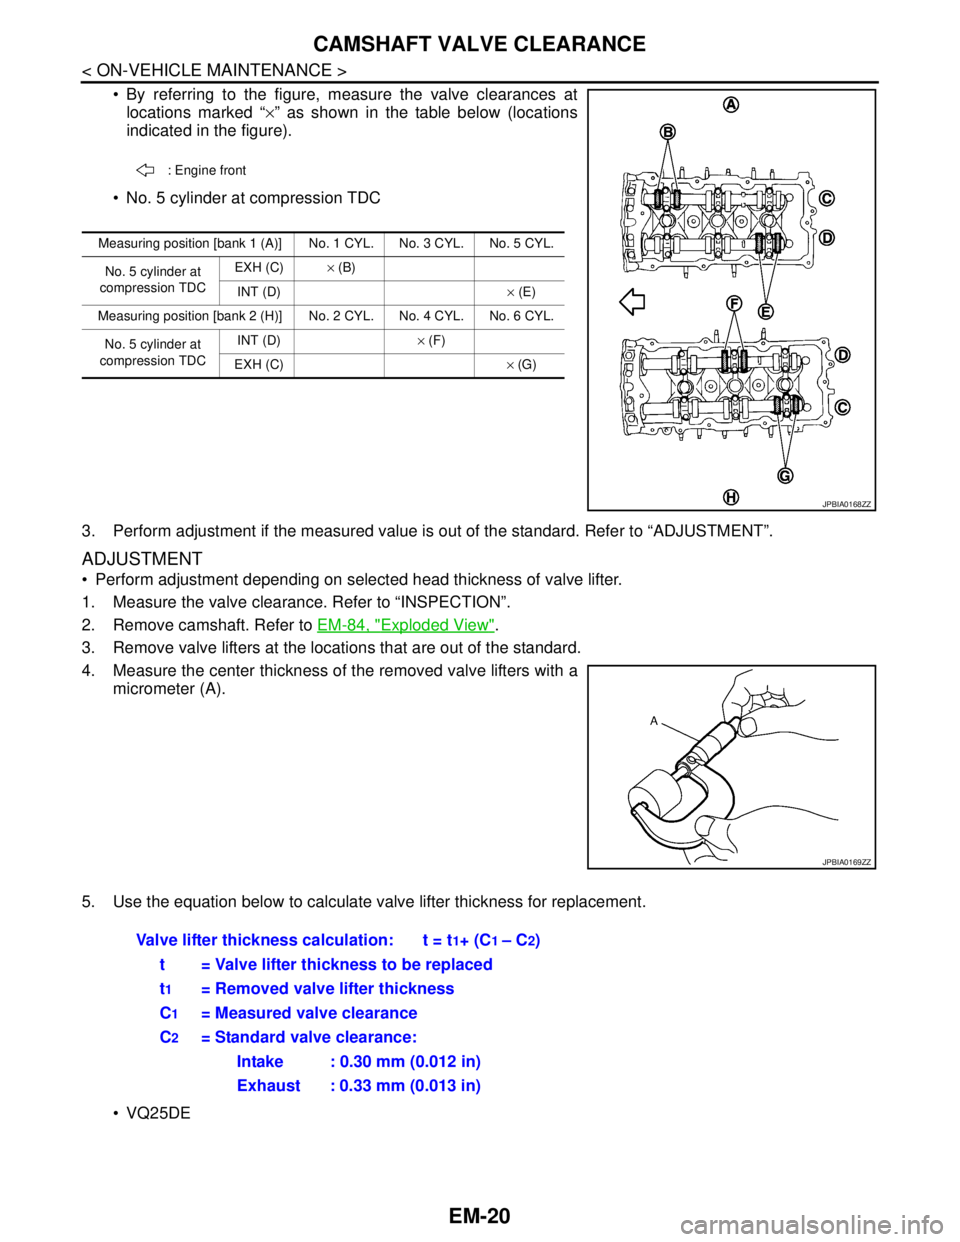
By referring to the figure, measure the valve clearances at
locations marked “×” as shown in the table below (locations
indicated in the figure).
No. 5 cylinder at compression TDC
3. Perform adjustment if the measured value is out of the standard. Refer to “ADJUSTMENT”.
ADJUSTMENT
Perform adjustment depending on selected head thickness of valve lifter.
1. Measure the valve clearance. Refer to “INSPECTION”.
2. Remove camshaft. Refer to EM-84, "
Exploded View".
3. Remove valve lifters at the locations that are out of the standard.
4. Measure the center thickness of the removed valve lifters with a
micrometer (A).
5. Use the equation below to calculate valve lifter thickness for replacement.
VQ25DE
: Engine front
Measuring position [bank 1 (A)] No. 1 CYL. No. 3 CYL. No. 5 CYL.
No. 5 cylinder at
compression TDCEXH (C)× (B)
INT (D)× (E)
Measuring position [bank 2 (H)] No. 2 CYL. No. 4 CYL. No. 6 CYL.
No. 5 cylinder at
compression TDCINT (D)× (F)
EXH (C)× (G)
JPBIA0168ZZ
JPBIA0169ZZ
Valve lifter thickness calculation: t = t1+ (C1 – C2)
t = Valve lifter thickness to be replaced
t
1= Removed valve lifter thickness
C
1= Measured valve clearance
C
2= Standard valve clearance:
Intake : 0.30 mm (0.012 in)
Exhaust : 0.33 mm (0.013 in)