Page 2951 of 5121

INL-72
< ECU DIAGNOSIS >
BCM (BODY CONTROL MODULE)
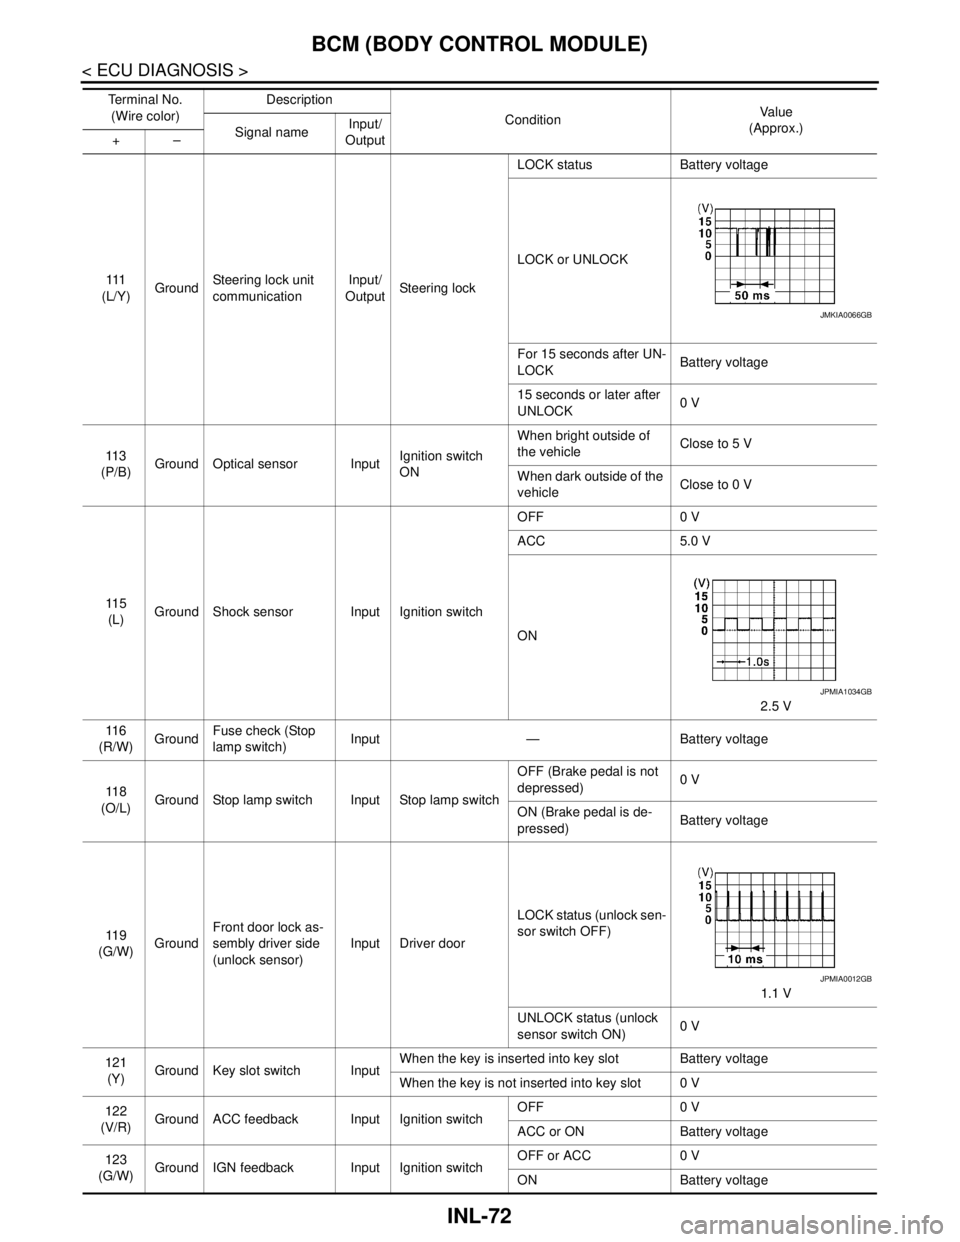
111
(L/Y)GroundSteering lock unit
communicationInput/
OutputSteering lockLOCK status Battery voltage
LOCK or UNLOCK
For 15 seconds after UN-
LOCKBattery voltage
15 seconds or later after
UNLOCK0 V
11 3
(P/B)Ground Optical sensor InputIgnition switch
ONWhen bright outside of
the vehicleClose to 5 V
When dark outside of the
vehicleClose to 0 V
11 5
(L)Ground Shock sensor Input Ignition switchOFF 0 V
ACC 5.0 V
ON
2.5 V
11 6
(R/W)GroundFuse check (Stop
lamp switch)Input — Battery voltage
11 8
(O/L)Ground Stop lamp switch Input Stop lamp switchOFF (Brake pedal is not
depressed)0 V
ON (Brake pedal is de-
pressed)Battery voltage
11 9
(G/W)GroundFront door lock as-
sembly driver side
(unlock sensor)Input Driver doorLOCK status (unlock sen-
sor switch OFF)
1.1 V
UNLOCK status (unlock
sensor switch ON)0 V
121
(Y)Ground Key slot switch InputWhen the key is inserted into key slot Battery voltage
When the key is not inserted into key slot 0 V
122
(V/R)Ground ACC feedback Input Ignition switchOFF 0 V
ACC or ON Battery voltage
123
(G/W)Ground IGN feedback Input Ignition switchOFF or ACC 0 V
ON Battery voltage Te r m i n a l N o .
(Wire color)Description
ConditionVa l u e
(Approx.)
Signal nameInput/
Output +–
JMKIA0066GB
JPMIA1034GB
JPMIA0012GB
Page 2968 of 5121

MAP LAMP
INL-89
< ON-VEHICLE REPAIR >
C
D
E
F
G
H
I
J
K
MA
B
INL
N
O
P
ON-VEHICLE REPAIR
MAP LAMP
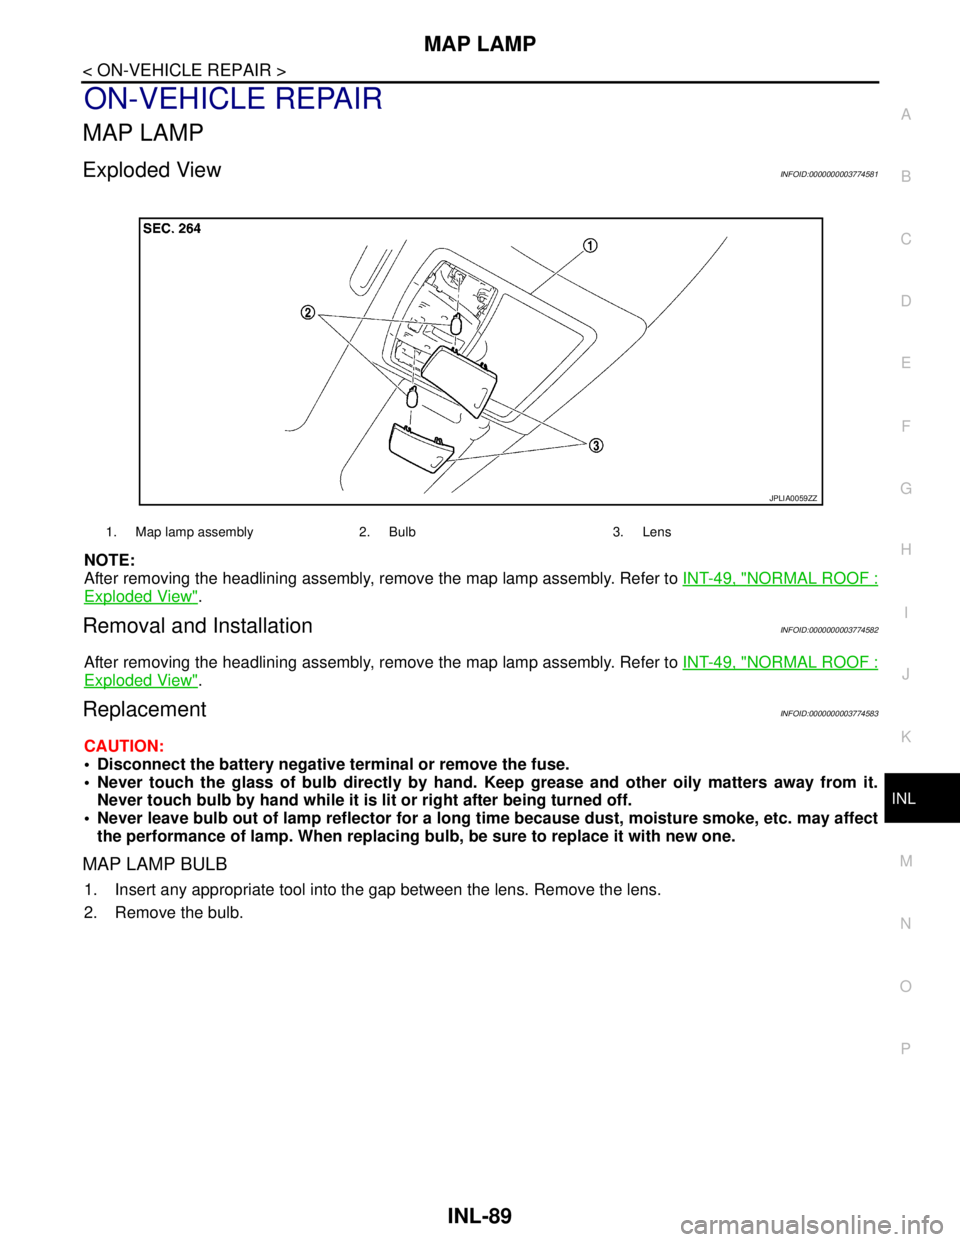
Exploded ViewINFOID:0000000003774581
NOTE:
After removing the headlining assembly, remove the map lamp assembly. Refer to INT-49, "
NORMAL ROOF :
Exploded View".
Removal and InstallationINFOID:0000000003774582
After removing the headlining assembly, remove the map lamp assembly. Refer to INT-49, "NORMAL ROOF :
Exploded View".
ReplacementINFOID:0000000003774583
CAUTION:
Disconnect the battery negative terminal or remove the fuse.
Never touch the glass of bulb directly by hand. Keep grease and other oily matters away from it.
Never touch bulb by hand while it is lit or right after being turned off.
Never leave bulb out of lamp reflector for a long time because dust, moisture smoke, etc. may affect
the performance of lamp. When replacing bulb, be sure to replace it with new one.
MAP LAMP BULB
1. Insert any appropriate tool into the gap between the lens. Remove the lens.
2. Remove the bulb.
1. Map lamp assembly 2. Bulb 3. Lens
JPLIA0059ZZ
Page 2969 of 5121
INL-90
< ON-VEHICLE REPAIR >
MOOD LAMP
MOOD LAMP
MAP LAMP
MAP LAMP : Exploded ViewINFOID:0000000003838126
Mood lamp (map lamp) is integrated into the map lamp assembly. Refer to INL-89, "Exploded View".
FRONT DOOR GRIP
FRONT DOOR GRIP : Exploded ViewINFOID:0000000003838122
NOTE:
Only passenger side
FRONT DOOR GRIP : ReplacementINFOID:0000000003838123
CAUTION:
Disconnect the battery negative terminal or remove the fuse.
MOOD LAMP (FRONT DOOR GRIP)
1. Remove the front door finisher (passenger side). Refer to INT-33, "PASSENGER SIDE : Exploded View".
2. Remove the mood lamp (front door grip) from the front door finisher (passenger side).
REAR DOOR GRIP
1. Mood lamp (front door grip)
J P L I A 111 4 Z Z
Page 2970 of 5121
MOOD LAMP
INL-91
< ON-VEHICLE REPAIR >
C
D
E
F
G
H
I
J
K
MA
B
INL
N
O
P
REAR DOOR GRIP : Exploded ViewINFOID:0000000003838124
REAR DOOR GRIP : ReplacementINFOID:0000000003838125
CAUTION:
Disconnect the battery negative terminal or remove the fuse.
MOOD LAMP (REAR DOOR GRIP)
1. Remove the rear door finisher. Refer to INT-36, "Exploded View".
2. Remove the mood lamp (rear door grip) from the rear door finisher.
1. Mood lamp (rear door grip)
J P L I A 111 5 Z Z
Page 2971 of 5121
INL-92
< ON-VEHICLE REPAIR >
VANITY MIRROR LAMP
VANITY MIRROR LAMP
Exploded ViewINFOID:0000000003774587
ReplacementINFOID:0000000003774588
CAUTION:
Disconnect the battery negative terminal or remove the fuse.
Never touch the glass of bulb directly by hand. Keep grease and other oily matters away from it.
Never touch bulb by hand while it is lit or right after being turned off.
Never leave bulb out of lamp reflector for a long time because dust, moisture smoke, etc. may affect
the performance of lamp. When replacing bulb, be sure to replace it with new one.
VANITY MIRROR LAMP BULB
1. Insert any appropriate tool into the gap between the lens. Remove the lens.
2. Remove the bulb.
1. Bulb 2. Lens
JPLIA1107ZZ
Page 2972 of 5121
ASHTRAY ILLUMINATION
INL-93
< ON-VEHICLE REPAIR >
C
D
E
F
G
H
I
J
K
MA
B
INL
N
O
P
ASHTRAY ILLUMINATION
Exploded ViewINFOID:0000000003774591
ReplacementINFOID:0000000003774592
CAUTION:
Disconnect the battery negative terminal or remove the fuse.
Never touch the glass of bulb directly by hand. Keep grease and other oily matters away from it.
Never touch bulb by hand while it is lit or right after being turned off.
Never leave bulb out of lamp reflector for a long time because dust, moisture smoke, etc. may affect
the performance of lamp. When replacing bulb, be sure to replace it with new one.
ASHTRAY ILLUMINATION BULB
1. Remove the console finisher assembly. Refer to IP-22, "Exploded View".
2. Rotate the bulb socket counterclockwise and unlock it.
3. Remove the bulb.
1. Bulb socket 2. Bulb
JPLIA1183ZZ
Page 2973 of 5121
INL-94
< ON-VEHICLE REPAIR >
GLOVE BOX LAMP
GLOVE BOX LAMP
Exploded ViewINFOID:0000000003774593
ReplacementINFOID:0000000003774594
CAUTION:
Disconnect the battery negative terminal or remove the fuse.
Never touch the glass of bulb directly by hand. Keep grease and other oily matters away from it.
Never touch bulb by hand while it is lit or right after being turned off.
Never leave bulb out of lamp reflector for a long time because dust, moisture smoke, etc. may affect
the performance of lamp. When replacing bulb, be sure to replace it with new one.
GLOVE BOX LAMP BULB
1. Remove the glove box assembly. Refer to IP-11, "Exploded View".
2. Rotate the bulb socket counterclockwise and unlock it.
3. Remove the bulb.
1. Bulb 2. Bulb socket
J P L I A 111 0 Z Z
Page 2974 of 5121

STEP LAMP
INL-95
< ON-VEHICLE REPAIR >
C
D
E
F
G
H
I
J
K
MA
B
INL
N
O
P
STEP LAMP
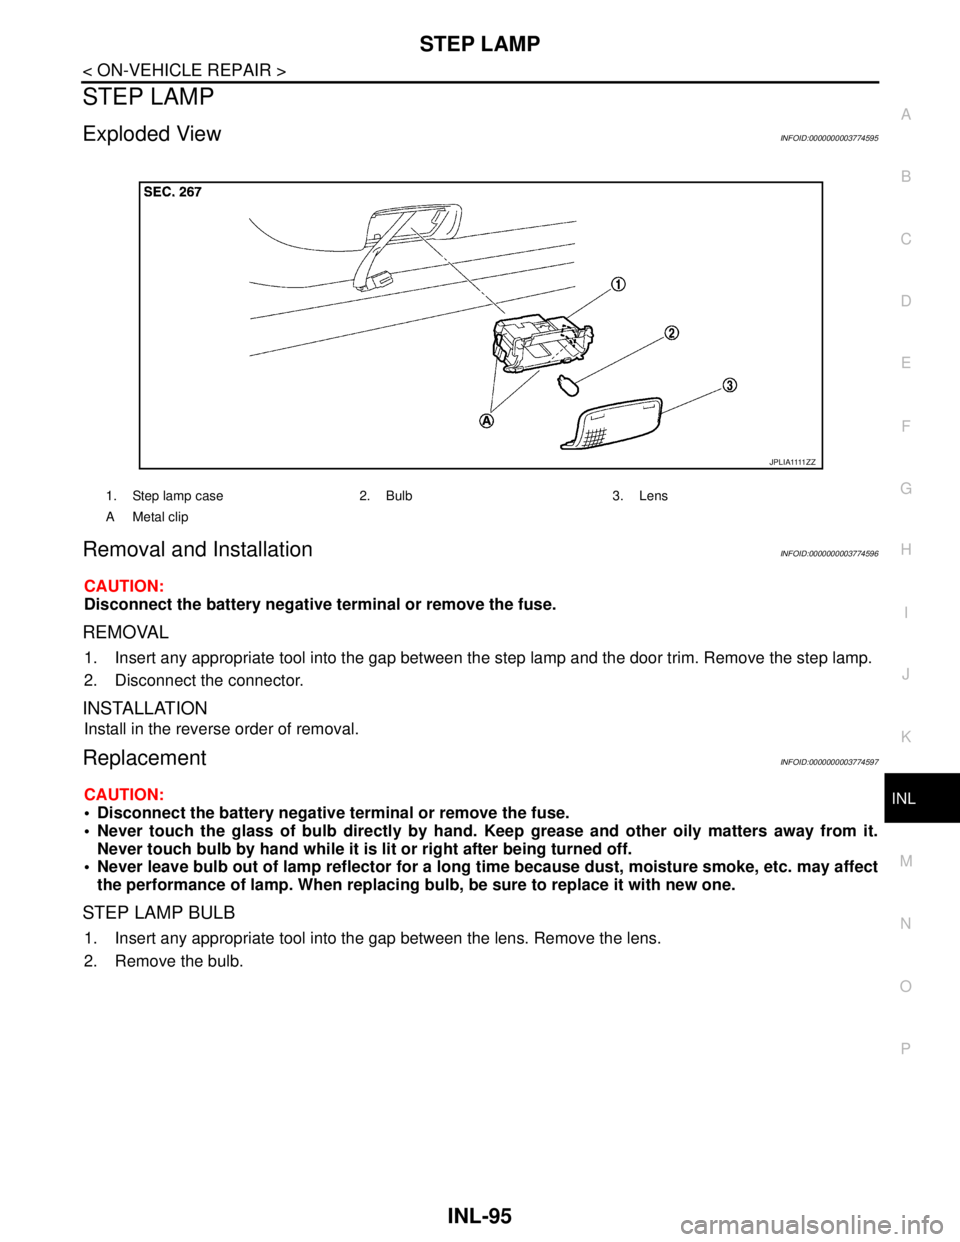
Exploded ViewINFOID:0000000003774595
Removal and InstallationINFOID:0000000003774596
CAUTION:
Disconnect the battery negative terminal or remove the fuse.
REMOVAL
1. Insert any appropriate tool into the gap between the step lamp and the door trim. Remove the step lamp.
2. Disconnect the connector.
INSTALLATION
Install in the reverse order of removal.
ReplacementINFOID:0000000003774597
CAUTION:
Disconnect the battery negative terminal or remove the fuse.
Never touch the glass of bulb directly by hand. Keep grease and other oily matters away from it.
Never touch bulb by hand while it is lit or right after being turned off.
Never leave bulb out of lamp reflector for a long time because dust, moisture smoke, etc. may affect
the performance of lamp. When replacing bulb, be sure to replace it with new one.
STEP LAMP BULB
1. Insert any appropriate tool into the gap between the lens. Remove the lens.
2. Remove the bulb.
1. Step lamp case 2. Bulb 3. Lens
A Metal clip
J P L I A 1111 Z Z