Page 221 of 317
Displa
ymessages 218 Display messages Possible cause/consequence Possible solution
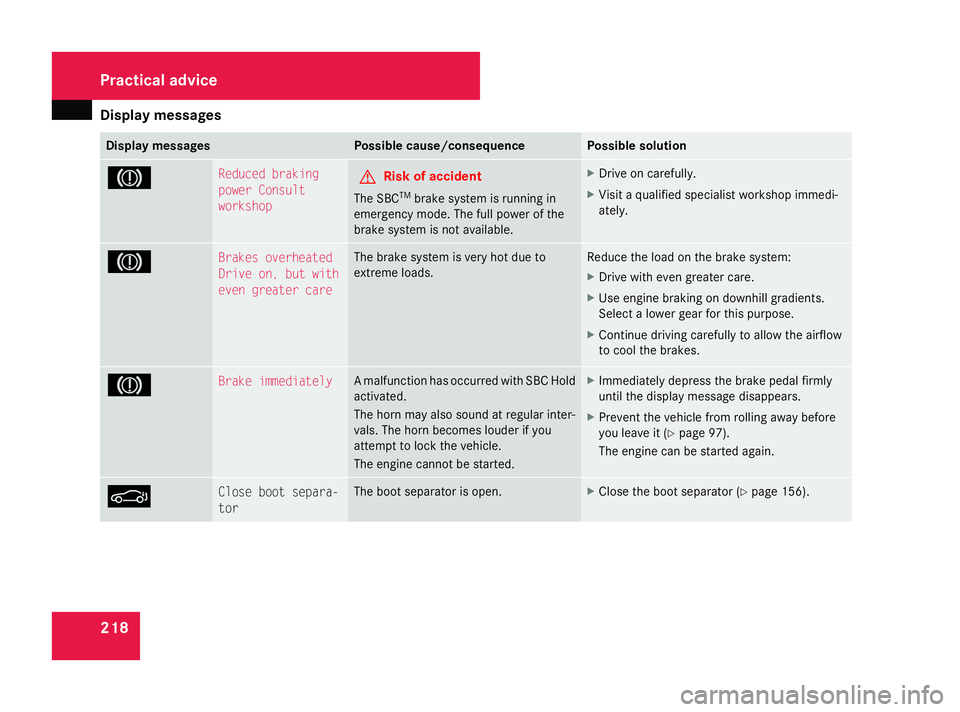
3 Reduce
dbraking
powe rConsult
workshop G
Ris
kofa ccident
Th eS BCTM
brak esystemisr unning in
emergency mode. Th efullp ower of the
brak esystemisn ot available. X
Drive on carefully.
X Visi taq ualified specialis tworksho pimmedi-
ately. 3 Brakes overheated
Driv
eon, butw ith
even greate rcare Th
eb rake syste misv eryh otdueto
extrem eloads. Reduce the load on the brak
esystem:
X Drive with even greate rcare.
X Us ee ngine braking on downhil lgradients.
Select alower gear for thi spurpose.
X Continue driving carefull ytoallowthe airflow
to coo lthe brakes. 3 Brak
eimmediately Am
alfunc tion ha soccurre dwithS BC Hold
activated.
Th eh ornm ayalso soun datregular inter-
vals .The horn becomes louder if you
attempt to lock the vehicle.
Th ee ngine cannot be started. X
Immediatel ydepress the brak epedal firmly
until the displa ymessage disappears.
X Prevent the vehicl efromr olling away before
yo ul eave it (Ypage 97).
Th ee ngine ca nbestarte dagain. M Clos
eboots epara-
tor Th
eb ootseparat or is open. X
Clos ethe boot separator (Y page 156).Practical advi
ce
230_AKB; 5; 4, en-GB
bjanott,
Version: 2.9.6 2008-04-08T15:09:54+02:00-Seite218 Dateiname: 6515_3089_02_buchblock.pdf; preflight
Page 235 of 317
Troubleshooting
232 Problem Possible cause/consequence Suggeste
dsolutions The
5 PASSENGER AIRBAG
OFF warning lamp on the centre
consol eislit. G
Ris
kofi njury
There is no child seat fitted to the
front-passenge rseat. Th eauto-
matic child seat recognition is
malfunctioning. X
Remov eelectroni cequipment fromt he front-passenge rseat, e.g.:
R Notebooks
R Mobile phones
R Cards with transponders ,e.g.s ki passe soraccesspasses
If the 5 PASSENGER AIRBAG OFF warning lamp is still lit:
X Visi taq ualified specialis tworkshop. Th
eloadi ng ai dswitch is flashing.
Yo uw illa lsoh earaw arning tone. Yo
uh avec lose dthe boot lid
befor ethe roo fhas been lowered
completely. X
Lower the roo fcompletely (Y page 154). Practical advice
230_AKB; 5; 4, en-GB
bjanott,
Version: 2.9.6 2008-04-08T15:09:54+02:00-Seite 232 Dateiname: 6515_3089_02_buchblock.pdf; preflight
Page 252 of 317
Troubleshooting
249Roof
Problem Possible cause/consequence Suggeste
dsolutions Th
er oofw illn ot open or close. Th
eb ootseparat or is not in place. X
Clos ethe boot separator. Th
eb ootlid is open. X
Clos ethe boot lid. Th
eo n-board voltag eistoo low. X
Let the engine run. Th
er oofw asopene dand closed
several times in succession. The
roo fdrive wa sautomatically
deactivated. Yo
uc an open or close the roo fagain after abou tten minutes.
X Switch the ignition off and the nonagain.
X Repeat the opening or closing procedure. Th
ea utomatic roo fmechanis mis
faulty. X
Consult aqualified specialis tworkshop. Practical advice
230_AKB; 5; 4, en-GB
bjanott,
Version: 2.9.6
2008-04-08T15:09:54+02:0
0-Seite 249 ZDateiname: 6515_3089_02_buchblock.pdf; preflight
Page 258 of 317
Locking/unlockin
ginanemergency 255Locking/unlocking in an emergency
Emergency key
If th evehicle can no longer be unlocked or
locke dwith th ekeyor th eKEYLESS GO
key*, use th eemergency ke yelement.
If you use th eemergency ke yelemen tto
unlock and open th edriver' sdoor or th eboot
lid, th eanti-thef talarm system* will be trig-
gered (Y page 59).
Ther eare several ways to tur noff th ealarm:
X Press the korj buttonont hekey.
or
X Inser tthe keyintot he ignition lock.
or
X Press th eKEYLESS GO button* on the
selecto rlever. The KEYLESS GO key* must
be in th evehicle.
or
X Loc koru nlock th evehicle usin gKEYLESS
GO*. The KEYLESS GO key* must be out-
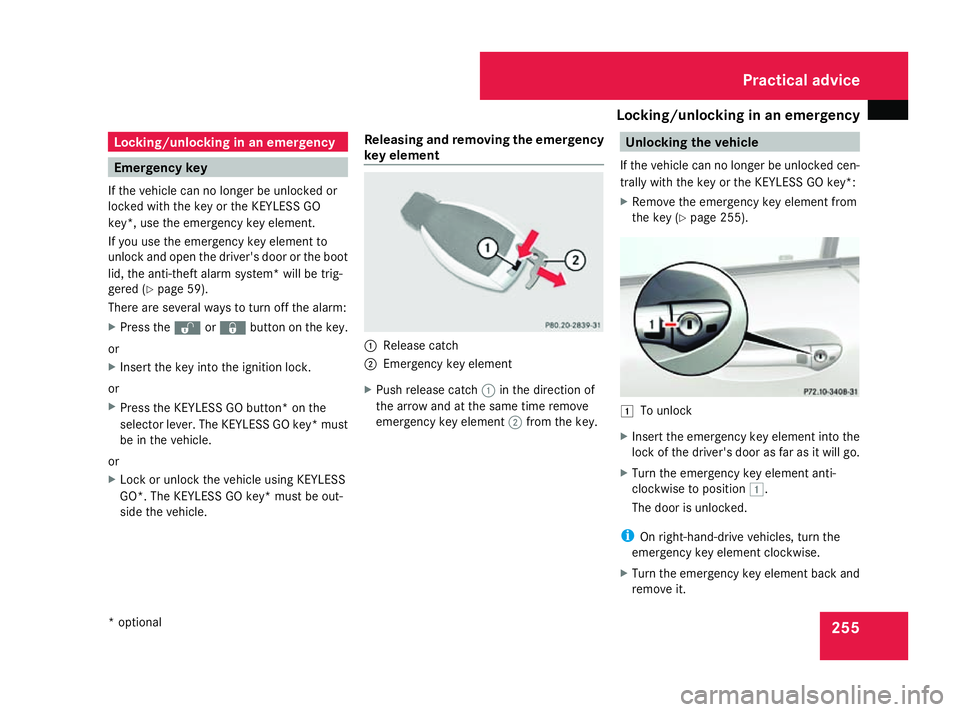
side th evehicle. Releasing and removing th
eemergency
key element 1
Release catch
2 Emergency ke yelement
X Push release catch 1in th edirection of
th ea rrow and at th esame tim eremove
emergency ke yelement 2from th ekey. Unlocking th
evehicle
If th evehicle can no longer be unlocked cen-
trally with th ekeyor th eKEYLESS GO key*:
X Remov ethe emergency ke yelemen tfrom
th ek ey ( Ypage 255). $
To unlock
X Inser tthe emergency ke yelemen tint ot he
loc koft hedriver' sdoor as far as it will go.
X Turn th eemergency ke yelemen tanti-
clockwise to position $.
The door is unlocked.
i On right-hand-driv evehicles, tur nthe
emergency ke yelemen tclockwise.
X Turn th eemergency ke yelemen tback and
remove it. Practical advice
*o ptional
230_AKB
;5;4,en-GB
bjanott ,V ersion: 2.9.6
2008-04-08T15:09:54+02:00
-Seite 255 ZDateiname: 6515_3089_02_buchblock.pdf; preflight
Page 259 of 317
Locking/unlockin
ginanemergency 256 Locking th
evehicle
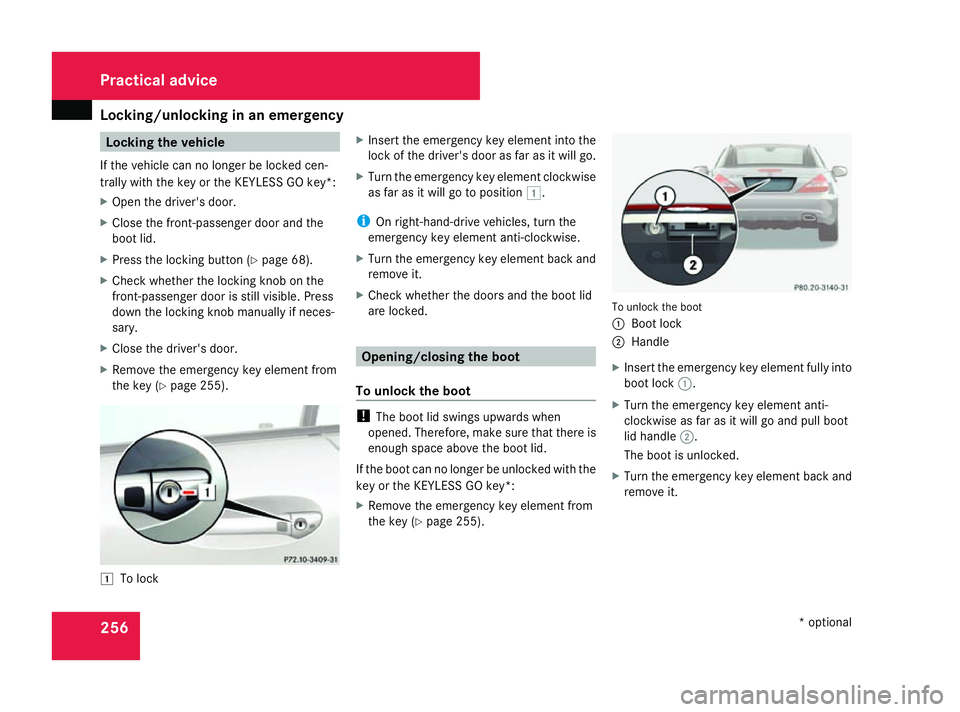
If th evehicle can no longer be locke dcen-
trally with th ekeyor th eKEYLESS GO key*:
X Open th edriver' sdoor.
X Close th efront-pa ssenger door and the
boot lid.
X Press th elockin gbutto n(Ypage 68).
X Chec kwhether th elockin gknobont he
front-passenger door is still visible. Press
down th elockin gknobm anually if neces-
sary.
X Close th edriver' sdoor.
X Remov ethe emergency ke yelemen tfrom
th ek ey ( Ypage 255). $
To lock X
Insert the emergenc ykey elemen tint ot he
lock of the driver's door as far as it will go.
X Turn the emergenc ykey elemen tclockwise
as far as it will go to position $.
i On right-hand-drive vehicles, tur nthe
emergenc ykey elemen tanti-clockwise.
X Turn the emergenc ykey elemen tback and
remove it.
X Check whether the doors and the boot lid
are locked. Opening/closing th
eboot
To unlock th eboot !
The boot lid swing supwards when
opened. Therefore, make sure that there is
enough space above the boot lid.
If the boot can no longer be unlocked with the
key or the KEYLESS GO key*:
X Remove the emergenc ykey elemen tfrom
the key (Y page 255). To unloc
kthe boot
1 Boot lock
2 Handle
X Insert the emergenc ykey elemen tfully into
boot lock 1.
X Turn the emergenc ykey elemen tanti-
clockwise as far as it will go and pull boot
lid handle 2.
The boot is unlocked.
X Turn the emergenc ykey elemen tback and
remove it. Practical advice
*optional
230_AKB; 5; 4, en-GB
bjanott
,V ersion: 2.9.6
2008-04-08T15:09:54+02:00
-Seite 256 Dateiname: 6515_3089_02_buchblock.pdf; preflight
Page 260 of 317
Locking/unlockin
ginanemergency 257
Opening th
eboot manually (remote
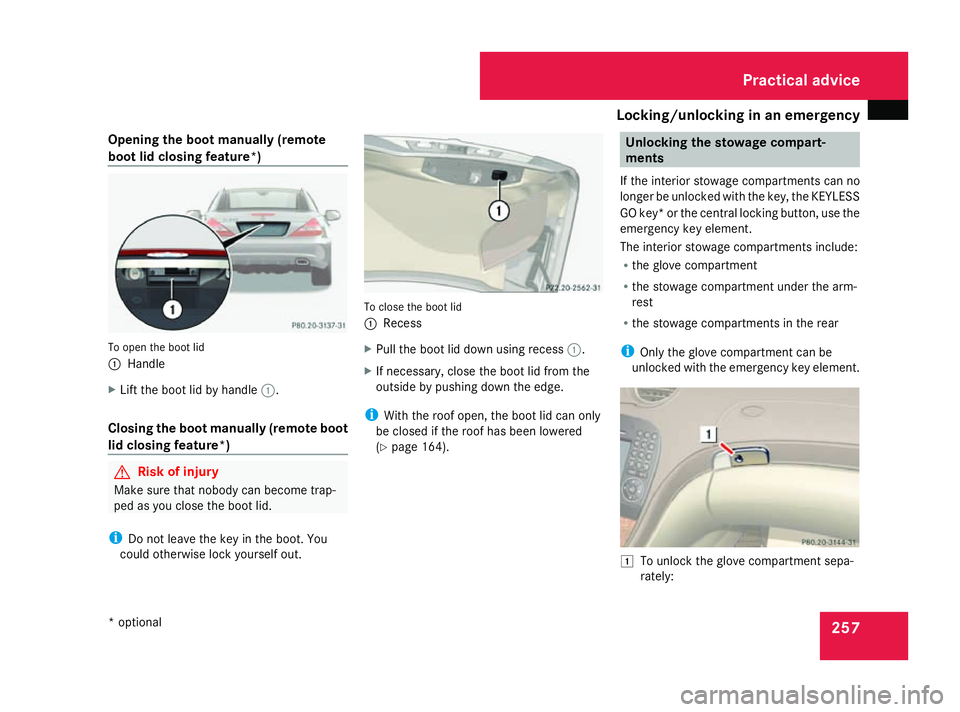
boot lid closing feature*) To open th
eboot lid
1 Handle
X Lif tthe boot lid by handle 1.
Closing th eboot manually (remote boot
lid closing feature*) G
Ris
kofi njury
Mak esure that nobody can become trap-
ped as you close th eboot lid.
i Do no tleave th ekeyin th eboot .You
coul dotherwise loc kyourself out. To close th
eboot lid
1 Recess
X Pull th eboot lid down usin grecess 1.
X If necessary, close th eboot lid from the
outside by pushing down th eedge.
i Withthe roo fopen ,the boot lid can only
be closed if th eroofh as been lowered
(Y page 164). Unlocking th
estowage compart-
ments
If th einterio rstowage compartments can no
longer be unlocked with th ekey,t heKEYLESS
GO key* or th ecentral lockin gbutton, use the
emergency ke yelement.
The interio rstowage compartments include:
R theg lovec om partment
R thes towage compartmen tunde rthe arm-
rest
R thes towage compartments in th erear
i Only th eglovec ompartmen tcan be
unlocked with th eemergency ke yelement. $
To unlock th eglovec ompartmen tsepa-
rately: Practical advice
*o ptional
230_AKB
;5;4,en-GB
bjanott ,V ersion: 2.9.6
2008-04-08T15:09:54+02:00
-Seite 257 ZDateiname: 6515_3089_02_buchblock.pdf; preflight
Page 261 of 317
Changing th
ebatteries 258
X
Remove th eemergenc ykey elemen tfrom
th ek ey ( Ypage 255).
X Inser tthe emergenc ykey elemen tint ot he
loc koft heglov ecom partmen tand tur nit
to position $.
You can open th eglovec om partment. Lowering th
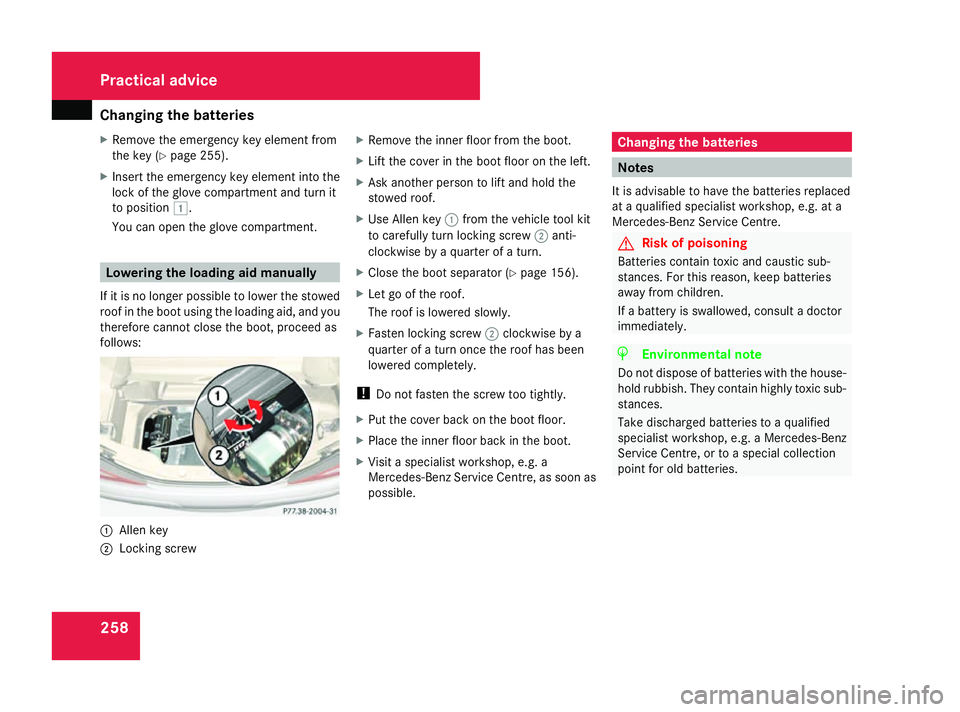
eloading aid manually
If it is no longer possible to lower th estowed
roo fint heboot usin gthe loadin gaid, and you
therefor ecanno tclose th eboot ,proceed as
follows: 1
Alle nkey
2 Lockin gscrew X
Remov ethe inner floo rfromt heboot.
X Lif tthe cover in th eboot floo rontheleft.
X Ask another person to lift and hold the
stowed roof.
X Use Alle nkey1 from th evehicle tool kit
to carefully tur nlocking screw 2anti-
clockwis ebyaquarter of aturn.
X Close th eboot separator (Y page 156).
X Let go of th eroof.
The roof is lowered slowly.
X Fasten locking screw 2clockwis ebya
quarter of aturno ncet he roof has been
lowered completely.
! Do not fasten th escrew to otightly.
X Put th ecover back on th eboot floor.
X Place th einner floo rback in th eboot.
X Visit aspecialist workshop, e.g .a
Mercedes-Ben zServic eCentre, as soon as
possible. Changing th
ebatteries Notes
It is advisabl etohave th ebatteries replaced
at aq ualified specialist workshop, e.g .ata
Mercedes-Ben zServic eCentre. G
Risk of poisoning
Batteries contain toxic and caustic sub-
stances. For this reason, kee pbatteries
away from children.
If ab attery is swallowed, consult adoctor
immediately. H
Environmental note
Do not dispos eofbatteries with th ehouse-
hold rubbish .They contain highly toxic sub-
stances.
Take discharge dbatteries to aqualified
specialist workshop, e.g .aMercedes-Benz
Servic eCentre, or to aspecial collection
poin tfor old batteries. Practical advice
230_AKB; 5; 4, en-GB
bjanott
,V ersion: 2.9.6
2008-04-08T15:09:54+02:00
-Seite 258 Dateiname: 6515_3089_02_buchblock.pdf; preflight
Page 266 of 317
Changing th
ebulbs 263
X
Turn bulb holder 5clockwise until it
engages.
The handle of bulb holder 5must be hor-
izontal.
X Align housing cover 1and tur nitclock-
wise. Changing th
erearb ulbs
Opening and closin gthe sidetrimp an-
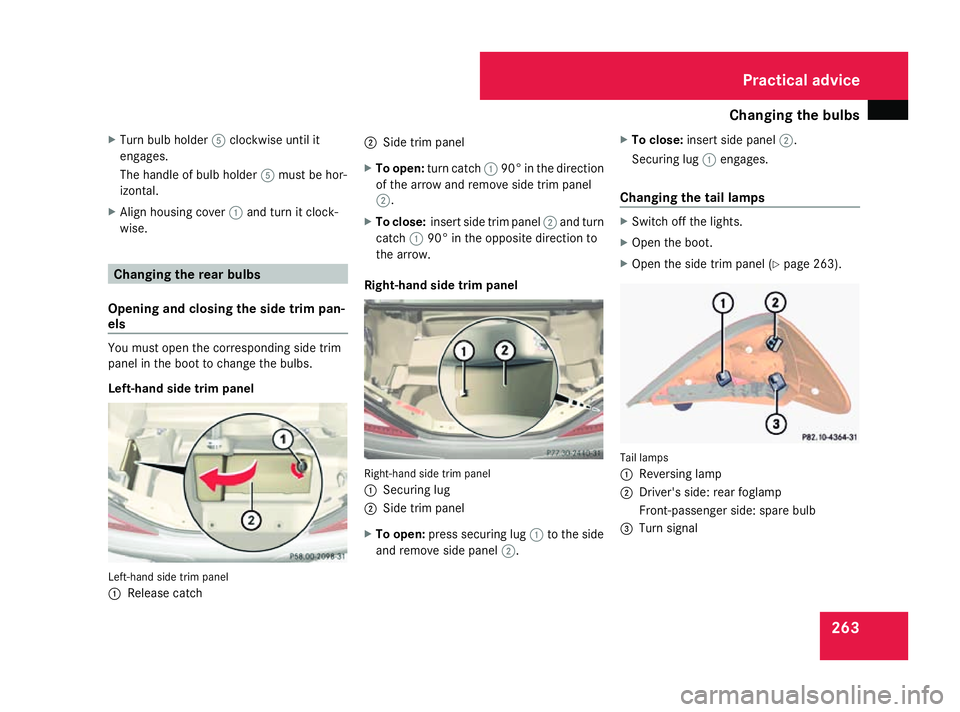
els You must open th
ecorre sponding side trim
panel in th eboot to chang ethe bulbs.
Left-hand sid etrimp anel Left-han
dside trim panel
1 Releas ecatch 2
Sidetrimp anel
X To open: turnc atch 190°int he direction
of the arrow and remove side trim panel
2.
X To close: insert side trim panel 2and turn
catch 190° in the opposite direction to
the arrow.
Right-han dsidet rim panel Right-hand side trim panel
1
Securing lug
2 Sidetrim panel
X To open: press securing lug 1to the side
and remove side panel 2.X
To close: insert side panel 2.
Securing lug 1engages.
Changin gthe tail lamps X
Switch off the lights.
X Ope nthe boot.
X Ope nthe side trim panel (Y page 263). Tail lamps
1
Reversing lamp
2 Driver' sside: rearfoglamp
Front-passenger side :spare bulb
3 Turn signal Practical advice
230_AKB; 5; 4, en-GB
bjanott,
Version: 2.9.6 2008-04-08T15:09:54+02:00-Seite 263 ZDateiname: 6515_3089_02_buchblock.pdf; preflight