Page 224 of 317
Displa
ymessages 221Display messages Possible cause/consequence Possible solution
. Turn signal rear
left Back-u
pbulb
on
or
Turn signal rear
righ tBack-up bulb
on Th
er earleft-han dorr earright -hand turn
signa lisfaulty. X
Replac ethe bulb (Y page 259). . Turn signal left
mirror
or
Turn signal right
mirror Th
et urns igna lint he left-han dorright-
hand exterior mirro risfaulty. This mes-
sage will onl yappea rifallLEDs have
failed. X
Visi taq ualified specialis tworkshop. . Turn signal front
left Back-u
pbulb
on
or
Turn signal front
righ tBack-up bulb
on Th
ef ront left-han dorright-hand turn sig-
na lisf aulty. X
Visi taq ualified specialis tworkshop. Practical advi
ce
230_AKB; 5; 4, en-GB
bjanott,
Version: 2.9.6
2008-04-08T15:09:54+02:0
0-Seite221 ZDateiname: 6515_3089_02_buchblock.pdf; preflight
Page 263 of 317

Changing th
ebulbs 260 Do no
tchang ex enon bulbs yourself ,but
have them replace dataqualified specialist
workshop whic hhas th eneces saryspecial-
ist knowledge and tools to carry out the
wor krequired.
Mercedes-Benz recommends that you use
aM ercedes-Benz Service Centr efor this
purpose .Inparticular, wor krelevan tto
safet yoro nsafety-related systems must be
carried out at aqualified specialist work-
shop.
! Do no tchang et he LEDs yourself .You
could otherwise damag ethe LEDs or parts
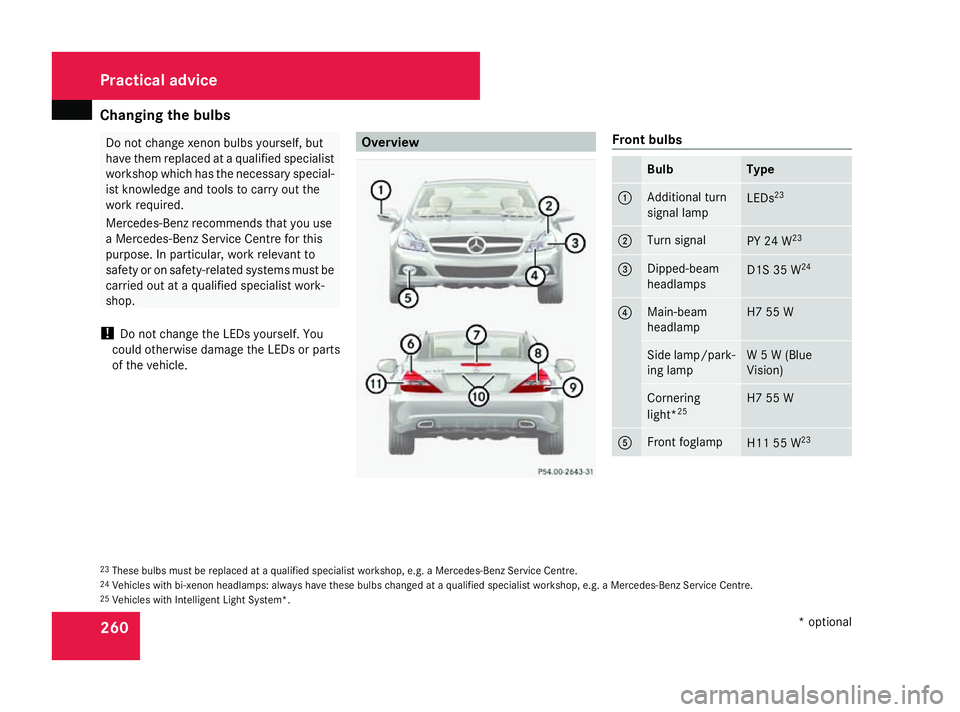
of th evehicle. Overview Front bulbs
Bulb Type
1 Additional turn
signal lamp LEDs
23 2 Turn signal
PY 24 W
23 3 Dipped-beam
headlamps
D1S35W
24 4 Main-beam
headlamp H7 55 W
Side lamp/park-
ing lamp W5W(
Blue
Vision) Cornering
light*
25 H7 55 W
5 Front foglamp
H11 55 W
23 23
These bulbs must be replaced at aqualifie dspecialist workshop, e.g .aMercedes-Ben zServic eCentre.
24 Vehicles with bi-xenon headlamps: always have these bulbs changed at aqualifie dspecialist workshop, e.g .aMercedes-Ben zServic eCentre.
25 Vehicles with Intelligen tLight System*. Practical advice
*optional
230_AKB; 5; 4, en-GB
bjanott ,V ersion: 2.9.6
2008-04-08T15:09:54+02:00
-Seite 260 Dateiname: 6515_3089_02_buchblock.pdf; preflight
Page 264 of 317

Changing th
ebulbs 261
Rea
rbulbs Bulb Type
6 Rear foglamp P21W
7 Thir
dbrak elamp LED
23 8 Reversing lamp P21W
9 Brake/tail lamp
LED
23 a Licence plate
lamp C5W
b Turn signal PY 21 W
Before changing bulbs
You can replace th
efollowin gbulbs:
R Main-beam headlamp
R Sid elamp and parking lamp
R Replacing th ebulb in th ecorner ingl ight*
(vehicles wit hIntel ligent Light System*)
R Reversing lamp
R Rear foglamp R
Turn signal (rear)
R Licence plat elamp
Observ ethe followin gpoints:
R Use only th ebulb types specifie dhere.
R To preven tashort-circuit ,switch off the
lights before changing abulb.
R Only hold bulbs wit haclean, lint-free cloth.
R Do no tworkw ithw et or greasy fingers.
R If th enew bulb still does no tligh tup, con-
sult aqualified specialist workshop, e.g. a
Mercedes-Benz Service Centre.
i Hav ethe headlamp setting checke dreg-
ularly at aqualified specialist workshop,
e.g. aMercedes-Benz Service Centre. Changing th
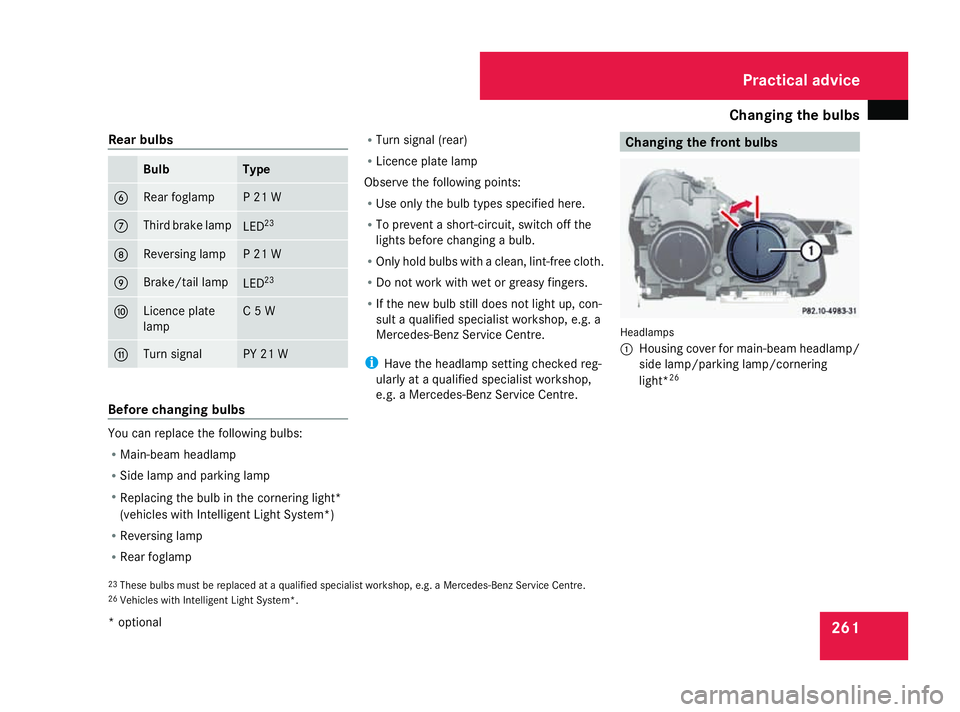
efront bulbs Headlamps
1
Housin gcover for main-beam headlamp/
side lamp/parking lamp/cornering
light* 26
23 These bulbs mus tbereplace dataq ualified specialist workshop ,e.g.aM ercedes-Ben zServic eCentre.
26 Vehicles wit hIntel ligent Light System*. Practical advice
*o ptional
230_AKB; 5; 4, en-GB
bjanott
,V ersion: 2.9.6
2008-04-08T15:09:54+02:00
-Seite 261 ZDateiname: 6515_3089_02_buchblock.pdf; preflight
Page 266 of 317

Changing th
ebulbs 263
X
Turn bulb holder 5clockwise until it
engages.
The handle of bulb holder 5must be hor-
izontal.
X Align housing cover 1and tur nitclock-
wise. Changing th
erearb ulbs
Opening and closin gthe sidetrimp an-
els You must open th
ecorre sponding side trim
panel in th eboot to chang ethe bulbs.
Left-hand sid etrimp anel Left-han
dside trim panel
1 Releas ecatch 2
Sidetrimp anel
X To open: turnc atch 190°int he direction
of the arrow and remove side trim panel
2.
X To close: insert side trim panel 2and turn
catch 190° in the opposite direction to
the arrow.
Right-han dsidet rim panel Right-hand side trim panel
1
Securing lug
2 Sidetrim panel
X To open: press securing lug 1to the side
and remove side panel 2.X
To close: insert side panel 2.
Securing lug 1engages.
Changin gthe tail lamps X
Switch off the lights.
X Ope nthe boot.
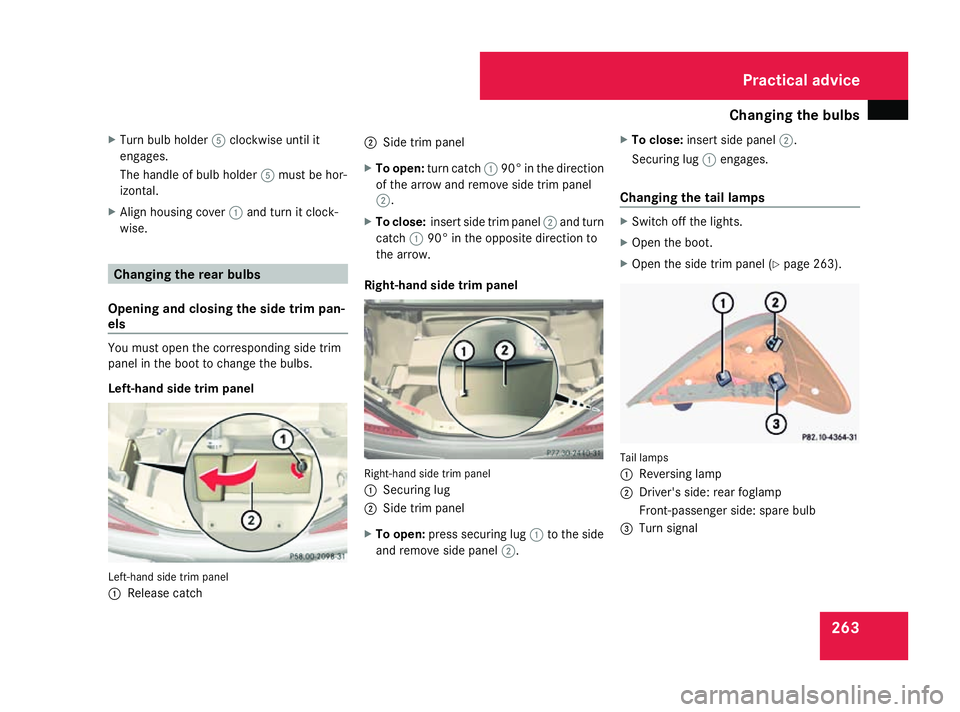
X Ope nthe side trim panel (Y page 263). Tail lamps
1
Reversing lamp
2 Driver' sside: rearfoglamp
Front-passenger side :spare bulb
3 Turn signal Practical advice
230_AKB; 5; 4, en-GB
bjanott,
Version: 2.9.6 2008-04-08T15:09:54+02:00-Seite 263 ZDateiname: 6515_3089_02_buchblock.pdf; preflight