2008 MERCEDES-BENZ SL ROADSTER mirror controls
[x] Cancel search: mirror controlsPage 66 of 317
63
Opening and closing
...........................64
Key positions ....................................... 73
Seats .................................................... 74
Steering wheel .................................... 78
Mirrors ................................................. 80
Memor yfunctions ............................... 82
Seat belts ............................................. 83
Lights ................................................... 87
Windscreen wipers .............................92
Side windows ...................................... 93Driving and parking
............................95
Automatic transmission .....................98
Instrument cluster ............................105
On-boar dcomputer .......................... 106
Driving systems ................................ 124
Air conditioning ................................. 144
Opening/closing the roof .................154
Loading and stowing ........................159
Features ............................................. 165 Controls
230_AKB
;5;4,en-GB
bjanott, Version:2.9.6
2008-04-08T15:09:54+02:0
0-Seite 63 Dateiname: 6515_3089_02_buchblock.pdf; preflight
Page 83 of 317
Mirrors
80 Mirrors
Rear-vie
wmirror
X Adjust the rear-view mirror by hand so you
have agood overview of the traffic condi-
tions. Exterior mirrors
G
Risk of accident
The exterior mirrors reduce the size of the
image. Objects are actually close rthan
they appear. You coul dmisjudge the dis-
tance from vehicles driving behind and
cause an accident, e.g. whe nchanging
lane. For this reason, make sure of the
actua ldistance from the vehicle driving
behind by glancing over you rshoulder.
The convex exterior mirrors give alarger field
of vision.
At low outside temperatures, the exterior mir-
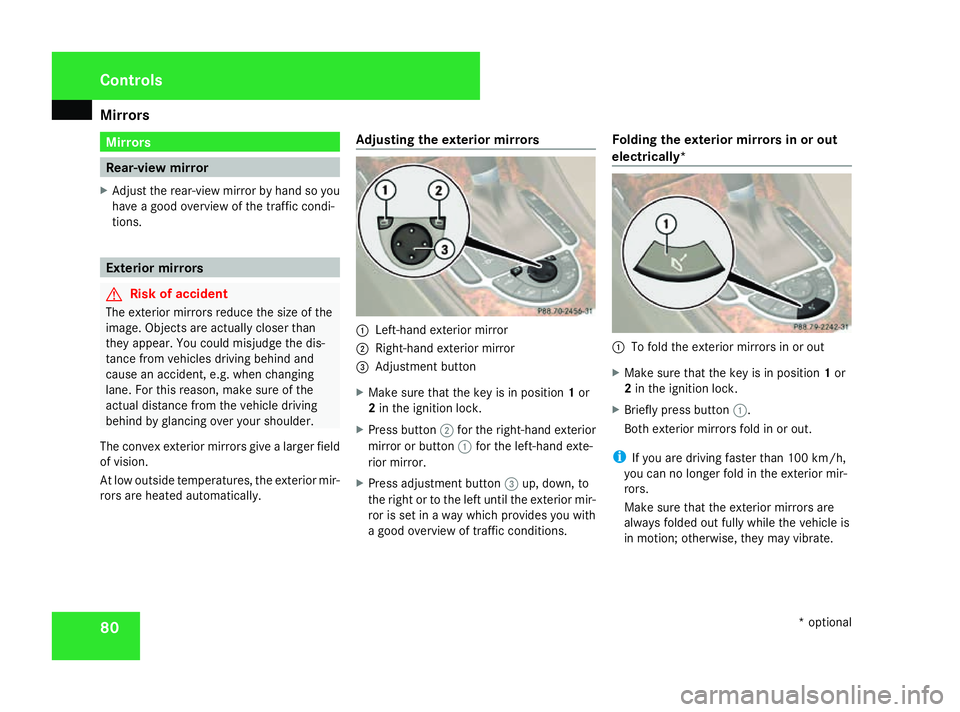
rors are heated automatically. Adjusting the exterior mirrors 1
Left-hand exterior mirror
2 Right-hand exterior mirror
3 Adjustment button
X Make sure that the key is in position 1or
2 in the ignition lock.
X Press button 2for the right-hand exterior
mirror or button 1for the left-hand exte-
rior mirror.
X Press adjustment button 3up, down, to
the right or to the left until the exterior mir-
ror is set in awaywhich provides you with
ag ood overview of traffic conditions. Folding the exterior mirrors in or out
electrically*
1
To fold the exterior mirrors in or out
X Make sure that the key is in position 1or
2 in the ignition lock.
X Briefl ypress button 1.
Both exterior mirrors fold in or out.
i If you are driving faster than 100 km/h,
you can no longe rfold in the exterior mir-
rors.
Make sure that the exterior mirrors are
always folded out fully while the vehicl eis
in motion; otherwise, they may vibrate. Controls
*optional
230_AKB; 5; 4, en-GB
bjanott,
Version: 2.9.6 2008-04-08T15:09:54+02:00-Seite 80 Dateiname: 6515_3089_02_buchblock.pdf; preflight
Page 84 of 317
Mirrors
81
Resetting the exterior mirrors If the battery has been disconnected or has
become discharged, the exterior mirrors
must be reset. Otherwise, they wil lnot fold in
whe nyou select the "Fol dinmirrors when
locking" function in the on-board computer
(Y pag e121).
X Make sure that the key is in position 1in
the ignition lock.
X Briefl ypress button 1.
Folding the exterior mirrors in or out
automatically* If the "Fol
dinmirrors whe nlocking" function
is activated in the on-board computer
(Y pag e121):
R The exterior mirrors fold in automatically as
soon as you lock the vehicle from the out-
side.
R The exterior mirrors fold out again auto-
matically as soon as you unlock the vehicle
and then open the driver's or front-
passenger door.
i If you have activated this function and fold
in the exterior mirrors using button 1,they
wil lnot be folded out automatically .You can then only fold out the exterior mirrors
using button
1. Automatic anti-dazzle mirrors
The rear-view mirror and the exterior mirror
on the driver's side automatically go into anti-
dazzle mode if the ignition is switched on and
incident light from headlamps strikes the sen-
sor in the rear-view mirror.
The mirrors do not go into anti-dazzle mode if
reverse gea risengaged or the interior lighting
is switched on. G
Risk of accident
If incident light from the headlamps of other
vehicles is prevented from striking the sen-
sor in the rear-view mirror, for instance if
the draught stop is fitted, the mirror's auto-
matic anti-dazzle function wil lnot operate.
Incident light coul dthen dazzle you .This
may distract you from the traffic conditions,
and you may thereby cause an accident. In
this case, adjust the rear-view mirror man-
ually. Passengers
ide exterior mirror park-
ing position
To make it easier to park, you can store the
front-passenger side exterior mirror position
in such awaythat you can see the rear wheel
on that side as soon as you engag ereverse
gear.
You can store aparking position for the exte-
rior mirror on the front-passenger side using
the memory button.
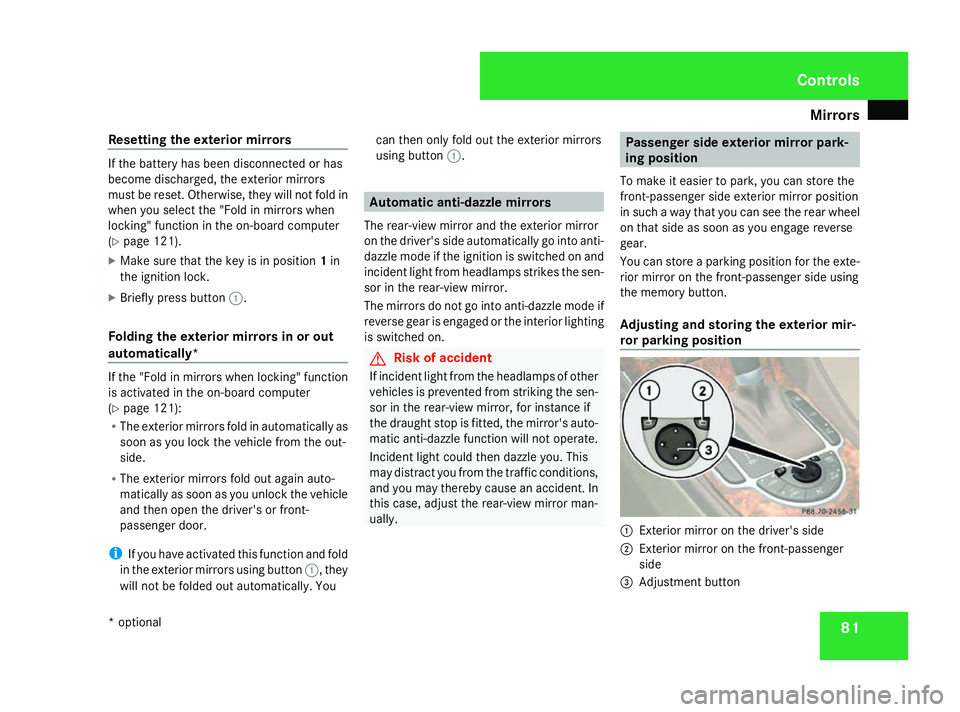
Adjusting and storin gthe exterior mir-
ror parking position 1
Exterior mirror on the driver's side
2 Exterior mirror on the front-passenger
side
3 Adjustment button Controls
*o ptional
230_AKB; 5; 4, en-GB
bjanott,
Version: 2.9.6 2008-04-08T15:09:54+02:00-Seite 81 ZDateiname: 6515_3089_02_buchblock.pdf; preflight
Page 85 of 317
Memory functions
82
X
Make sure that the vehicle is stationary and
that the key is in position 2in the ignition
lock.
X Press button 2for the exterior mirror on
the front-passenger side.
X Use adjustment button 3to adjust the
exterior mirror to aposition which allows
you to see the rear wheel and the kerb.
X Press memory button M(Y pag e82)on
the door control panel.
X Press one of the arrow sonadjustment but-
ton 3withi nthree seconds.
The parking position is stored if the exterior
mirror does not move.
i If the mirror moves out of position, repeat
the steps. You can adjust the exterior mir-
ror again after storing the setting.
Calling up astored parking position set-
ting X
With the key in position 2in the ignition
lock and with exterior mirror on the front-
passenger side 2activated, engage
reverse gear.
Exterior mirror on the front-passenger 2
moves to the stored parking position. The exterior mirror on the front-passenger
side moves back to its original position:
R as soon as you exceed aspee dof
10 km/h
R about ten seconds after you have disen-
gaged reverse gear
R if you press button 1for the exterior mir-
ror on the driver's side Memory functions
Storing settings
You can store up to three different settings
using the memory button.
The following settings are stored as asingle
memory preset:
R position of the seat, backres tand head
restraint
R multi-contour seat*: the backres tside
cushions of the sea tcushion and the back-
rest, contour of the backres tinthe lumbar
and shoulde rregions
R driver's side :steering-whee lposition
R driver's side :position of the exterior mir-
rors on the driver's and front-passenger
sides G
Risk of injury
The memory function can be use dwhent he
key has been removed .For this reason,
children should never be left unsupervised
in the vehicle. They coul dotherwise
become trappe dwhenm oving the sea tor
the steering wheel. Controls
*optional
230_AKB; 5; 4, en-GB
bjanott,
Version: 2.9.6 2008-04-08T15:09:54+02:00-Seite 82 Dateiname: 6515_3089_02_buchblock.pdf; preflight
Page 86 of 317
Seat belts
83G
Risk of accident
Only use the memory function on the driv-
er's side when the vehicle is stationary. You
could otherwise be distracted from the traf-
fic conditions by the steering wheel and
seat moving of their own accord, and cause
an accident. 1
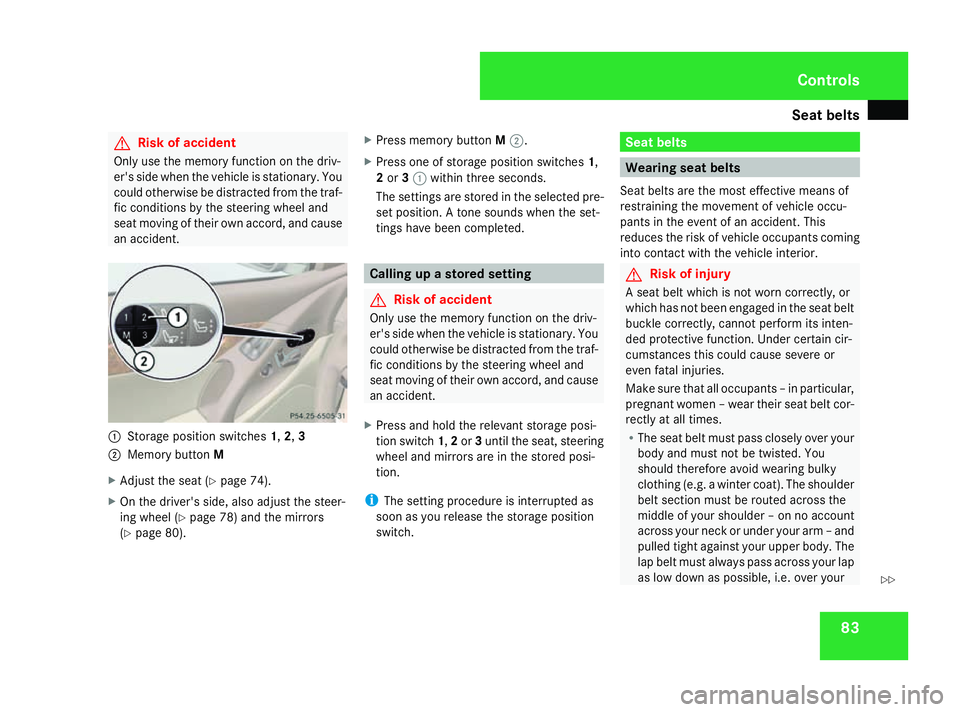
Storage position switches 1,2,3
2 Memory button M
X Adjust the seat (Y page 74).
X On the driver's side, also adjust the steer-
ing wheel (Y page 78) and the mirrors
(Y page 80). X
Press memory button M2.
X Press one of storage position switches 1,
2 or 31 within three seconds.
The settings are stored in the selected pre-
set position. Atone sounds when the set-
tings have been completed. Calling up
astored setting G
Risk of accident
Only use the memory function on the driv-
er's side when the vehicle is stationary. You
could otherwise be distracted from the traf-
fic conditions by the steering wheel and
seat moving of their own accord, and cause
an accident.
X Press and hold the relevant storage posi-
tion switch 1,2or 3until the seat, steering
wheel and mirrors are in the stored posi-
tion.
i The setting procedure is interrupted as
soon as you release the storage position
switch. Seat belts
Wearing seat belts
Seat belts are the most effective means of
restraining the movement of vehicle occu-
pants in the event of an accident. This
reduces the risk of vehicle occupants coming
into contact with the vehicle interior. G
Risk of injury
As eat belt which is not worn correctly, or
which has not been engaged in the seat belt
buckle correctly, cannot perform its inten-
ded protective function. Under certain cir-
cumstances this could cause severe or
even fatal injuries.
Make sure that all occupants –inparticular,
pregnant women –weartheir seat belt cor-
rectly at all times.
R The seat belt must pass closely over your
body and must not be twisted. You
shouldt herefore avoid wearing bulky
clothing (e.g. awinter coat). The shoulder
belt section must be routed across the
middleofy ours houlder –onnoa ccount
across yourn eck or under youra rm–and
pulled tight against youru pperbody.T he
lap belt must always pass across yourl ap
as low down as possible, i.e. over your Controls
230_AKB; 5; 4, en-GB
bjanott,
Version: 2.9.6
2008-04-08T15:09:54+02:00
-Seite 83 ZDateiname: 6515_3089_02_buchblock.pdf; preflight
Page 120 of 317
On-boar
dcomputer 117
X
Press the æorç buttontos elect a
submenu.
The selected submenu is highlighted.
X Press the jbuttontos electafunction
within the submenu.
X Press the æorç buttontoc hange
the setting.
The changed setting is stored.
X Press the èorÿ buttontos elect a
differen tdisplay.
The following tables show the settings you
can make in the individual submenus. You will
find additional information on the pages
shown. Instrument cluster submenu
R
unit of measuremen tfor distance
(Y page 117)
R distanc eunits for digital speedometer
(Y page 118)
R language (Y page 118)
R status line display (Y page 118) Lighting submenu
R
constan theadlamp mode (Y page 118)
R locator lightin g(Ypage 119)
R exterior lightin gdelayed switch-off
(Y page 119)
R interior lightin gdelayed switch-off
(Y page 120)
R Intelligent Light System *(Ypage 120) Vehicle submenu
R
permanen tSpeedtronic (Y page 136)
R automatic locking feature (Y page 120)
R interior motion sensor *(Ypage 121) Convenience submenu
R
easy-entry/exit feature (Y page 121)
R fold the exterior mirror sinwhen locking
the vehicle* (Y page 121) Selecting the unit of measurement for
distance
This function is not available on vehicles with
speedometers in mph.
The selected unit of measuremen
tfor dis-
tanc eapplies to:
R the analogue speedometer
R the total distanc erecorder and the trip
meter
R the trip computer
R cruise control
R Speedtronic
R Distronic*
X Press èor· to select the Set-
tings menu.
X Press the jbuttontos elect submenus.
X Press the æorç buttontoselect the
Inst. cluster submenu.
X Press the jbuttontos electSpeedom-
eter. Controls
*o ptional
230_AKB
;5;4,en-GB
bjanott, Version:2.9.6
2008-04-08T15:09:54+02:0
0-Seite 117 ZDateiname: 6515_3089_02_buchblock.pdf; preflight
Page 124 of 317
On-boar
dcomputer 121
Priming/deactivating the interior
motion sensor* Vehicles for the Netherlands: this function is
not available. The interior motion sensor is
alway
sprimed, even when the roof is open.
This function allows you to prime the interior
motion sensor ,even when the roof is open.
However, false alarms can be caused by fall-
ing leaves or insects, for example.
X Press èor· to select the Set-
tings... menu.
X Press the jbuttontos elect submenus.
X Press the æorç buttontoselect the
Vehicle submenu.
X Press the jbuttontos electInterior
motion sensor with roof open.
X Press the æorç buttontop rime or
deactivate the Interiormotion sensor
with roof open.
X Press the j,èorÿ buttonto
select adifferen tdisplay. Activating or deactivating the easy-
entry/exit feature i
For more information on the easy-entry/
exit feature, see (Y page 79). G
Risk of injury
The steering wheel moves when the easy-
entry/exit feature is active. There is arisk
of occupants becomin gtrapped. Before
activating the easy-entry/exit feature,
make sure that nobody can become trap-
ped.
Do not leave children unsupervised in the
vehicle, even if they are secured in achild
restraint system. The children could open
the driver's door and thereby unintention-
ally activate the easy-entry/exit feature
and become trapped.
X Press èor· to select the Set-
tings menu.
X Press the jbuttontos elect submenus.
X Press the æorç buttontoselect the
Convenience submenu.
X Press the jbuttontos elect the EASY-
ENTRY system. X
Press the æorç buttontoa ctivate
or deactivate the EASY-ENTRY system.
X Press the j,èorÿ buttonto
select adifferen tdisplay.
Activating/deactivating the Fold in mir-
rorsw hen locking* function The
Fold in mirrors when locking func-
tion allows you to determine whether the
exterior mirror sshould fold in when you lock
the vehicle. When you switch on the ignition,
the exterior mirror sfold out again.
If you have switched the function on and you
fold in the exterior mirror susing the button
on the centre console (Y page 80), they will
not fold out automatically. The exterior mir-
rors can then only be folded out using the
butto nont he centre console.
X Press èor· to select the Set-
tings menu.
X Press the jbuttontos elect submenus.
X Press æorç to select the Conve-
nience submenu.
X Press jto select Fold in mirrors
when locking . Controls
*o ptional
230_AKB
;5;4,en-GB
bjanott, Version:2.9.6
2008-04-08T15:09:54+02:0
0-Seite 121 ZDateiname: 6515_3089_02_buchblock.pdf; preflight
Page 125 of 317
On-boar
dcomputer 122
X
Press æorç to activate or deacti-
vate Fold in mirrors when locking .
X Press the j,èorÿ buttonto
select adifferen tdisplay. Trip computer menu
You can use the Trip computermenu to call
up or reset statistical data for your vehicle.
i You can select KilometresorMiles as
the unit of measuremen tfor distance
(Y page 117).
i Menu overview: see (Y page 109).
Use the buttons on the multi-function steer-
ing wheel.
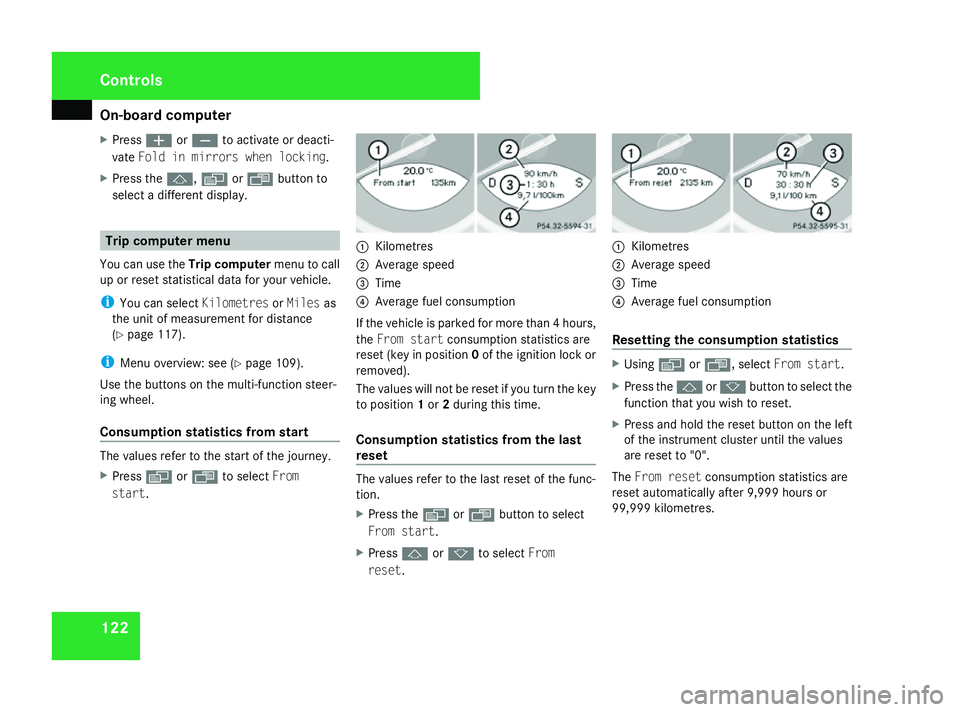
Consumption statistics from start The values refer to the start of the journey.
X Press èor· to select From
start. 1
Kilometres
2 Average speed
3 Time
4 Average fuel consumption
If the vehicle is parked for more than 4hours,
the From start consumption statistic sare
reset (key in position 0of the ignition lock or
removed).
The values will not be reset if you turn the key
to position 1or 2during this time.
Consumption statistics from the last
reset The values refer to the last reset of the func-
tion.
X
Press the èor· buttontos elect
From start.
X Press jork to select From
reset. 1
Kilometres
2 Average speed
3 Time
4 Average fuel consumption
Resetting the consumption statistics X
Using èor·,s electFrom start.
X Press the jork buttontoselect the
function that you wish to reset.
X Press and hold the reset butto nonthe left
of the instrument cluster until the values
are reset to "0".
The From reset consumption statistic sare
reset automatically after 9,99 9hours or
99,999 kilometres. Controls
230_AKB
;5;4,en-GB
bjanott, Version:2.9.6
2008-04-08T15:09:54+02:0
0-Seite 122 Dateiname: 6515_3089_02_buchblock.pdf; preflight