2008 MERCEDES-BENZ SL ROADSTER boot
[x] Cancel search: bootPage 73 of 317
Opening and closing
701
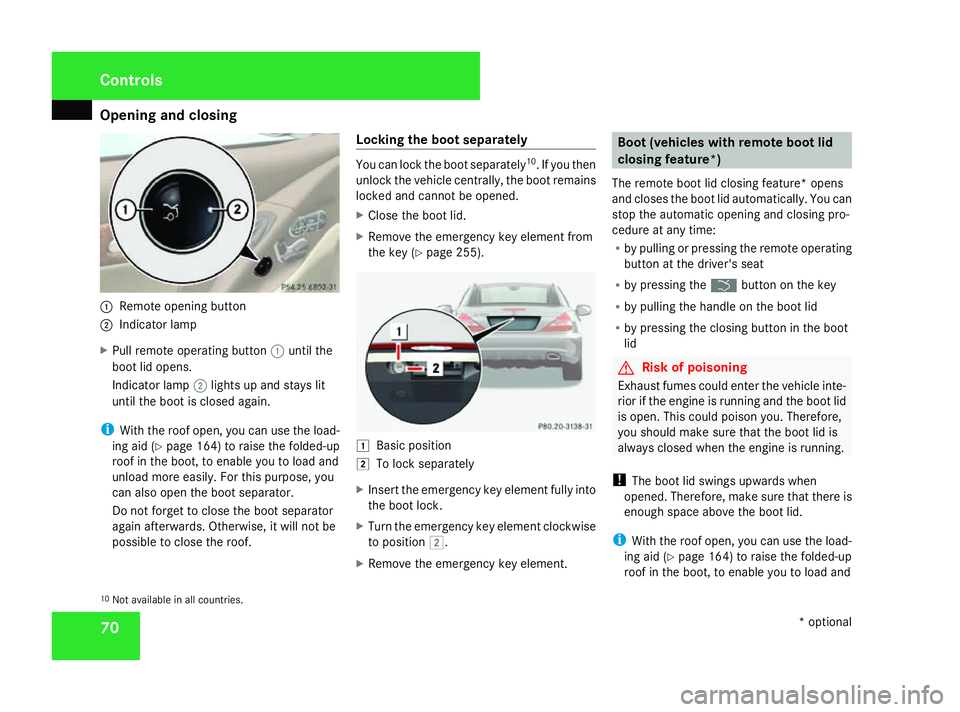
Remote opening button
2 Indicator lamp
X Pull remote operating button 1until the
boot lid opens.
Indicator lamp 2lights up and stays lit
until the boot is closed again.
i With the roof open, you can use the load-
ing aid (Y page 164) to raise the folded-up
roof in the boot, to enable you to load and
unload more easily.F or this purpose, you
can also open the boot separator.
Do not forget to close the boot separator
again afterwards. Otherwise, it will not be
possible to close the roof. Locking the boot separately You can lock the boot separately
10
.Ify ou then
unlock the vehicle centrally, the boot remains
locked and cannot be opened.
X Close the boot lid.
X Remove the emergency key element from
the key (Y page 255). $
Basic position
% To lock separately
X Insert the emergency key element fully into
the boot lock.
X Turn the emergency key element clockwise
to position %.
X Remove the emergency key element. Boot (vehicles with remote boot lid
closing feature*)
The remote boot lid closing feature* opens
and closes the boot lid automatically. You can
stop the automatic opening and closing pro-
cedure at any time:
R by pulling or pressing the remote operating
button at the driver's seat
R by pressing the ibutton on the key
R by pulling the handle on the boot lid
R by pressing the closing button in the boot
lid G
Risk of poisoning
Exhaust fumes could enter the vehicle inte-
rior if the engine is running and the boot lid
is open. This could poison you. Therefore,
you should make sure that the boot lid is
always closed when the engine is running.
! The boot lid swings upwards when
opened. Therefore, make sure that there is
enough space above the boot lid.
i With the roof open, you can use the load-
ing aid (Y page 164) to raise the folded-up
roof in the boot, to enable you to load and
10 Not availabl einall countries. Controls
*optional
230_AKB; 5; 4, en-GB
bjanott
,V ersion: 2.9.6
2008-04-08T15:09:54+02:00
-Seite 70 Dateiname: 6515_3089_02_buchblock.pdf; preflight
Page 74 of 317
Opening and closing
71
unload more easily. For this purpose, you
can also open the boot separator.
Do not forget to close the boot separator
again afterwards. Otherwise, it will not be
possible to close the roof.
Opening from the outside You can only open the boot lid after unlocking
it first.
i
You can only unlock the boot lid when the
vehicle is stationary and the roof is fully
opened or closed.
X To unlock centrally: press thekbut-
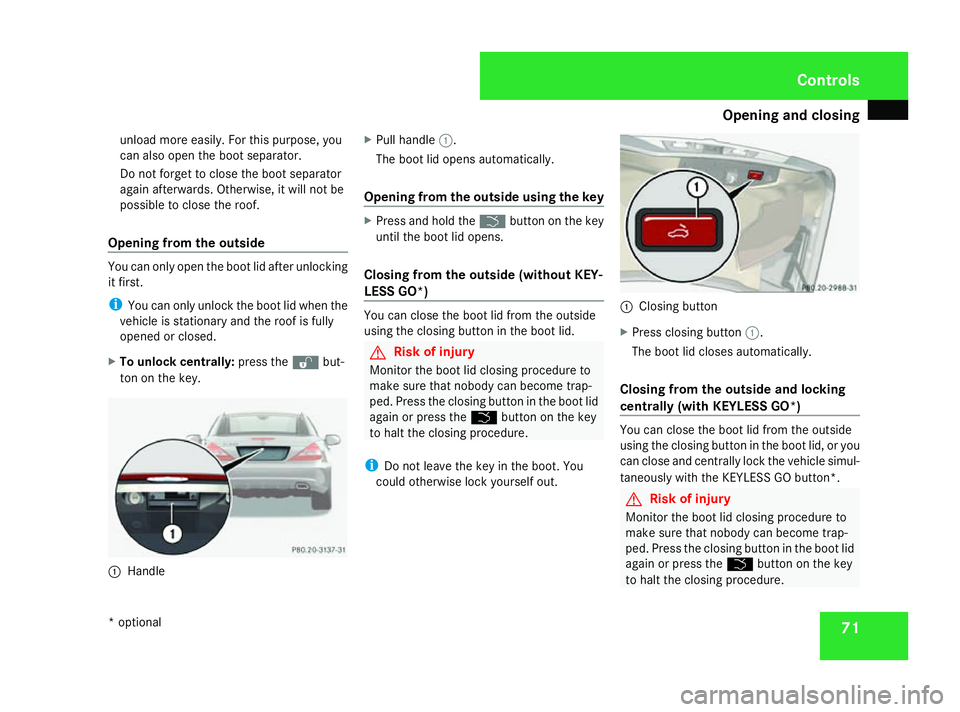
ton on the key. 1
Handle X
Pull handle 1.
The boot lid opens automatically.
Opening from the outsid eusing the key X
Press and hold the ibuttonont he key
until the boot lid opens.
Closing from the outsid e(without KEY-
LESS GO*) You can close the boot lid from the outside
using the closin
gbutto nint he boot lid. G
Risk of injury
Monitor the boot lid closin gprocedure to
make sure that nobody can become trap-
ped. Press the closin gbutto nint he boot lid
again or press the ibuttonont he key
to halt the closin gprocedure.
i Do not leave the key in the boot. You
could otherwise lock yourself out. 1
Closing button
X Press closin gbutton 1.
The boot lid closes automatically.
Closing from the outsid eand locking
centrally (with KEYLESS GO*) You can close the boot lid from the outside
using the closin
gbutto nint he boot lid, or you
can close and centrally lock the vehicle simul-
taneously with the KEYLESSGOb utton*. G
Risk of injury
Monitor the boot lid closin gprocedure to
make sure that nobody can become trap-
ped. Press the closin gbutto nint he boot lid
again or press the ibuttonont he key
to halt the closin gprocedure. Controls
*o ptional
230_AKB
;5;4,en-GB
bjanott, Version:2.9.6
2008-04-08T15:09:54+02:0
0-Seite 71 ZDateiname: 6515_3089_02_buchblock.pdf; preflight
Page 75 of 317
Opening and closing
72
i
Do not leave the key in the boot. You
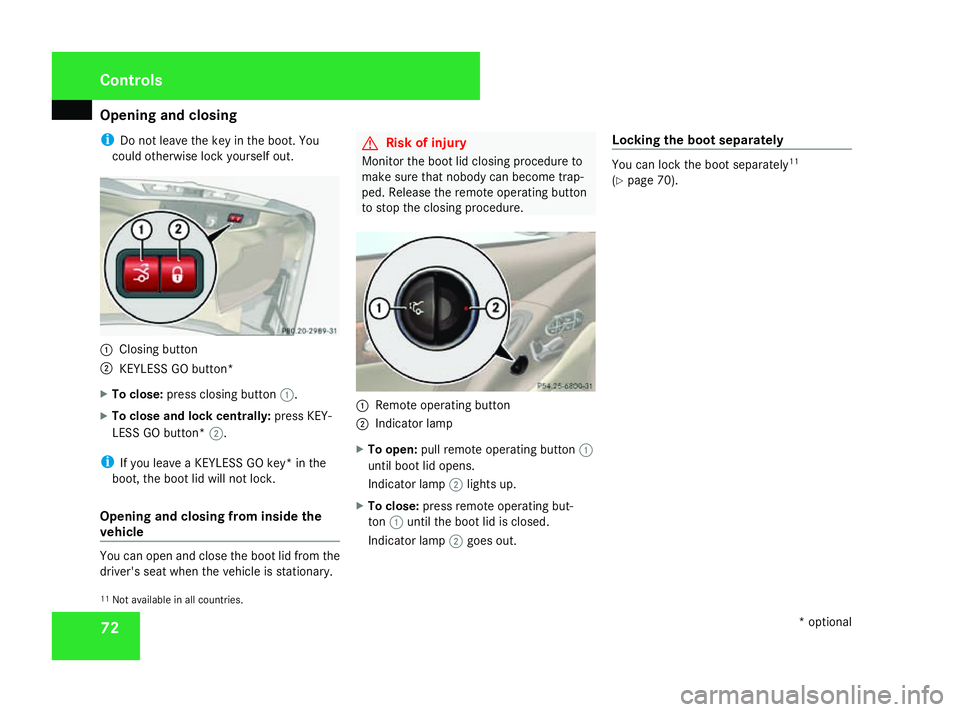
could otherwise lock yourself out. 1
Closing button
2 KEYLESSGOb utton*
X To close: press closing button 1.
X To close and lock centrally: press KEY-
LESS GO button* 2.
i If you leave aKEYLESSGOk ey* in the
boot, the boot lid will not lock.
Opening and closing from inside the
vehicle You can open and close the boot lid from the
driver's seat when the vehicle is stationary. G
Risk of injury
Monitor the boot lid closing procedure to
make sure that nobody can become trap-
ped. Release the remote operating button
to stop the closing procedure. 1
Remote operating button
2 Indicator lamp
X To open: pull remote operating button 1
until boot lid opens.
Indicator lamp 2lights up.
X To close: press remote operating but-
ton 1until the boot lid is closed.
Indicator lamp 2goes out. Locking the boot separately You can lock the boot separately
11
(Y page 70).
11 Not availabl einall countries. Controls
*optional
230_AKB; 5; 4, en-GB
bjanott
,V ersion: 2.9.6
2008-04-08T15:09:54+02:00
-Seite 72 Dateiname: 6515_3089_02_buchblock.pdf; preflight
Page 95 of 317
Windscreen wipers
92
3
ð To switch the interio rlighting on/off
4 ¤ To switch the automatic interior
lighting control on/off
Automatic interior lighting control
X To switch on or off: slide the¤switch
to the left or right.
The interio rlighting switches on whe nyou:
R unlock the vehicle
R open adoor
R remove the key from the ignition lock
The interio rlighting switches off after adelay.
You can set the delayed switch-off using the
on-board computer (Y page119).
i If the door is left open, the interio rlighting
goes out after approximately five minutes.
Manual control
Interior lighting
X To switch on/off: press theðbutton.
i The setting applie ssimultaneousl ytothe
boot lighting. If you leave the boot lid open,
the boot lighting goes out automatically
after approximately ten minutes. Reading lamps
X To switch on/off: press theXbutton. Windscreen wipers
Combinatio
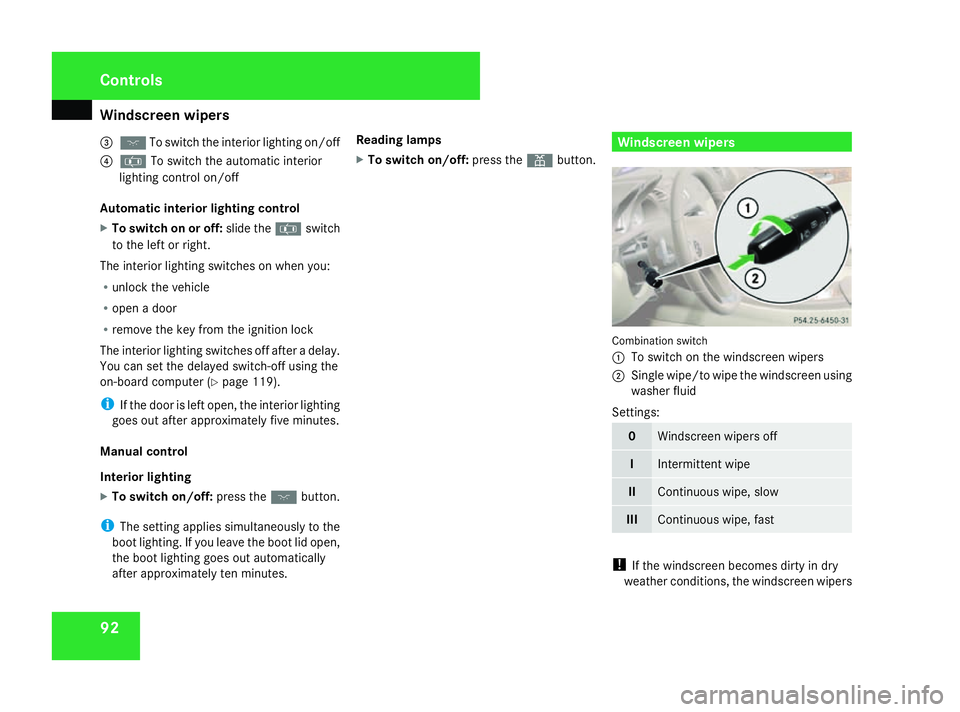
nswitch
1 To switch on the windscreen wipers
2 Singl ewipe/to wipe the windscreen using
washe rfluid
Settings: 0 Windscreen wiper
soff I Intermittent wipe
II Continuous wipe, slow
III Continuous wipe, fast
!
If the windscreen becomes dirty in dry
weathe rconditions, the windscreen wipers Controls
230_AKB; 5; 4, en-GB
bjanott,
Version: 2.9.6 2008-04-08T15:09:54+02:00-Seite 92 Dateiname: 6515_3089_02_buchblock.pdf; preflight
Page 157 of 317
Opening/closing the roof
154 Opening/closing the roof
For safety reasons ,the roof can only be
opened and closed when the vehicle is sta-
tionary. G
Risk of accident and injury
Always open or close the roof fully before
driving.
If the roof does not open or close fully, the
roof hydraulic system is depressurised and
the roof is lowered:
R after about seven minutes if the ignition
is switched on
R after about 15 seconds if the ignition is
switched off
Aw arning ton esounds shortly beforehand.
The K and the being lowered message
appear in the multi-function display.
Lock the roof again before driving on. Oth-
erwise the unlocked roof could open during
the journey and cause you to lose control
of your vehicle. You or other person scould
be injured as aresult.
! Never sit on the rear shelf or stor eheavy
objects there. You will otherwise damage
the roof and the rear shelf of your vehicle. !
When openin gand closin gthe roof, make
sure that:
R ther eiss ufficien tupward clearance, as
the roof swings upwards
R ther eiss ufficien tclearanc ebehind the
vehicle as the boot lid swings backwards
beyond the bumper
R the boot is only loaded to below the boot
separator
R the boot separator is not pushed up by
the load
R the boot separator is closed
R the boot lid is closed
R no roof rack is fitted
R the outside temperature is above -15 †
R the roof is not dirty or wet
You will otherwise damage the roof and the
boot of your vehicle. Using the roof switch
G
Risk of injury
When openin gorclosingthe roof, make
sure that nobody is trapped or injured by
movin gparts such as the boot lid, the
hinged roof or the roof linkage.
If ther eisar isk of entrapment ,release the
roof switch immediately. The roof folding
mechanism stops immediately.
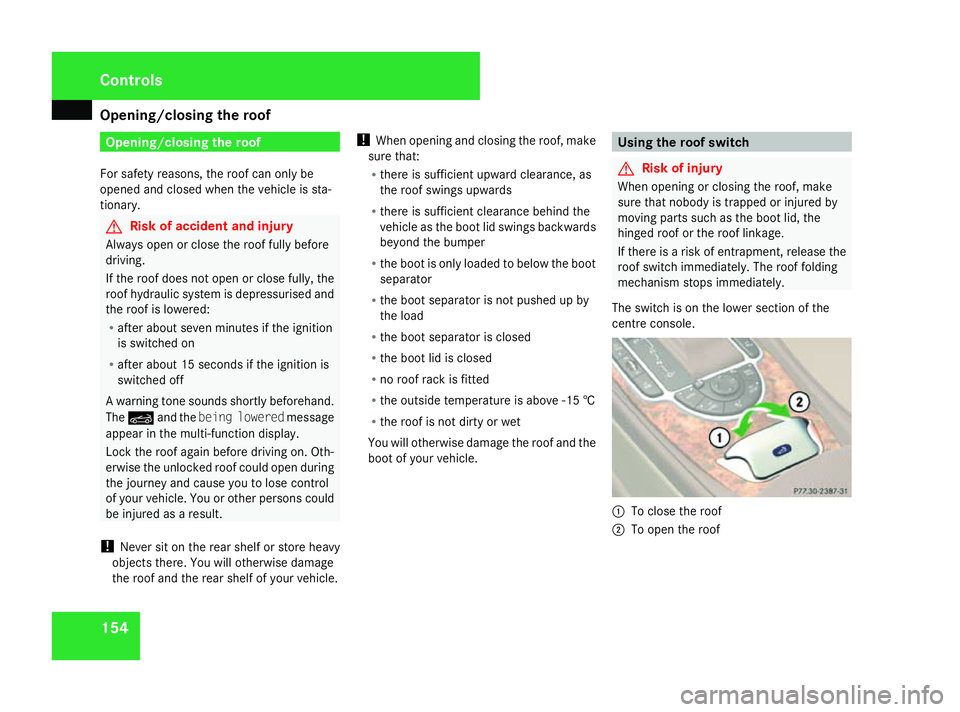
The switch is on the lower section of the
centre console. 1
To close the roof
2 To open the roof Controls
230_AKB; 5; 4, en-GB
bjanott
,V ersion: 2.9.6
2008-04-08T15:09:54+02:00
-Seite 154 Dateiname: 6515_3089_02_buchblock.pdf; preflight
Page 158 of 317
Opening/closing the roof
155
Opening i
Make sure that the roof and rear window
are dry before openin gthe roof. Otherwise,
water could enter the interior or boot.
X Engage the parkin gbrake (Y page 98).
X Make sure that the boot separator is closed
(Y page 156).
X Close the boot lid.
X Make sure that the key is in position 2in
the ignition lock.
X Pull the roof switch in the direction of arrow
2 until the soft-top has been fully retrac-
ted int othe boot and the Vario-roof in
operation message disappears from the
multi-function display.
Closing X
Engage the parkin gbrake (Y page 98).
X Make sure that the boot separator is closed
(Y page 156).
X Close the boot lid. X
Make sure that the key is in position 2in
the ignition lock.
X Press the roof switch in the direction of
arrow 1until the soft-top has been fully
retracted int othe boot and the Vario-
roof in operation message disappears
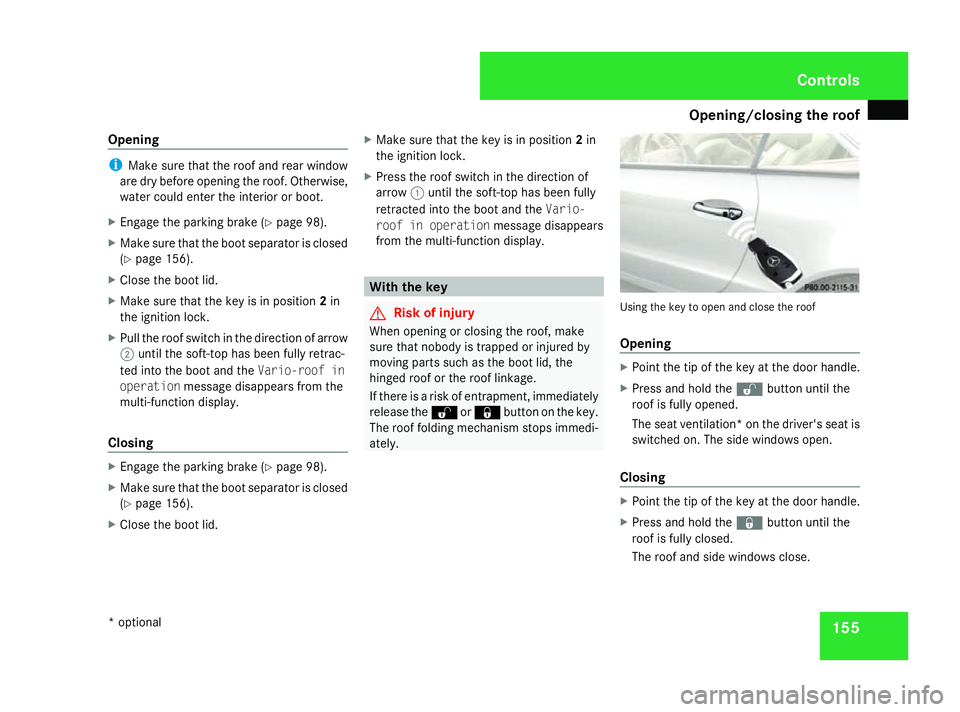
from the multi-function display. With the key
G
Risk of injury
When openin gorclosingthe roof, make
sure that nobody is trapped or injured by
movin gparts such as the boot lid, the
hinged roof or the roof linkage.
If ther eisar isk of entrapment ,immediately
release the korj buttononthe key.
The roof folding mechanism stops immedi-
ately. Using the key to open and close the roof
Opening
X
Point the tip of the key at the door handle.
X Press and hold the kbuttonuntil the
roof is fully opened.
The seat ventilation* on the driver's seat is
switched on. The side windows open.
Closing X
Point the tip of the key at the door handle.
X Press and hold the jbuttonuntil the
roof is fully closed.
The roof and side windows close. Controls
*o ptional
230_AKB
;5;4,en-GB
bjanott, Version:2.9.6
2008-04-08T15:09:54+02:0
0-Seite 155 ZDateiname: 6515_3089_02_buchblock.pdf; preflight
Page 159 of 317
Opening/closing the roof
156 Locking the roof again
The roof is unlocked when:
R the K Vario-roof in operation
message appears in the multi-function dis-
play
R you hear awarning ton eorthe indicator
lamp flashes for up to ten seconds when
pulling away or while driving
You can lock the roof again if it is not locked
fully.
Befor edriving on X
Make sure that the key is in position 2in
the ignition lock.
X Push the roof switch forwards
(Y page 154).
While driving X
Stop the vehicle immediately, paying atten-
tion to road and traffic conditions.
X Push the roof switch forwards
(Y page 154). Boot separator
The boot separator can be used to cover lug-
gage and loads in the boot.
! To avoid damaging the roof or luggage
when folding back the roof, you should:
R only load the boot to below the boot sep-
arator
R not place any objects on or in fron tofthe
boot separator
R not place any objects on the cover
behind the roll-over bars
R not allow the load to push up the boot
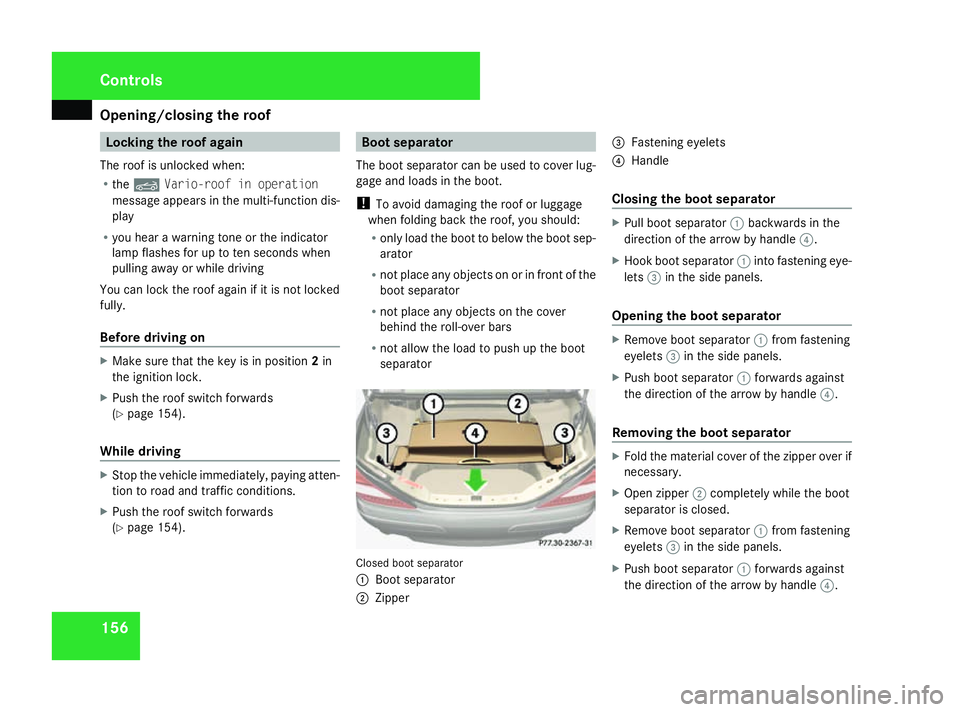
separator Closed boot separator
1
Boot separator
2 Zipper 3
Fastenin geyelets
4 Handle
Closing the boot separator X
Pull boot separator 1backwards in the
direction of the arrow by handle 4.
X Hook boot separator 1intofastening eye-
lets 3in the side panels.
Opening the boot separator X
Remove boot separator 1from fastening
eyelets 3in the side panels.
X Push boot separator 1forwards against
the direction of the arrow by handle 4.
Removing the boot separator X
Fold the material cover of the zipper over if
necessary.
X Open zipper 2completely while the boot
separator is closed.
X Remove boot separator 1from fastening
eyelets 3in the side panels.
X Push boot separator 1forwards against
the direction of the arrow by handle 4.Controls
230_AKB
;5;4,en-GB
bjanott, Version:2.9.6
2008-04-08T15:09:54+02:0
0-Seite 156 Dateiname: 6515_3089_02_buchblock.pdf; preflight
Page 160 of 317
Opening/closing the roof
157
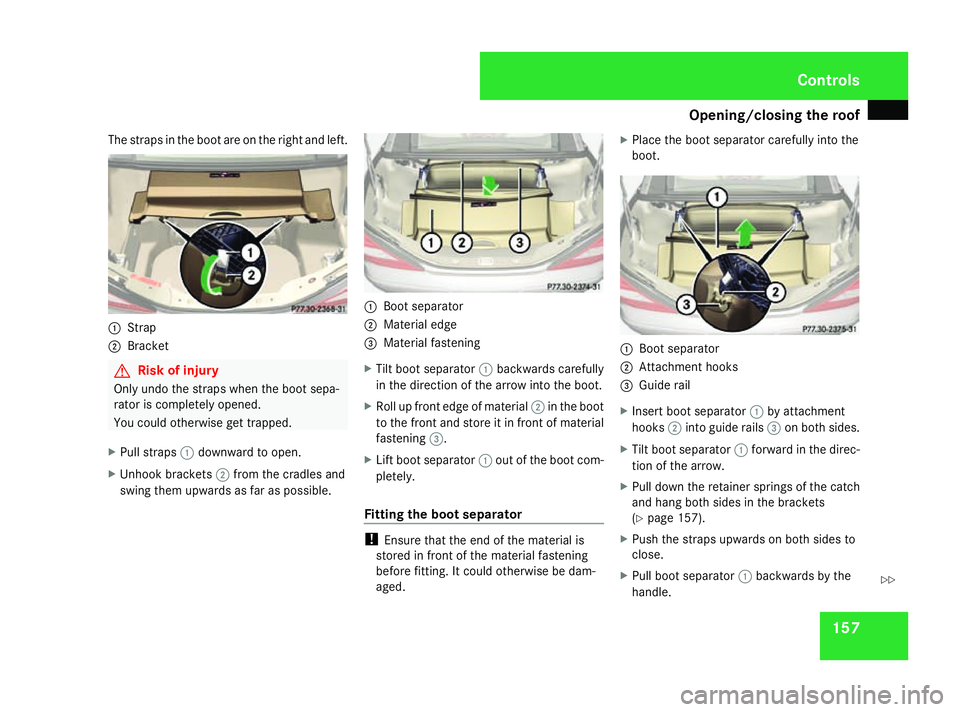
The straps in the boot are on the right and left.
1
Strap
2 Bracket G
Risk of injury
Only undo the straps when the boot sepa-
rator is completely opened.
You could otherwise get trapped.
X Pull straps 1downward to open.
X Unhook brackets 2from the cradles and
swing them upwards as far as possible. 1
Boot separator
2 Material edge
3 Material fastening
X Tilt boot separator 1backwards carefully
in the direction of the arrow into the boot.
X Roll up front edge of material 2in the boot
to the front and store it in front of material
fastening 3.
X Lift boot separator 1out of the boot com-
pletely.
Fitting the boot separator !
Ensure that the end of the material is
stored in front of the material fastening
before fitting. It could otherwise be dam-
aged. X
Place the boot separator carefully into the
boot. 1
Boot separator
2 Attachment hooks
3 Guider ail
X Insert boot separator 1by attachment
hooks 2into guide rails 3on both sides.
X Tilt boot separator 1forward in the direc-
tion of the arrow.
X Pull down the retainer springs of the catch
and hang both sides in the brackets
(Y page 157).
X Push the straps upwards on both sides to
close.
X Pull boot separator 1backwards by the
handle. Controls
230_AKB; 5; 4, en-GB
bjanott
,V ersion: 2.9.6
2008-04-08T15:09:54+02:00
-Seite 157 ZDateiname: 6515_3089_02_buchblock.pdf; preflight