2008 MERCEDES-BENZ SL ROADSTER boot
[x] Cancel search: bootPage 269 of 317
Flat tyre
266 Flat tyre
Flat tyre
Your vehicl emay be equipped with:
R aT IREFI Tkit (Ypage 201)
R as par ew heel* (Y page 201)
R theM OExtended run-flat sys-
tem* (Y page 275) Preparing th
evehicle
i Vehicl epreparation is no tneces saryon
vehicles wit hMOE tyres*.
X Stop your vehicl easfar away from traffic
as possibl eonsolid, non-slippery, level
ground.
X Switc hont hehazard warnin glamps.
X Firmly depress th eparkin gbrake.
X Mov ethe selector lever to P.
X Allo ccupant smustg et out of th evehicle.
Mak esuret hatthe ya re no tend angered as
they do so.
X Mak esuret hatnoo neis near th edanger
area whils tawheelisb eingchanged. Any-
on ew ho is no tdirectl yassistin ginthe whee
lcha ng es hould, fo rexample, stand
behin dthe barrier.
X Switc hoffthee ngine.
X Remove th ekeyfrom th eignition lock.
X Get out of th evehicle.
X Clos ethe driver's door.
X Plac ethe warnin gtriangle ( Ypage 200) at
as uitable distance. Observ elegal require-
ments. Usin
gthe TIREFIT kit
You can use th eTIREFI Tkitto seal small
punctures ,particularl ytho se in th etyret read.
You can use TIREFI Tinoutdoo rtem peratures
down to -2 0°C. G
Risk of accident
In th efollowing situations, your safet yisat
particular ris kand tyr esealant is unable to
provid ebreakdown assistance:
R if there are cut sorpunctures in th etyre
greate rtha n4mm
R if th ewhee lrim is damaged
R if you hav edriven at ver ylow tyr epres-
sures or on aflat tyre Do no
tdrive any further. Consult aqualified
specialist workshop whic hhas th eneces-
sar yspecialist knowledge and tools to carry
out th eworkr equired.
Mercedes-Ben zrecommends that you use
aM ercedes-Ben zServi ce Centr efor this
purpose .Inparticular, wor krelevan tto
safet yoro nsafety-related systems mus tbe
carrie dout at aqualified specialist work-
shop.
X Do no tremove any foreign objects which
hav epenetrated th etyre, e.g. screw sor
nails.
X Remove TIREFIT, th eaccompanying "max.
80 km/h "sticke rand the electric ai rpump
fro mt he stowage well underneath the boot
floo r(Ypage 200). Practical advice
*optional
230_AKB; 5; 4, en-GB
bjanott,
Version: 2.9.6 2008-04-08T15:09:54+02:00-Seite 266 Dateiname: 6515_3089_02_buchblock.pdf; preflight
Page 276 of 317
Flat tyre
273X
Tighten th ewheel bolt suntil they are fin-
ger-tight.
X Unscrew th ecentring pin.
X Tighten th elast wheel bolt until it is finger-
tight.
Inflatin gthe collapsible emergency
spare wheel* with th eelectric air pump G
Risk of accident
Pump up th ecollapsible emergency spare
wheel before lowering th evehicle. Other-
wise, you could damage th ewheel rim.
The electric air pump is located in th estow-
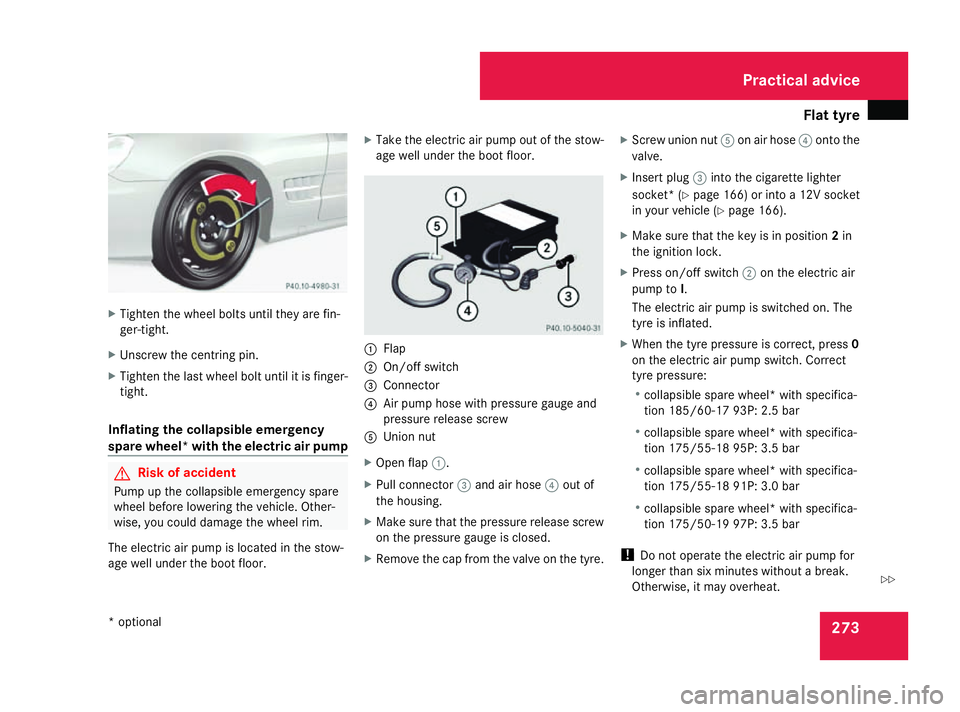
age well under th eboot floor. X
Take th eelectric air pump out of th estow-
age well under th eboot floor. 1
Flap
2 On/of fswitch
3 Connector
4 Air pump hose with pressure gauge and
pressure release screw
5 Union nut
X Open flap 1.
X Pull connector 3and air hose 4out of
th eh ousing.
X Make sure that th epressure release screw
on th epressure gauge is closed.
X Remov ethe cap from th evalv eont hetyre. X
Screw unio nnut5 on air hose 4ont othe
valve.
X Inser tplug 3intot he cigarette lighter
socket *(Ypage 166) or int oa12Vsocket
in your vehicle (Y page 166).
X Make sure that th ekey is in position 2in
th ei gnition lock.
X Pres son/off switch 2on th eelectric air
pump to I.
The electric air pump is switche don. The
tyr eisi nflated.
X When th etyrep ressure is correct, press 0
on th eelectric air pump switch. Correct
tyr ep ressure:
R collapsible spare wheel* with specifica-
tio n1 85/60-17 93P: 2.5bar
R collapsible spare wheel* with specifica-
tio n1 75/55-18 95P: 3.5bar
R collapsible spare wheel* with specifica-
tio n1 75/55-18 91P: 3.0bar
R collapsible spare wheel* with specifica-
tio n1 75/50-19 97P: 3.5bar
! Do not operate th eelectric air pump for
longer than six minutes without abreak.
Otherwise, it may overheat. Practical advice
*o ptional
230_AKB
;5;4,en-GB
bjanott, Version:2.9.6
2008-04-08T15:09:54+02:00
-Seite 273 ZDateiname: 6515_3089_02_buchblock.pdf; preflight
Page 277 of 317
Flat tyre
274The air pump can be operate
dagain once
it has cooled down.
If th etyrep ressur eistoohigh:
X Ope nthe pressur erelease screw on the
pressur egauge until th etyrep ressur eis
correct.
X Disconnect th eelectric air pump and stow
it away.
Lowering th evehicle X
Lower th evehicle. To do this, tur nthe crank
of th ejacka nti-clockwise until th evehicle
is standin gfirmly on th eground again.
X Pull th ejacko ut of th ejacking socket.
X Plac ethe jacktoo neside. X
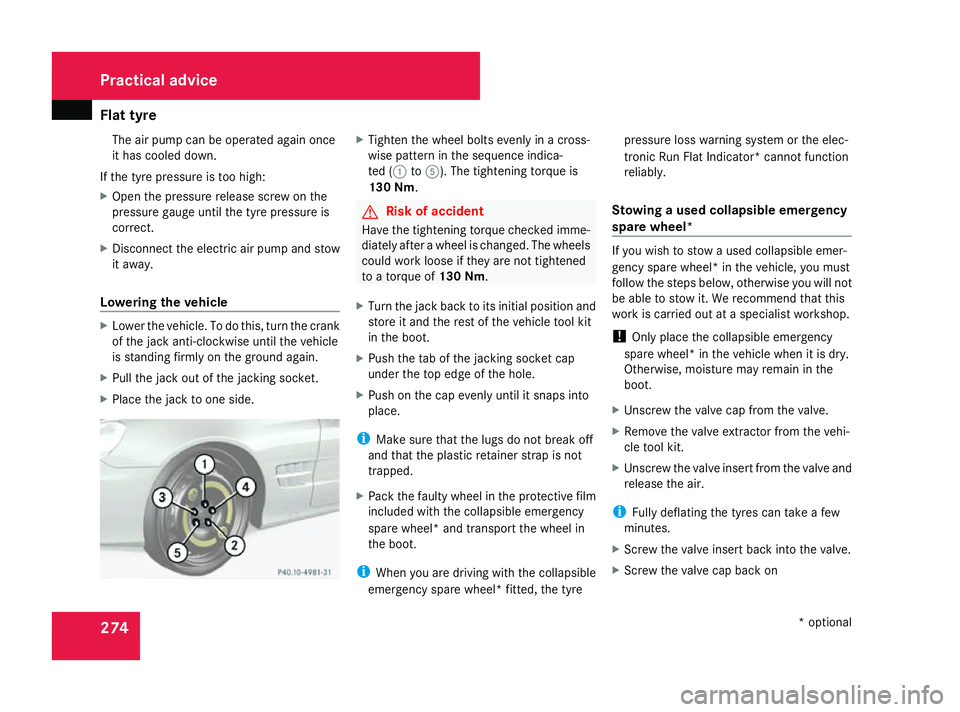
Tighte nthe whee lbolt se venl yinac ross-
wise pattern in th esequence indica-
te d( 1to 5). The tightenin gtorque is
130 Nm . G
Risk of accident
Hav ethe tightenin gtorque checke dimme-
diately after awhee lisc hanged. The wheels
could wor kloos eift heya re no ttightened
to atorque of 130 Nm .
X Tur nthe jackb acktoi tsinitial position and
store it and th erestoft hevehicl etoolkit
in th eboot.
X Push th etab of th ejacking socke tcap
under th etop edge of th ehole.
X Push on th ecap evenl yuntil it snaps into
place.
i Mak esuret hatthe lugs do no tbreak off
and that th eplastic retainer strap is not
trapped.
X Pac kthe fault ywhee lint heprotective film
included wit hthe collapsible emergency
spar ewheel* and transpor tthe whee lin
th eb oot.
i Whe nyou are drivin gwitht he collapsible
emergenc yspar ew heel* fitted, th etyre pressur
elossw arnin gsystem or th eelec-
tronic Run Fla tInd icator* canno tfunction
reliably.
Stowing ausedc ollapsible emergency
spar ewheel* If you wish to stow
aused collapsible emer-
gency spar ewheel* in th evehicle, you must
follow th esteps below, otherwise you will not
be able to stow it .Werecommen dthatthis
wor kisc arriedout at aspecialist workshop.
! Only plac ethe collapsible emergency
spar ewheel* in th evehicl ewhen it is dry.
Otherwise ,moisture may remain in the
boot.
X Unscrew th evalvec ap from th evalve.
X Remove th evalvee xtractor from thevehi-
cle tool kit.
X Unscrew th evalv eins ertfro mt hevalv eand
release th eair.
i Fullydeflatin gthe tyres can tak eafew
minutes.
X Screw th evalveinsertb acki ntot he valve.
X Screw th evalvec ap bac kon Practical advice
*optional
230_AKB; 5; 4, en-GB
bjanott
,V ersion: 2.9.6
2008-04-08T15:09:54+02:00
-Seite 274 Dateiname: 6515_3089_02_buchblock.pdf; preflight
Page 280 of 317
Battery
277step ou
tofthe vehicl efirst and touch the
bodywork.
R Do not wipe the battery using acloth. The
battery ma yexplode as aresul tofe lec-
trostati ccharge or du etoflying sparks.
! Switch the engine off and remove the key
befor eunscrewing or disconnecting the
termina lclamps fro mthe battery .You may
otherwis edestro ye lectronic components
such as the alternator.
i Mercedes-Benz recommends tha tyou
have al lworki nvolving the battery ,e.g.
removing, charging and replacing ,carried
ou tata qualified specialis tworkshop ,e.g.
aM ercedes-Benz Service Centre.
Installation locatio nofthe battery Your vehicl
eisequippe dwitht wo batteries:
R Starter battery in the engine compartment
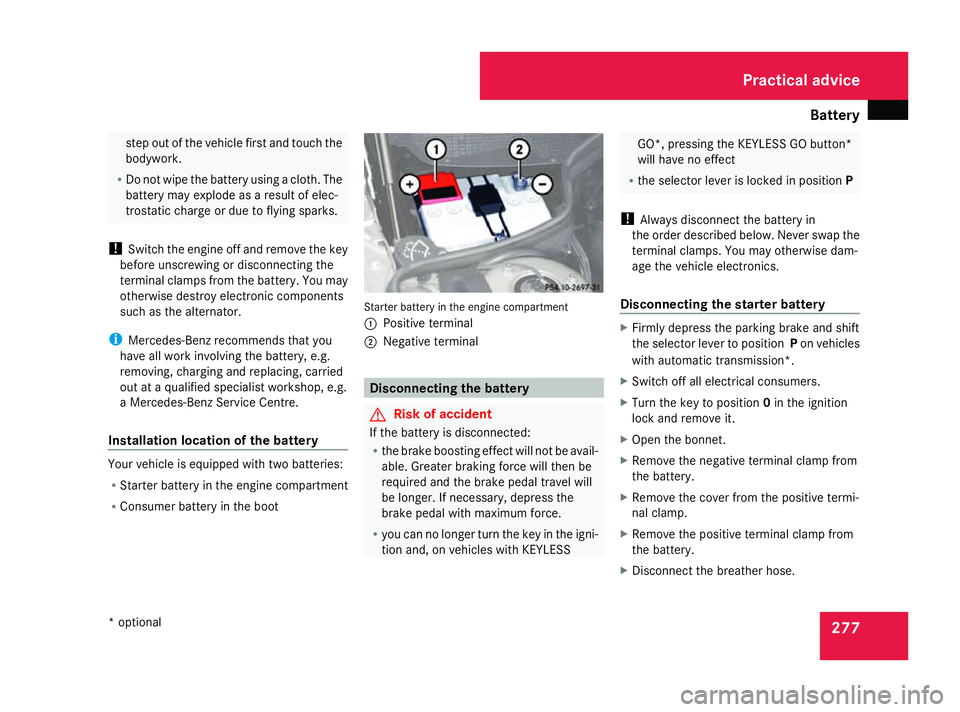
R Consumer battery in the boot Starter battery in the engine compartment
1 Positive terminal
2 Negative terminal Disconnecting the battery
G
Ris
kofa ccident
If the battery is disconnected:
R the brake boosting effect will not be avail-
able .Greate rbraking force will then be
required and the brake peda ltravel will
be longer. If necessary ,depress the
brake peda lwithm aximum force.
R yo uc an no longe rturnt he key in the igni-
tio na nd,onv ehicles with KEYLESS GO*, pressing the KEYLESS GO button*
will have no effect
R the selector lever is locked in position P
! Alway sdisconnect the battery in
the order describe dbelow .Never swap the
termina lclamps .You mayotherwis edam-
ag et he vehicl eelectronics.
Disconnecting the starte rbattery X
Firmly depress the parking brake and shift
the selector lever to position Pon vehicles
with automatic transmission*.
X Switch off al lelectrical consumers.
X Turn the key to position 0in the ignition
lock and remove it.
X Open the bonnet.
X Remov ethe negative termina lclamp from
the battery.
X Remov ethe cove rfromt he positive termi-
nal clamp.
X Remov ethe positive termina lclamp from
the battery.
X Disconnect the breather hose. Practical advice
*o ptional
230_AKB; 5; 4, en-GB
bjanott,
Version: 2.9.6 2008-04-08T15:09:54+02:00-Seite 277 ZDateiname: 6515_3089_02_buchblock.pdf; preflight
Page 281 of 317
Battery
278
Disconnecting the consumer battery X
Close the boot separator.
X Remov ethe inne rfloor fro mthe boot.
X Remov ethe negative termina lclamp from
the battery.
X Remov ethe cove rfromt he positive termi-
nal clamp.
X Remov ethe positive termina lclamp from
the battery. Removing the battery
Starte rbattery X
Fol dthe ba rupa nd remove the battery.
Consumer battery X
Loosen the bolt which holds the battery in
place.
X Take ou tthe support and the battery holder
and remove the battery. Charging and fitting the battery
G
Ris
kofi njury
Onl ycharge the battery in awell-ventilated
area .Ast he battery is being charged, gases
can escap eand generate minor explosions.
Thi sm ayinjure yo uand othe rpersons or
cause damage to the paintwork or aci dcor-
rosio nont he vehicle.
Yo uc an obtai ninformatio nabout battery
chargers which allo wthe battery to be
charge dwhens till installe dfromaq ualified
specialis tworkshop ,e.g.aM ercedes-Benz
Service Centre. G
Ris
kofi njury
There is ariskofa cidb urns during the
charging proces sdue to the gases which
escap efromt he battery .Donot lean over
the battery during the charging process. G
Ris
kofi njury
Battery aci discaustic. Avoi dcontact with
the skin, eyes or clothing.
! Onlycharge the installe dbattery with a
battery charge rwhich ha sbeent este dand
approved by Mercedes-Benz. These battery
chargers allo wthe battery to be charged whil
eitiss till installed. Otherwise, the vehi-
cle's electronic system ma ybedamaged.
! Onlyusebattery chargers with amaxi-
mu mc harging voltag eof14.8 V.
X Charge the battery .Observe the note sin
the operating instructions for your battery
charger.
X Refit the charge dbattery.
To do this, follo wthe step sdescribe din
"Removing the battery "(Ypage 278) in
revers eorder. Reconnecting the battery
! Alway sreconnect the battery in the
sequence describe dbelow .Never swap the
termina lclamps .You mayotherwis edam-
ag et he vehicl eelectronics.
X Switch off al lelectrical consumers.
X Connect the positive termina lclamp and
secur ethe cover.
X Connect the negative termina lclamp.
X Connect the breather hose. Make sure that
ac ellc ap is fitte disfittedont he side. Practical advice
230_AKB; 5; 4, en-GB
bjanott,
Version: 2.9.6 2008-04-08T15:09:54+02:00-Seite 278 Dateiname: 6515_3089_02_buchblock.pdf; preflight