Page 3162 of 3924
LT-60
< SERVICE INFORMATION >
AUTO LIGHT SYSTEM
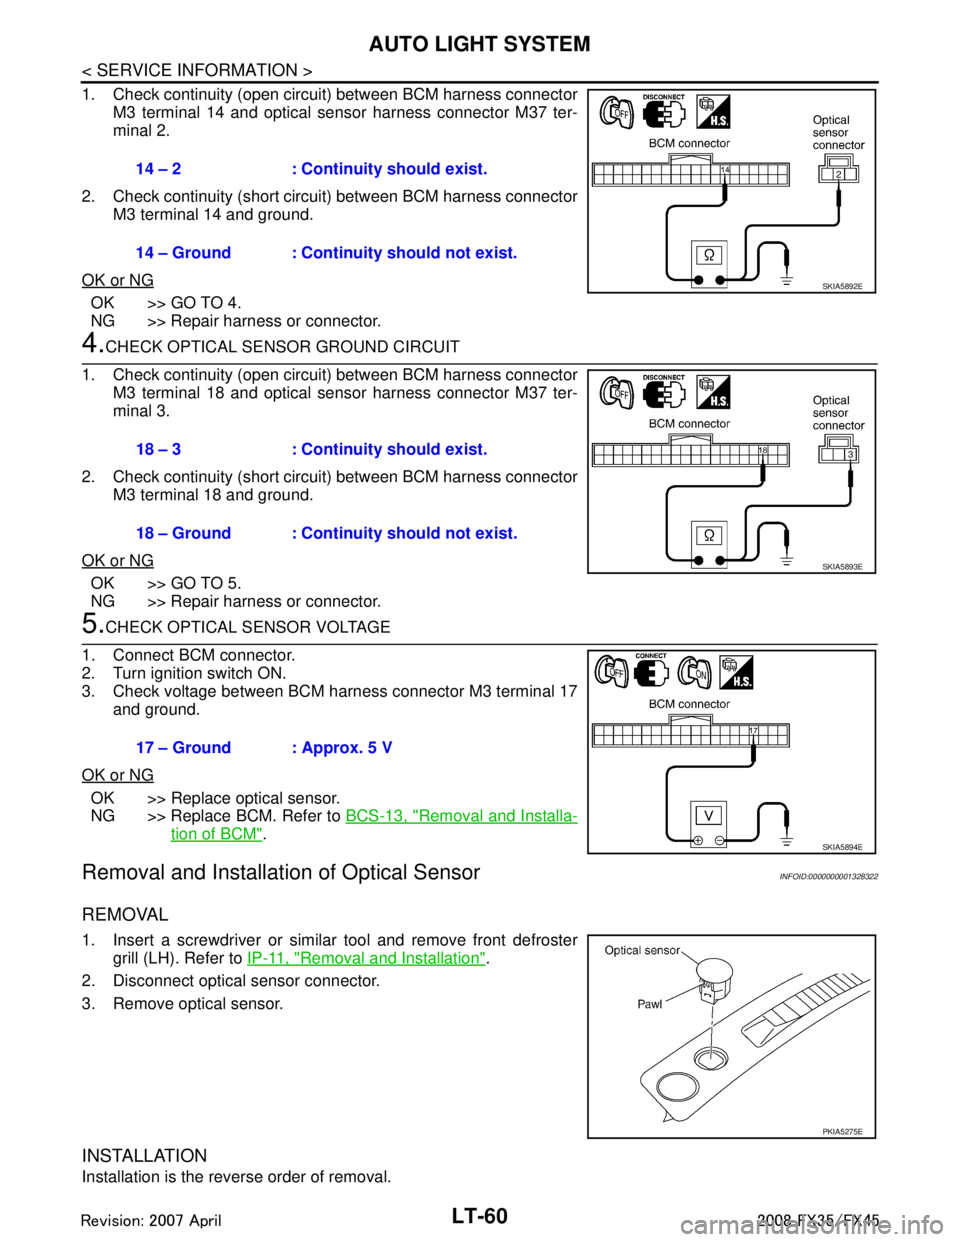
1. Check continuity (open circuit) between BCM harness connectorM3 terminal 14 and optical sensor harness connector M37 ter-
minal 2.
2. Check continuity (short circuit) between BCM harness connector M3 terminal 14 and ground.
OK or NG
OK >> GO TO 4.
NG >> Repair harness or connector.
4.CHECK OPTICAL SENSOR GROUND CIRCUIT
1. Check continuity (open circuit) between BCM harness connector M3 terminal 18 and optical sensor harness connector M37 ter-
minal 3.
2. Check continuity (short circuit) between BCM harness connector M3 terminal 18 and ground.
OK or NG
OK >> GO TO 5.
NG >> Repair harness or connector.
5.CHECK OPTICAL SENSOR VOLTAGE
1. Connect BCM connector.
2. Turn ignition switch ON.
3. Check voltage between BCM harness connector M3 terminal 17 and ground.
OK or NG
OK >> Replace optical sensor.
NG >> Replace BCM. Refer to BCS-13, "
Removal and Installa-
tion of BCM".
Removal and Installation of Optical SensorINFOID:0000000001328322
REMOVAL
1. Insert a screwdriver or similar tool and remove front defroster
grill (LH). Refer to IP-11, "
Removal and Installation".
2. Disconnect optical sensor connector.
3. Remove optical sensor.
INSTALLATION
Installation is the reverse order of removal. 14 – 2 : Continuity should exist.
14 – Ground : Continuity should not exist.
SKIA5892E
18 – 3 : Continuity should exist.
18 – Ground : Continuity should not exist.
SKIA5893E
17 – Ground : Approx. 5 V
SKIA5894E
PKIA5275E
3AA93ABC3ACD3AC03ACA3AC03AC63AC53A913A773A893A873A873A8E3A773A983AC73AC93AC03AC3
3A893A873A873A8F3A773A9D3AAF3A8A3A8C3A863A9D3AAF3A8B3A8C
Page 3166 of 3924
LT-64
< SERVICE INFORMATION >
HEADLAMP AIMING CONTROL
Removal and Installation
INFOID:0000000001328325
REMOVAL
TKWM4302E
3AA93ABC3ACD3AC03ACA3AC03AC63AC53A913A773A893A873A873A8E3A773A983AC73AC93AC03AC3
3A893A873A873A8F3A773A9D3AAF3A8A3A8C3A863A9D3AAF3A8B3A8C
Page 3167 of 3924
HEADLAMP AIMING CONTROLLT-65
< SERVICE INFORMATION >
C
DE
F
G H
I
J
L
M A
B
LT
N
O P
1. Remove combination meter. Refer to DI-22, "Removal and
Installation of Combination Meter".
2. Remove screws for removing headlamp aiming switch from meter housing.
3. Remove screws and then remove headlamp aiming switch.
INSTALLATION
Installation is the reverse order of removal.
Switch Circuit InspectionINFOID:0000000001328326
Using a circuit tester, check resistance between the headlamp aim-
ing switch connector terminals in each operation status of the aiming
switch.
PKIB3630E
PKIC1215E
3AA93ABC3ACD3AC03ACA3AC03AC63AC53A913A773A893A873A873A8E3A773A983AC73AC93AC03AC3
3A893A873A873A8F3A773A9D3AAF3A8A3A8C3A863A9D3AAF3A8B3A8C
Page 3175 of 3924
FRONT FOG LAMPLT-73
< SERVICE INFORMATION >
C
DE
F
G H
I
J
L
M A
B
LT
N
O P
2.FRONT FOG LAMP ACTIVE TEST
CONSULT-III ACTIVE TEST
1. Select “LAMPS” of IPDM E/R active test item.
2. With operating the test item, check th at the front fog lamp is turned ON.
IPDM E/R AUTO ACTIVE TEST
1. Start auto active test. Refer to PG-20, "
Auto Active Test".
2. Make sure front fog lamp operation.
OK or NG
OK >> GO TO 3.
NG >> GO TO 4.
3.CHECK IPDM E/R
CONSULT-III DATA MONITOR
1. Select “FR FOG REQ” of IPDM E/R data monitor item.
2. Turn lighting switch 1ST.
3. With operating the front fog lamp switch, check the monitor status.
OK or NG
OK >> Replace IPDM E/R. Refer to PG-24, "Removal and Installation of IPDM E/R".
NG >> Replace BCM. Refer to BCS-13, "
Removal and Installation of BCM".
4.CHECK FRONT FOG LAMP INPUT SIGNAL
CONSULT-III ACTIVE TEST
1. Turn ignition switch OFF.
2. Disconnect front fog lamp RH and LH connectors.
3. Select “LAMPS” of IPDM E/R active test item.
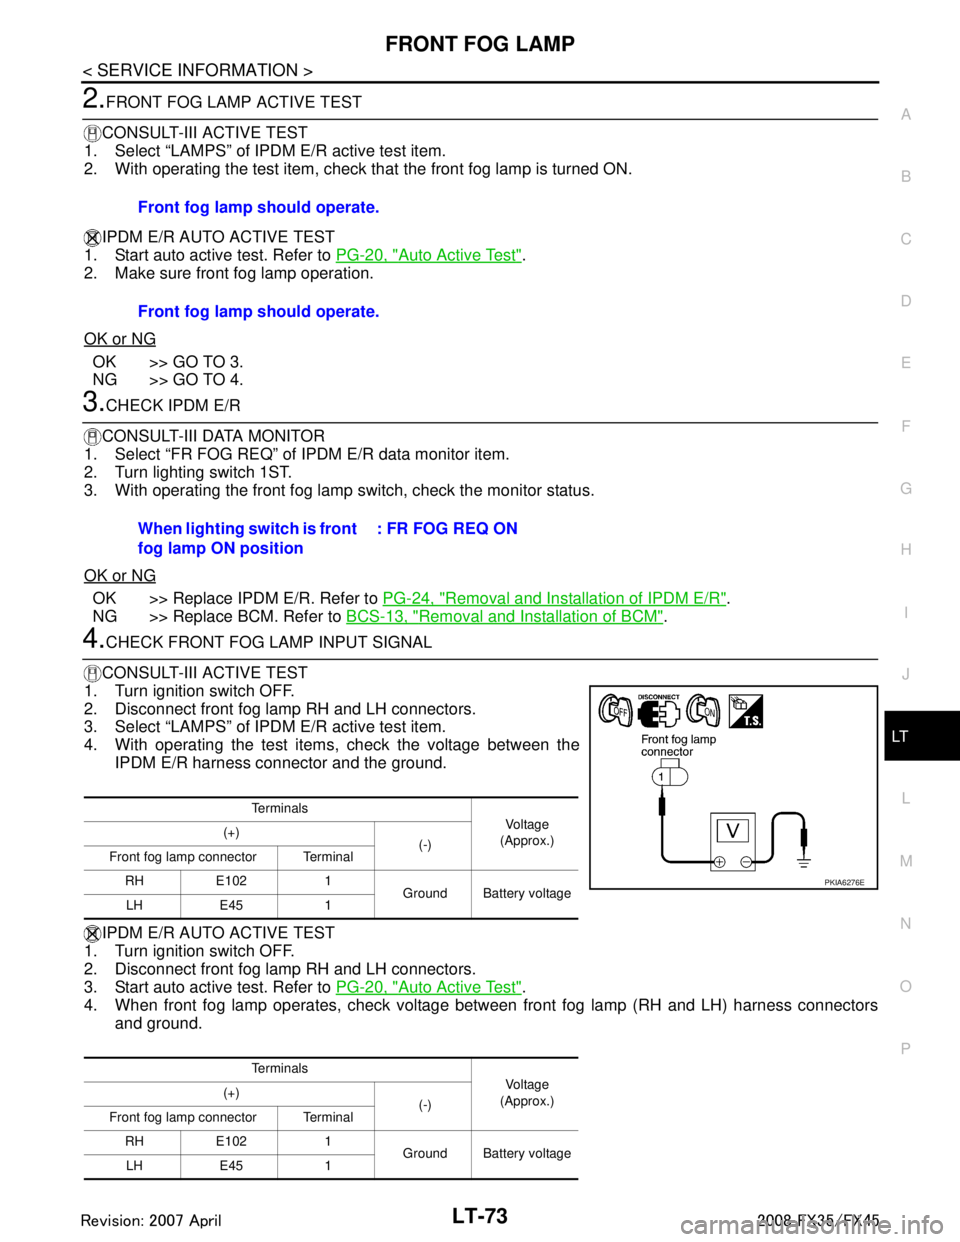
4. With operating the test items, check the voltage between the IPDM E/R harness connector and the ground.
IPDM E/R AUTO ACTIVE TEST
1. Turn ignition switch OFF.
2. Disconnect front fog lamp RH and LH connectors.
3. Start auto active test. Refer to PG-20, "
Auto Active Test".
4. When front fog lamp operates, check voltage bet ween front fog lamp (RH and LH) harness connectors
and ground. Front fog lamp should operate.
Front fog lamp should operate.
When lighting switch is front
fog lamp ON position
: FR FOG REQ ON
Te r m i n a l s
Vol tag e
(Approx.)
(+)
(-)
Front fog lamp connector Terminal
RH E102 1 Ground Battery voltage
LH E45 1
Te r m i n a l s Vol tag e
(Approx.)
(+)
(-)
Front fog lamp connector Terminal
RH E102 1 Ground Battery voltage
LH E45 1
PKIA6276E
3AA93ABC3ACD3AC03ACA3AC03AC63AC53A913A773A893A873A873A8E3A773A983AC73AC93AC03AC3
3A893A873A873A8F3A773A9D3AAF3A8A3A8C3A863A9D3AAF3A8B3A8C
Page 3176 of 3924
LT-74
< SERVICE INFORMATION >
FRONT FOG LAMP
OK or NG
OK >> GO TO 6.
NG >> GO TO 5.
5.CHECK FRONT FOG LAMP CIRCUIT
1. Turn ignition switch OFF.
2. Disconnect IPDM E/R connector.
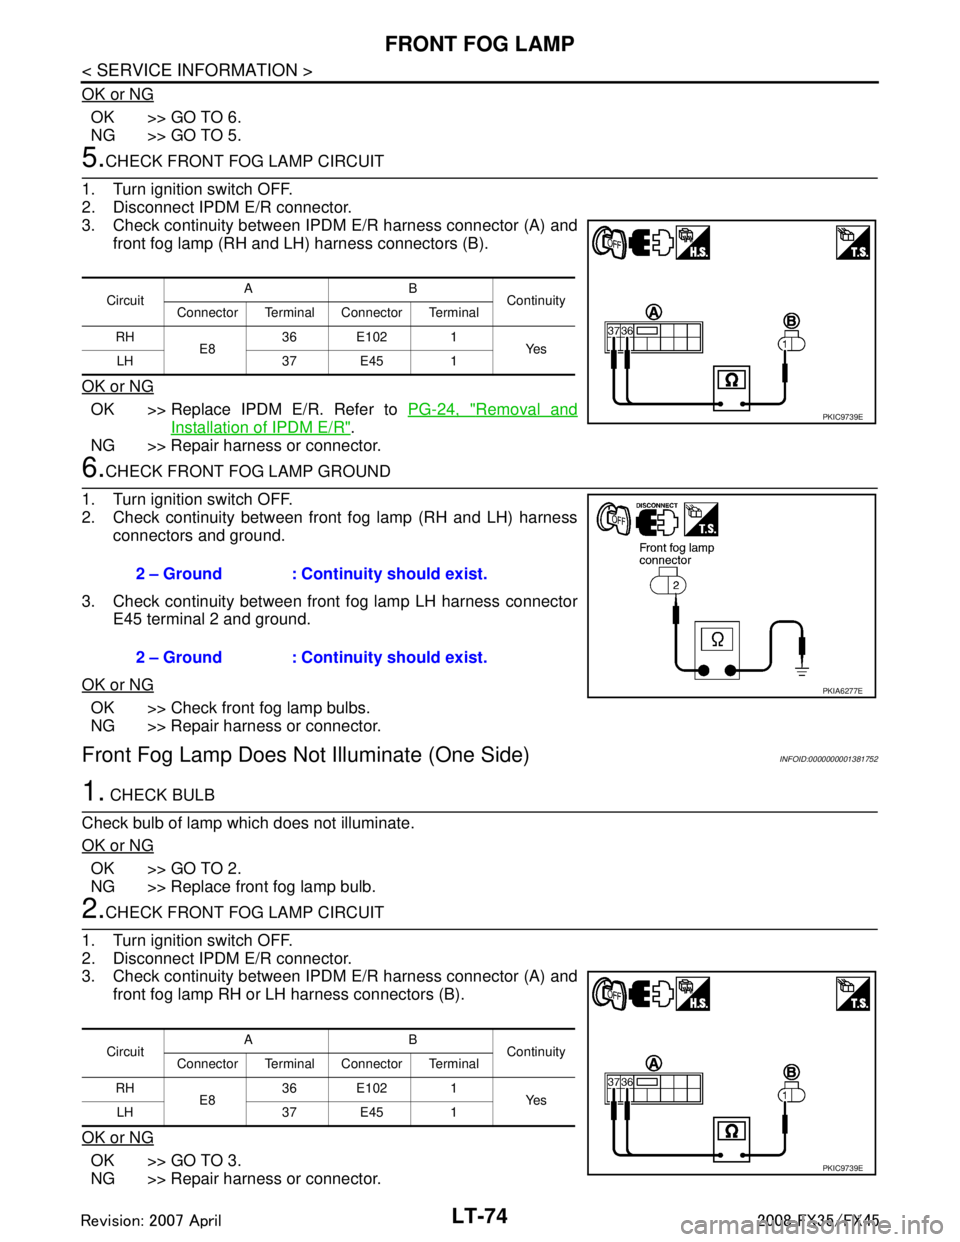
3. Check continuity between IPDM E/R harness connector (A) and
front fog lamp (RH and LH) harness connectors (B).
OK or NG
OK >> Replace IPDM E/R. Refer to PG-24, "Removal and
Installation of IPDM E/R".
NG >> Repair harness or connector.
6.CHECK FRONT FOG LAMP GROUND
1. Turn ignition switch OFF.
2. Check continuity between front fog lamp (RH and LH) harness connectors and ground.
3. Check continuity between front fog lamp LH harness connector E45 terminal 2 and ground.
OK or NG
OK >> Check front fog lamp bulbs.
NG >> Repair harness or connector.
Front Fog Lamp Does No t Illuminate (One Side)INFOID:0000000001381752
1. CHECK BULB
Check bulb of lamp which does not illuminate.
OK or NG
OK >> GO TO 2.
NG >> Replace front fog lamp bulb.
2.CHECK FRONT FOG LAMP CIRCUIT
1. Turn ignition switch OFF.
2. Disconnect IPDM E/R connector.
3. Check continuity between IPDM E/R harness connector (A) and
front fog lamp RH or LH harness connectors (B).
OK or NG
OK >> GO TO 3.
NG >> Repair harness or connector.
Circuit AB
Continuity
Connector Terminal Connector Terminal
RH E836 E102 1
Ye s
LH 37 E45 1
PKIC9739E
2 – Ground : Continuity should exist.
2 – Ground : Continuity should exist.
PKIA6277E
Circuit AB
Continuity
Connector Terminal Connector Terminal
RH E836 E102 1
Ye s
LH 37 E45 1
PKIC9739E
3AA93ABC3ACD3AC03ACA3AC03AC63AC53A913A773A893A873A873A8E3A773A983AC73AC93AC03AC3
3A893A873A873A8F3A773A9D3AAF3A8A3A8C3A863A9D3AAF3A8B3A8C
Page 3177 of 3924
FRONT FOG LAMPLT-75
< SERVICE INFORMATION >
C
DE
F
G H
I
J
L
M A
B
LT
N
O P
3.CHECK FRONT FOG LAMP GROUND
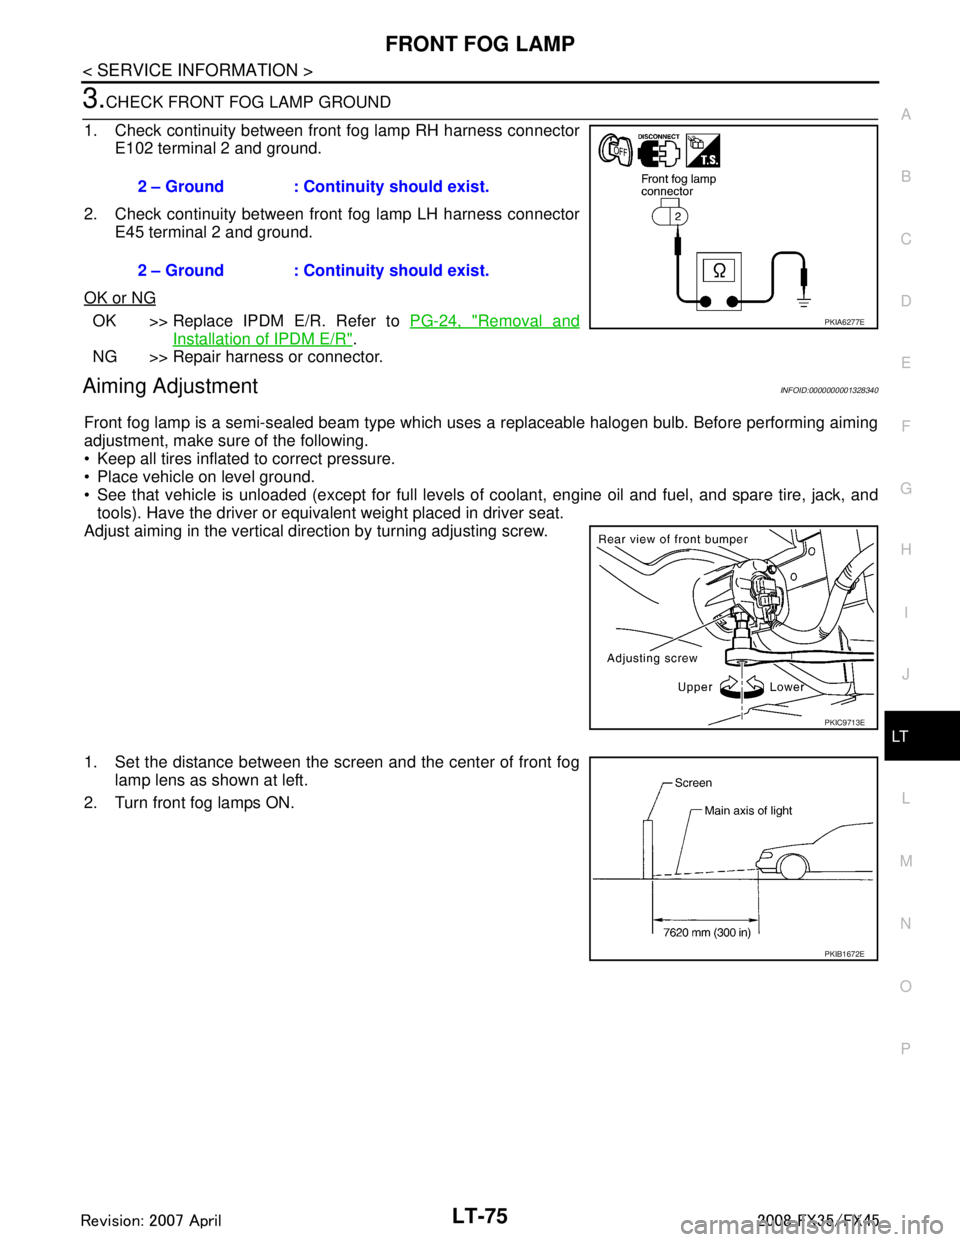
1. Check continuity between front fog lamp RH harness connector E102 terminal 2 and ground.
2. Check continuity between front fog lamp LH harness connector E45 terminal 2 and ground.
OK or NG
OK >> Replace IPDM E/R. Refer to PG-24, "Removal and
Installation of IPDM E/R".
NG >> Repair harness or connector.
Aiming AdjustmentINFOID:0000000001328340
Front fog lamp is a semi-sealed beam type which uses a replaceable halogen bulb. Before performing aiming
adjustment, make sure of the following.
Keep all tires inflated to correct pressure.
Place vehicle on level ground.
See that vehicle is unloaded (except for full levels of coolant, engine oil and fuel, and spare tire, jack, and tools). Have the driver or equivalent weight placed in driver seat.
Adjust aiming in the vertical direction by turning adjusting screw.
1. Set the distance between the scr een and the center of front fog
lamp lens as shown at left.
2. Turn front fog lamps ON. 2 – Ground : Continuity should exist.
2 – Ground : Continuity should exist.
PKIA6277E
PKIC9713E
PKIB1672E
3AA93ABC3ACD3AC03ACA3AC03AC63AC53A913A773A893A873A873A8E3A773A983AC73AC93AC03AC3
3A893A873A873A8F3A773A9D3AAF3A8A3A8C3A863A9D3AAF3A8B3A8C
Page 3178 of 3924
LT-76
< SERVICE INFORMATION >
FRONT FOG LAMP
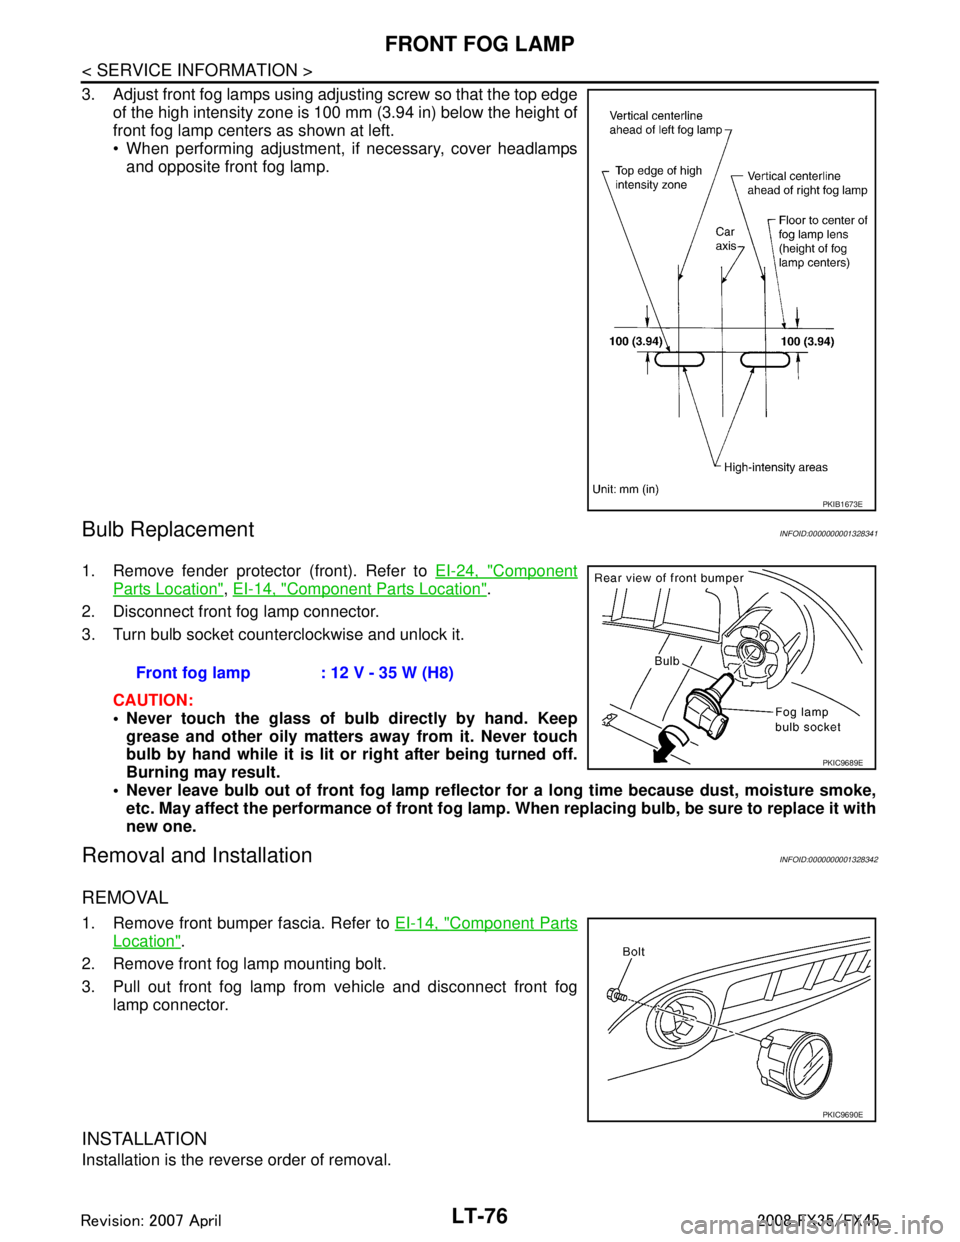
3. Adjust front fog lamps using adjusting screw so that the top edgeof the high intensity zone is 100 mm (3.94 in) below the height of
front fog lamp centers as shown at left.
When performing adjustment, if necessary, cover headlampsand opposite front fog lamp.
Bulb ReplacementINFOID:0000000001328341
1. Remove fender protector (front). Refer to EI-24, "Component
Parts Location", EI-14, "Component Parts Location".
2. Disconnect front fog lamp connector.
3. Turn bulb socket counterclockwise and unlock it.
CAUTION:
Never touch the glass of bulb directly by hand. Keepgrease and other oily matters away from it. Never touch
bulb by hand while it is lit or right after being turned off.
Burning may result.
Never leave bulb out of front fog lamp reflector for a long time because dust, moisture smoke,
etc. May affect the performance of front fog lamp . When replacing bulb, be sure to replace it with
new one.
Removal and InstallationINFOID:0000000001328342
REMOVAL
1. Remove front bumper fascia. Refer to EI-14, "Component Parts
Location".
2. Remove front fog lamp mounting bolt.
3. Pull out front fog lamp from vehicle and disconnect front fog lamp connector.
INSTALLATION
Installation is the reverse order of removal.
PKIB1673E
Front fog lamp : 12 V - 35 W (H8)
PKIC9689E
PKIC9690E
3AA93ABC3ACD3AC03ACA3AC03AC63AC53A913A773A893A873A873A8E3A773A983AC73AC93AC03AC3
3A893A873A873A8F3A773A9D3AAF3A8A3A8C3A863A9D3AAF3A8B3A8C
Page 3192 of 3924
LT-90
< SERVICE INFORMATION >
TURN SIGNAL AND HAZARD WARNING LAMPS
ACTIVE TEST
Display Item List
Turn Signal Lamp Does Not OperateINFOID:0000000001381753
1.CHECK BULB
Check bulb standard of each turn signal lamp is correct.
OK or NG
OK >> GO TO 2.
NG >> Replace turn signal lamp bulb.
2.CHECK COMBINATION SWITCH INPUT SIGNAL
CONSULT-III DATA MONITOR
1. Select “TURN SIGNAL R” and “TURN SIGNAL L” of BCM (FLASHER) data monitor item.
2. With operating the test item, check the monitor status.
CHECK THE COMBINATION SWITCH
Refer to LT-104, "
Combination Switch Inspection".
OK or NG
OK >> GO TO 3.
NG >> Check combination switch (lighting switch). Refer to LT-104, "
Combination Switch Inspection".
3.ACTIVE TEST
CONSULT-III ACTIVE TEST
1. Select “FLASHER” of BCM (FLASHER) active test item.
2. With operating the test item, check the turn signal lamp operation.
GO TO 4
OK or NG
OK >> Replace BCM. Refer to BCS-13, "Removal and Installation of BCM".
NG >> GO TO 4.
4.CHECK TURN SIGNAL LAMP CIRCUIT
1. Turn ignition switch OFF.
2. Disconnect BCM connector, front combination lamp (RH and LH) connectors, side turn signal lamp (RH and LH) connectors and rear combination lamp (RH and LH) connectors.
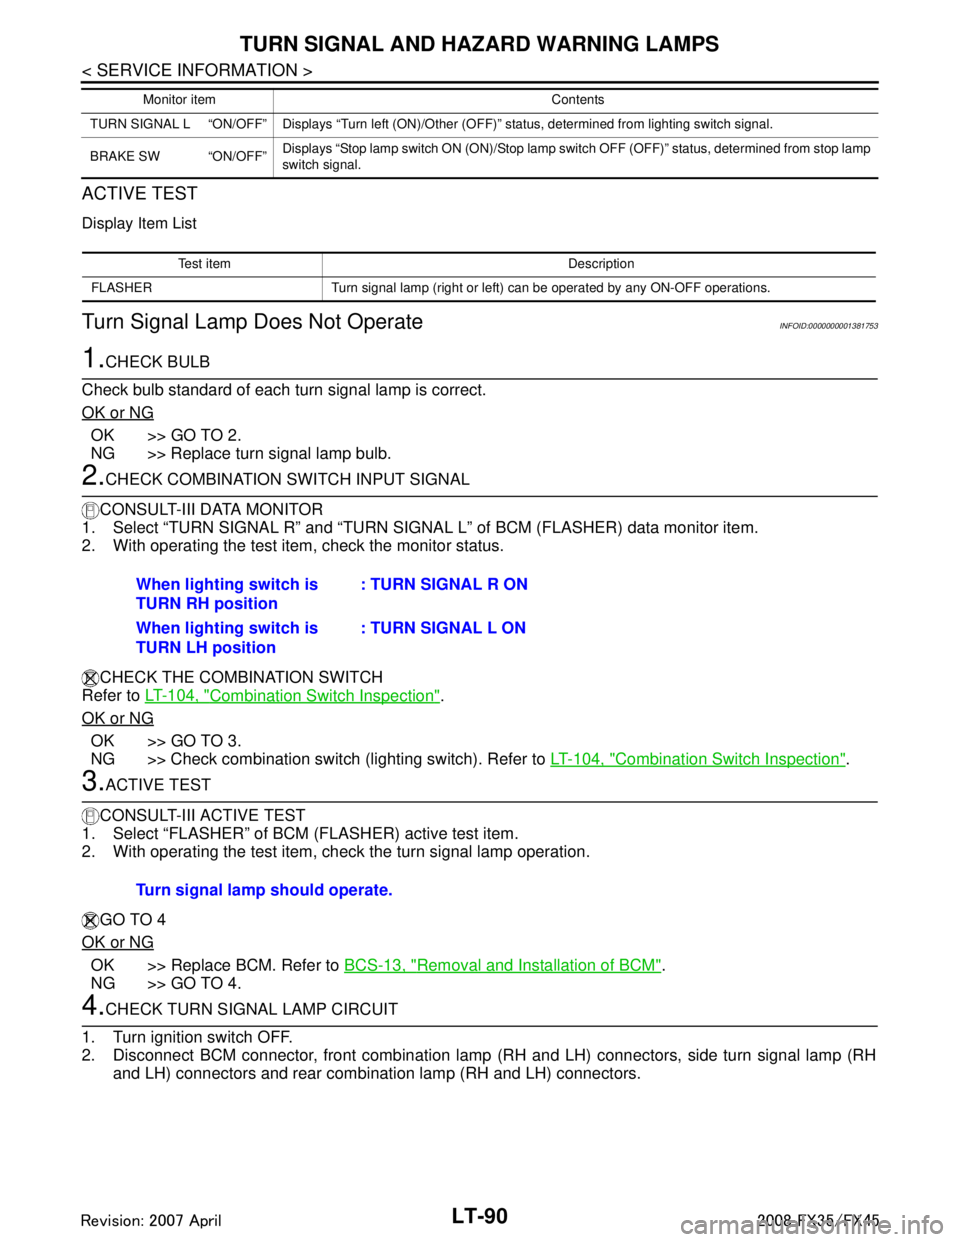
TURN SIGNAL L “ON/OFF” Displays “Turn left (ON)/Other (O FF)” status, determined from lighting switch signal.
BRAKE SW “ON/OFF” Displays “Stop lamp switch ON (ON)/Stop lamp switch OFF (OFF)” status, determined from stop lamp
switch signal.
Monitor item Contents
Test item Description
FLASHER Turn signal lamp (right or left) can be operated by any ON-OFF operations.
When lighting switch is
TURN RH position : TURN SIGNAL R ON
When lighting switch is
TURN LH position : TURN SIGNAL L ON
Turn signal lamp should operate.
3AA93ABC3ACD3AC03ACA3AC03AC63AC53A913A773A893A873A873A8E3A773A983AC73AC93AC03AC3
3A893A873A873A8F3A773A9D3AAF3A8A3A8C3A863A9D3AAF3A8B3A8C