Page 3194 of 3924
LT-92
< SERVICE INFORMATION >
TURN SIGNAL AND HAZARD WARNING LAMPS
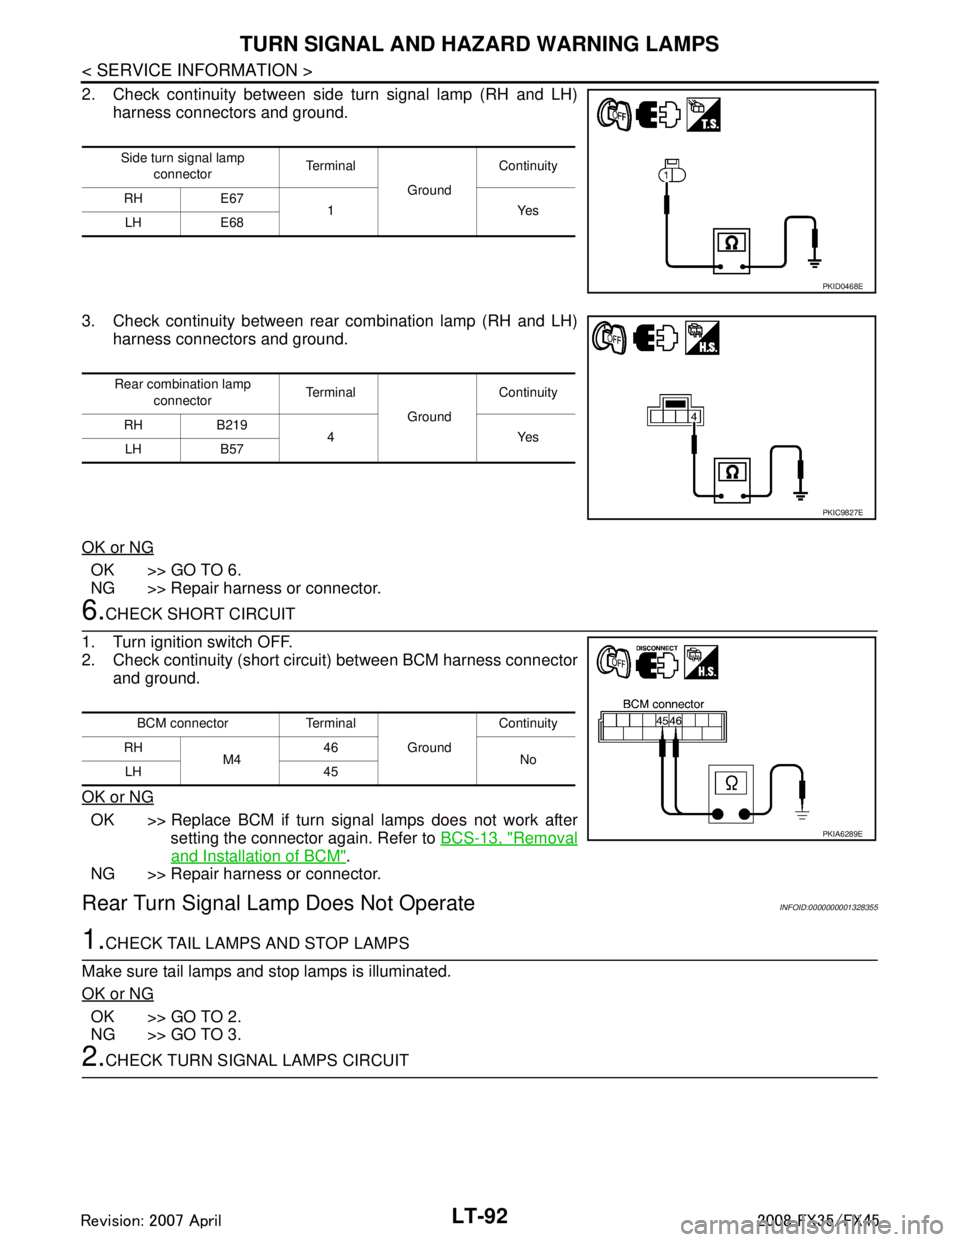
2. Check continuity between side turn signal lamp (RH and LH)harness connectors and ground.
3. Check continuity between rear combination lamp (RH and LH) harness connectors and ground.
OK or NG
OK >> GO TO 6.
NG >> Repair harness or connector.
6.CHECK SHORT CIRCUIT
1. Turn ignition switch OFF.
2. Check continuity (short circuit) between BCM harness connector and ground.
OK or NG
OK >> Replace BCM if turn signal lamps does not work after setting the connector again. Refer to BCS-13, "
Removal
and Installation of BCM".
NG >> Repair harness or connector.
Rear Turn Signal Lam p Does Not OperateINFOID:0000000001328355
1.CHECK TAIL LAMPS AND STOP LAMPS
Make sure tail lamps and stop lamps is illuminated.
OK or NG
OK >> GO TO 2.
NG >> GO TO 3.
2.CHECK TURN SIGNAL LAMPS CIRCUIT
Side turn signal lamp connector Te r m i n a l
GroundContinuity
RH E67 1Yes
LH E68
PKID0468E
Rear combination lamp
connector Te r m i n a l
GroundContinuity
RH B219 4Yes
LH B57
PKIC9827E
BCM connector Terminal
GroundContinuity
RH M4 46
No
LH 45
PKIA6289E
3AA93ABC3ACD3AC03ACA3AC03AC63AC53A913A773A893A873A873A8E3A773A983AC73AC93AC03AC3
3A893A873A873A8F3A773A9D3AAF3A8A3A8C3A863A9D3AAF3A8B3A8C
Page 3196 of 3924
LT-94
< SERVICE INFORMATION >
TURN SIGNAL AND HAZARD WARNING LAMPS
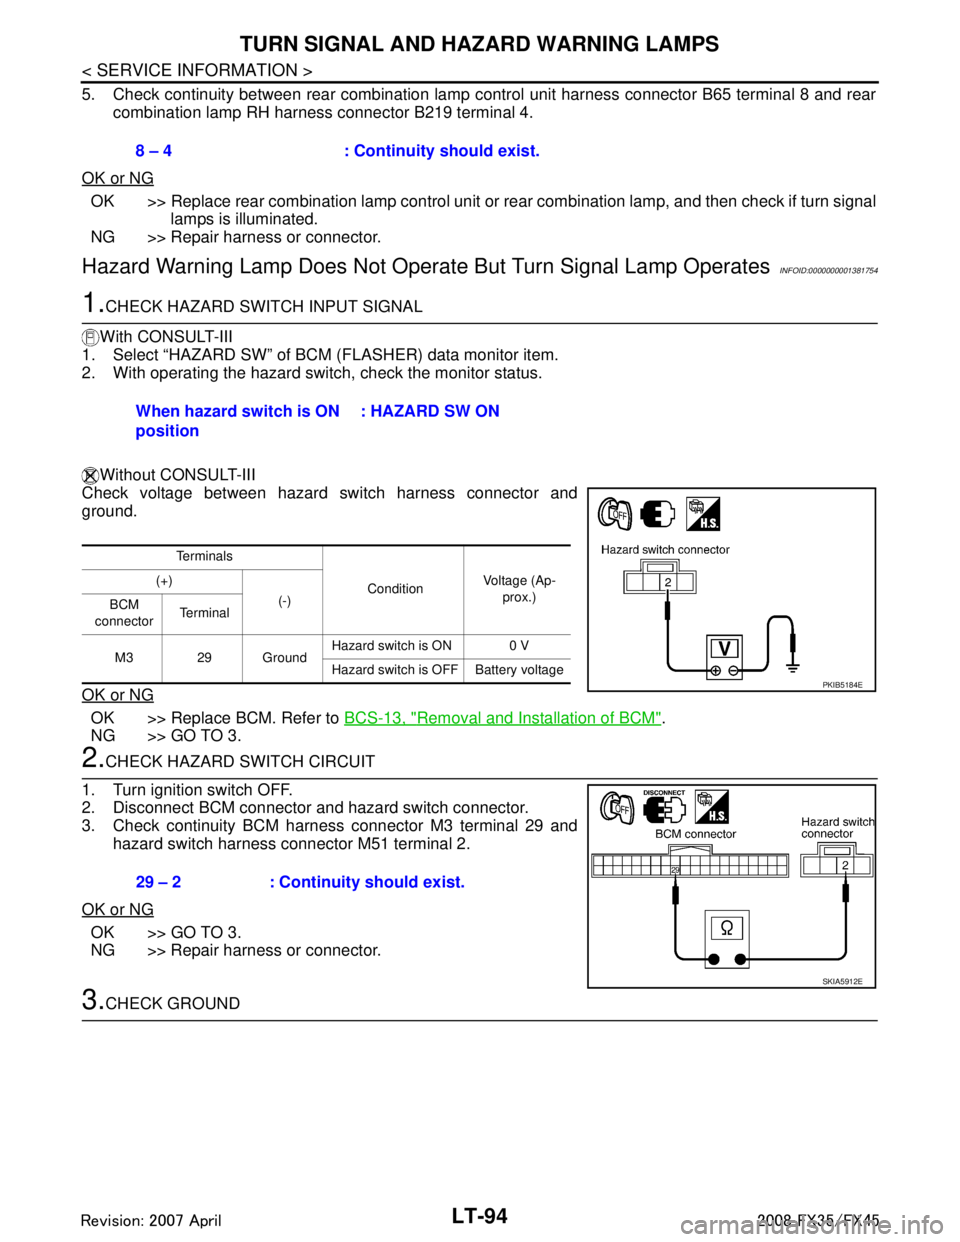
5. Check continuity between rear combination lamp control unit harness connector B65 terminal 8 and rearcombination lamp RH harness connector B219 terminal 4.
OK or NG
OK >> Replace rear combination lamp control unit or rear combination lamp, and then check if turn signal
lamps is illuminated.
NG >> Repair harness or connector.
Hazard Warning Lamp Does Not Oper ate But Turn Signal Lamp OperatesINFOID:0000000001381754
1.CHECK HAZARD SWITCH INPUT SIGNAL
With CONSULT-III
1. Select “HAZARD SW” of BCM (FLASHER) data monitor item.
2. With operating the hazard switch, check the monitor status.
Without CONSULT-III
Check voltage between hazard switch harness connector and
ground.
OK or NG
OK >> Replace BCM. Refer to BCS-13, "Removal and Installation of BCM".
NG >> GO TO 3.
2.CHECK HAZARD SWITCH CIRCUIT
1. Turn ignition switch OFF.
2. Disconnect BCM connector and hazard switch connector.
3. Check continuity BCM harness connector M3 terminal 29 and
hazard switch harness connector M51 terminal 2.
OK or NG
OK >> GO TO 3.
NG >> Repair harness or connector.
3.CHECK GROUND 8 – 4 : Continuity should exist.
When hazard switch is ON
position
: HAZARD SW ON
Te r m i n a l s
ConditionVoltage (Ap-
prox.)
(+)
(-)
BCM
connector Te r m i n a l
M3 29 Ground Hazard switch is ON 0 V
Hazard switch is OFF Battery voltage
PKIB5184E
29 – 2 : Continuity should exist.
SKIA5912E
3AA93ABC3ACD3AC03ACA3AC03AC63AC53A913A773A893A873A873A8E3A773A983AC73AC93AC03AC3
3A893A873A873A8F3A773A9D3AAF3A8A3A8C3A863A9D3AAF3A8B3A8C
Page 3197 of 3924
TURN SIGNAL AND HAZARD WARNING LAMPSLT-95
< SERVICE INFORMATION >
C
DE
F
G H
I
J
L
M A
B
LT
N
O P
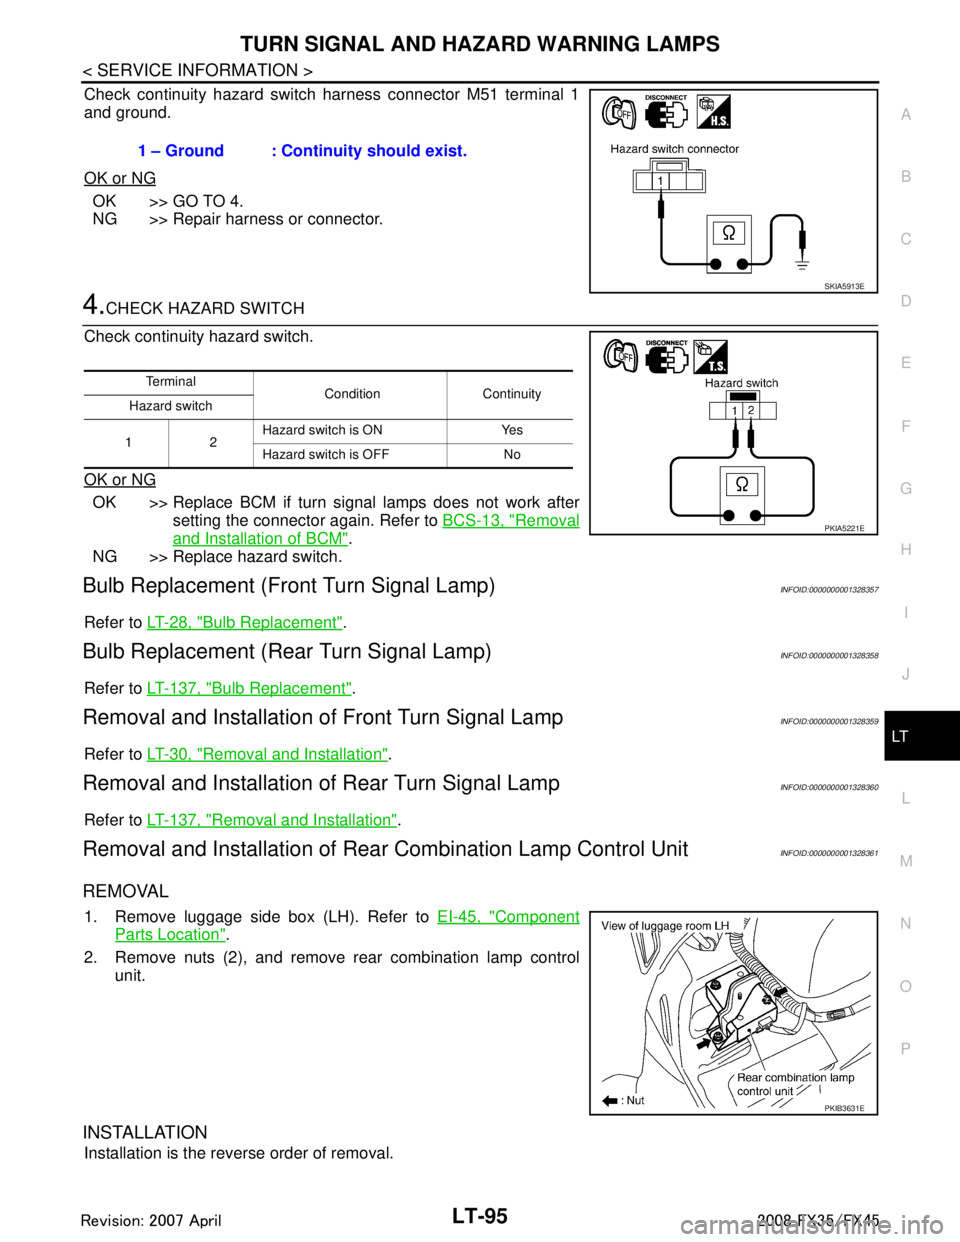
Check continuity hazard switch harness connector M51 terminal 1
and ground.
OK or NG
OK >> GO TO 4.
NG >> Repair harness or connector.
4.CHECK HAZARD SWITCH
Check continuity hazard switch.
OK or NG
OK >> Replace BCM if turn signal lamps does not work after setting the connector again. Refer to BCS-13, "
Removal
and Installation of BCM".
NG >> Replace hazard switch.
Bulb Replacement (Fr ont Turn Signal Lamp)INFOID:0000000001328357
Refer to LT-28, "Bulb Replacement".
Bulb Replacement (Rear Turn Signal Lamp)INFOID:0000000001328358
Refer to LT-137, "Bulb Replacement".
Removal and Installation of Front Turn Signal LampINFOID:0000000001328359
Refer to LT-30, "Removal and Installation".
Removal and Installation of Rear Turn Signal LampINFOID:0000000001328360
Refer to LT-137, "Removal and Installation".
Removal and Installation of Rear Combination Lamp Control UnitINFOID:0000000001328361
REMOVAL
1. Remove luggage side box (LH). Refer to EI-45, "Component
Parts Location".
2. Remove nuts (2), and remove rear combination lamp control unit.
INSTALLATION
Installation is the reverse order of removal. 1 – Ground : Continuity should exist.
SKIA5913E
Te r m i n a l
Condition Continuity
Hazard switch
12 Hazard switch is ON Yes
Hazard switch is OFF No
PKIA5221E
PKIB3631E
3AA93ABC3ACD3AC03ACA3AC03AC63AC53A913A773A893A873A873A8E3A773A983AC73AC93AC03AC3
3A893A873A873A8F3A773A9D3AAF3A8A3A8C3A863A9D3AAF3A8B3A8C
Page 3198 of 3924
LT-96
< SERVICE INFORMATION >
LIGHTING AND TURN SIGNAL SWITCH
LIGHTING AND TURN SIGNAL SWITCH
Removal and InstallationINFOID:0000000001328362
REMOVAL
1. Remove steering column cover. Refer to IP-10.
2. While pressing pawls in direction as shown in the figure, pull lighting and turn signal switch toward driver door and disconnect
from the base.
INSTALLATION
Installation is the reverse order of removal.
PKIB3477E
3AA93ABC3ACD3AC03ACA3AC03AC63AC53A913A773A893A873A873A8E3A773A983AC73AC93AC03AC3
3A893A873A873A8F3A773A9D3AAF3A8A3A8C3A863A9D3AAF3A8B3A8C
Page 3199 of 3924
HAZARD SWITCHLT-97
< SERVICE INFORMATION >
C
DE
F
G H
I
J
L
M A
B
LT
N
O P
HAZARD SWITCH
Removal and InstallationINFOID:0000000001328363
REMOVAL
1. Remove A/T console finisher. Refer to IP-10.
2. Disconnect the hazard switch connector.
3. Remove the drink holder.
4. Press pawl on reverse side and remove hazard switch.
INSTALLATION
Installation is the reverse order of removal.
PKIC9691E
3AA93ABC3ACD3AC03ACA3AC03AC63AC53A913A773A893A873A873A8E3A773A983AC73AC93AC03AC3
3A893A873A873A8F3A773A9D3AAF3A8A3A8C3A863A9D3AAF3A8B3A8C
Page 3208 of 3924
LT-106
< SERVICE INFORMATION >
COMBINATION SWITCH
1. Connect BCM connector and combination switch connector.
2. Turn ignition switch ON.
3. Lighting switch and wiper switch are turned OFF.
4. Set wiper intermittent dial position 4.
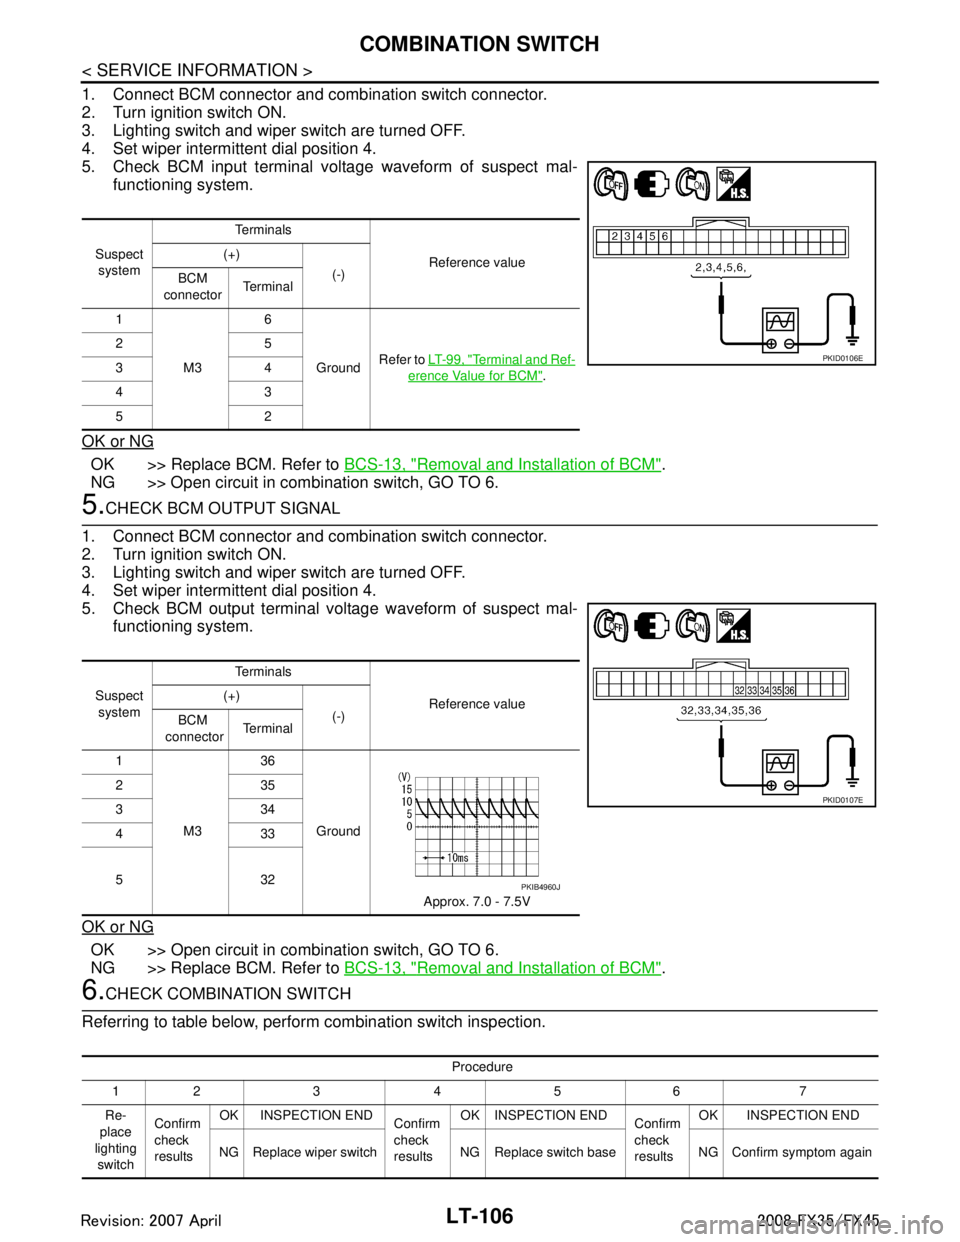
5. Check BCM input terminal voltage waveform of suspect mal-functioning system.
OK or NG
OK >> Replace BCM. Refer to BCS-13, "Removal and Installation of BCM".
NG >> Open circuit in combination switch, GO TO 6.
5.CHECK BCM OUTPUT SIGNAL
1. Connect BCM connector and combination switch connector.
2. Turn ignition switch ON.
3. Lighting switch and wiper switch are turned OFF.
4. Set wiper intermittent dial position 4.
5. Check BCM output terminal voltage waveform of suspect mal- functioning system.
OK or NG
OK >> Open circuit in combination switch, GO TO 6.
NG >> Replace BCM. Refer to BCS-13, "
Removal and Installation of BCM".
6.CHECK COMBINATION SWITCH
Referring to table below, perform combination switch inspection.
Suspect system Te r m i n a l s
Reference value
(+)
(-)
BCM
connector Te r m i n a l
1
M3 6
Ground Refer to
LT- 9 9 , "
Terminal and Ref-
erence Value for BCM".
25
34
43
52
PKID0106E
Suspect
system Te r m i n a l s
Reference value
(+)
(-)
BCM
connector Te r m i n a l
1
M3 36
Ground Approx. 7.0 - 7.5V
235
334
433
532
PKID0107E
PKIB4960J
Procedure
12 3 4 5 6 7
Re-
place
lighting switch Confirm
check
results
OK INSPECTION END
Confirm
check
resultsOK INSPECTION END
Confirm
check
resultsOK INSPECTION END
NG Replace wiper switch NG Replace switch base NG Confirm symptom again
3AA93ABC3ACD3AC03ACA3AC03AC63AC53A913A773A893A873A873A8E3A773A983AC73AC93AC03AC3
3A893A873A873A8F3A773A9D3AAF3A8A3A8C3A863A9D3AAF3A8B3A8C
Page 3209 of 3924
COMBINATION SWITCHLT-107
< SERVICE INFORMATION >
C
DE
F
G H
I
J
L
M A
B
LT
N
O P
>> INSPECTION END
Removal and InstallationINFOID:0000000001328369
Refer to LT- 9 6 and WW-28, "Removal and Installation of Front Wiper and Washer Switch".
3AA93ABC3ACD3AC03ACA3AC03AC63AC53A913A773A893A873A873A8E3A773A983AC73AC93AC03AC3
3A893A873A873A8F3A773A9D3AAF3A8A3A8C3A863A9D3AAF3A8B3A8C
Page 3216 of 3924
LT-114
< SERVICE INFORMATION >
STOP LAMP
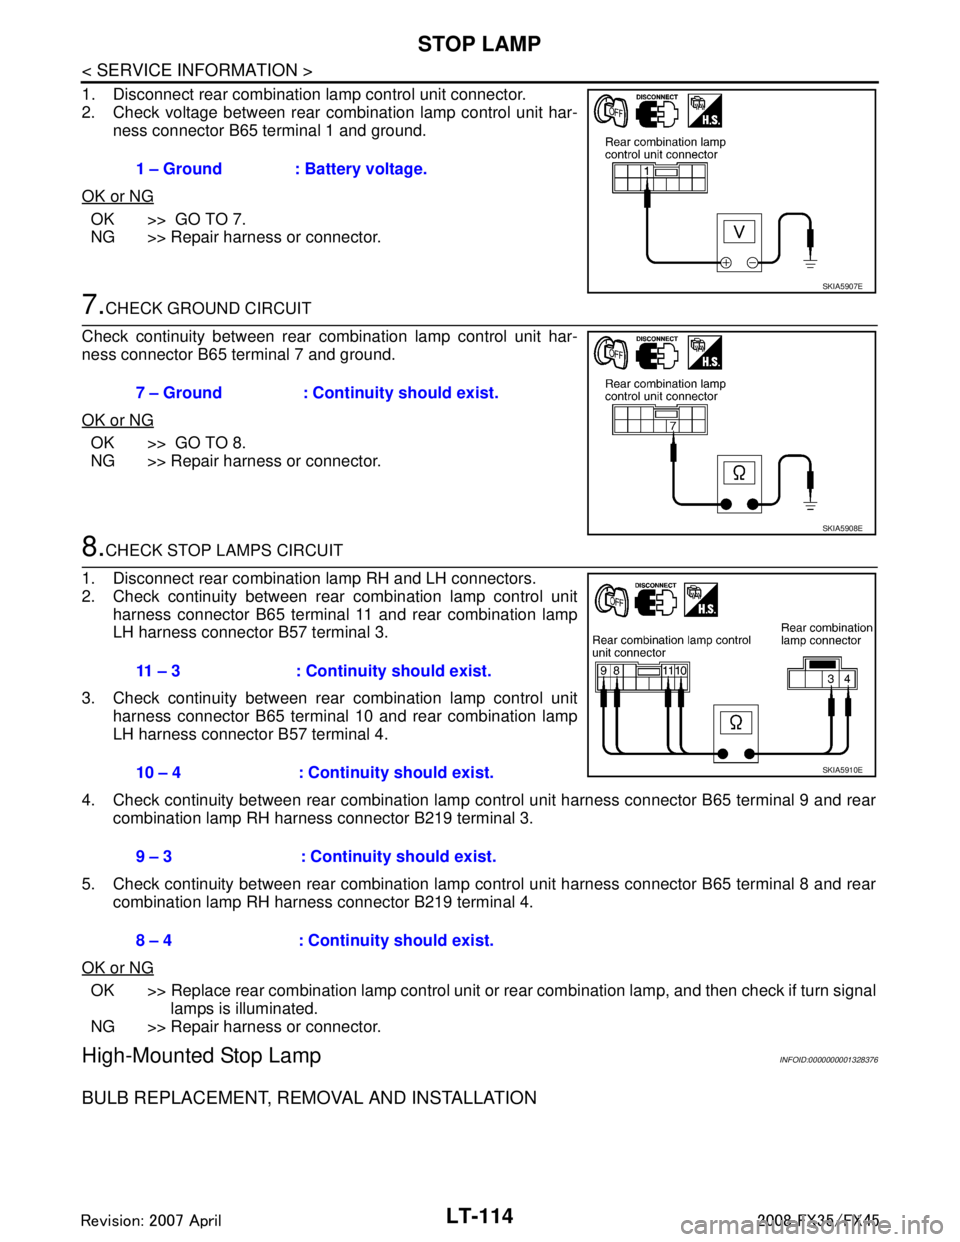
1. Disconnect rear combination lamp control unit connector.
2. Check voltage between rear combination lamp control unit har-ness connector B65 terminal 1 and ground.
OK or NG
OK >> GO TO 7.
NG >> Repair harness or connector.
7.CHECK GROUND CIRCUIT
Check continuity between rear combination lamp control unit har-
ness connector B65 terminal 7 and ground.
OK or NG
OK >> GO TO 8.
NG >> Repair harness or connector.
8.CHECK STOP LAMPS CIRCUIT
1. Disconnect rear combination lamp RH and LH connectors.
2. Check continuity between rear combination lamp control unit harness connector B65 terminal 11 and rear combination lamp
LH harness connector B57 terminal 3.
3. Check continuity between rear combination lamp control unit harness connector B65 terminal 10 and rear combination lamp
LH harness connector B57 terminal 4.
4. Check continuity between rear combination lamp control unit harness connector B65 terminal 9 and rear combination lamp RH harness connector B219 terminal 3.
5. Check continuity between rear combination lamp control unit harness connector B65 terminal 8 and rear combination lamp RH harness connector B219 terminal 4.
OK or NG
OK >> Replace rear combination lamp control unit or rear combination lamp, and then check if turn signal
lamps is illuminated.
NG >> Repair harness or connector.
High-Mounted Stop LampINFOID:0000000001328376
BULB REPLACEMENT, REMOVAL AND INSTALLATION
1 – Ground : Battery voltage.
SKIA5907E
7 – Ground : Continuity should exist.
SKIA5908E
11 – 3 : Continuity should exist.
10 – 4 : Continuity should exist.
9 – 3 : Continuity should exist.
8 – 4 : Continuity should exist.
SKIA5910E
3AA93ABC3ACD3AC03ACA3AC03AC63AC53A913A773A893A873A873A8E3A773A983AC73AC93AC03AC3
3A893A873A873A8F3A773A9D3AAF3A8A3A8C3A863A9D3AAF3A8B3A8C