2008 INFINITI FX35 battery
[x] Cancel search: batteryPage 1207 of 3924
LANE DEPARTURE WARNING SYSTEMDI-81
< SERVICE INFORMATION >
C
DE
F
G H
I
J
L
M A
B
DI
N
O P
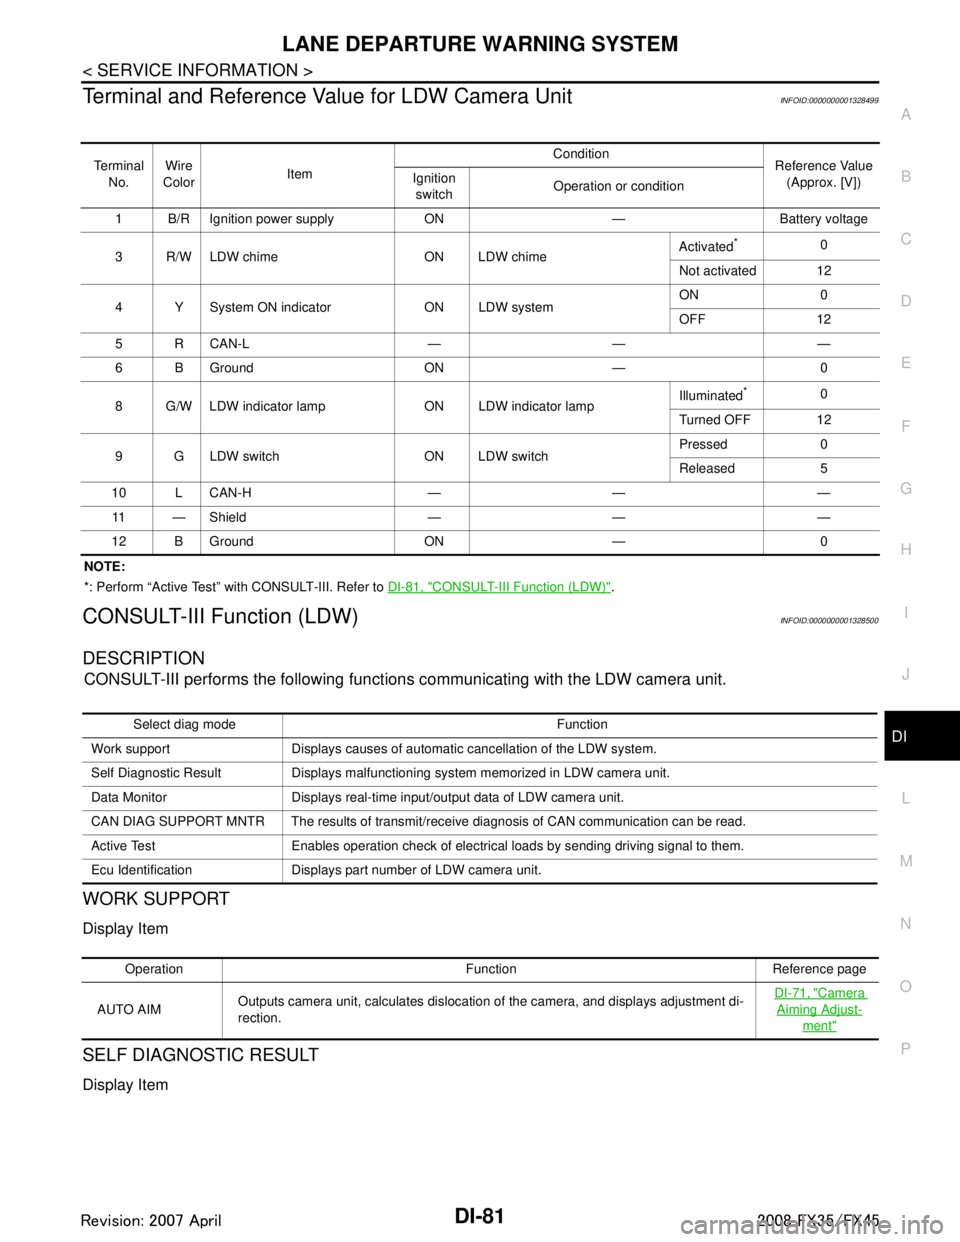
Terminal and Reference Va lue for LDW Camera UnitINFOID:0000000001328499
NOTE:
*: Perform “Active Test” with CONSULT-III. Refer to DI-81, "
CONSULT-III Function (LDW)".
CONSULT-III Function (LDW)INFOID:0000000001328500
DESCRIPTION
CONSULT-III performs the following functions communicating with the LDW camera unit.
WORK SUPPORT
Display Item
SELF DIAGNOSTIC RESULT
Display Item
Te r m i n a l
No. Wire
Color Item Condition
Reference Value
(Approx. [V])
Ignition
switch Operation or condition
1 B/R Ignition power supply ON — Battery voltage
3 R/W LDW chime ON LDW chime Activated
*0
Not activated 12
4 Y System ON indicator ON LDW system ON 0
OFF 12
5 R CAN-L — — —
6 B Ground ON — 0
8 G/W LDW indicator lamp ON LDW indicator lamp Illuminated
*0
Turned OFF 12
9 G LDW switch ON LDW switch Pressed 0
Released 5
10 L CAN-H — — — 11 — Shield — — —
12 B Ground ON — 0
Select diag mode Function
Work support Displays causes of automatic cancellation of the LDW system.
Self Diagnostic Result Displays malfunctioning system memorized in LDW camera unit.
Data Monitor Displays real-time input/output data of LDW camera unit.
CAN DIAG SUPPORT MNTR The results of transmit/receive diagnosis of CAN communication can be read.
Active Test Enables operation check of electrical loads by sending driving signal to them.
Ecu Identification Displays part number of LDW camera unit.
Operation Function Reference page
AUTO AIM Outputs camera unit, calculates dislocation of the camera, and displays adjustment di-
rection.
DI-71, "
Camera
Aiming Adjust-
ment"
3AA93ABC3ACD3AC03ACA3AC03AC63AC53A913A773A893A873A873A8E3A773A983AC73AC93AC03AC3
3A893A873A873A8F3A773A9D3AAF3A8A3A8C3A863A9D3AAF3A8B3A8C
Page 1211 of 3924
LANE DEPARTURE WARNING SYSTEMDI-85
< SERVICE INFORMATION >
C
DE
F
G H
I
J
L
M A
B
DI
N
O P
OK or NG
OK >> GO TO 2.
NG >> Be sure to eliminate cause of malfunction before installing new fuse. Refer to PG-77, "
Terminal
Arrangement".
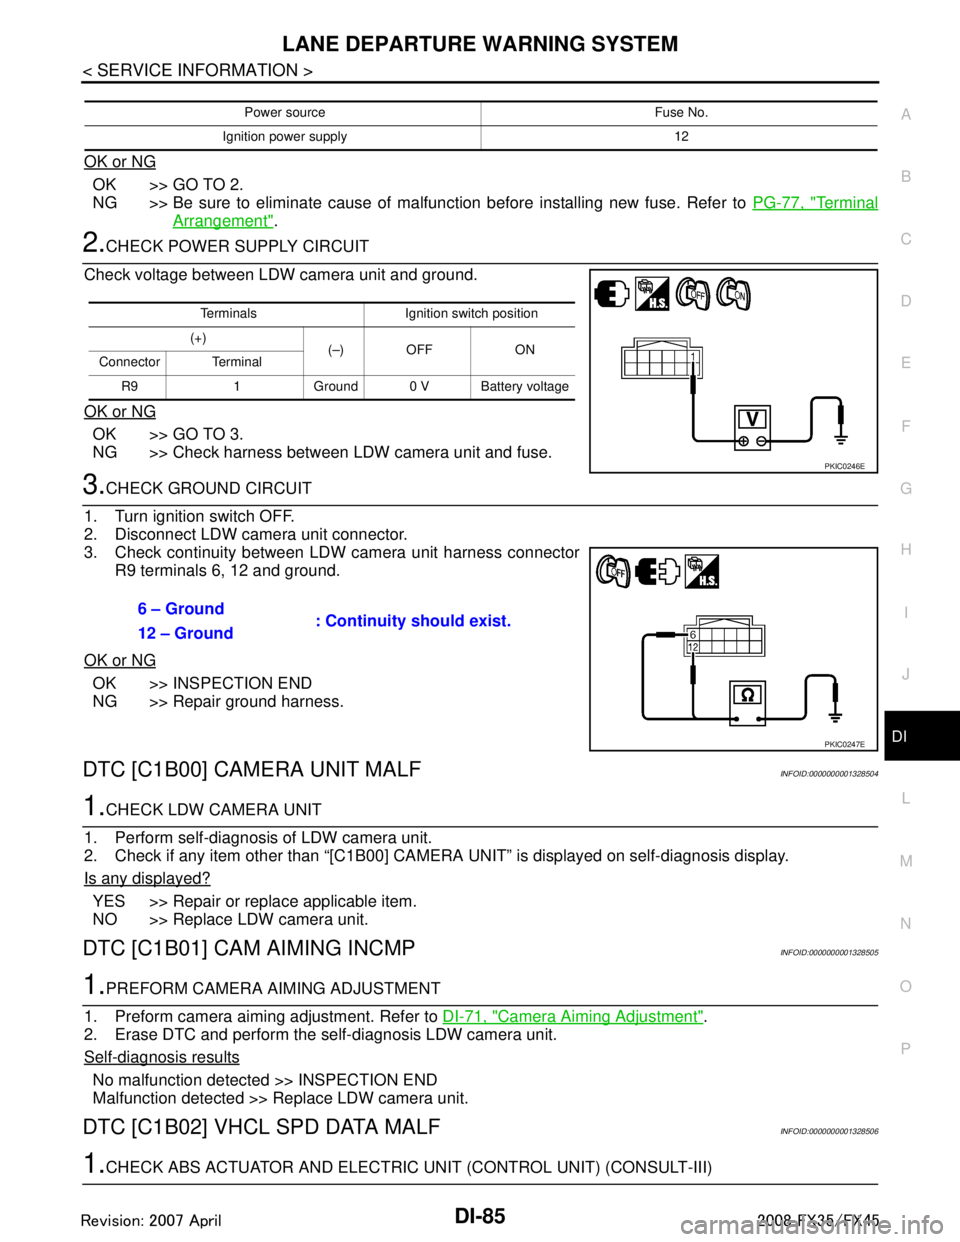
2.CHECK POWER SUPPLY CIRCUIT
Check voltage between LDW camera unit and ground.
OK or NG
OK >> GO TO 3.
NG >> Check harness between LDW camera unit and fuse.
3.CHECK GROUND CIRCUIT
1. Turn ignition switch OFF.
2. Disconnect LDW camera unit connector.
3. Check continuity between LDW camera unit harness connector R9 terminals 6, 12 and ground.
OK or NG
OK >> INSPECTION END
NG >> Repair ground harness.
DTC [C1B00] CAMERA UNIT MALFINFOID:0000000001328504
1.CHECK LDW CAMERA UNIT
1. Perform self-diagnosis of LDW camera unit.
2. Check if any item other than “[C1B00] CAMERA UNIT” is displayed on self-diagnosis display.
Is any displayed?
YES >> Repair or replace applicable item.
NO >> Replace LDW camera unit.
DTC [C1B01] CAM AIMING INCMPINFOID:0000000001328505
1.PREFORM CAMERA AIMING ADJUSTMENT
1. Preform camera aiming adjustment. Refer to DI-71, "
Camera Aiming Adjustment".
2. Erase DTC and perform the self-diagnosis LDW camera unit.
Self
-diagnosis results
No malfunction detected >> INSPECTION END
Malfunction detected >> Replace LDW camera unit.
DTC [C1B02] VHCL SPD DATA MALFINFOID:0000000001328506
1.CHECK ABS ACTUATOR AND ELECTRIC UNIT (CONTROL UNIT) (CONSULT-III)
Power source Fuse No.
Ignition power supply 12
Terminals Ignition switch position
(+) (–) OFF ON
Connector Terminal
R9 1 Ground 0 V Battery voltage
PKIC0246E
6 – Ground : Continuity should exist.
12 – Ground
PKIC0247E
3AA93ABC3ACD3AC03ACA3AC03AC63AC53A913A773A893A873A873A8E3A773A983AC73AC93AC03AC3
3A893A873A873A8F3A773A9D3AAF3A8A3A8C3A863A9D3AAF3A8B3A8C
Page 1213 of 3924
LANE DEPARTURE WARNING SYSTEMDI-87
< SERVICE INFORMATION >
C
DE
F
G H
I
J
L
M A
B
DI
N
O P
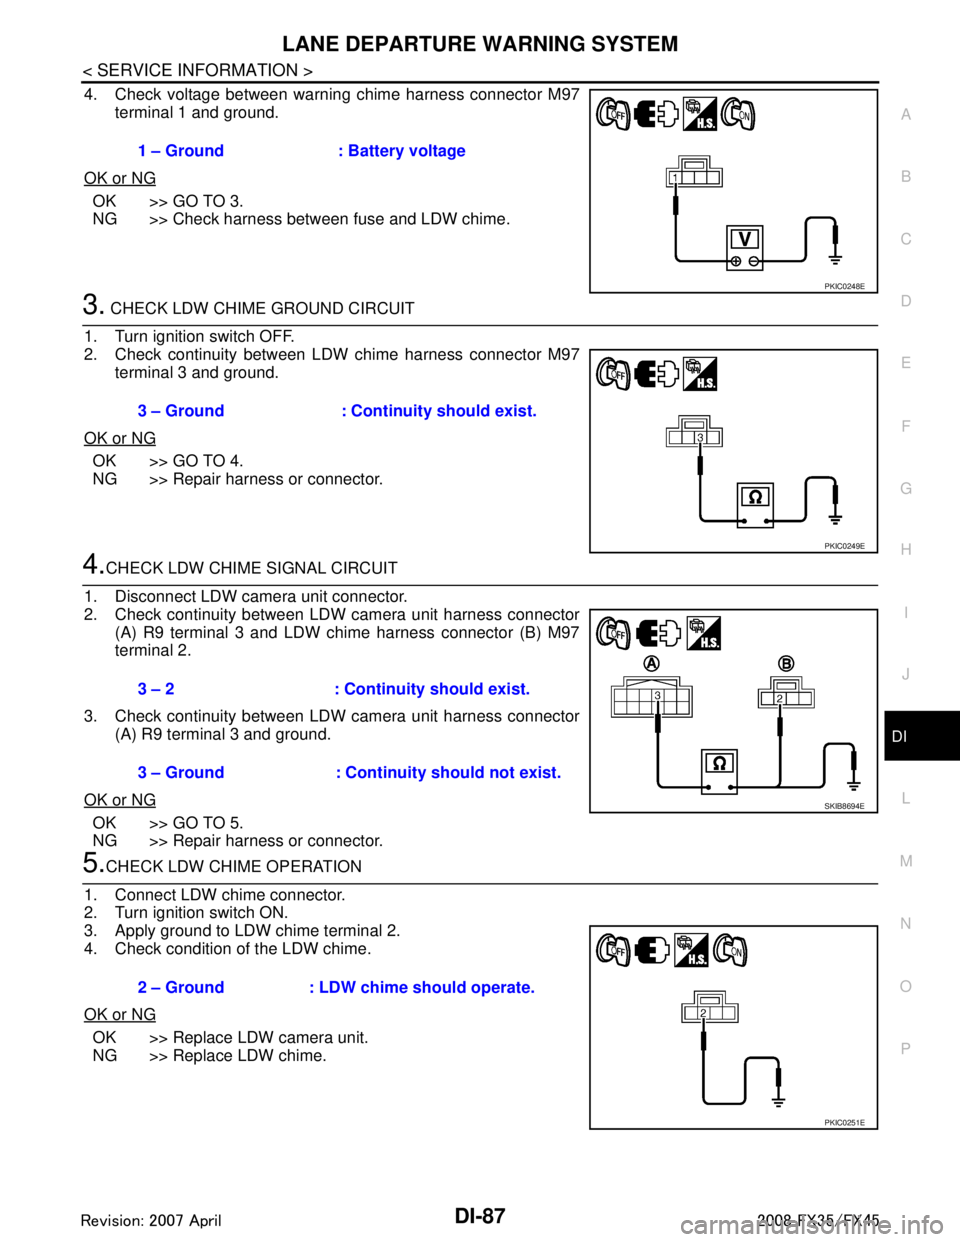
4. Check voltage between warning chime harness connector M97 terminal 1 and ground.
OK or NG
OK >> GO TO 3.
NG >> Check harness between fuse and LDW chime.
3. CHECK LDW CHIME GROUND CIRCUIT
1. Turn ignition switch OFF.
2. Check continuity between LDW chime harness connector M97 terminal 3 and ground.
OK or NG
OK >> GO TO 4.
NG >> Repair harness or connector.
4.CHECK LDW CHIME SIGNAL CIRCUIT
1. Disconnect LDW camera unit connector.
2. Check continuity between LDW camera unit harness connector (A) R9 terminal 3 and LDW chime harness connector (B) M97
terminal 2.
3. Check continuity between LDW camera unit harness connector (A) R9 terminal 3 and ground.
OK or NG
OK >> GO TO 5.
NG >> Repair harness or connector.
5.CHECK LDW CHIME OPERATION
1. Connect LDW chime connector.
2. Turn ignition switch ON.
3. Apply ground to LDW chime terminal 2.
4. Check condition of the LDW chime.
OK or NG
OK >> Replace LDW camera unit.
NG >> Replace LDW chime. 1 – Ground : Battery voltage
PKIC0248E
3 – Ground : Continuity should exist.
PKIC0249E
3 – 2 : Continui
ty should exist.
3 – Ground : Continuity should not exist.
SKIB8694E
2 – Ground : LDW chime should operate.
PKIC0251E
3AA93ABC3ACD3AC03ACA3AC03AC63AC53A913A773A893A873A873A8E3A773A983AC73AC93AC03AC3
3A893A873A873A8F3A773A9D3AAF3A8A3A8C3A863A9D3AAF3A8B3A8C
Page 1215 of 3924

LANE DEPARTURE WARNING SYSTEMDI-89
< SERVICE INFORMATION >
C
DE
F
G H
I
J
L
M A
B
DI
N
O P
6.CHECK OPERATION OF LDW SYSTEM ON INDICATOR
Check LDW system ON indicator oper ation “SYSTEM ON LAMP DRIVE” in “Active Test” mode with CON-
SULT-III.
NOTE:
Perform “SYSTEM ON LAMP DRIVE” when LDW system ON indicator turns OFF.
OK or NG
OK >> Replace LDW camera unit.
NG >> GO TO 7.
7.CHECK LDW SYSTEM ON INDICATOR POWER SUPPLY CIRCUIT
1. Turn ignition switch OFF.
2. Disconnect LDW switch connector.
3. Turn ignition switch ON.
4. Check voltage between LDW switch harness connector M96 ter- minal 3 and ground.
OK or NG
OK >> GO TO 8.
NG >> Check harness between fuse and LDW switch.
8.CHECK LDW SYSTEM ON INDICATOR SIGNAL CIRCUIT
1. Disconnect LDW camera unit connector.
2. Check continuity between LDW camera unit harness connector R9 terminal 4 and LDW switch harness connector M96 terminal
2.
3. Check continuity between LDW camera unit harness connector R9 terminal 4 and ground.
OK or NG
OK >> GO TO 9.
NG >> Repair harness or connector.
9.CHECK LDW SYSTEM ON INDICATOR
1. Connect LDW switch connector.
2. Turn ignition switch ON. “SYSTEM ON LAMP DRIVE”
Select “On” : LDW system ON
indicator illuminates.
Select “Off” : LDW system ON indicator turns OFF.
3 – Ground : Battery voltage
PKIB4705E
4 – 2 : Continuity should exist.
4 – Ground : Continuity should not exist.
PKIB4706E
3AA93ABC3ACD3AC03ACA3AC03AC63AC53A913A773A893A873A873A8E3A773A983AC73AC93AC03AC3
3A893A873A873A8F3A773A9D3AAF3A8A3A8C3A863A9D3AAF3A8B3A8C
Page 1232 of 3924
DI-106
< SERVICE INFORMATION >
REAR VIEW MONITOR
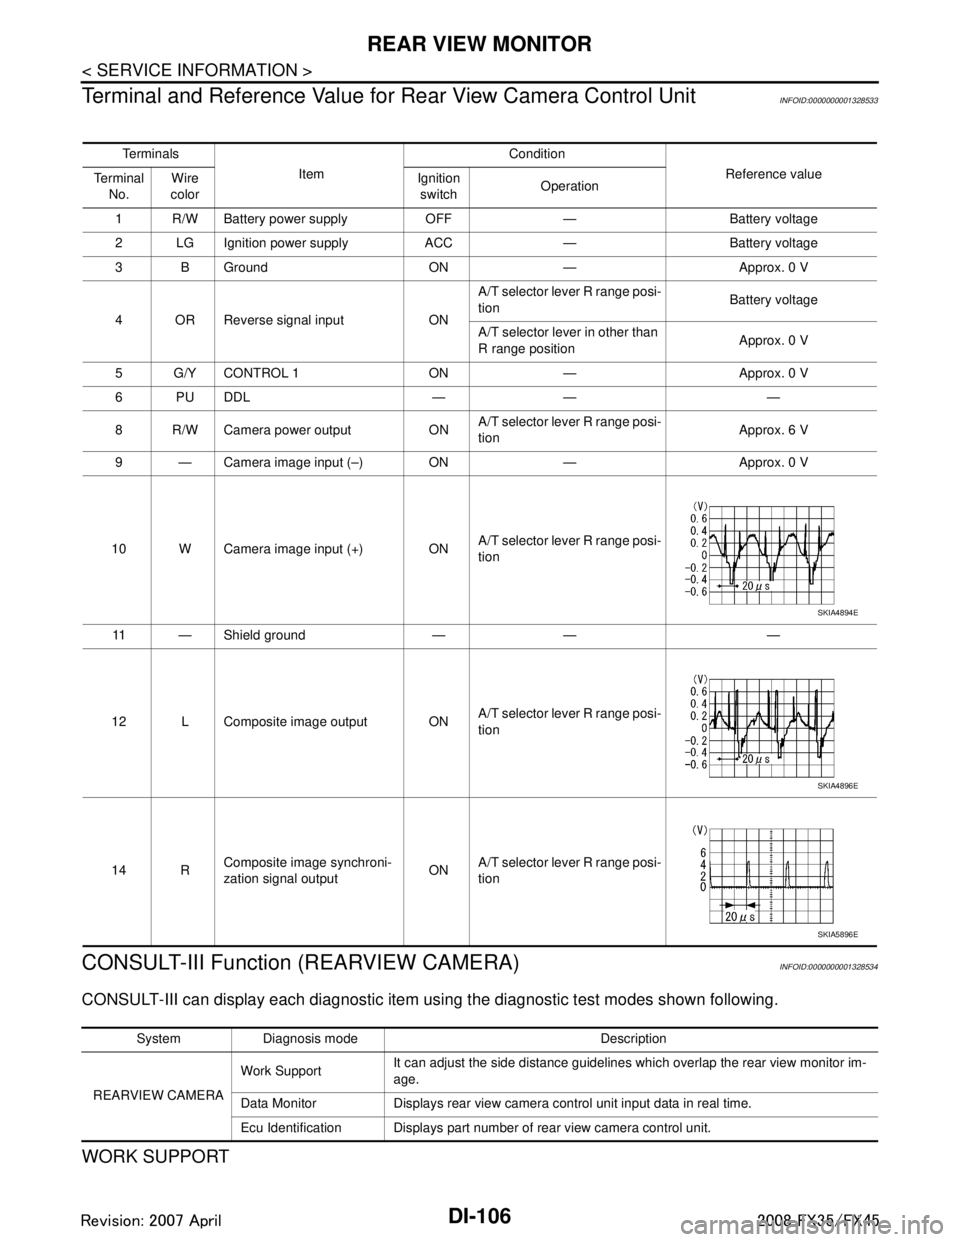
Terminal and Reference Value for Rear View Camera Control Unit
INFOID:0000000001328533
CONSULT-III Function (REARVIEW CAMERA)INFOID:0000000001328534
CONSULT-III can display each diagnostic item using the diagnostic test modes shown following.
WORK SUPPORT
Te r m i n a l s
Item Condition
Reference value
Te r m i n a l
No. Wire
color Ignition
switch Operation
1 R/W Battery power supply OFF — Battery voltage
2 LG Ignition power supply ACC — Battery voltage
3 B Ground ON — Approx. 0 V
4 OR Reverse signal input ON A/T selector lever R range posi-
tion
Battery voltage
A/T selector lever in other than
R range position Approx. 0 V
5 G/Y CONTROL 1 ON — Approx. 0 V
6PUDDL — — —
8 R/W Camera power output ON A/T selector lever R range posi-
tion
Approx. 6 V
9 — Camera image input (–) ON — Approx. 0 V
10 W Camera image input (+) ON A/T selector lever R range posi-
tion
11 — Shield ground — — —
12 L Composite image output ON A/T selector lever R range posi-
tion
14 R Composite image synchroni-
zation signal output ONA/T selector lever R range posi-
tion
SKIA4894E
SKIA4896E
SKIA5896E
System Diagnosis mode Description
REARVIEW CAMERA Work Support
It can adjust the side distance guidelines which overlap the rear view monitor im-
age.
Data Monitor Displays rear view camera control unit input data in real time.
Ecu Identification Displays part number of rear view camera control unit.
3AA93ABC3ACD3AC03ACA3AC03AC63AC53A913A773A893A873A873A8E3A773A983AC73AC93AC03AC3
3A893A873A873A8F3A773A9D3AAF3A8A3A8C3A863A9D3AAF3A8B3A8C
Page 1234 of 3924
DI-108
< SERVICE INFORMATION >
REAR VIEW MONITOR
6. Select “SAVE”, and confirm the guide line.
7. Select “End”.
8. Select “ADJ GUIDELINE POSITION”.
9. Adjust the guide line selecting “X UP”, “X DOWN”, “Y UP” or “Y DOWN” so that the corrected line can fit
the guide line.
10. Touch “SAVE”, and confirm the guide line.
11. Touch “End” to finish correcting.
Power Supply and Ground Circuit InspectionINFOID:0000000001328536
1.CHECK FUSE
Make sure the fuses for rear view camera control unit is blown.
OK or NG
OK >> GO TO 2.
NG >> Be sure to eliminate cause of malfunction before installing new fuse. Refer to PG-3
.
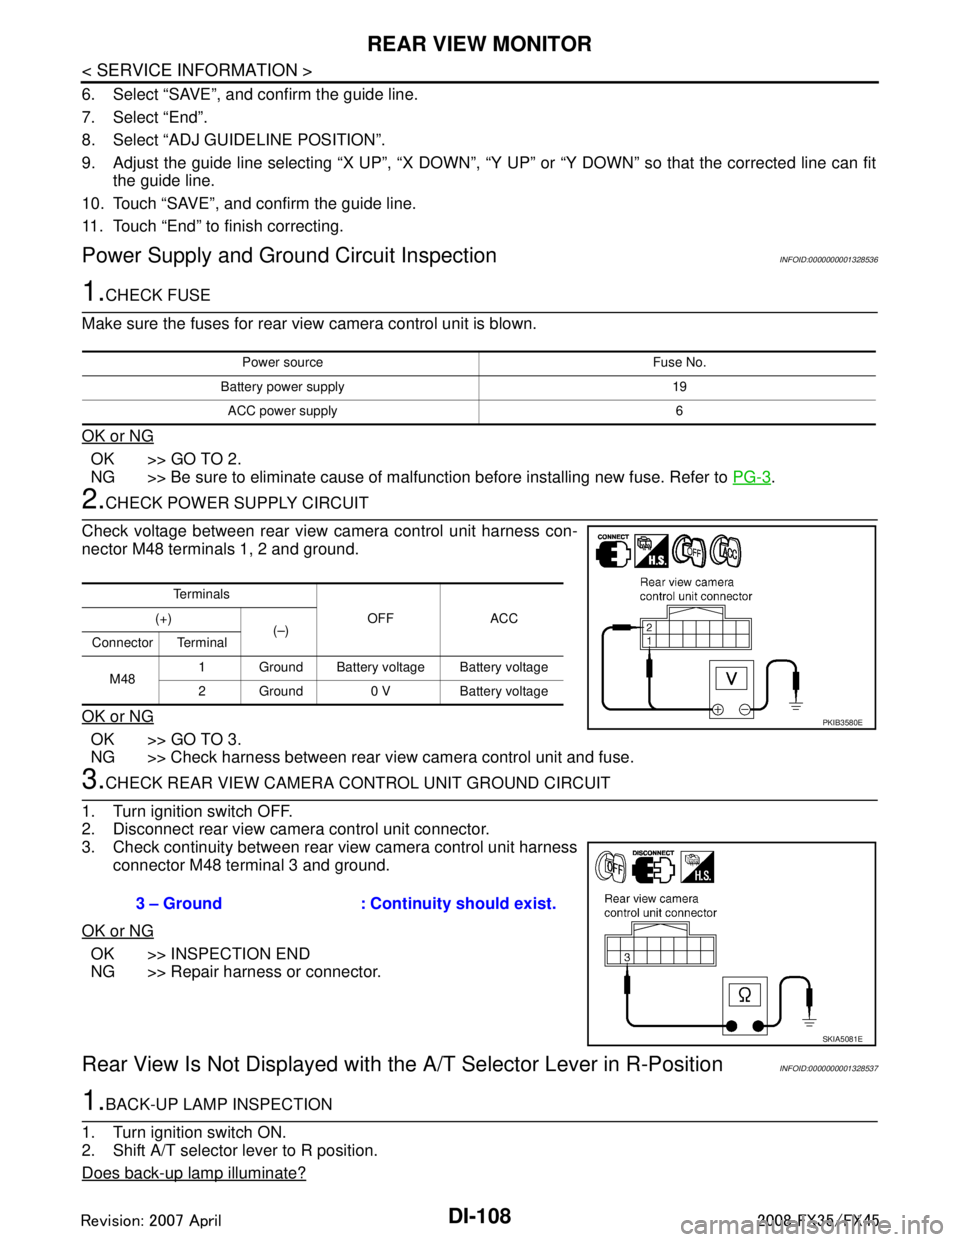
2.CHECK POWER SUPPLY CIRCUIT
Check voltage between rear view camera control unit harness con-
nector M48 terminals 1, 2 and ground.
OK or NG
OK >> GO TO 3.
NG >> Check harness between rear view camera control unit and fuse.
3.CHECK REAR VIEW CAMERA CONTROL UNIT GROUND CIRCUIT
1. Turn ignition switch OFF.
2. Disconnect rear view camera control unit connector.
3. Check continuity between rear view camera control unit harness connector M48 terminal 3 and ground.
OK or NG
OK >> INSPECTION END
NG >> Repair harness or connector.
Rear View Is Not Displayed with the A/T Selector Lever in R-PositionINFOID:0000000001328537
1.BACK-UP LAMP INSPECTION
1. Turn ignition switch ON.
2. Shift A/T selector lever to R position.
Does back-up lamp illuminate?
Power source Fuse No.
Battery power supply 19 ACC power supply 6
Te r m i n a l s OFF ACC
(+)
(–)
Connector Terminal
M48 1 Ground Battery voltage Battery voltage
2 Ground 0 V Battery voltage
PKIB3580E
3 – Ground : Continuity should exist.
SKIA5081E
3AA93ABC3ACD3AC03ACA3AC03AC63AC53A913A773A893A873A873A8E3A773A983AC73AC93AC03AC3
3A893A873A873A8F3A773A9D3AAF3A8A3A8C3A863A9D3AAF3A8B3A8C
Page 1235 of 3924
REAR VIEW MONITORDI-109
< SERVICE INFORMATION >
C
DE
F
G H
I
J
L
M A
B
DI
N
O P
YES >> GO TO 2.
NO >> Check back-up lamp system. Refer to LT-116, "
Wiring Diagram - BACK/L -" in LT section.
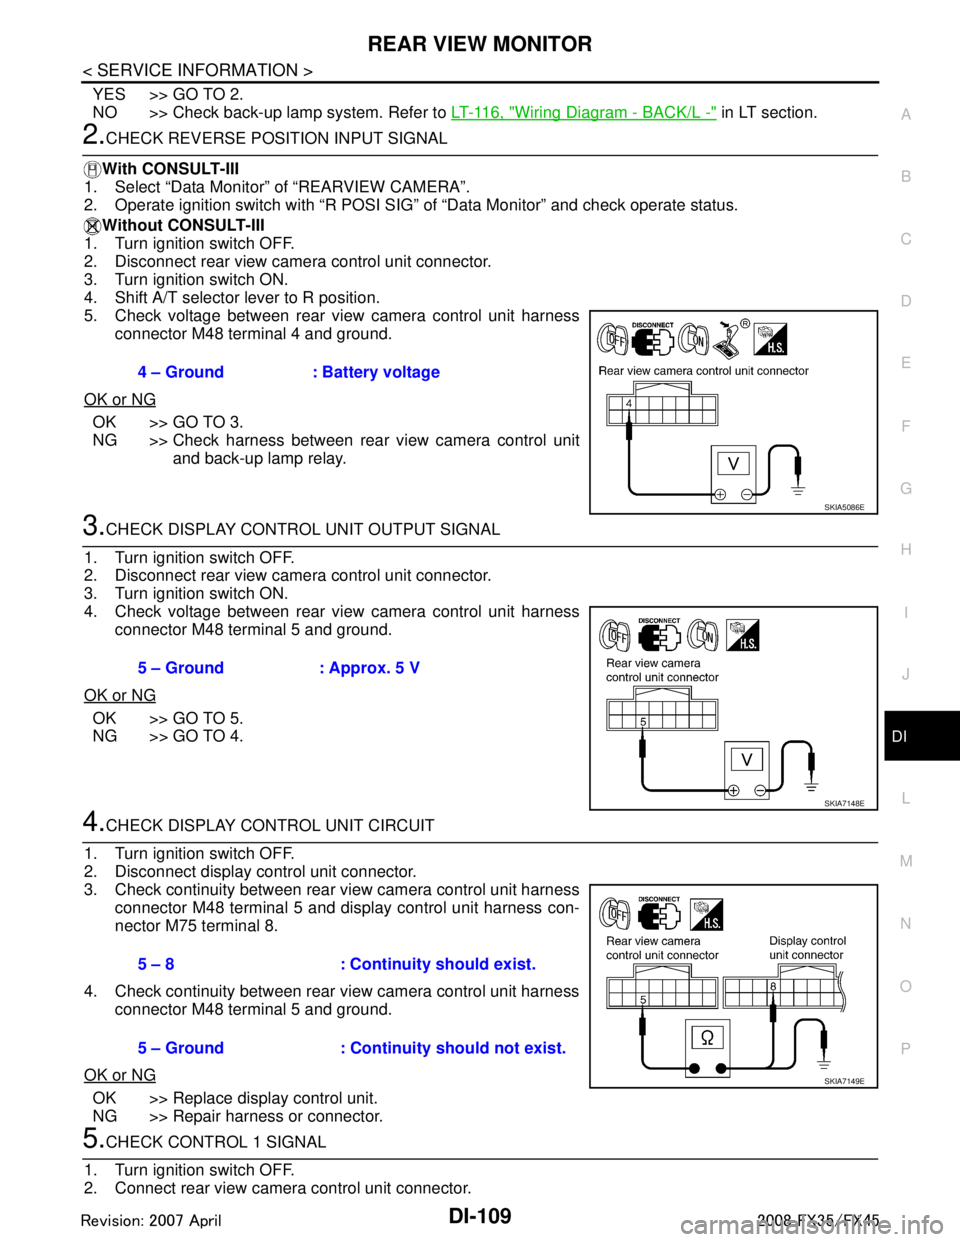
2.CHECK REVERSE POSITION INPUT SIGNAL
With CONSULT-III
1. Select “Data Monitor” of “REARVIEW CAMERA”.
2. Operate ignition switch with “R POSI SIG” of “Data Monitor” and check operate status.
Without CONSULT-III
1. Turn ignition switch OFF.
2. Disconnect rear view camera control unit connector.
3. Turn ignition switch ON.
4. Shift A/T selector lever to R position.
5. Check voltage between rear view camera control unit harness
connector M48 terminal 4 and ground.
OK or NG
OK >> GO TO 3.
NG >> Check harness between rear view camera control unit and back-up lamp relay.
3.CHECK DISPLAY CONTROL UNIT OUTPUT SIGNAL
1. Turn ignition switch OFF.
2. Disconnect rear view camera control unit connector.
3. Turn ignition switch ON.
4. Check voltage between rear view camera control unit harness connector M48 terminal 5 and ground.
OK or NG
OK >> GO TO 5.
NG >> GO TO 4.
4.CHECK DISPLAY CO NTROL UNIT CIRCUIT
1. Turn ignition switch OFF.
2. Disconnect display control unit connector.
3. Check continuity between rear view camera control unit harness connector M48 terminal 5 and display control unit harness con-
nector M75 terminal 8.
4. Check continuity between rear view camera control unit harness connector M48 terminal 5 and ground.
OK or NG
OK >> Replace display control unit.
NG >> Repair harness or connector.
5.CHECK CONTROL 1 SIGNAL
1. Turn ignition switch OFF.
2. Connect rear view camera control unit connector. 4 – Ground : Battery voltage
SKIA5086E
5 – Ground : Approx. 5 V
SKIA7148E
5 – 8 : Continuity should exist.
5 – Ground : Continuity should not exist.
SKIA7149E
3AA93ABC3ACD3AC03ACA3AC03AC63AC53A913A773A893A873A873A8E3A773A983AC73AC93AC03AC3
3A893A873A873A8F3A773A9D3AAF3A8A3A8C3A863A9D3AAF3A8B3A8C
Page 1265 of 3924
![INFINITI FX35 2008 Service Manual
PRECAUTIONSEC-25
< SERVICE INFORMATION > [VQ35DE]
C
D
E
F
G H
I
J
K L
M A
EC
NP
O
PRECAUTIONS
Precaution for Supplemental
Restraint System (SRS) "AIR BAG" and "SEAT BELT
PRE-TENSIONER"
INFOID:00000 INFINITI FX35 2008 Service Manual
PRECAUTIONSEC-25
< SERVICE INFORMATION > [VQ35DE]
C
D
E
F
G H
I
J
K L
M A
EC
NP
O
PRECAUTIONS
Precaution for Supplemental
Restraint System (SRS) "AIR BAG" and "SEAT BELT
PRE-TENSIONER"
INFOID:00000](/manual-img/42/57017/w960_57017-1264.png)
PRECAUTIONSEC-25
< SERVICE INFORMATION > [VQ35DE]
C
D
E
F
G H
I
J
K L
M A
EC
NP
O
PRECAUTIONS
Precaution for Supplemental
Restraint System (SRS) "AIR BAG" and "SEAT BELT
PRE-TENSIONER"
INFOID:0000000001612915
The Supplemental Restraint System such as “A IR BAG” and “SEAT BELT PRE-TENSIONER”, used along
with a front seat belt, helps to reduce the risk or severi ty of injury to the driver and front passenger for certain
types of collision. This system includes seat belt switch inputs and dual stage front air bag modules. The SRS
system uses the seat belt switches to determine the front air bag deployment, and may only deploy one front
air bag, depending on the severity of a collision and whether the front occupants are belted or unbelted.
Information necessary to service the system safely is included in the “SUPPLEMENTAL RESTRAINT SYS-
TEM” and “SEAT BELTS” of this Service Manual.
WARNING:
To avoid rendering the SRS inoper ative, which could increase the risk of personal injury or death in
the event of a collision which would result in air bag inflation, all maintenance must be performed by
an authorized NISSAN/INFINITI dealer.
Improper maintenance, including in correct removal and installation of the SRS, can lead to personal
injury caused by unintentional act ivation of the system. For removal of Spiral Cable and Air Bag
Module, see the “SUPPLEMEN TAL RESTRAINT SYSTEM”.
Do not use electrical test equipm ent on any circuit related to the SRS unless instructed to in this
Service Manual. SRS wiring harnesses can be identi fied by yellow and/or orange harnesses or har-
ness connectors.
Precaution for Procedur e without Cowl Top CoverINFOID:0000000001612935
When performing the procedure after removing cowl top cover, cover
the lower end of windshield with urethane, etc.
On Board Diagnosis (OBD) System of Engine and A/TINFOID:0000000001325891
The ECM has an on board diagnostic system. It will light up the malfunction indicator lamp (MIL) to warn the
driver of a malfunction causing emission deterioration.
CAUTION:
Be sure to turn the ignition switch OFF and di sconnect the negative battery cable before any repair
or inspection work. The op en/short circuit of related switches, sensors, solenoid valves, etc. will
cause the MIL to light up.
Be sure to connect and lock the connectors secure ly after work. A loose (unlocked) connector will
cause the MIL to light up due to the open circuit. (Be sure the connector is free from water, grease,
dirt, bent terminals, etc.)
Certain systems and components, especially those related to OBD, may use a new style slide-lock-
ing type harness connector. For descripti on and how to disconnect, refer to PG-68
.
Be sure to route and secure the harnesses properly after work. The interference of the harness with
a bracket, etc. may cause the MIL to li ght up due to the short circuit.
Be sure to connect rubber tubes properly afte r work. A misconnected or disconnected rubber tube
may cause the MIL to light up due to the malfuncti on of the EVAP system or fuel injection system,
etc.
Be sure to erase the unnecessary ma lfunction information (repairs completed) from the ECM and
TCM (Transmission control module) before returning the vehicle to the customer.
PIIB3706J
3AA93ABC3ACD3AC03ACA3AC03AC63AC53A913A773A893A873A873A8E3A773A983AC73AC93AC03AC3
3A893A873A873A8F3A773A9D3AAF3A8A3A8C3A863A9D3AAF3A8B3A8C