Page 2778 of 3924
![INFINITI FX35 2008 Service Manual
FRONT DRIVE SHAFTFAX-13
< SERVICE INFORMATION > [AWD]
C
EF
G H
I
J
K L
M A
B
FA X
N
O P
FRONT DRIVE SHAFT
On-Vehicle InspectionINFOID:0000000001327515
Check drive shaft mounting point and joint for INFINITI FX35 2008 Service Manual
FRONT DRIVE SHAFTFAX-13
< SERVICE INFORMATION > [AWD]
C
EF
G H
I
J
K L
M A
B
FA X
N
O P
FRONT DRIVE SHAFT
On-Vehicle InspectionINFOID:0000000001327515
Check drive shaft mounting point and joint for](/manual-img/42/57017/w960_57017-2777.png)
FRONT DRIVE SHAFTFAX-13
< SERVICE INFORMATION > [AWD]
C
EF
G H
I
J
K L
M A
B
FA X
N
O P
FRONT DRIVE SHAFT
On-Vehicle InspectionINFOID:0000000001327515
Check drive shaft mounting point and joint for looseness and other damage.
Check boot for cracks and other damage. CAUTION:
Replace entire drive shaft assembly when noi se or vibration occur from drive shaft.
DRIVE SHAFT BOOT REPLACEMENT
1. Remove tires from vehicle with power tool.
2. Remove undercover with power tool.
3. Remove cotter pin. Then remove lock nut from drive shaft with power tool.
4. Remove wheel sensor harness fr om strut assembly. Refer to BRC-52
.
CAUTION:
Do not pull on wheel sensor harness.
5. Remove brake hose lock plate. Then remove brake hose from strut assembly. Refer to BR-10
.
6. Remove fixing bolts and nuts between strut assembly and steering knuckle with power tool.
7. Remove drive shaft from wheel hub and bearing assembly.
8. Using a puller (suitable tool), remove drive shaft from steering knuckle.
CAUTION:
When removing drive shaf t, do not apply an excessive
angle to drive shaft joint. Al so be careful not to excessively
extend slide joint.
9. Remove boot bands, and then remove boot from joint sub-assembly.
10. Screw a drive shaft puller (suitable tool) into joint sub-assembly screw part to a length of 30 mm (1.18 in) or more. Support drive
shaft with one hand and pull out joint sub-assembly with a slid-
ing hammer (suitable tool) from shaft.
CAUTION:
• Align a sliding hammer and drive shaft and remove them
by pulling firmly and uniformly.
If joint sub-assembly cannot be pulled out, try after
removing drive shaft from vehicle.
11. Remove the circular clip from shaft.
12. Remove boot from shaft.
13. Clean the old grease on joint sub-assembly with paper towels.
SDIA0972J
SDIA0881J
SDIA2489E
3AA93ABC3ACD3AC03ACA3AC03AC63AC53A913A773A893A873A873A8E3A773A983AC73AC93AC03AC3
3A893A873A873A8F3A773A9D3AAF3A8A3A8C3A863A9D3AAF3A8B3A8C
Page 2780 of 3924
![INFINITI FX35 2008 Service Manual
FRONT DRIVE SHAFTFAX-15
< SERVICE INFORMATION > [AWD]
C
EF
G H
I
J
K L
M A
B
FA X
N
O P
CAUTION:
If the boot mounting length is outside the standard, it may cause breakage in the boot.
Be carefu INFINITI FX35 2008 Service Manual
FRONT DRIVE SHAFTFAX-15
< SERVICE INFORMATION > [AWD]
C
EF
G H
I
J
K L
M A
B
FA X
N
O P
CAUTION:
If the boot mounting length is outside the standard, it may cause breakage in the boot.
Be carefu](/manual-img/42/57017/w960_57017-2779.png)
FRONT DRIVE SHAFTFAX-15
< SERVICE INFORMATION > [AWD]
C
EF
G H
I
J
K L
M A
B
FA X
N
O P
CAUTION:
If the boot mounting length is outside the standard, it may cause breakage in the boot.
Be careful not to touch the inside of the bo ot with a tip of a flat-bladed screwdriver.
22. Secure the large and small ends of the boot with new boot bands using the boot band crimping tool [SST: KV40107300
( – )] as shown in the figure.
NOTE:
Secure boot band so that dimension “M” meets the specification
as shown.
23. Secure joint sub-assembly and shaft, and then make sure that they are in the correct position when rotating boot. Install them
with new boot band when boot installation positions become
incorrect.
24. Insert drive shaft to wheel hub and bearing assembly, and then temporarily tighten hub lock nut.
25. Install nuts and bolts to steering knuckle and strut.
26. Install break hose bracket to strut assembly. BR-10, "
Removal and Installation of Front Brake Tube and
Brake Hose".
27. Install wheel sensor to strut assembly. Refer to BRC-52
.
28. Tighten the hub lock nut to the specified torque.
29. Install cotter pin.
30. Install tires to vehicle.
Removal and Installation (Left Side)INFOID:0000000001327516
COMPONENTS
REMOVAL
1. Remove tires from vehicle with power tool. Boot installation length (L) : 136 mm (5.35 in)
RAC1133D
Dimension “M” : 2.0 – 3.0 mm (0.079 – 0.118 in)
DSF0047D
1. Cotter pin 2. Washer 3. Drive shaft
Refer to
GI-8, "
Component", for the symbols in the figure.
PDIA1218E
3AA93ABC3ACD3AC03ACA3AC03AC63AC53A913A773A893A873A873A8E3A773A983AC73AC93AC03AC3
3A893A873A873A8F3A773A9D3AAF3A8A3A8C3A863A9D3AAF3A8B3A8C
Page 2791 of 3924
FAX-26
< SERVICE INFORMATION >[AWD]
SERVICE DATA AND SPECIFICATIONS (SDS)
SERVICE DATA AND SPECIFICATIONS (SDS)
Wheel BearingINFOID:0000000001327520
Drive ShaftINFOID:0000000001327521
Axial end play
0.05 mm (0.002 in) or less
Joint Wheel side Front final drive assembly side
Engine type VQ35DE models VK45DE models VQ35DE models VK45DE models
Grease quantityLH side
77 – 97 g (2.71 – 3.42 oz) 95 – 105 g (3.35 – 3.70 oz)
RH side 113 – 123 g (3.98 – 4.33 oz)
Boots installed length LH side
136 mm (5.35 in) 150.9 – 152.9 mm (5.94
– 6.02 in) 95 – 97 mm
(3.74 – 3.82 in)
RH side 157.55 – 159.55 mm (6.20 – 6.28 in)
3AA93ABC3ACD3AC03ACA3AC03AC63AC53A913A773A893A873A873A8E3A773A983AC73AC93AC03AC3
3A893A873A873A8F3A773A9D3AAF3A8A3A8C3A863A9D3AAF3A8B3A8C
Page 2794 of 3924

PREPARATIONFFD-3
< SERVICE INFORMATION >
CEF
G H
I
J
K L
M A
B
FFD
N
O P
PREPARATION
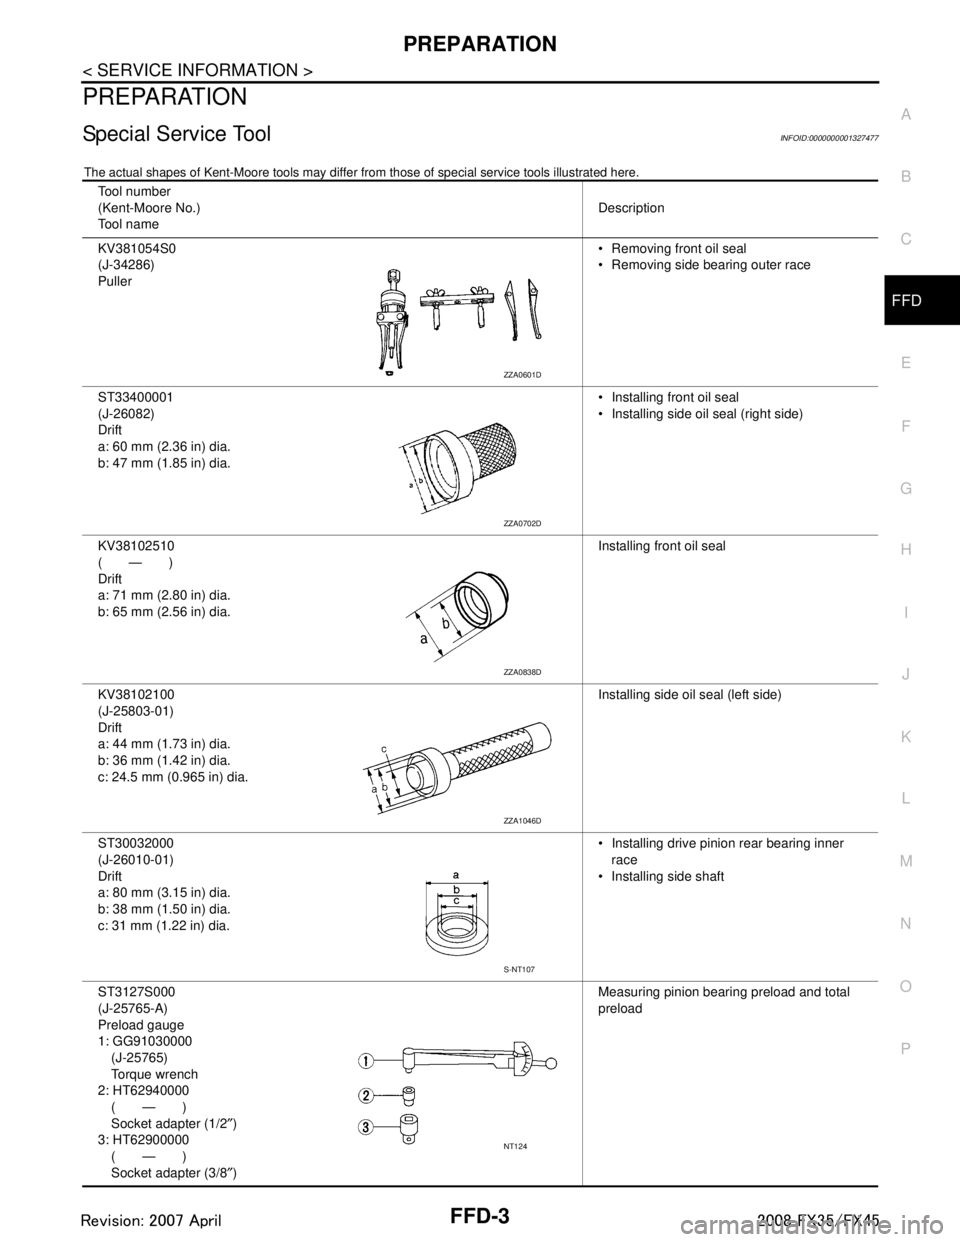
Special Service ToolINFOID:0000000001327477
The actual shapes of Kent-Moore t ools may differ from those of special service tools illustrated here.
Tool number
(Kent-Moore No.)
Tool name Description
KV381054S0
(J-34286)
Puller Removing front oil seal
Removing side bearing outer race
ST33400001
(J-26082)
Drift
a: 60 mm (2.36 in) dia.
b: 47 mm (1.85 in) dia. Installing front oil seal
Installing side oil seal (right side)
KV38102510
(—)
Drift
a: 71 mm (2.80 in) dia.
b: 65 mm (2.56 in) dia. Installing front oil seal
KV38102100
(J-25803-01)
Drift
a: 44 mm (1.73 in) dia.
b: 36 mm (1.42 in) dia.
c: 24.5 mm (0.965 in) dia. Installing side oil seal (left side)
ST30032000
(J-26010-01)
Drift
a: 80 mm (3.15 in) dia.
b: 38 mm (1.50 in) dia.
c: 31 mm (1.22 in) dia. Installing drive pinion rear bearing inner
race
Installing side shaft
ST3127S000
(J-25765-A)
Preload gauge
1: GG91030000 (J-25765)
Torque wrench
2: HT62940000 (—)
Socket adapter (1/2 ″)
3: HT62900000 (—)
Socket adapter (3/8 ″) Measuring pinion bearing preload and total
preload
ZZA0601D
ZZA0702D
ZZA0838D
ZZA1046D
S-NT107
NT124
3AA93ABC3ACD3AC03ACA3AC03AC63AC53A913A773A893A873A873A8E3A773A983AC73AC93AC03AC3
3A893A873A873A8F3A773A9D3AAF3A8A3A8C3A863A9D3AAF3A8B3A8C
Page 2795 of 3924
FFD-4
< SERVICE INFORMATION >
PREPARATION
K V 1 0 1111 0 0
(J-37228)
Seal cutterRemoving carrier cover
ST3306S001
(J-22888-D)
Differential side bearing puller set
1: ST33051001 (J-22888-20)
Puller
2: ST33061000
(J-8107-2)
Base
a: 28.5 mm (1.122 in) dia.
b: 38 mm (1.50 in) dia. Removing and installing side bearing inner
race
ST30031000
(J-22912-01)
Replacer Removing pinion rear bearing inner race
KV31103000
(J-38982)
Drift
a: 49 mm (1.93 in) dia.
b: 70 mm (2.76 in) dia. Installing side bearing outer race
ST30611000
(J-25742-1)
Drift bar Installing side bearing outer race (Use with
KV31103000)
ST37820000
(—)
Drift
a: 39 mm (1.54 in) dia.
b: 72 mm (2.83 in) dia. Installing drive pinion front and rear bearing
outer race
Tool number
(Kent-Moore No.)
Tool name
Description
S-NT046
NT072
ZZA0700D
ZZA1113D
S-NT090
ZZA0836D
3AA93ABC3ACD3AC03ACA3AC03AC63AC53A913A773A893A873A873A8E3A773A983AC73AC93AC03AC3
3A893A873A873A8F3A773A9D3AAF3A8A3A8C3A863A9D3AAF3A8B3A8C
Page 2796 of 3924
PREPARATIONFFD-5
< SERVICE INFORMATION >
CEF
G H
I
J
K L
M A
B
FFD
N
O P
Commercial Service ToolINFOID:0000000001327478
ST33230000
(J-25805-01)
Drift
a: 51 mm (2.01 in) dia.
b: 41 mm (1.61 in) dia.
c: 28.5 mm (1.122 in) dia. Installing side bearing inner race
KV38100200
(—)
Drift
a: 65 mm (2.56 in) dia.
b: 49 mm (1.93 in) dia. Installing side shaft oil seal
(J-8129)
Spring gauge Measuring turning torque
Tool number
(Kent-Moore No.)
Tool name
Description
ZZA1046D
ZZA1143D
NT127
Tool name
Description
Flange wrench Removing and installing drive pinion lock nut
Spacer
a: 60 mm (2.36 in) dia.
b: 36 mm (1.42 in) dia.
c: 30 mm (1.18 in) Installing pinion front bearing inner race
Power tool Loosening bolts and nuts
NT771
ZZA1133D
PBIC0190E
3AA93ABC3ACD3AC03ACA3AC03AC63AC53A913A773A893A873A873A8E3A773A983AC73AC93AC03AC3
3A893A873A873A8F3A773A9D3AAF3A8A3A8C3A863A9D3AAF3A8B3A8C
Page 2798 of 3924
DESCRIPTIONFFD-7
< SERVICE INFORMATION >
CEF
G H
I
J
K L
M A
B
FFD
N
O P
DESCRIPTION
Cross-Sectional ViewINFOID:0000000001327480
VQ35DE models
VK45DE models
PDIA0647E
1. Side retainer 2. Side bearing 3. Differential case
4. Drive gear 5. Pinion mate shaft 6. Pinion mate gear
7. Side gear 8. Side shaft 9. Gear carrier
10. Drive pinion 11. Companion flange 12. Pinion front bearing
13. Pinion rear bearing 14. Extension tube retainer 15. Engine assembly
PDIA1214E
1. Side retainer 2. Side bearing 3. Differential case
4. Drive gear 5. Pinion mate shaft 6. Pinion mate gear
7. Side gear 8. Side shaft 9. Gear carrier
10. Drive pinion 11. Companion flange 12. Pinion front bearing
13. Pinion rear bearing 14. Extension tube retainer 15. Engine assembly
3AA93ABC3ACD3AC03ACA3AC03AC63AC53A913A773A893A873A873A8E3A773A983AC73AC93AC03AC3
3A893A873A873A8F3A773A9D3AAF3A8A3A8C3A863A9D3AAF3A8B3A8C
Page 2809 of 3924

FFD-18
< SERVICE INFORMATION >
FRONT FINAL DRIVE ASSEMBLY
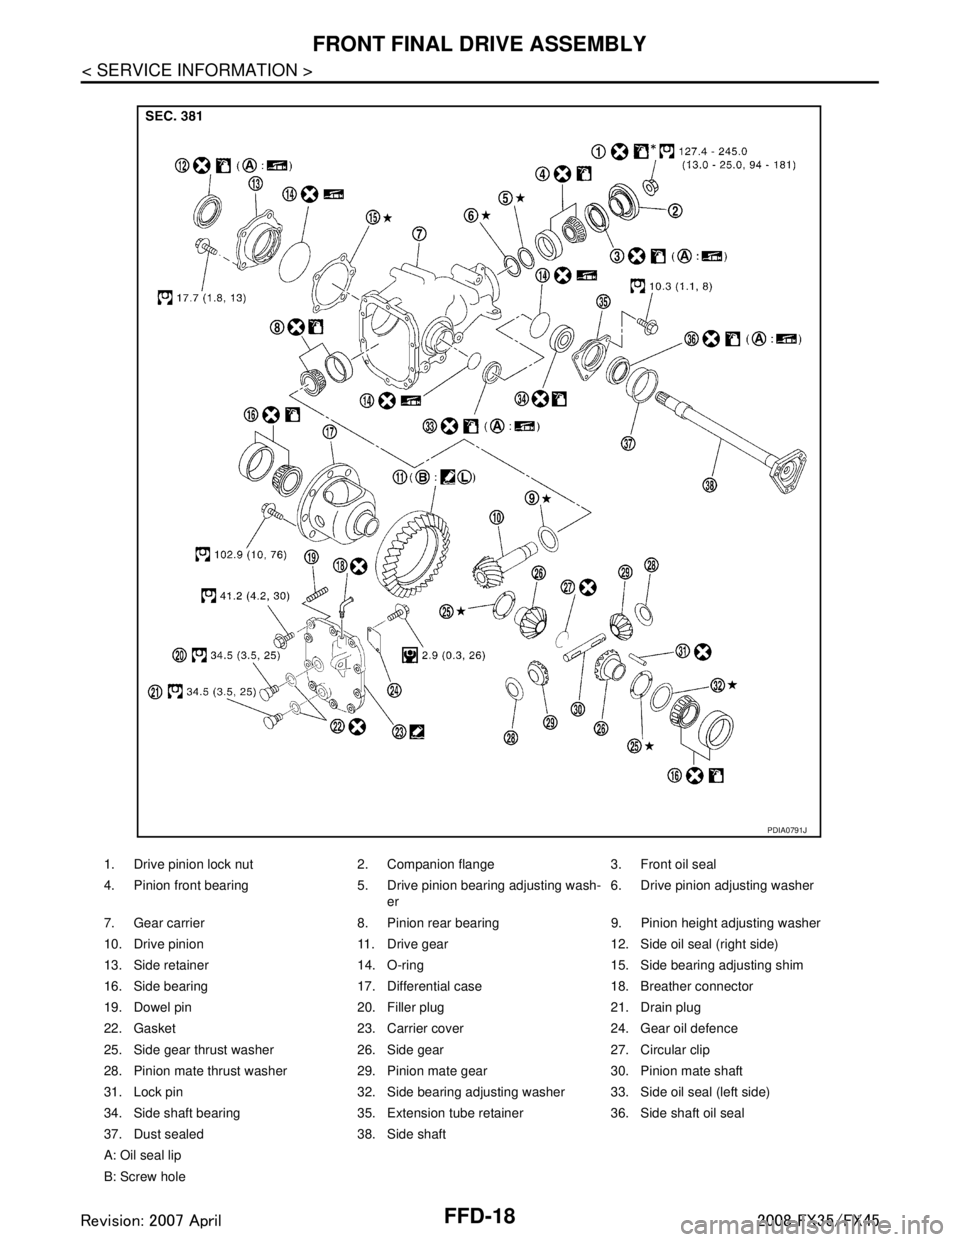
1. Drive pinion lock nut 2. Companion flange 3. Front oil seal
4. Pinion front bearing 5. Drive pinion bearing adjusting wash-er6. Drive pinion adjusting washer
7. Gear carrier 8. Pinion rear bearing 9. Pinion height adjusting washer
10. Drive pinion 11. Drive gear 12. Side oil seal (right side)
13. Side retainer 14. O-ring 15. Side bearing adjusting shim
16. Side bearing 17. Differential case 18. Breather connector
19. Dowel pin 20. Filler plug 21. Drain plug
22. Gasket 23. Carrier cover 24. Gear oil defence
25. Side gear thrust washer 26. Side gear 27. Circular clip
28. Pinion mate thrust washer 29. Pinion mate gear 30. Pinion mate shaft
31. Lock pin 32. Side bearing adjusting washer 33. Side oil seal (left side)
34. Side shaft bearing 35. Extension tube retainer 36. Side shaft oil seal
37. Dust sealed 38. Side shaft
A: Oil seal lip
B: Screw hole
PDIA0791J
3AA93ABC3ACD3AC03ACA3AC03AC63AC53A913A773A893A873A873A8E3A773A983AC73AC93AC03AC3
3A893A873A873A8F3A773A9D3AAF3A8A3A8C3A863A9D3AAF3A8B3A8C