Page 89 of 368

Intermittent wiping
- P ush the wiper lever forward towards the dashboard and
to the first posit ion
G) => page 86, fig. 87. The rear
wi ndow wiper will wipe t he wi ndow approx. every six
seco nds .
Automatic w iper /washer fun ction
- P ush the wiper lever forward to the second stop, position
@ , and hold it there for as long as you want t he rear
wiper/washer to operate.
- Release the lever again . th e wiper will keep run ning fo r
approx. four seconds.
Switching intermittent wiper a ction off
- Pull the lever all the way b ack to t he orig inal posit ion.
& WARNING
Wipe r blades are cruci al for safe dr iv ing! Only in good cond ition
a re the y able to clea r the windo ws properly to provide unre
s tricted vi sibility . Worn or frayed wiper blades a re a safety hazard!
~ page 88 , "In stalling new wiper bl ades "
0 Note
In freezing or near freezing conditions:
• Always check that the wiper blades are not frozen to the glass
before you turn the wiper on. Loosen a wiper blade which is frozen
in place before operating the wiper to prevent damage to the wiper
b lade or the wiper moto r.
• Do not use the wiper to clear a frosted window. Using the wipers
as a convenient ice scraper will destroy the wiper blades. •
Controls and equip
ment
Clear v ision
Ap plies to vehicles : wi th h eadl igh t w as her sy ste m
Headlight washer system
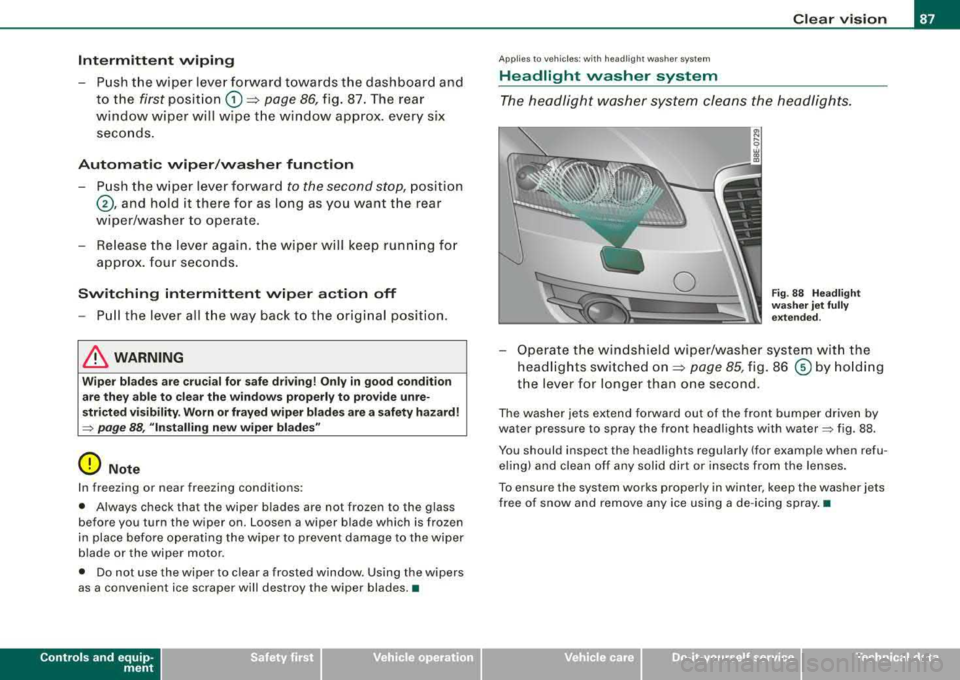
The headlight w asher system cleans the headligh ts .
Fig . 88 Headlight
wa sher jet fully
e xte nded .
-Operate the windshield wiper/washer system wi th the
head lights switched
on=> page 85 , fig. 86 © b y hold ing
the lever for longer than one second .
The washer jets extend forward out of the fron t bumper driven by
water pressure to spray the front head lights with
water~ fig. 88 .
You should inspect the headlights regu lar ly (for example when refu
e ling) and c lean off any solid dirt or i nsects from the lenses .
To ensure the system works proper ly in winter , keep the washer jets
free of snow and remove any ice using a de -icing spray .•
irechnical data
Page 90 of 368

Clear vision Installing new wiper blades
Wiper blades in good condition help keep the windshield
clear.
@
'
Removing the wiper blade
Fig . 89 Removing the
wiper blade, driver's
side
Fig . 90 Installing a
new wiper blade
-Lift the wiper arm away from the windshield.
-Insert your thumb into the small gap behind the blade
retainer
clip @==> fig. 89 and push the clip off the wiper
arm end.
-Take the blade off the wiper arm, arrow ®·
Installing a new wiper blade
-Slide the retainer clip on the new blade back to expose
the connector plug .
-Insert the plug into the matching recess on the wiper arm
@==>fig. 90.
-Push with your thumb on the blunt end of retainer clip to
insert the clip with its tab into the wiper arm profile ,
arrow @.
-Keep pushing the clip in until only a small gap remains
between the retainer clip and the end of the wiper arm.
Only after the new blade has engaged with a faint click is
it securely attached to the wiper arm.
-Fold the wiper arm back onto the windshield.
The wiper blade on the driver's side measures 21.65 in. (550 mm) in
length, the wiper blade on the passenger side 22.83 in. (580 mml.
Clean your wiper blades regularly with a windshield washer solution
to prevent streaking. If the blades are very dirty, for examp le with
insects, carefully clean the blades with a sponge or a soft brush.
If the wiper blades begin to streak the windshield, this could be
caused by residue left on the windshield by automatic car washes.
Fill the windshield washer container with a special solution avail
able at your authorized Audi dealer to remove the residue.
Be sure to inspect the condition of your wiper blades regularly. For
safety reasons, replace your wiper blades once or twice a year if
necessary. See your authorized Audi dealer for replacement
blades. ~
Page 91 of 368

& WARNING
• Clean your wiper blades regularly with a windshield washer
solution to prevent streaking.
If the wiper blades are very dirty, for
example with insects, carefully clean the wiper blades with a
sponge or a soft brush.
• For your safety, you should replace the wiper blades once or
twice a year. See your authorized Audi dealer for replacement blades.
0 Note
• To prevent damage to the wiper system:
-Always loosen blades which are frozen to the windshield
before operating wipers.
-Do not use gasoline, kerosene, paint thinner , or other solvents
on or near the wiper blades.
-Do not attempt to move the wipers by hand.
[ i] Tips
Commercial hot waxes applied by automatic car washes affect the
cleanability of the glass surface. •
Controls and equip
ment
Clear vision
Installing new rear window wiper blades
@
®
Fig . 91 Installing/rem
oving wiper blade
Removing wiper blade on the rear window
Lift the wiper arm away from the windshield.
Use one hand to hold the upper part of the wiper arm.
-Use the other hand to pull on the wiper blade in the direc
tion indicated by
arrow @=} fig. 91 until it disengages
from the blade holder.
Installing a new wiper blade on the rear window
Push the new wiper blade in the direction indicated by
arrow ® until it clips back into the blade holder .
Clean your wiper blades regularly with a windshield washer solution
to prevent streaking . If the blades are very dirty, for example with
insects, carefully clean the blades with a sponge or a soft brush .
If the wiper blades begin to streak the windshield, this could be
caused by residue left on the windshield by au tomatic car washes.
Fill the windshield washer container with a special solution avail -
able at your authorized Audi dealer to remove the residue.
.,,_
irechnical data
Page 92 of 368

Clear vision
Be su re to inspect the condition of your w iper blades regu larly . For
safety reasons, replace your wiper blades once or twice a year if
necessary . See your authorized Aud i dealer for replacement b lades.
& WARNING
• Clean your wiper blades regularly with a windshield washer
solution to prevent streaking . If the wiper blade s are very dirty , for
e xample w ith in se cts , c arefully clean the wiper blade s w ith a
sponge or a soft brush.
• For your safety , you s hould repl ace the wiper blades on ce or
twi ce a year . See your authorized Audi dealer for replacement
blades .
0 Note
• To prevent damage to the wiper system:
-Always loosen blades which are frozen to the windshield
be fore operating wipers .
-Do not use gasoline, kerosene, paint thinner, or other solvents
on or near the wiper blades .
-Do not attemp t to move the wipers by hand.
[ i ] Tips
Commercial hot waxes applied by automatic car washes affect the
cleanabili ty of the g lass surface .•
Mirrors
Manual glare-dimming
Standard setting
-Move the sma ll lever (located on the bottom edge of t he
m irr or) to the front .
Anti-glare setting
Move the sma ll l ever (locate d on th e bottom edge of t he
m irror) to the rea r. •
Ap plies to vehic les: w it h auto matically dimming inside mirro r
Automatically dimming inside mirror
The automatic dimming function can be turned on and off
if required .
Fig . 9 2 Inside re ar
v iew mirror
Page 93 of 368

Disabling auto dimming
- Press button © =>page 90, fig. 92 briefly, -the green
indicator light ® goes out .
Activat ing /reactivating auto dimming
- Press button © briefly, -the green indicator light ®
goes on.
Au toma tic dimming func tion
The automatic dimming function is activated every t ime the ignition
is turned on . The green indicator light is lit to indicate auto dimming
is active.
When dimming is activated, the inside mirror will darken
automati
cally
in respo nse to the amount of light striking the mirror (such as
headlights from rearward approaching vehicles) . Even in dimming
mode, the mirror surface turns b right when:
• the interior light is sw itched on
• reverse gear is engaged.
& WARNING
The glass of the ins ide rearview mirror i s layered and contain s an
ele ctrolyte to achie ve it s properties . Be aware of liquid ele ctrolyte
le aking from a broken mirror gla ss. This liquid can cau se irritation
to skin , eye s, and re spir atory sy stem . If you get ele ctrolyte in your
e yes or on your skin , immed iately rinse with plenty of water . If irri
t a tion per sis ts, s eek medical attention .
0 Note
Liquid electrolyte leaked from a broken mirror glass wi ll damage any
p lastic surfaces it comes in contact with. Clean up spi lled electrolyte
immedia tely w ith c lear water and a sponge.
Controls and equip
ment
Clear v ision
[ i ] Tips
• If you switch off the automatic dimming function on the in side
mirror , automatic dim ming of the out side mirrors will l ikewise be
di sabled .
• Check to make sure there are no objects preventing light from
reaching the inside mirror.
• Do not attach any stickers to the windshield in front of the light
sensor, as this would interfere with both the automatic operation of
the headlights and the automatic dimming of the inside mirror.
• Be aware that au tomatic dimming of the inside mirror can on ly
operate properly if the rear window sun blind * is retracted .•
Outside mirrors
The outside mirrors are electrically adjusted (power
mirrors)
Fig . 93 Forwa rd
s ecti on of dri ver 's
ar mr est : pow er mirr or
co ntr ols
....
irechnical data
Page 94 of 368

Clear vision
Adjusting th e outside mirrors
- Turn the adjus ting knob
to=> page 91, fig. 93 © (drive r's
side ou tside mirror)
to @ (front passenger's outside
m irror).
- Press the knob in the appropriate direction to move the
m irror surface so t hat you have a good view to the rear.
Folding both outside mirrors *
- Turn t he kn ob
to @ .
The mirror surfaces are heated whenever you sw itch on the rear
window defogger regardless of the outside temperature .
You are we ll- advised to fold the outside mirro rs in when maneu
vering in t ight spaces or when leaving the car parked close to other
vehic les.
A uto matic tilt -d own of passen ger side outsid e mirr or*
With the knob turned to posi tion ®=> page 91, fig. 93, the mirror on
the front passenger door will tilt downward s lightly when you move
the selector lever into
R ( R everse) . This feature provides a better
view of the curb when you are backing into a parking space.
T he mirror wil l go back to its original position when you shift out of
Reverse, or when y ou turn the control k nob back
to © or@ .
Memo ry setting for the outsid e mirrors *
On veh ic les w it h the memory function *, w hen you store a seat posi
tion in the memory, the position of the outside mirrors is a lso stored
in the
memory => page 100.
0 Note
• Curved mirror surfaces (co nvex o r spher ical*) i ncrease you r fie ld
of view . Remember that vehic les or other objects wil l appear smaller
and fa rther away than w he n seen in a fla t mi rro r. If yo u use t his mirror to estimate distances of following vehic
les when changing
lanes, you cou ld esti mate incorrec tly a nd cause an acc ident .
• I f the mirror housing is moved unintentional ly (for example,
while parking y our vehicle), t hen you must first fo ld the mirror e lec
trically. Do not readjust the mirror housing manually . You cou ld
damage the m otor which controls t he m irror.
[ i ] Tips
If there shou ld be a malfunction in t he electrical syste m, you can
sti ll ad just the outside mirrors by pressing the edge of the mirror .•
Ap plies to vehicles : wit h au tomat ica lly a djus tin g outs ide mirro rs
Automatic dimming for the outside mirrors
The outside mirro rs d im at t he same t ime as the ins ide mirror. W hen
the ignition is switched on, the mirrors automatical ly dim
depending on the amount of flight striking the mir ro rs (such as
headlights shinin g into the veh ic le from the rear).
When you switch on the in terior light , or when you move the
selector lever into
R (Reverse), the d imm ing function stops and the
mirrors return to their original condition (not darkened).
[ i ] Tips
The automat ic dimming feature on the mirrors wil l not operate
pro per ly if the ligh t shining on the m irrors is blocked by other
objects .•
Page 95 of 368

Digital compass
Applies 10 vehicles: w ith di gita l com pass
Activating or deactivating the compass
The direction is displayed on the interior rear view mirror.
g
Fig . 94 Inside rear
view mirror: digital compass activated
To activate or deactivate, hold the@~ fig. 94 button
down until the red display appears or disappears .
The digital compass only works with the ignition turned on . The
directions are displayed as initials:
N (North), NE (Northeast), E
(East), SE !Southeast), S (South), SW !Southwest), W !West), NW
(Northwest).
[ i] Tips
To avoid inaccurate directions, do not allow any remote controls,
electrical systems, or metal parts close to the mirror .•
Controls and equip
ment
Clear vision
Ap plies 10 vehi cles: w it h digi ta l c ompass
Setting the magnetic deflection zone
The correct magnetic deflection zone must be set in order
to display the directions correctly.
0
, _,,,,_,~~
(/
I : I I
' I r I I 1 © l I I
I I ' I~ ,.., ___ ~ ,,,..
' 1
'
®
\,, ,, ...... .. ... -------
©
Fig. 95 North America: magnetic deflection zone boundaries
Hold the@~ fig. 94 button down until the number of
the set magnetic deflection zone appears on the interior
. . rear view mirror.
Adjust the magnetic deflection zone by repeatedly pressing on
the @ button. The set mode automatically
deactivates after a few seconds .
•
irechnical data
Page 96 of 368
Clear vision
Applies to vehicles: with d igita l compass
Calibrating the compass
The compass has to be recalibrated if the display is wrong
or inaccurate.
- Hold the @button down until the letter C is displayed on
the interior rear view mirror.
- Drive in a circle at a speed of about 6 mph (10 km/h) unt il
a direction is shown on the interior rear view mirror.
& WARNING
The digital compass is to be used as a directional aid only. Even
though you may want to look at it while you are driving, you must
still pay attention to traffic, road and weather conditions as well
as other possible hazards . •