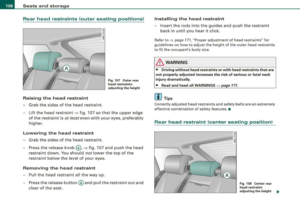
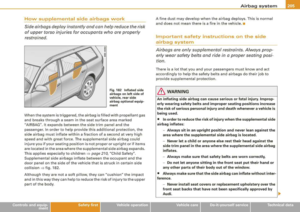
Page 81 of 368

• USA models: illumin ation of the in strument clu ste r (gauge s and
needle s), dash and center con sole around the gear shift lever i s
c ontrolled by a light sen sor l oca ted in the in strument panel . The
instrument panel illum ination will automatic ally become dimmer
a s the d aylight f ade s aw ay a nd e ventuall y will go out completel y
wh en out side light is very low . Thi s is to remind you , the driver , to
s witch on the he adlight s before it get s too dark.
• Canada model s: instrument panel illum ination will sta y br ight
rega rdle ss of the inten sity of ambient light . Al ways be aw are of
changes in outside light conditions while you are driving . Respond
in time to fading daylight by tu rning the light switch to position
1[D
(or "AUTO" if your car is equipped with this feature) to turn on your
he adlight s.
•
App lies to veh icle s: w it h xe non head lig hts
Xenon headlights
After sta rting the engine, the xenon head lights are automatica lly
adjusted to the load and angle of the veh ic le ( for example, during
accel eration and braking) . This prevents oncoming traffic from
experienc ing unnecessary headlight glare from your xenon head
lights.
I f the system is not operating properly, a warning symbol in the
Auto-Check Control is
displayed=> page 34. •
Controls and equip
ment
Cl ea r vision
Emergency flasher ~
The emergency flasher ma kes other motorists aware that
you or your vehicle are in an emergency situation .
Fig. 77 Ce nter
co nso le: e merg en cy
fl as he r sw it ch
- Press the switch &1. ~ fig. 77, to switch t he eme rgency
flasher on or off.
When the emergency flasher is on, all four turn signal blink at the
same time. The turn signal indicator lights ¢
9 in the instrument
c luster, as we ll as the light in the emergency flasher
switch ~ blink
likewise.
The emergency flasher wi ll automatically switch on if you are in an
accident where the airbag has deployed .
[ i] Tip s
You shou ld switch on the emergency flasher when :
• you are the las t vehicle standing in a traffic jam so that any other
vehicles coming can see you, or when
• your vehicle has broken down or you are in an emergency situa -
tion, o r when _.,
Page 82 of 368

Clear vision
• your vehicle is being towed by a tow truck or if you a re towing
another vehicle behind you. •
Turn signals -¢ ¢ and high beam ~D lever
The lever on the left side of the steering column is used to
operate the turn signals and the high beam as well as the
headlight flasher.
Fig. 78 Turn signa l and
high beam lever
The turn signal and high beam lever has the following func
tions:
Turn signals ¢ ¢
-Lift the lever up all the way~ fig. 78, to use the right turn
signals, or push the lever down all the way to use the left
turn signals .
Auto-blink
-Move the lever (up or down) just to the point of resis
tance to use the turn signals for as long as you need
them , for example when changing lanes.
-Briefly move the lever up or down just to the point of
resistance and t hen release it to flash the turn signals
three times in succession. This feature allows to indicate
lane changes clearly and with minimum effort when
driving on highways.
High beam ~D
-Push the lever forward to switch on the high beam.
-Pull the lever back towards you to switch off the high
beam.
Headlight flasher ~D
-P ull the lever toward the steering wheel to use the head
light flasher .
Notes on these features
• The turn signals only work with the ignition switched on . The
indicator
lights ¢ or¢ in the instrument cluster => page 19 also
blink .
• After you have turned a corner, the turn signal switches off auto
matically .
• The high beam works only when the head lights are on . The indi
cator light
~ D in the instrument clus ter illuminates when the high
beams are on.
• The headlight flasher works only as long as you hold the lever -
even if there are no lights switched on. The indicator light
~Din the
instrument cluster illuminates when you use the headlight flasher .
0 Note
Do not use the high beam or headlight flasher if you know that these
could be blinding oncoming traffic. •
Page 83 of 368

Interior lights
Interior lights and glove compartment light The interior lights include the both reading lights for the
driver and the front passenger.
--
Fi g. 7 9 Control pan el
a bov e wind sh ie ld : int e
r ior ligh t sw itche s
Light sw itch @=> fig. 79 has the following funct ions :
Door contact activation
-Move the switch to the ce nter positi on. The forward
dome light is tur ned on/off by the contact switches o n
any of the doors.
Forward dome light on
- Move the switch to positio n I. The forward dome lig ht
g o es on an d stays on regardless of doo r position .
Forward dome light off
- Move the switch to positio n 0. The lig ht will not go on
regardless of door position.
Controls and equip
ment
Clear v ision
Forw ard reading lights
~
-Press right or left switch @ to turn the front reading light
on your side on or off.
Glove compartment light
-Open the glove com partment -the lig ht in the g love
compartment automatica lly il lum inates as lo ng as the
side marker lights or head lights are on. When you c lose
the glove compartment, the light goes off.
With the interior light switch at the door contact (center) position,
the forward dome light il luminates whenever you unlock the veh icle
or open a door . The dome light goes out after approximately 30
seconds after you have closed the door . Likewise, when you lock
your vehicle or switch on the ignition, the dome light goes out.
If you leave a door open, the d ome light wi ll go out after ten minutes
to conserve battery charge.
A dimmer automatically controls the brightness of the lights when
they are switched on .•
irechnical data
Page 84 of 368
Clear vision
Ambient lighting
The ambient lighting illuminate i mportant controls for
y o u.
0
(1\\\\\
D
fJJJJJJJ
Fig . 8 0 Contr ol p an el
a bo ve winds hield:
p os ition of amb ient
l ig ht bu lb s
When you swi tch on the ignition, the ligh ts in the d oor hand les illu
minate .
When the side marker lights or head lights are switched on, the
center console is i lluminated from the amb ient light located above
the windshield.
You cannot manually turn off these lights .•
Rear reading lights
Rear reading lights
F ig . 8 1 Rea r reading
lig hts
Press the side switch '½ to tu rn on and off the reading ligh ts .
Rear dom e light
Switch positions ~ page 81. •
Page 85 of 368

Luggage compartment light
A dome light in the rear roof liner illuminates the luggage compartment. An additional light is provided on the
inside of the rear lid .
8l
9 w CD
"'
L--------,;
Fig . 8 2 Swi tc h in r ear
d om e light
Fi g. 83 Rear lid in sid e:
l oca tio n of add itio na l
li g ht
The switc h in the rea r dome light => fig. 82 has three posi
t io ns:
Controls and equip
ment
Clear v ision
Re ar lid conta ct ac tivation
-Move the switch to the center position. The rear dome
light is turned on or off by the rear lid contact switch.
Rear dome l ight on
Move the switch to position I. The light stays on regard
less of rear lid posit ion.
Re ar dome light off
-Move the switch to pos ition 0 . The light rema ins dark
regardless o f rear lid posi tion .
With the switch at the center pos ition , the rear dome light is auto
matical ly switched on as soon as the rear lid is opened. The rear
dome light goes out 30 seconds after the rear lid is closed .
An additional light is located on the inside of the trunk
lid=> fig. 83 .
This light is turned on/off every time the rea r lid is opened/closed .
If the rear lid is left open for more than 10 minutes, both the rear
dome light and the light in rear lid are switched off to conserve the
battery charge. •
irechnical data
Page 86 of 368
Clear vision
Vision
Sun visors
Using the sun visors makes driving safer.
Fig. 84 Sun visor
The sun visors for the driver and front passenger can be removed
from their center mountings and moved toward the door windows
G) ~ fig. 84 to protect against side glare.
Th e vanity mirror in the sun visors is covered by a lid . When you
slide the lid
@ open the mirror illumination comes on automati
cally . When you slide the lid shut or fold the sun visor back up, the
illumination also goes out.•
Applies to veh ic les : w it h sun b lind s on rea r side window s
Sun blind
Use the sun shades to cut glare through the rear
passenger windows and the rear window.
Fig. 85 Rear side
window : sun blind
extended
Sun blind, rear side windows doors
- Pull the shade upward out of the door sill and engage in
the hooks located at the top of the door
frame=> fig. 85. •
Page 87 of 368

Wiper and washer system
r,··· ,
Windshield wiper ~
The windshield wipe r lever controls both the windshield
w ipers and the washer sys te m .
Fig. 8 6 Winds hiel d
w iper le ver
T he windshield wiper lever=> fig. 8 6 has t he following posi
t ions:
One-touch w iping
- Move the le ve r to p osit ion G) , when you want to wipe t he
windshield
briefly.
Intermittent wiping "V1 (activating rain sensor )*
-Move the lever up to pos ition 0 -
- Move switch © up or down, to adjust the sensitivity of
the rain sensor or to adjust the intermitte nt interval.
Low wiper speed
- Mov e the l ever u p to pos ition G) .
Controls and equip
ment
Clear v ision
High wiper speed
- Move the lever up to position @ .
Automatic wiper /washer
- Pull the lever to pos ition ® (towar d the steering w heel)
and ho ld.
Re lease the lever . The washer stops an d the wipers keep
going f or a bout fou r seconds.
Turning off the wipers
- Move the lever back to posit ion @ .
The windshie ld wipers and washer on ly work when the ignition is
turned on .
The rain sensor* is only activated w ith the wiper lever set to position
G). When it starts to rain, the rain sensor will automa tically activate
the intermittent wiping mode .
To reduce the sensitivity of the sensor, move switch @down . To
inc rease the sensitivity, move the switch up. The higher you adjust
the sensitivity, the faster the sensor will react when it senses mois
ture on the windshield. The pauses between wiper turns depend not only on the sensitivity setting, but on the vehicle speed as well.
The rain sensor wiper interva ls depend on the sensitivity setting as
we ll as vehic le speed. During brief stops, wiper motion will adjust to
the amount of rain on the w indshield.
When the ignit ion is turned on, the washer jets are heated .
With the low beam headlights switched on, pull the wiper lever
towards you only
briefly to c lean the windshield. Ho lding the wiper
lever would also engage the headlight washer system* each time
you clean the windshield and would drain the washer fluid reservoir
prematurely.
.,
irechnical data
Page 88 of 368

Clear vision
& WARNING
• Wip er blades a re c ruc ia l f or sa fe dri vin g! On ly whe n the y are in
good condition are th ey able to cl ear the window s properly to
p rovi de un comp romi sed vis ibilit y. Wor n or damaged wiper bl ade s
are a safety
hazard => page 88, "In stalling new wiper blades "!
• The rain sen sor i s onl y des igned to assist and s upport the
driver. It rem ain s entirely the driver's respon sibil ity to monit or
o ut side weather con dit ions and to manu ally acti va te the wipe rs as
s o on as rain or drizz le reduce s vi sibility through th e wind shield .
• The windshi eld mu st not b e treat ed w ith water -r e pellent m ate
rials. T hey can increa se glare u nder poor visibilit y conditi ons such
as w etness, darkne ss, or when the sun i s low on the hori zo n. In
addition , they can caus e the windshield wipers to chatt er.
0 Note
I n freezing or near freezing conditions :
• Always check that the wiper blades are not frozen to the glass
before yo u turn the wipers on. Loosen a wiper b lade which is frozen
in place before operating the w ipers to prevent damage to the wiper
blade or the wiper motor.
• Do not use the wipers to clear a frosted window . Using the
wipers as a convenient ice scraper will destroy the wiper blades .
• Before you take your vehicle to an automatic car wash , make sure
you have the windshield w iper system switched off (lever in position
0), otherwise the windshield wiper system could get damaged in the
car wash if it should suddenly come on .
[ i J Tips
• The rain sensor is part of the interva l wiping system . Turning off
the ignition will also deactivate the rain sensor. To reactivate the sensor, switch off the interval wiping function, then switch it back
on again. •
If you switch off the ignition with the windshield wiper lever sti ll
in the interva l wipe position and then come back a while later and
drive off, the rain sensor will reactivate itself after the vehicle speed
has exceeded 4 mph (6 km/h) .
• Worn or dirty windshield wiper b lades cause smearing which
can affect the opera tion of the rain sensor . Check the conditio n of
your windshield wiper blades regularly .
• Make sure the washer fluid reservoir in the engine compartment
is topped off before going on a long trip . Look
up=> page 291 for
checking and filling the washer container .•
Rear vvindovv vviper (Q
The wiper lever is also used to operate the rear window
wiper and the automatic wiper/w asher function.
F ig . 8 7 Wip er lever:
a cti vating th e rea r
w indo w wipe r an d
was her
The rear win dow wiper a nd the au tomati c wip er/washer
f un ctions are activate d as fo llows: