2007 NISSAN TIIDA radiator
[x] Cancel search: radiatorPage 3689 of 5883

INT-10
< PREPARATION >
SQUEAK AND RATTLE TROUBLE DIAGNOSIS
Most of these incidents can be repaired by adjusting, securing or insulating the item(s) or component(s) caus-
ing the noise.
SUNROOF/HEADLINING
Noises in the sunroof/headlining area can often be traced to one of the following:
1. Sunroof lid, rail, linkage or seals making a rattle or light knocking noise
2. Sun visor shaft shaking in the holder
3. Front or rear windshield touching headliner and squeaking
Again, pressing on the components to stop the noise while duplicating the conditions can isolate most of these
incidents. Repairs usually consist of insulating with felt cloth tape.
OVERHEAD CONSOLE (FRONT AND REAR)
Overhead console noises are often caused by the console panel clips not being engaged correctly. Most of
these incidents are repaired by pushing up on the console at the clip locations until the clips engage.
In addition look for:
1. Loose harness or harness connectors.
2. Front console map/reading lamp lens loose.
3. Loose screws at console attachment points.
SEATS
When isolating seat noise it's important to note the position the seat is in and the load placed on the seat when
the noise is present. These conditions should be duplicated when verifying and isolating the cause of the
noise.
Cause of seat noise include:
1. Headrest rods and holder
2. A squeak between the seat pad cushion and frame
3. The rear seatback lock and bracket
These noises can be isolated by moving or pressing on the suspected components while duplicating the con-
ditions under which the noise occurs. Most of these incidents can be repaired by repositioning the component
or applying urethane tape to the contact area.
UNDERHOOD
Some interior noise may be caused by components under the hood or on the engine wall. The noise is then
transmitted into the passenger compartment.
Causes of transmitted underhood noise include:
1. Any component installed on the engine wall
2. Components that pass through the engine wall
3. Engine wall mounts and connectors
4. Loose radiator pins
5. Hood bumpers out of adjustment
6. Hood striker out of adjustment
These noises can be difficult to isolate since they cannot be reached from the interior of the vehicle. The best
method is to secure, move or insulate one component at a time and test drive the vehicle. Also, engine RPM
or load can be changed to isolate the noise. Repairs can usually be made by moving, adjusting, securing, or
insulating the component causing the noise.
Page 3722 of 5883
SQUEAK AND RATTLE TROUBLE DIAGNOSES
IP-7
< SERVICE INFORMATION >
C
D
E
F
G
H
I
K
L
MA
B
IP
N
O
P
Most of these incidents can be repaired by adjusting, securing or insulating the item(s) or component(s) caus-
ing the noise.
SUNROOF/HEADLINING
Noises in the sunroof/headlining area can often be traced to one of the following:
1. Sunroof lid, rail, linkage or seals making a rattle or light knocking noise
2. Sun visor shaft shaking in the holder
3. Front or rear windshield touching headliner and squeaking
Again, pressing on the components to stop the noise while duplicating the conditions can isolate most of these
incidents. Repairs usually consist of insulating with felt cloth tape.
OVERHEAD CONSOLE (FRONT AND REAR)
Overhead console noises are often caused by the console panel clips not being engaged correctly. Most of
these incidents are repaired by pushing up on the console at the clip locations until the clips engage.
In addition look for:
1. Loose harness or harness connectors.
2. Front console map/reading lamp lens loose.
3. Loose screws at console attachment points.
SEATS
When isolating seat noise it's important to note the position the seat is in and the load placed on the seat when
the noise is present. These conditions should be duplicated when verifying and isolating the cause of the
noise.
Cause of seat noise include:
1. Headrest rods and holder
2. A squeak between the seat pad cushion and frame
3. The rear seatback lock and bracket
These noises can be isolated by moving or pressing on the suspected components while duplicating the con-
ditions under which the noise occurs. Most of these incidents can be repaired by repositioning the component
or applying urethane tape to the contact area.
UNDERHOOD
Some interior noise may be caused by components under the hood or on the engine wall. The noise is then
transmitted into the passenger compartment.
Causes of transmitted underhood noise include:
1. Any component mounted to the engine wall
2. Components that pass through the engine wall
3. Engine wall mounts and connectors
4. Loose radiator mounting pins
5. Hood bumpers out of adjustment
6. Hood striker out of adjustment
These noises can be difficult to isolate since they cannot be reached from the interior of the vehicle. The best
method is to secure, move or insulate one component at a time and test drive the vehicle. Also, engine RPM
or load can be changed to isolate the noise. Repairs can usually be made by moving, adjusting, securing, or
insulating the component causing the noise.
Page 4237 of 5883
![NISSAN TIIDA 2007 Service Repair Manual LU-30
< ON-VEHICLE REPAIR >[K9K]
OIL COOLER
OIL COOLER
Exploded ViewINFOID:0000000001381543
Removal and InstallationINFOID:0000000001381544
CAUTION:
Be careful not to get burned when the engine and NISSAN TIIDA 2007 Service Repair Manual LU-30
< ON-VEHICLE REPAIR >[K9K]
OIL COOLER
OIL COOLER
Exploded ViewINFOID:0000000001381543
Removal and InstallationINFOID:0000000001381544
CAUTION:
Be careful not to get burned when the engine and](/manual-img/5/57395/w960_57395-4236.png)
LU-30
< ON-VEHICLE REPAIR >[K9K]
OIL COOLER
OIL COOLER
Exploded ViewINFOID:0000000001381543
Removal and InstallationINFOID:0000000001381544
CAUTION:
Be careful not to get burned when the engine and engine oil are hot.
When removing, prepare a shop cloth to absorb any oil leakage or spillage.
Completely wipe off any oil that adhere to the engine and the vehicle.
REMOVAL
1. Remove engine undercover using power tool.
2. Drain engine coolant. Refer to CO-58, "
Draining".
CAUTION:
Perform when engine is cold.
3. Remove RH front wheel. Refer to WT-6, "
Rotation".
4. Remove RH fender protector. Refer to EXT-22, "
Removal and Installation".
5. Remove drive belt. Refer to EM-263, "
Removal and Installation".
6. Remove generator and position aside. Refer to CHG-43, "
Removal and Installation".
7. Remove A/C compressor and position aside. Refer to HA-35, "
Removal and Installation of Compressor -
K9K".
8. Remove oil filter and oil filter bracket. Refer to LU-28, "
Replacement".
1. Cylinder block 2. Water pipe 3. O-ring
4. O-ring 5. O-ring 6. Oil cooler
7. Connecting stud 8. O-ring 9. Oil filter bracket
10. Oil pressure switch 11. Oil filter 12. O-ring
13. Connecting bolt
A. To radiator lower hose B. To water pump
E1BIA0011GB
Page 4241 of 5883
MA-1
MAINTENANCE
C
D
E
F
G
H
I
J
K
L
MB
MA
SECTION MA
N
OA
CONTENTS
MAINTENANCE
PRECAUTION ...............................................3
PRECAUTIONS ...................................................3
Precaution for Supplemental Restraint System
(SRS) "AIR BAG" and "SEAT BELT PRE-TEN-
SIONER" ...................................................................
3
PREPARATION ............................................4
PREPARATION ...................................................4
Special Service Tool .................................................4
Commercial Service Tool ..........................................4
Pre-Delivery Inspection Item .....................................5
ON-VEHICLE MAINTENANCE .....................6
GENERAL MAINTENANCE ................................6
General Maintenance ................................................6
PERIODIC MAINTENANCE ................................7
Periodic Maintenance ................................................7
RECOMMENDED FLUIDS AND LUBRI-
CANTS ................................................................
19
Fluids and Lubricants ..............................................19
SAE Viscosity Number ............................................20
Engine Coolant Mixture Ratio .................................21
ENGINE MAINTENANCE (HR16DE) .................22
DRIVE BELTS ...........................................................22
DRIVE BELTS : Checking .......................................22
DRIVE BELTS : Tension Adjustment ......................22
ENGINE COOLANT ...................................................23
ENGINE COOLANT : Inspection .............................23
ENGINE COOLANT : Changing Engine Coolant ....23
RADIATOR ................................................................25
RADIATOR : Checking Radiator .............................25
FUEL LINES ..............................................................25
FUEL LINES : Inspection ........................................25
AIR CLEANER FILTER .............................................25
AIR CLEANER FILTER : Removal and Installation
....
26
ENGINE OIL ...............................................................26
ENGINE OIL : Draining ............................................27
ENGINE OIL : Refilling ............................................27
OIL FILTER ................................................................27
OIL FILTER : Removal and Installation ...................27
OIL FILTER : Inspection ..........................................28
SPARK PLUG ............................................................28
SPARK PLUG : Removal and Installation ...............28
SPARK PLUG : Inspection ......................................29
EVAP VAPOR LINES ................................................30
EVAP VAPOR LINES : Inspection ...........................30
ENGINE MAINTENANCE (MR18DE) ...............31
DRIVE BELTS ............................................................31
DRIVE BELTS : Component ....................................31
DRIVE BELTS : Checking Drive Belts .....................31
DRIVE BELTS : Tension Adjustment ......................31
ENGINE COOLANT ...................................................31
ENGINE COOLANT : Inspection .............................31
ENGINE COOLANT : Changing Engine Coolant ....32
RADIATOR .................................................................33
RADIATOR : Checking Radiator Cap ......................34
RADIATOR : Checking Radiator .............................34
FUEL LINES ...............................................................34
FUEL LINES : Inspection .........................................35
AIR CLEANER FILTER .............................................35
AIR CLEANER FILTER : Removal and Installation
....
35
ENGINE OIL ...............................................................36
ENGINE OIL : Inspection .........................................36
ENGINE OIL : Changing Engine Oil ........................37
Page 4242 of 5883

MA-2
OIL FILTER ...............................................................38
OIL FILTER : Removal and Installation ..................38
OIL FILTER : Inspection .........................................39
SPARK PLUG ...........................................................39
SPARK PLUG : Component ...................................40
SPARK PLUG : Removal and Installation ..............40
EVAP VAPOR LINES ................................................41
EVAP VAPOR LINES : Inspection ..........................41
ENGINE MAINTENANCE (K9K) .......................42
DRIVE BELTS ...........................................................42
DRIVE BELTS : Exploded View .............................42
DRIVE BELTS : Inspection and Adjustment ...........42
ENGINE COOLANT ..................................................42
ENGINE COOLANT : Inspection ............................42
ENGINE COOLANT : Draining ...............................43
ENGINE COOLANT : Refilling ................................43
ENGINE COOLANT : Flushing ...............................44
RADIATOR ................................................................44
RADIATOR : Checking Radiator Cap .....................44
RADIATOR : Checking Radiator ............................45
FUEL LINES ..............................................................45
FUEL LINES : Inspection ........................................45
AIR CLEANER FILTER .............................................46
AIR CLEANER FILTER : Removal and Installation
...
46
ENGINE OIL ..............................................................46
ENGINE OIL : Inspection ........................................47
ENGINE OIL : Draining ...........................................47
ENGINE OIL : Refilling ............................................48
OIL FILTER ...............................................................48
OIL FILTER : Replacement .....................................48
CHASSIS AND BODY MAINTENANCE ...........50
Air Conditioner Filter ...............................................50
Checking Exhaust System ......................................50
Checking Clutch Fluid Level and Leaks ..................50
Checking Clutch System .........................................50
Checking M/T Oil ....................................................50
Changing M/T Oil ....................................................51
Checking A/T Fluid: RE4F03B ................................51
Changing A/T Fluid: RE4F03B ................................52
Checking A/T Fluid: RSF91R ..................................52
Changing A/T Fluid: RS9F94R ...............................52
Balancing Wheels ...................................................53
Rotation ...................................................................53
Checking Brake Fluid Level and Leaks ...................54
Checking Brake Line and Cables ............................54
Changing Brake Fluid .............................................54
Drain and Refill .......................................................54
Checking Disc Brake ...............................................55
Axle and Suspension Parts .....................................56
Drive Shaft ..............................................................56
Lubricating Locks, Hinges and Hood Latch ............57
Checking Seat Belts, Buckles, Retractors, An-
chors and Adjusters ................................................
57
Page 4244 of 5883
MA-4
< PREPARATION >
PREPARATION
PREPARATION
PREPARATION
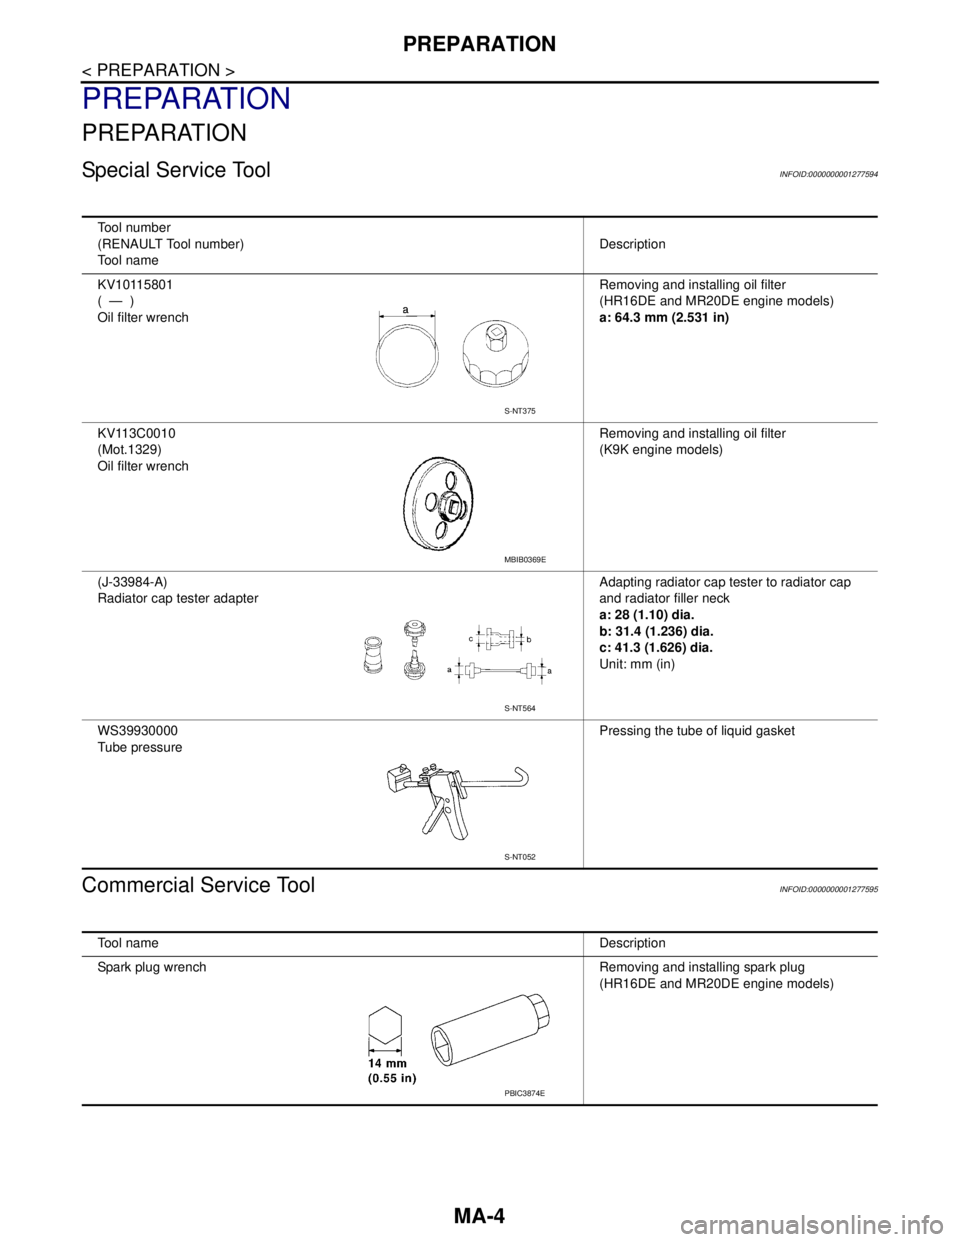
Special Service ToolINFOID:0000000001277594
Commercial Service ToolINFOID:0000000001277595
Tool number
(RENAULT Tool number)
Tool nameDescription
KV10115801
( — )
Oil filter wrenchRemoving and installing oil filter
(HR16DE and MR20DE engine models)
a: 64.3 mm (2.531 in)
KV113C0010
(Mot.1329)
Oil filter wrenchRemoving and installing oil filter
(K9K engine models)
(J-33984-A)
Radiator cap tester adapterAdapting radiator cap tester to radiator cap
and radiator filler neck
a: 28 (1.10) dia.
b: 31.4 (1.236) dia.
c: 41.3 (1.626) dia.
Unit: mm (in)
WS39930000
Tube pressurePressing the tube of liquid gasket
S-NT375
MBIB0369E
S-NT564
S-NT052
Tool nameDescription
Spark plug wrench Removing and installing spark plug
(HR16DE and MR20DE engine models)
PBIC3874E
Page 4261 of 5883
RECOMMENDED FLUIDS AND LUBRICANTS
MA-21
< ON-VEHICLE MAINTENANCE >
C
D
E
F
G
H
I
J
K
L
MB
MAN
OA
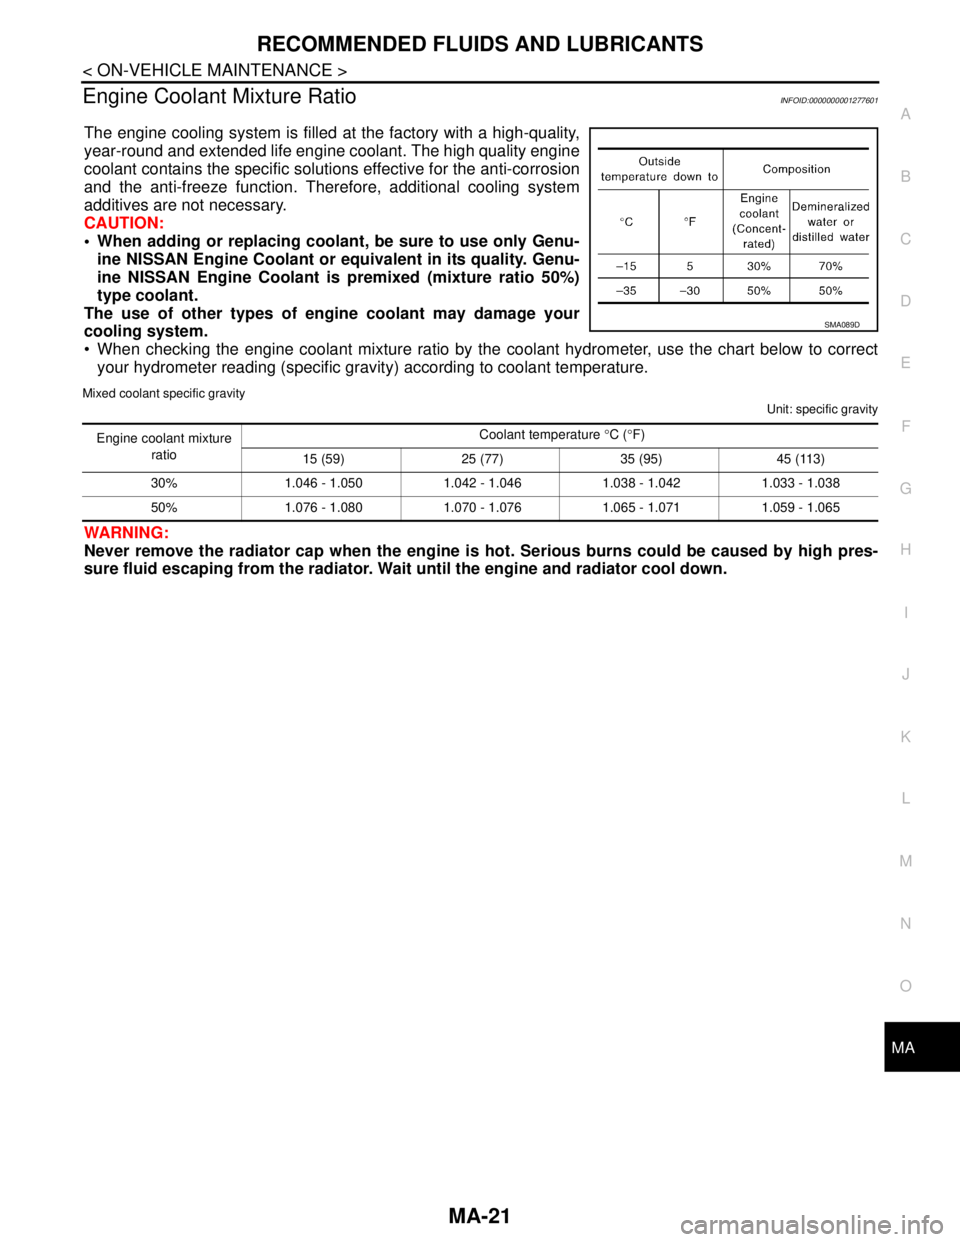
Engine Coolant Mixture RatioINFOID:0000000001277601
The engine cooling system is filled at the factory with a high-quality,
year-round and extended life engine coolant. The high quality engine
coolant contains the specific solutions effective for the anti-corrosion
and the anti-freeze function. Therefore, additional cooling system
additives are not necessary.
CAUTION:
When adding or replacing coolant, be sure to use only Genu-
ine NISSAN Engine Coolant or equivalent in its quality. Genu-
ine NISSAN Engine Coolant is premixed (mixture ratio 50%)
type coolant.
The use of other types of engine coolant may damage your
cooling system.
When checking the engine coolant mixture ratio by the coolant hydrometer, use the chart below to correct
your hydrometer reading (specific gravity) according to coolant temperature.
Mixed coolant specific gravity
Unit: specific gravity
WARNING:
Never remove the radiator cap when the engine is hot. Serious burns could be caused by high pres-
sure fluid escaping from the radiator. Wait until the engine and radiator cool down.
SMA089D
Engine coolant mixture
ratioCoolant temperature °C (°F)
15 (59) 25 (77) 35 (95) 45 (113)
30% 1.046 - 1.050 1.042 - 1.046 1.038 - 1.042 1.033 - 1.038
50% 1.076 - 1.080 1.070 - 1.076 1.065 - 1.071 1.059 - 1.065
Page 4263 of 5883
ENGINE MAINTENANCE (HR16DE)
MA-23
< ON-VEHICLE MAINTENANCE >
C
D
E
F
G
H
I
J
K
L
MB
MAN
OA
When the lock nut is loosened excessively, the idler pulley tilts and the correct tension adjust-
ment cannot be performed. Never loosen it excessively (more than 45 degrees).
Put a matching mark on the lock nut, and check turning angle with a protractor. Never visually
check the tightening angle.
2. Adjust the belt tension by turning the adjusting bolt.
CAUTION:
When checking immediately after installation, first adjust it to the specified value. Then, after
turning crankshaft two turns or more, re-adjust to the specified value to avoid variation in deflec-
tion between pulleys.
When the tension adjustment is performed, the lock nut should be in the condition at step“2”. If
the tension adjustment is performed when the lock nut is loosened more than the standard, the
idler pulley tilts and the correct tension adjustment cannot be performed.
3. Tighten the idler pulley lock nut.
ENGINE COOLANT
ENGINE COOLANT : InspectionINFOID:0000000001730856
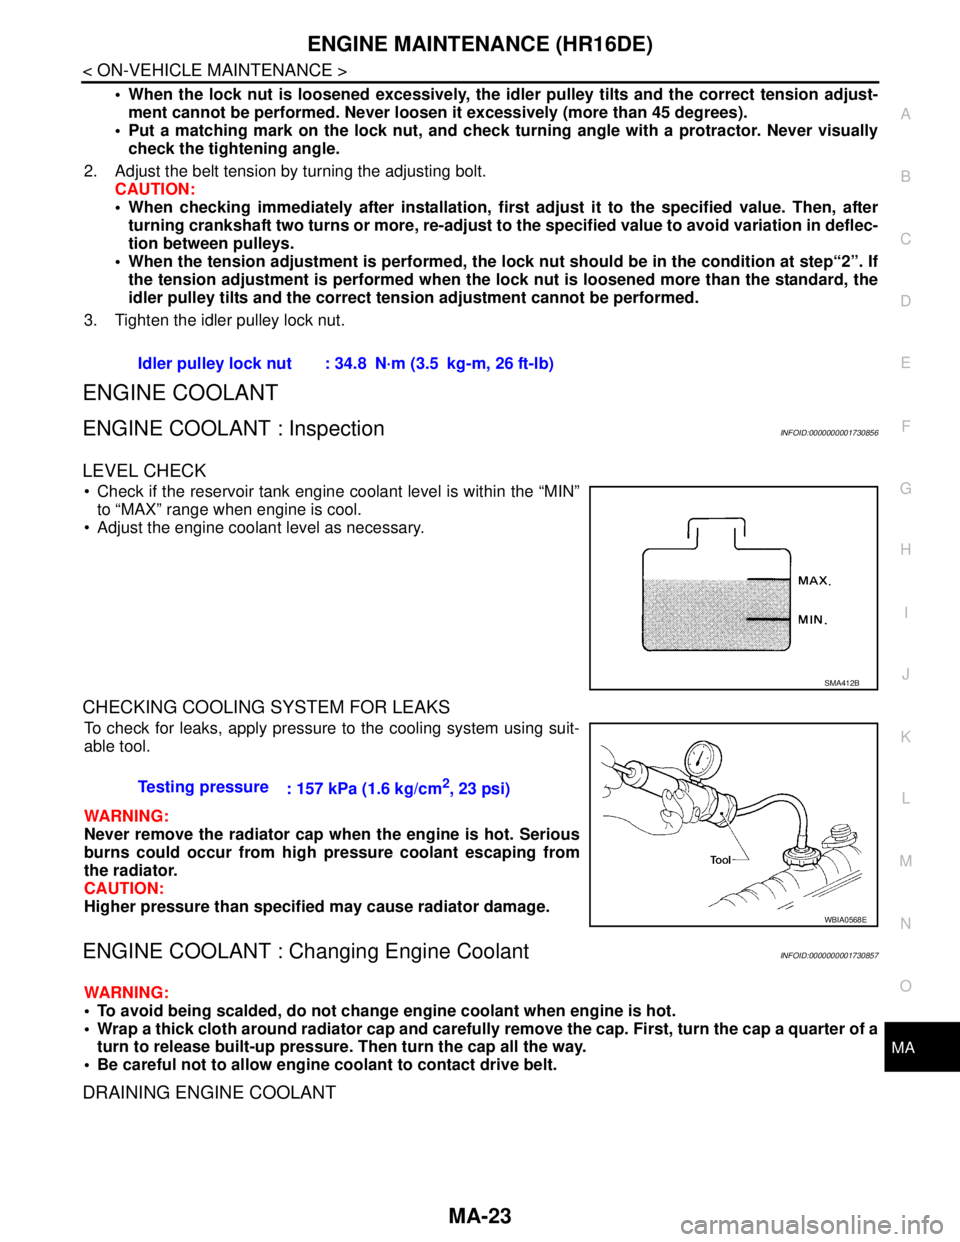
LEVEL CHECK
Check if the reservoir tank engine coolant level is within the “MIN”
to “MAX” range when engine is cool.
Adjust the engine coolant level as necessary.
CHECKING COOLING SYSTEM FOR LEAKS
To check for leaks, apply pressure to the cooling system using suit-
able tool.
WARNING:
Never remove the radiator cap when the engine is hot. Serious
burns could occur from high pressure coolant escaping from
the radiator.
CAUTION:
Higher pressure than specified may cause radiator damage.
ENGINE COOLANT : Changing Engine CoolantINFOID:0000000001730857
WARNING:
To avoid being scalded, do not change engine coolant when engine is hot.
Wrap a thick cloth around radiator cap and carefully remove the cap. First, turn the cap a quarter of a
turn to release built-up pressure. Then turn the cap all the way.
Be careful not to allow engine coolant to contact drive belt.
DRAINING ENGINE COOLANT
Idler pulley lock nut : 34.8 N·m (3.5 kg-m, 26 ft-lb)
SMA412B
Testing pressure
: 157 kPa (1.6 kg/cm2, 23 psi)
WBIA0568E