Page 1143 of 1575
7.Installation is the reverse of removal.
SECONDARY SEAT BELT REPLACEMENT
a.When installing the belt, make sure not to damage the pretensioner.
1. Remove the following items first.
a. Rear seat assembly.
b. Front and rear door scuff trim.
c. Rear filler trim.
2. Remove the lower anchor (A).
Page 1144 of 1575
3.Remove the luggage side trim.
4. Remove the D pillar trim.
5. Remove the upper anchor (A).
6. After loosening the retractor (C) mounting bolt, remove the rear seat belt (B).
Page 1145 of 1575
7.Installation is the reverse of removal.
THIRD SEAT BELT REPLACEMENT
1.Remove the following items first.
a. Rear seat assembly.
b. Front and rear door scuff trim.
c. Rear filler trim.
2. Remove the lower anchor (A).
Page 1146 of 1575
3.Remove the luggage side trim.
4. Remove the C pillar trim.
5. Remove the upper anchor (A).
6. After loosening the retractor (C) mounting bolt, remove the rear seat belt (B).
7.Installation is the reverse of removal.
Page 1147 of 1575
FRONT SEAT BELT BUCKLE REPLACEMENT
1.Remove the following items first.
a. Front seat assembly.
b. Recliner cover.
2. Remove the seat belt buckle (A).
3.Installation is the reverse of removal.
SECONDARY SEAT BELT BUCKLE REPLACEMENT
1.Remove the following items first.
a. Front seat assembly.
b. Recliner cover.
2. Remove the seat belt buckle (A).
3.Installation is the reverse of removal.
THIRD SEAT BELT BUCKLE REPLACEMENT
1.Remove the recliner cover (A).
Page 1148 of 1575
2.Remove the seat belt buckle (A).
3.Remove the seat belt buckle (A).
4.Installation is the reverse of removal.
HEIGHT ADJUSTER REPLACEMENT
1.Remove the following items first.
a. Front assembly .
b. Front and rear door scuff trim .
c. Front seat belt upper and lower anchor.
d. Center pillar lower and upper trim.
2. Loosen the mounting bolts, then remove the height adjuster (A).
Page 1152 of 1575

2007 > 2.7L V6 GASOLINE >
GENERAL TROUBLESHOOTING INFORMATION
BEFORE TROUBLESHOOTING
1. Check applicable fuses in the appropriate fuse/relay box.
2. Check the battery for damage, state of charge, and clean and tight connections.
a.Do not quick- charge a battery unless the battery ground cable has been disconnected, otherwise you will
damage the generator diodes.
b. Do not attempt to crank the engine with the battery ground cable loosely connected or you will severely
damage the wiring.
3. Check the generator belt tension.
HANDLING CONNECTORS
1.Make sure the connectors are clean and have no loose wire terminals.
2. Make sure multiple cavity connectors are packed with grease (except watertight connectors).
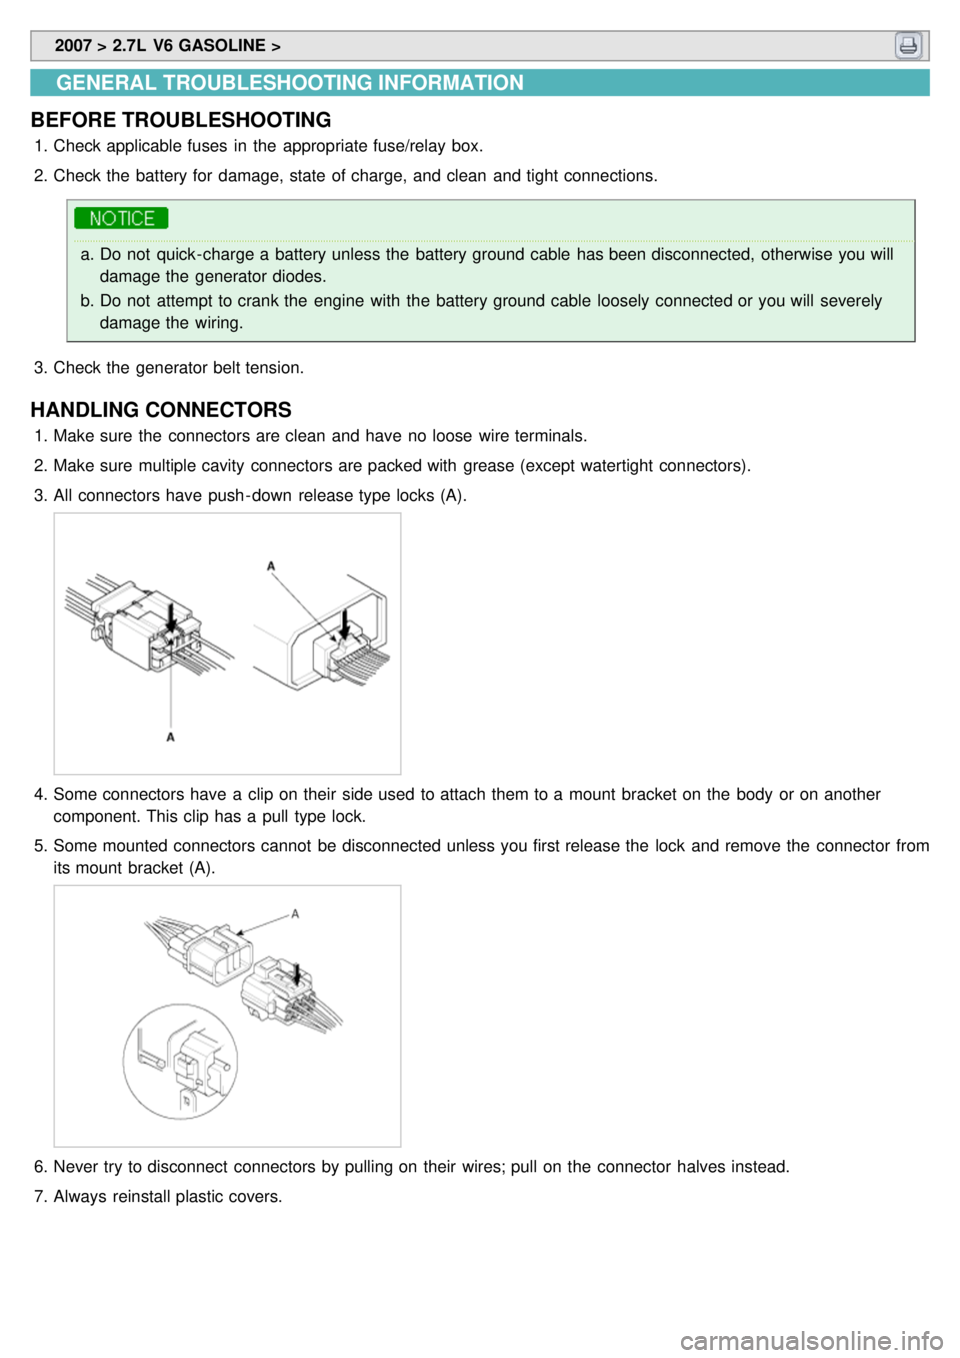
3. All connectors have push - down release type locks (A).
4.Some connectors have a clip on their side used to attach them to a mount bracket on the body or on another
component. This clip has a pull type lock.
5. Some mounted connectors cannot be disconnected unless you first release the lock and remove the connector from
its mount bracket (A).
6.Never try to disconnect connectors by pulling on their wires; pull on the connector halves instead.
7. Always reinstall plastic covers.
Page 1211 of 1575

2007 > 2.7L V6 GASOLINE >
DESCRIPTION
All modules are linked a low speed CAN network.
The input information for the modules is coming from both the CAN network and the hardware components
(actuatorsand sensors).
a. FAM (Front Area Module)
a. Headlamp low/high beam control (with DRL)
b. Park lamp control
c. Front fog lamp control
d. Front turn signal lamp control
e. Windshield wiper control
f. Windshield deicer
g. Diagnostics
b. IPM (In - Panel Module)
a. RKE (Remote Keyless Control)
b. VAS (Voice Alarm System)
c. Ignition key hole illumination
d. Switch indicators control
e. Panel light control
f. Seat belt warning
g. Auto light/DRL control (Logic)
h. Windshield/Rear wiper control (Logic)
i. Turn and Hazard lamp control (Logic)
j. Central door lock (Logic)
k. Windshield deicer timer
l. Rear glass defog timer
m. Gateway for ISO- 9141 (K- Line)
c. RAM (Rear Area Module)
a. Tail lamp control
b. Turn and Hazard lamp control
c. Back up lamp control
d. Rea fog lamp control
e. Stop lamp outage detection
f. Sliding door power window/Quarter glass control
g. Room lamp control
h. Rear wiper control
i. Rear glass defog
j. Fuel filler door open solenoid control
d. ADM (Assist Drive Module)
e. DDM (Driver Drive Module)
MODULE INTRODUCTION
FAM/IPM/RAM consists of a power board and an electronic board. The power board contains circuit protection devices
and switching devices. The electronic board uses Intelligent Power Switching (IPS) for HS/LS load control, logic
functions and CAN/K- Line communication. The power board and electronic board are connected with pin blocks for
the Front Area Module (FAM) and VCD (Variable Connection Displacement) for the In- Panel Module (IPM) and the
Rear Area Module (RAM).