2007 ISUZU KB P190 key
[x] Cancel search: keyPage 3975 of 6020
TRANSMISSION CONTROL SYSTEM (AW30–40LE) 7A2-9
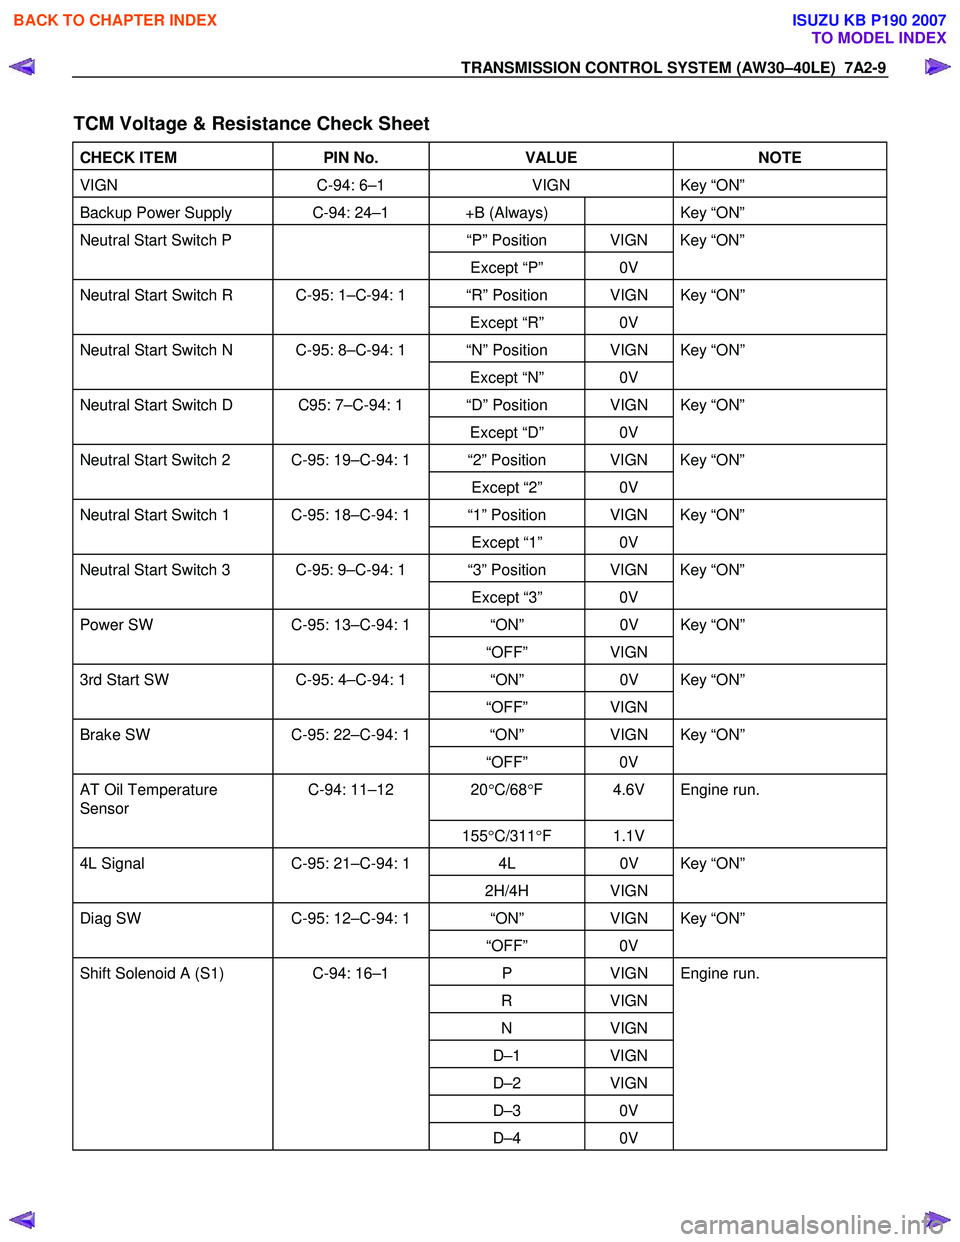
TCM Voltage & Resistance Check Sheet
CHECK ITEM PIN No. VALUE NOTE
VIGN C-94: 6–1 VIGN Key “ON”
Backup Power Supply C-94: 24–1 +B (Always) Key “ON”
Neutral Start Switch P “P” Position VIGN Key “ON”
Except “P” 0V
Neutral Start Switch R C-95: 1–C-94: 1 “R” Position VIGN Key “ON”
Except “R” 0V
Neutral Start Switch N C-95: 8–C-94: 1 “N” Position VIGN Key “ON”
Except “N” 0V
Neutral Start Switch D C95: 7–C-94: 1 “D” Position VIGN Key “ON”
Except “D” 0V
Neutral Start Switch 2 C-95: 19–C-94: 1 “2” Position VIGN Key “ON”
Except “2” 0V
Neutral Start Switch 1 C-95: 18–C-94: 1 “1” Position VIGN Key “ON”
Except “1” 0V
Neutral Start Switch 3 C-95: 9–C-94: 1 “3” Position VIGN Key “ON”
Except “3” 0V
Power SW C-95: 13–C-94: 1 “ON” 0V Key “ON”
“OFF” VIGN
3rd Start SW C-95: 4–C-94: 1 “ON” 0V Key “ON”
“OFF” VIGN
Brake SW C-95: 22–C-94: 1 “ON” VIGN Key “ON”
“OFF” 0V
AT Oil Temperature
Sensor C-94: 11–12 20
°C/68 °F 4.6V Engine run.
155°C/311 °F 1.1V
4L Signal C-95: 21–C-94: 1 4L 0V Key “ON”
2H/4H VIGN
Diag SW C-95: 12–C-94: 1 “ON” VIGN Key “ON”
“OFF” 0V
Shift Solenoid A (S1) C-94: 16–1 P VIGN Engine run.
R VIGN
N VIGN
D–1 VIGN
D–2 VIGN
D–3 0V
D–4 0V
BACK TO CHAPTER INDEX
TO MODEL INDEX
ISUZU KB P190 2007
Page 3976 of 6020
7A2-10 TRANSMISSION CONTROL SYSTEM (AW30–40LE)
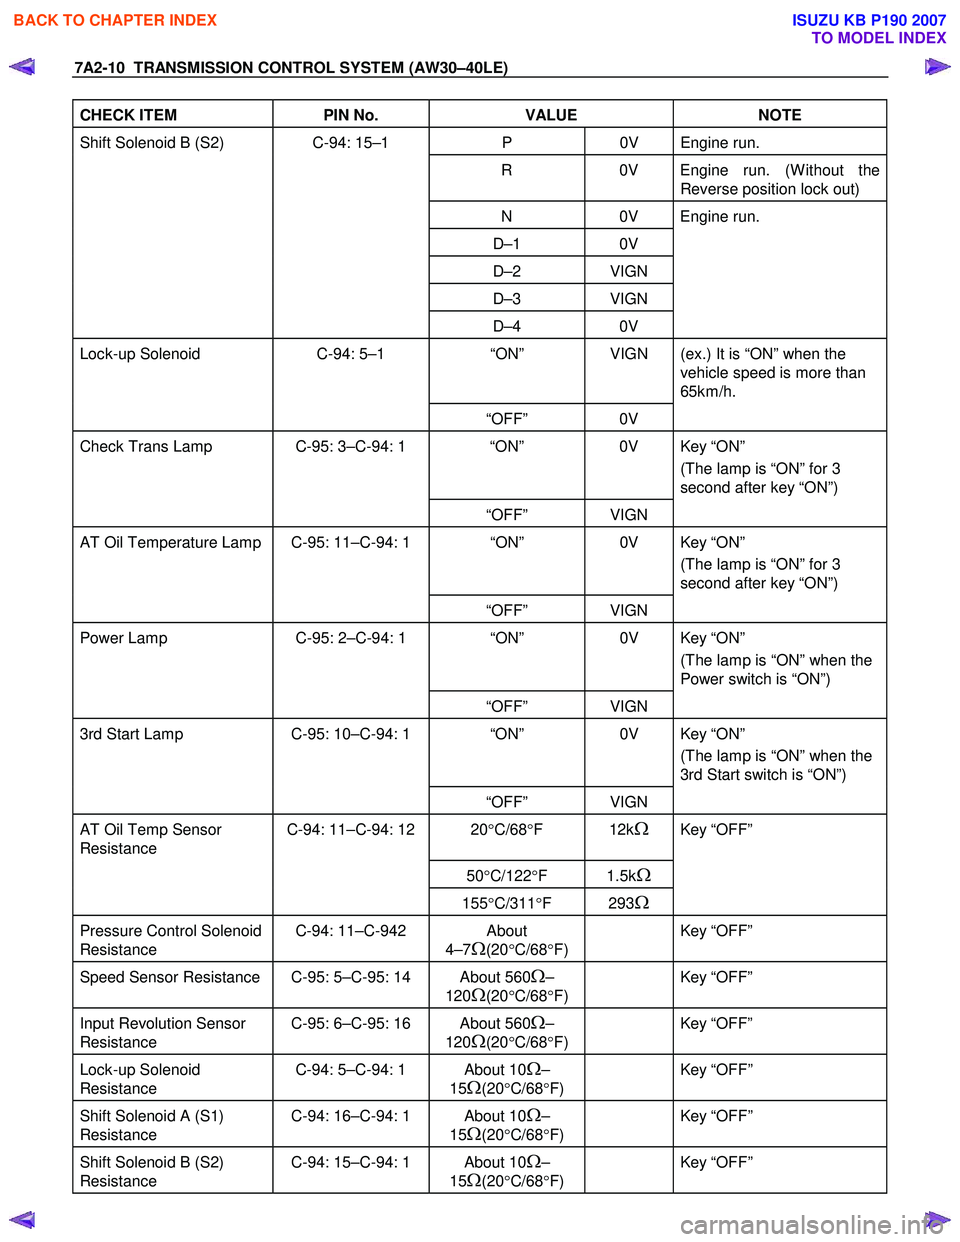
CHECK ITEM PIN No. VALUE NOTE
Shift Solenoid B (S2) C-94: 15–1 P 0V Engine run.
R 0V Engine run. (W ithout the
Reverse position lock out)
N 0V Engine run.
D–1 0V
D–2 VIGN
D–3 VIGN
D–4 0V
Lock-up Solenoid C-94: 5–1 “ON” VIGN (ex.) It is “ON” when the
vehicle speed is more than
65km/h.
“OFF” 0V
Check Trans Lamp C-95: 3–C-94: 1 “ON” 0V Key “ON”
(The lamp is “ON” for 3
second after key “ON”)
“OFF” VIGN
AT Oil Temperature Lamp C-95: 11–C-94: 1 “ON” 0V Key “ON”
(The lamp is “ON” for 3
second after key “ON”)
“OFF” VIGN
Power Lamp C-95: 2–C-94: 1 “ON” 0V Key “ON”
(The lamp is “ON” when the
Power switch is “ON”)
“OFF” VIGN
3rd Start Lamp C-95: 10–C-94: 1 “ON” 0V Key “ON”
(The lamp is “ON” when the
3rd Start switch is “ON”)
“OFF” VIGN
AT Oil Temp Sensor
Resistance C-94: 11–C-94: 12 20
°C/68 °F 12kΩ Key “OFF”
50°C/122 °F 1.5kΩ
155°C/311 °F 293Ω
Pressure Control Solenoid
Resistance C-94: 11–C-942 About
4–7
Ω(20 °C/68 °F)
Key “OFF”
Speed Sensor Resistance C-95: 5–C-95: 14 About 560Ω–
120
Ω(20 °C/68 °F)
Key “OFF”
Input Revolution Sensor
Resistance C-95: 6–C-95: 16 About 560Ω–
120
Ω(20 °C/68 °F)
Key “OFF”
Lock-up Solenoid
Resistance C-94: 5–C-94: 1 About 10Ω–
15
Ω(20 °C/68 °F)
Key “OFF”
Shift Solenoid A (S1)
Resistance C-94: 16–C-94: 1 About 10Ω–
15
Ω(20 °C/68 °F)
Key “OFF”
Shift Solenoid B (S2)
Resistance C-94: 15–C-94: 1 About 10Ω–
15
Ω(20 °C/68 °F)
Key “OFF”
BACK TO CHAPTER INDEX
TO MODEL INDEX
ISUZU KB P190 2007
Page 3978 of 6020
7A2-12 TRANSMISSION CONTROL SYSTEM (AW30–40LE)
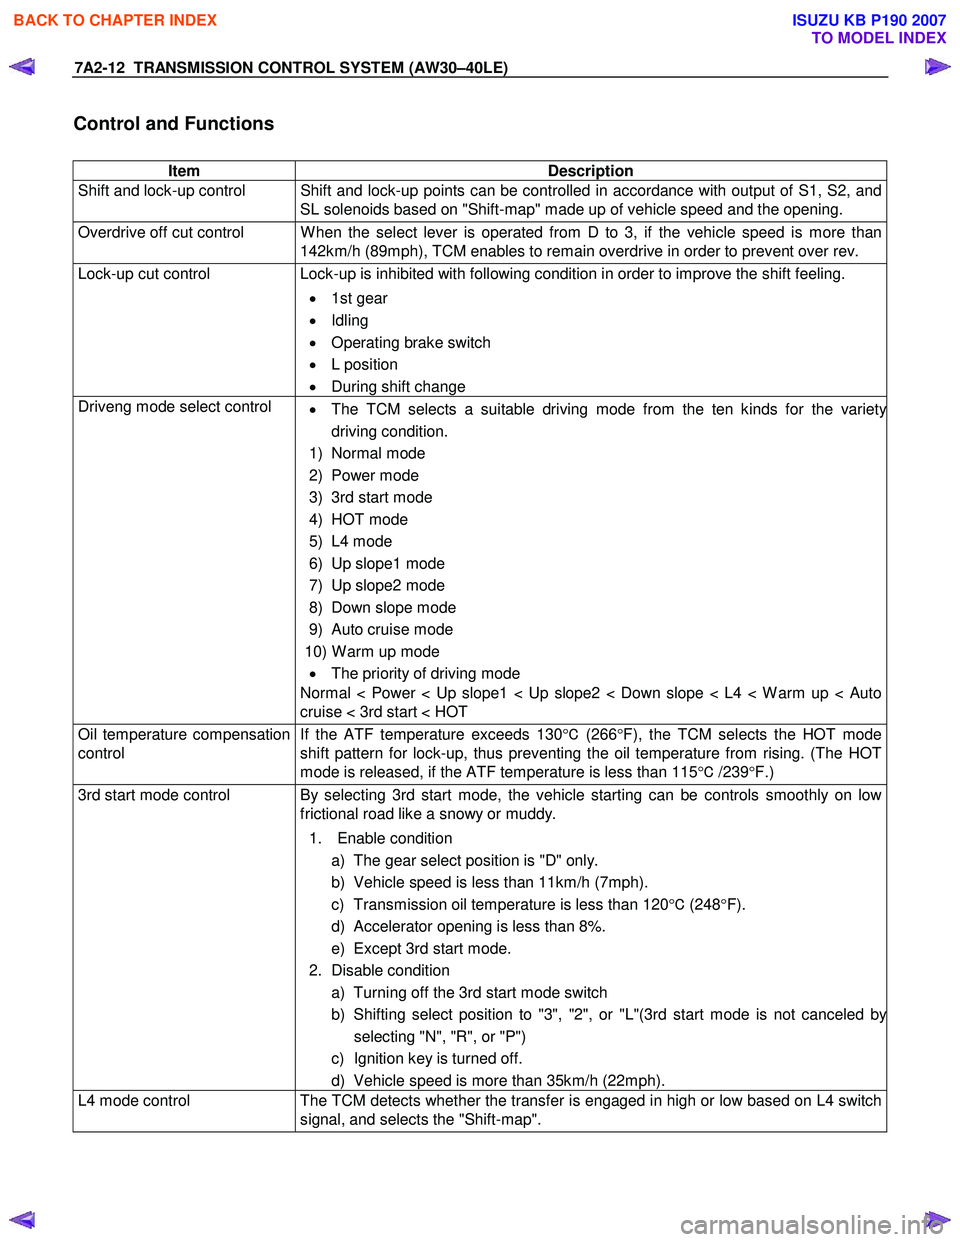
Control and Functions
Item Description
Shift and lock-up control Shift and lock-up points can be controlled in accordance with output of S1, S2, and SL solenoids based on "Shift-map" made up of vehicle speed and the opening.
Overdrive off cut control W hen the select lever is operated from D to 3, if the vehicle speed is more than 142km/h (89mph), TCM enables to remain overdrive in order to prevent over rev.
Lock-up cut control Lock-up is inhibited with following condition in order to improve the shift feeling.
• 1st gear
• Idling
• Operating brake switch
• L position
• During shift change
Driveng mode select control
• The TCM selects a suitable driving mode from the ten kinds for the variety
driving condition.
1) Normal mode
2) Power mode
3) 3rd start mode
4) HOT mode
5) L4 mode
6) Up slope1 mode
7) Up slope2 mode
8) Down slope mode
9) Auto cruise mode
10) W arm up mode • The priority of driving mode
Normal < Power < Up slope1 < Up slope2 < Down slope < L4 < W arm up < Auto
cruise < 3rd start < HOT
Oil temperature compensation
control If the ATF temperature exceeds 130
°C (266 °F), the TCM selects the HOT mode
shift pattern for lock-up, thus preventing the oil temperature from rising. (The HOT
mode is released, if the ATF temperature is less than 115 °C /239 °F.)
3rd start mode control By selecting 3rd start mode, the vehicle starting can be controls smoothly on low
frictional road like a snowy or muddy.
1. Enable condition a) The gear select position is "D" only.
b) Vehicle speed is less than 11km/h (7mph).
c) Transmission oil temperature is less than 120 °C (248 °F).
d) Accelerator opening is less than 8%.
e) Except 3rd start mode.
2. Disable condition a) Turning off the 3rd start mode switch
b) Shifting select position to "3", "2", or "L"(3rd start mode is not canceled b
y
selecting "N", "R", or "P")
c) Ignition key is turned off.
d) Vehicle speed is more than 35km/h (22mph).
L4 mode control The TCM detects whether the transfer is engaged in high or low based on L4 switch
signal, and selects the "Shift-map".
BACK TO CHAPTER INDEX
TO MODEL INDEX
ISUZU KB P190 2007
Page 3982 of 6020
7A2-16 TRANSMISSION CONTROL SYSTEM (AW30–40LE)
CAN bus systems in automatic
transmission control (AW30-40LE)
The automatic transmission control system in AW 30-
40LE uses high speed CAN bus system .The individual
CAN bus systems are connected via two interfaces and
can exchange information and data. This allows control
modules that are connected to different CAN bus
systems to communicate.
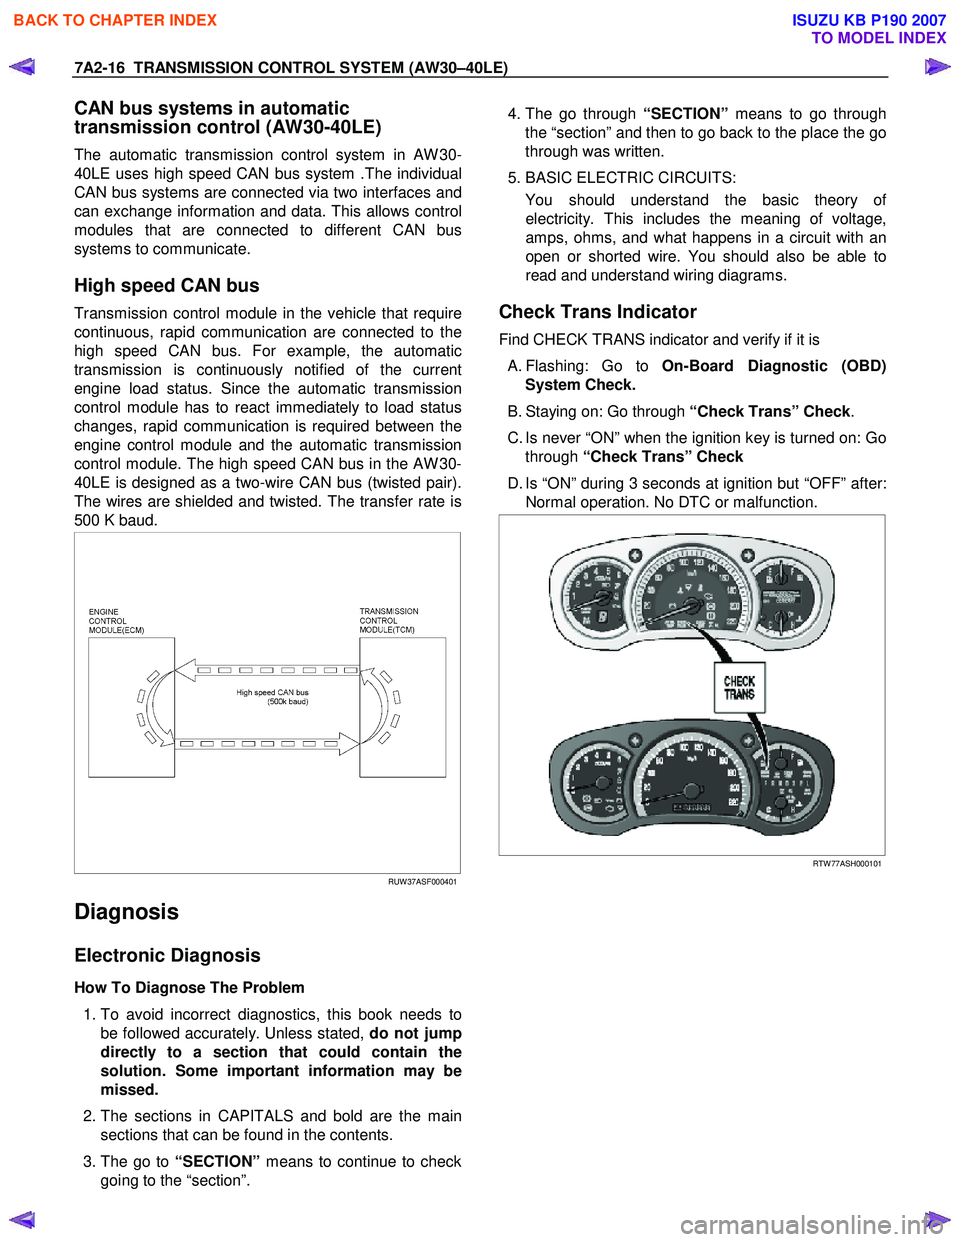
High speed CAN bus
Transmission control module in the vehicle that require
continuous, rapid communication are connected to the
high speed CAN bus. For example, the automatic
transmission is continuously notified of the current
engine load status. Since the automatic transmission
control module has to react immediately to load status
changes, rapid communication is required between the
engine control module and the automatic transmission
control module. The high speed CAN bus in the AW 30-
40LE is designed as a two-wire CAN bus (twisted pair).
The wires are shielded and twisted. The transfer rate is
500 K baud.
RUW 37ASF000401
Diagnosis
Electronic Diagnosis
How To Diagnose The Problem
1. To avoid incorrect diagnostics, this book needs to
be followed accurately. Unless stated, do not jump
directly to a section that could contain the
solution. Some important information may be
missed.
2. The sections in CAPITALS and bold are the main
sections that can be found in the contents.
3. The go to “SECTION” means to continue to check
going to the “section”.
4. The go through “SECTION” means to go through
the “section” and then to go back to the place the go
through was written.
5. BASIC ELECTRIC CIRCUITS:
You should understand the basic theory o
f
electricity. This includes the meaning of voltage,
amps, ohms, and what happens in a circuit with an
open or shorted wire. You should also be able to
read and understand wiring diagrams.
Check Trans Indicator
Find CHECK TRANS indicator and verify if it is
A. Flashing: Go to On-Board Diagnostic (OBD)
System Check.
B. Staying on: Go through “Check Trans” Check.
C. Is never “ON” when the ignition key is turned on: Go through “Check Trans” Check
D. Is “ON” during 3 seconds at ignition but “OFF” after: Normal operation. No DTC or malfunction.
RTW 77ASH000101
BACK TO CHAPTER INDEX
TO MODEL INDEX
ISUZU KB P190 2007
Page 3989 of 6020
TRANSMISSION CONTROL SYSTEM (AW30–40LE) 7A2-23
Diagnostic Trouble Codes
The purpose of the “Diagnostic Trouble Codes” mode is
to display stored TCM trouble codes.
W hen “Diagnostic Trouble Codes” is selected an
“Application Menu” screen appears.
Read DTC Information
W hen “Read DTC Information” is selected, an
“Application Menu” appears with a list of DTC
information function keys addressing DTC specifics and
their origins.
Function key selections may vary for particular vehicle
and/or system.
Requested emission-related DTCs
Clear DTC Information
The purpose of the “Clear DTC Information” mode is to
command the clearing of stored TCM trouble codes.
W hen “Clear DTC Information” is selected, a “Clea
r
DTC Information”, warning screen appears. This screen
informs you that by cleaning DTC's, “all stored DTC
information in controller will be erased”.
Do you want to clear DTC's (Yes/No).
Press either the Yes or No key when answering.
After clearing codes, confirm system operation by test-
driving the vehicle.
Allow the vehicle to shift through all four forward gears
in a manner which attempts to repeat the failure
condition.
NOTE: W hen the trouble has not been repaired and
the trouble code cannot be erased, check the vehicle
again.
Data Display
The purpose of the “Data Display” mode is to
continuously monitor data parameters.
The current actual values of all important sensors and
signals in the system are displayed through F1 mode.
W hen “Data Display” is selected an “Application Menu”
appears. “Transmission Data Display”.
See “Transmission Data” on next page.
Snapshot
W hen “Snapshot” is selected an “Application Menu”
appears.
W hen “Transmission Snapshot” application is selected
from the “Application Menu”, a “Snapshot Menu”
appears, displaying several options. “Snapshot” options
may vary from one system to another.
“Snapshot” allows a recording of all vehicle parameters.
There parameters may then be replayed at a future
point in time.
This action allows you to focus on making the condition
occur, rather than trying to view all of the data in
anticipation of the fault. The snapshot will collect
parameter information around a trigger point that you
select.
W hen a snapshot is taken, it is recorded onto the
PCMCIA memory card. W hen the Tech 2 is powered
down. Snapshots are not lost.
Actuator Test
The purpose of “Actuator Test” mode is to check fo
r
correct operation of electronic system actuators.
Solenoid 2-3 Test, Solenoid 1-2/3-4 and Test TCC
Solenoid Test
You can operate the solenoids by pressing the “ON”
and “OFF” buttons.
Preconditions: P–N position, no vehicle speed, no
engine speed
Pressure Control Solenoid (PCS)
You can set desired PCS Current using the “ON” and
“OFF” button. The PCS Data informs about PCS
Current, Pressure and Duty Cycle.
Preconditions: P–N position, no engine speed, no
vehicle speed
3rd Start Lamp Test, Power Lamp Test, AT Oil
Temperature Lamp Test and Check Light Test
You can operate the lamps by pressing the “ON” and
“OFF” buttons.
Preconditions: none
NOTE: Freeze Frame
Freeze Frame is an element of the Diagnostic
Management System which stores various vehicle
information at the moment an emission-related fault
is stored in memory and when the Check Trans
Lamp is commanded on. These data can help to
identity the cause of a fault. Refer to Storing An
d
Erasing Freeze Frame Data for more detaile
d
information.
BACK TO CHAPTER INDEX
TO MODEL INDEX
ISUZU KB P190 2007
Page 3996 of 6020
7A2-30 TRANSMISSION CONTROL SYSTEM (AW30–40LE)
Service Programming System (SPS)
The procedure to program the control unit by using the
Service Programming System (SPS) software
contained in TIS2000 is explained below.
NOTE: • Should Tech2 display “SPS Procedure was not
successful”, engine will not start, but no DTCs are
present, low battery voltage or poor electrical
connections should be the primary suspects.
Perform the SPS procedure again after rectifying
the fault/s.
IMPORTANT:
Perform the following checks before attempting to
program the control unit:
•
••
•
The Tech2 PCMCIA card is programmed with
the latest software release.
•
••
•
The latest release of TIS2000 is loaded on the
PC.
•
••
•
The vehicle battery is fully charged.
•
••
•
The control unit to be programmed is
connected to the vehicle.
1. Preparations of TIS 2000
1. Connect Tech 2 to P/C.
2. Check to see if Hardware Key is plugged into Port.
3. Activate TIS 2000 by P/C.
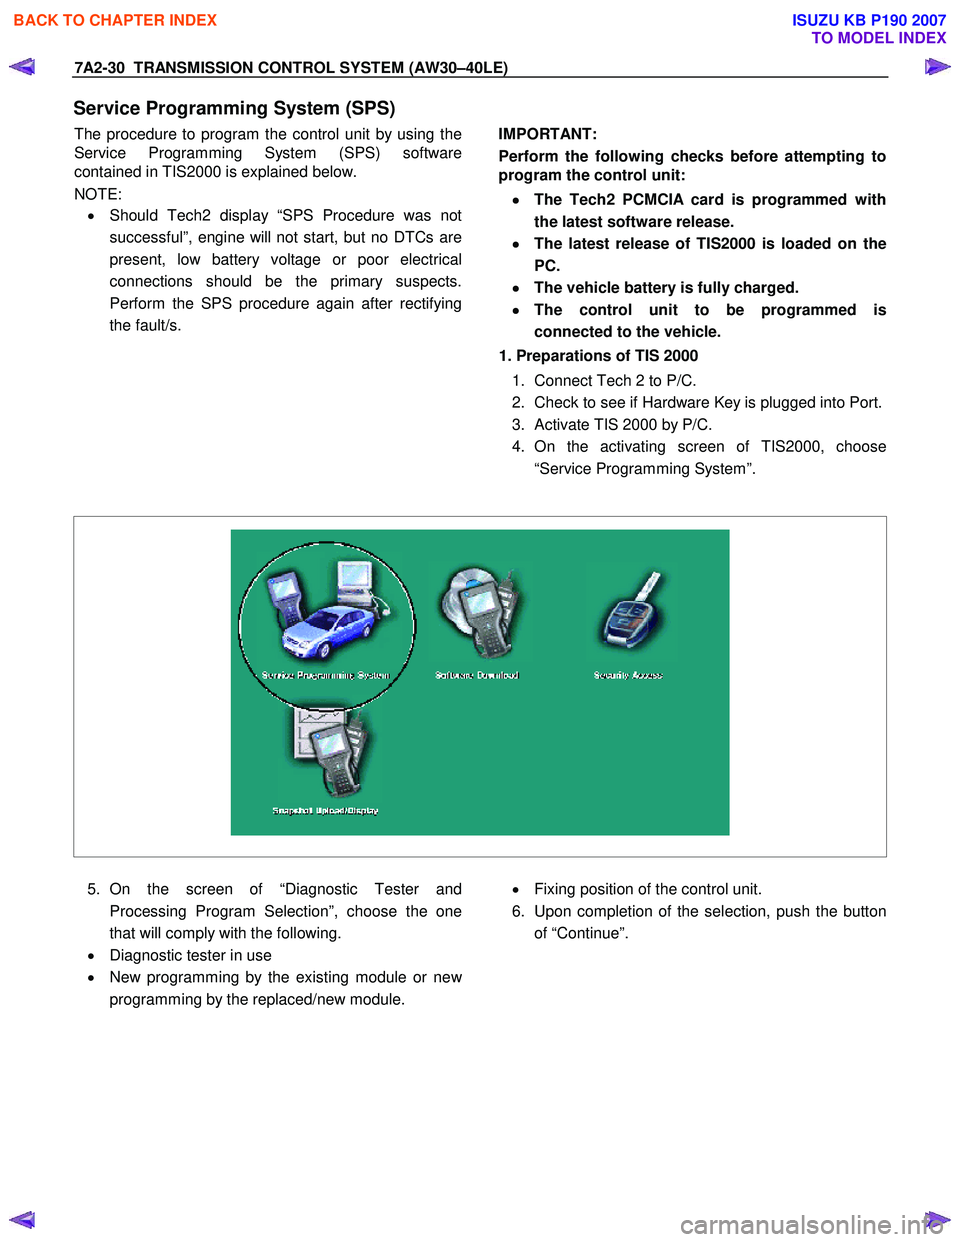
4. On the activating screen of TIS2000, choose
“Service Programming System”.
5. On the screen of “Diagnostic Tester and
Processing Program Selection”, choose the one
that will comply with the following.
• Diagnostic tester in use
• New programming by the existing module or ne
w
programming by the replaced/new module.
• Fixing position of the control unit.
6. Upon completion of the selection, push the button
of “Continue”.
BACK TO CHAPTER INDEX
TO MODEL INDEX
ISUZU KB P190 2007
Page 4000 of 6020
7A2-34 TRANSMISSION CONTROL SYSTEM (AW30–40LE)
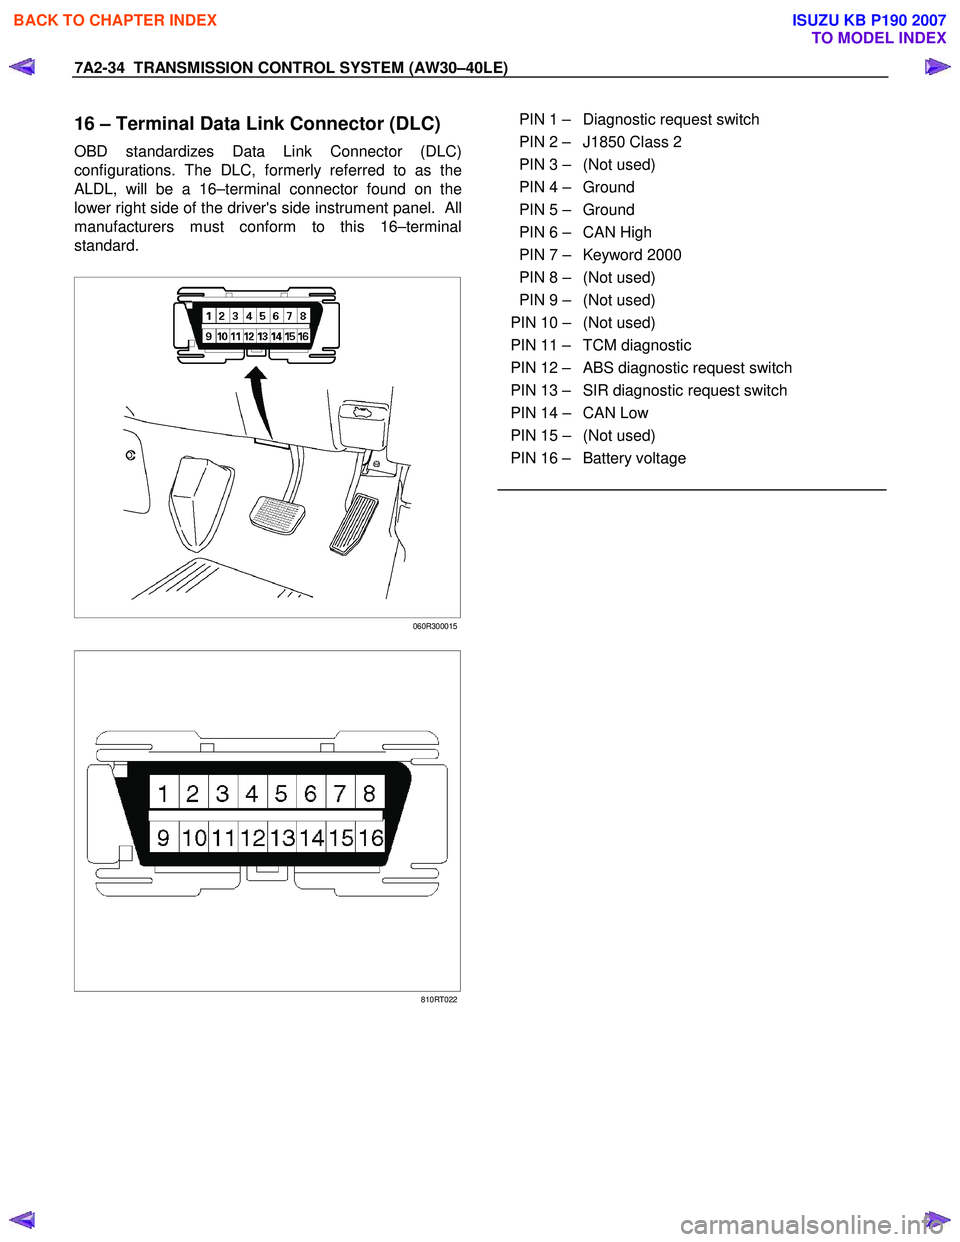
16 – Terminal Data Link Connector (DLC)
OBD standardizes Data Link Connector (DLC)
configurations. The DLC, formerly referred to as the
ALDL, will be a 16–terminal connector found on the
lower right side of the driver's side instrument panel. All
manufacturers must conform to this 16–terminal
standard.
060R300015
810RT022
PIN 1 – Diagnostic request switch
PIN 2 – J1850 Class 2
PIN 3 – (Not used)
PIN 4 – Ground
PIN 5 – Ground
PIN 6 – CAN High
PIN 7 – Keyword 2000
PIN 8 – (Not used)
PIN 9 – (Not used)
PIN 10 – (Not used)
PIN 11 – TCM diagnostic
PIN 12 – ABS diagnostic request switch
PIN 13 – SIR diagnostic request switch
PIN 14 – CAN Low
PIN 15 – (Not used)
PIN 16 – Battery voltage
BACK TO CHAPTER INDEX
TO MODEL INDEX
ISUZU KB P190 2007
Page 4001 of 6020
TRANSMISSION CONTROL SYSTEM (AW30–40LE) 7A2-35
Clear DTC
NOTE: If you clear the DTC (Diagnostic Trouble
Codes) you will not be able to read any codes recorded
during the last occurrence.
NOTE: To use the DTC again to identify a problem, you
will need to reproduce the fault or the problem. This
may require a new test drive or just turning the ignition
on (this depends on the nature of the fault).
1. IF you have a Tech 2:
1. Connect the Tech 2 and perform the Tech 2
Operating.
2. Push “F1: Clear DTC Information” in the
Application Menu and answer “Yes” to the
question “Do you want to clear DTC's?”
a. W hen a malfunction still exists and the Tech 2 displays “AW 30-40 CODES NOT
CLEARED”. This means that the problem is
still there or that the recovery was not done.
Please go to DTC Check.
b. W hen a malfunction has been repaired and the recovery is done the Tech 2 displays
“AW 30-40LE CODES CLEARED”.
2. W hen you have no Tech 2, the storaged trouble
codes can be cleared by shorting the terminals
No.11 and No.4 or 5 (ground) of data link connecto
r
with a lead wire for 1 ∼ 6 seconds.
DTC Check
1. Diagnostic Trouble Codes (DTC) have been
identified by Tech 2.
2. You have written the list of the DTCs. The order o
f
the malfunctions has no meanings for this TCM.
Usually only one or two malfunctions should be set
for a given problem.
3. Check directly the DTCs you identified. The DTCs
are sorted by number. Refer to Diagnostic Trouble
Code (DTC) Identification in this section.
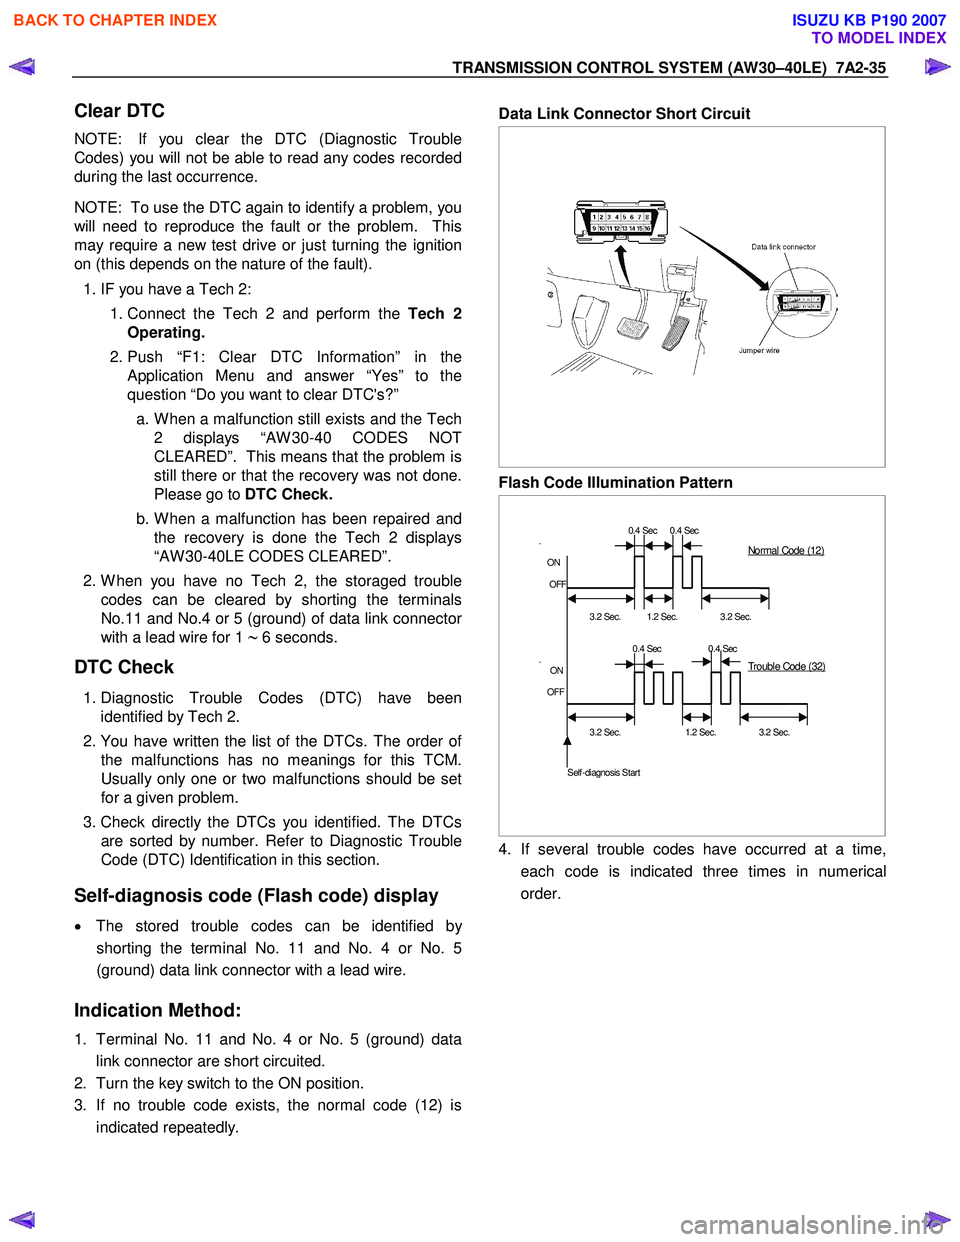
Self-diagnosis code (Flash code) display
• The stored trouble codes can be identified by
shorting the terminal No. 11 and No. 4 or No. 5
(ground) data link connector with a lead wire.
Indication Method:
1. Terminal No. 11 and No. 4 or No. 5 (ground) data
link connector are short circuited.
2. Turn the key switch to the ON position.
3. If no trouble code exists, the normal code (12) is
indicated repeatedly.
Data Link Connector Short Circuit
Flash Code Illumination Pattern
0.4 Sec 0.4 Sec
.
ON
OFF
3.2 Sec.
1.2 Sec.
3.2 Sec.
0.4 Sec 0.4 Sec
.
ON
OFF
3.2 Sec. 1.2 Sec. 3.2 Sec.
Self-diagnosis Start
Normal Code (12)
Trouble Code (32)
4. If several trouble codes have occurred at a time,
each code is indicated three times in numerical
order.
BACK TO CHAPTER INDEX
TO MODEL INDEX
ISUZU KB P190 2007