2007 INFINITI QX56 rear door
[x] Cancel search: rear doorPage 2209 of 3061

LT-2
Wiring Diagram - F/FOG - ......................................51
Terminal and Reference Value for BCM .................52
Terminal and Reference Value for IPDM E/R .........52
How to Proceed with Trouble Diagnosis .................53
Preliminary Check ..................................................53
CONSULT-II Function for BCM ..............................53
CONSULT-II Function for IPDM E/R ......................53
Front Fog Lamps Do Not Illuminate (Both Sides) ...53
Front Fog Lamp Does Not Illuminate (One Side) ...54
Aiming Adjustment ..................................................55
Bulb Replacement ..................................................55
Removal and Installation ........................................56
TURN SIGNAL AND HAZARD WARNING
LAMPS ...............................................................
57
Component Parts and Harness Connector Loca-
tion ..........................................................................
57
System Description .................................................57
CAN Communication System Description ..............59
Schematic ...............................................................60
Wiring Diagram - TURN - ........................................61
Terminal and Reference Value for BCM .................63
How to Proceed with Trouble Diagnosis .................63
Preliminary Check ..................................................64
CONSULT-II Function (BCM) .................................64
Front Turn Signal Lamp Does Not Operate ............64
Door Mirror Turn Signal Lamp Does Not Operate ...65
Rear Turn Signal Lamp Does Not Operate ............66
Hazard Warning Lamp Does Not Operate But
Turn Signal Lamp Operatess ..................................
67
Turn Signal Indicator Lamp Does Not Operate ......68
Bulb Replacement ..................................................69
Removal and Installation ........................................69
LIGHTING AND TURN SIGNAL SWITCH .........70
Removal and Installation ........................................70
HAZARD SWITCH .............................................71
Removal and Installation ........................................71
COMBINATION SWITCH ..................................72
Wiring Diagram - COMBSW - .................................72
Combination Switch Reading Function ...................72
CONSULT-II Function (BCM) .................................73
Combination Switch Inspection ..............................73
Removal and Installation ........................................76
Switch Circuit Inspection ........................................76
STOP LAMP ......................................................77
System Description .................................................77
Wiring Diagram - STOP/L - .....................................78
Bulb Replacement ..................................................78
Removal and Installation ........................................79
BACK-UP LAMP ................................................80
Wiring Diagram - BACK/L - .....................................80
Bulb Replacement ..................................................80
Removal and Installation ........................................81
PARKING, LICENSE PLATE AND TAIL
LAMPS ...............................................................
82
Component Parts and Harness Connector Loca-
tion ..........................................................................
82
System Description .................................................82
CAN Communication System Description ..............83
Schematic ...............................................................84
Wiring Diagram - TAIL/L - .......................................85
Terminal and Reference Value for BCM .................87
Terminal and Reference Value for IPDM E/R .........87
How to Proceed with Trouble Diagnosis .................88
Preliminary Check ...................................................88
CONSULT-II Function for BCM ...............................88
CONSULT-II Function for IPDM E/R .......................88
Parking, License Plate and/or Tail Lamps Do Not
Illuminate .................................................................
88
Parking, License Plate and Tail Lamps Do Not
Turn OFF (After Approx. 10 Minutes) .....................
91
Bulb Replacement ...................................................91
Removal and Installation .........................................92
REAR COMBINATION LAMP ...........................93
Bulb Replacement ...................................................93
Removal and Installation .........................................93
TRAILER TOW ..................................................94
Component Parts and Harness Connector Loca-
tion ..........................................................................
94
System Description .................................................94
Schematic ...............................................................96
Wiring Diagram - T/TOW - ......................................97
INTERIOR ROOM LAMP ..................................101
Component Parts and Harness Connector Loca-
tion ........................................................................
101
System Description ...............................................101
Schematic .............................................................105
Wiring Diagram - INT/L - .......................................107
Terminal and Reference Value for BCM ...............113
How to Proceed with Trouble Diagnosis ...............113
Preliminary Check .................................................114
CONSULT-II Function (BCM) ...............................114
Room/Map Lamp Control Does Not Operate ........115
Personal Lamp Control Does Not Operate (Room/
Map Lamps Operate) ............................................
116
All Step/Foot/Puddle Lamps Do Not Operate .......117
All Interior Room Lamps Do Not Operate .............118
Ignition Keyhole Illumination Control Does Not
Operate .................................................................
118
ILLUMINATION ................................................120
Component Parts and Harness Connector Loca-
tion ........................................................................
120
System Description ...............................................120
CAN Communication System Description ............122
Schematic .............................................................123
Wiring Diagram - ILL - ...........................................126
Removal and Installation of Illumination Control
Switch ...................................................................
136
Page 2220 of 3061
HEADLAMP (FOR USA)
LT-13
< SERVICE INFORMATION >
C
D
E
F
G
H
I
J
L
MA
B
LT
N
O
P
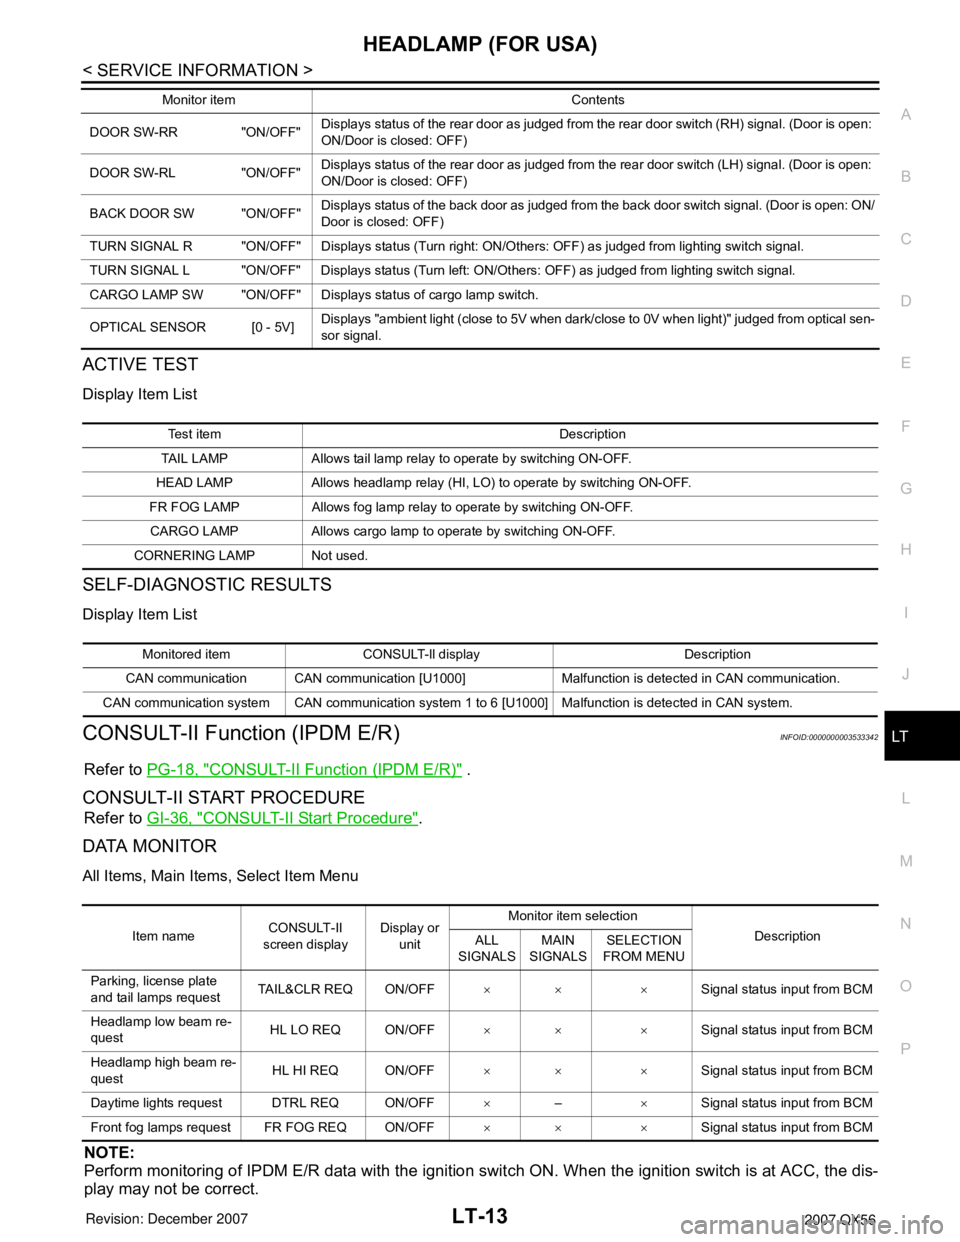
ACTIVE TEST
Display Item List
SELF-DIAGNOSTIC RESULTS
Display Item List
CONSULT-II Function (IPDM E/R)INFOID:0000000003533342
Refer to PG-18, "CONSULT-II Function (IPDM E/R)" .
CONSULT-II START PROCEDURE
Refer to GI-36, "CONSULT-II Start Procedure".
DATA MONITOR
All Items, Main Items, Select Item Menu
NOTE:
Perform monitoring of IPDM E/R data with the ignition switch ON. When the ignition switch is at ACC, the dis-
play may not be correct.
DOOR SW-RR "ON/OFF"Displays status of the rear door as judged from the rear door switch (RH) signal. (Door is open:
ON/Door is closed: OFF)
DOOR SW-RL "ON/OFF"Displays status of the rear door as judged from the rear door switch (LH) signal. (Door is open:
ON/Door is closed: OFF)
BACK DOOR SW "ON/OFF"Displays status of the back door as judged from the back door switch signal. (Door is open: ON/
Door is closed: OFF)
TURN SIGNAL R "ON/OFF" Displays status (Turn right: ON/Others: OFF) as judged from lighting switch signal.
TURN SIGNAL L "ON/OFF" Displays status (Turn left: ON/Others: OFF) as judged from lighting switch signal.
CARGO LAMP SW "ON/OFF" Displays status of cargo lamp switch.
OPTICAL SENSOR [0 - 5V] Displays "ambient light (close to 5V when dark/close to 0V when light)" judged from optical sen-
sor signal. Monitor item Contents
Te s t i t e m D e s c r i p t i o n
TAIL LAMP Allows tail lamp relay to operate by switching ON-OFF.
HEAD LAMP Allows headlamp relay (HI, LO) to operate by switching ON-OFF.
FR FOG LAMP Allows fog lamp relay to operate by switching ON-OFF.
CARGO LAMP Allows cargo lamp to operate by switching ON-OFF.
CORNERING LAMP Not used.
Monitored item CONSULT-ll display Description
CAN communication CAN communication [U1000] Malfunction is detected in CAN communication.
CAN communication system CAN communication system 1 to 6 [U1000] Malfunction is detected in CAN system.
Item nameCONSULT-II
screen displayDisplay or
unitMonitor item selection
Description
ALL
SIGNALSMAIN
SIGNALSSELECTION
FROM MENU
Parking, license plate
and tail lamps requestTAIL&CLR REQ ON/OFF×× ×Signal status input from BCM
Headlamp low beam re-
questHL LO REQ ON/OFF×× ×Signal status input from BCM
Headlamp high beam re-
questHL HI REQ ON/OFF×× ×Signal status input from BCM
Daytime lights request DTRL REQ ON/OFF×–×Signal status input from BCM
Front fog lamps request FR FOG REQ ON/OFF×× ×Signal status input from BCM
Page 2242 of 3061
AUTO LIGHT SYSTEM
LT-35
< SERVICE INFORMATION >
C
D
E
F
G
H
I
J
L
MA
B
LT
N
O
P
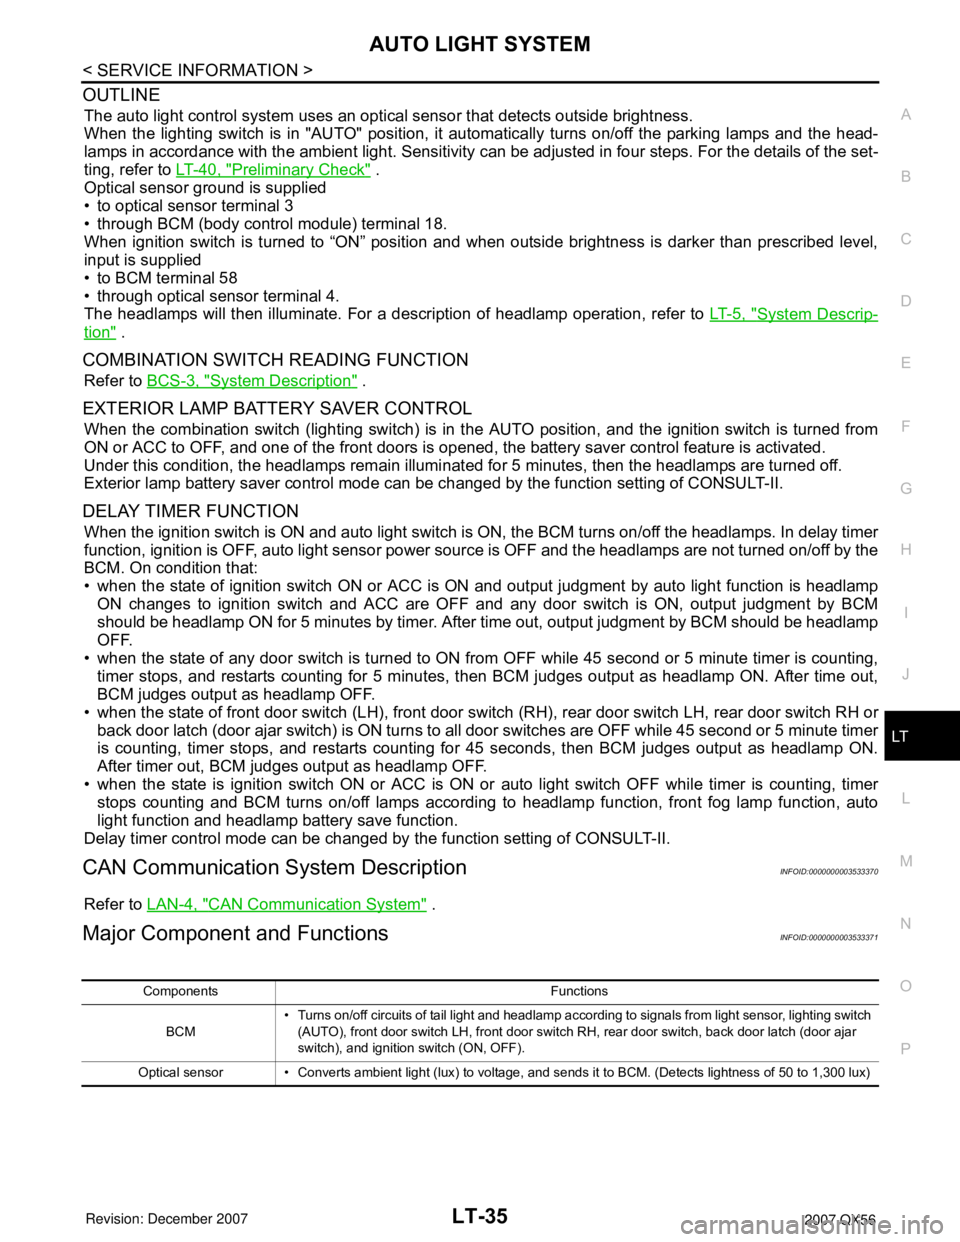
OUTLINE
The auto light control system uses an optical sensor that detects outside brightness.
When the lighting switch is in "AUTO" position, it automatically turns on/off the parking lamps and the head-
lamps in accordance with the ambient light. Sensitivity can be adjusted in four steps. For the details of the set-
ting, refer to LT-40, "
Preliminary Check" .
Optical sensor ground is supplied
• to optical sensor terminal 3
• through BCM (body control module) terminal 18.
When ignition switch is turned to “ON” position and when outside brightness is darker than prescribed level,
input is supplied
• to BCM terminal 58
• through optical sensor terminal 4.
The headlamps will then illuminate. For a description of headlamp operation, refer to LT- 5 , "
System Descrip-
tion" .
COMBINATION SWITCH READING FUNCTION
Refer to BCS-3, "System Description" .
EXTERIOR LAMP BATTERY SAVER CONTROL
When the combination switch (lighting switch) is in the AUTO position, and the ignition switch is turned from
ON or ACC to OFF, and one of the front doors is opened, the battery saver control feature is activated.
Under this condition, the headlamps remain illuminated for 5 minutes, then the headlamps are turned off.
Exterior lamp battery saver control mode can be changed by the function setting of CONSULT-II.
DELAY TIMER FUNCTION
When the ignition switch is ON and auto light switch is ON, the BCM turns on/off the headlamps. In delay timer
function, ignition is OFF, auto light sensor power source is OFF and the headlamps are not turned on/off by the
BCM. On condition that:
• when the state of ignition switch ON or ACC is ON and output judgment by auto light function is headlamp
ON changes to ignition switch and ACC are OFF and any door switch is ON, output judgment by BCM
should be headlamp ON for 5 minutes by timer. After time out, output judgment by BCM should be headlamp
OFF.
• when the state of any door switch is turned to ON from OFF while 45 second or 5 minute timer is counting,
timer stops, and restarts counting for 5 minutes, then BCM judges output as headlamp ON. After time out,
BCM judges output as headlamp OFF.
• when the state of front door switch (LH), front door switch (RH), rear door switch LH, rear door switch RH or
back door latch (door ajar switch) is ON turns to all door switches are OFF while 45 second or 5 minute timer
is counting, timer stops, and restarts counting for 45 seconds, then BCM judges output as headlamp ON.
After timer out, BCM judges output as headlamp OFF.
• when the state is ignition switch ON or ACC is ON or auto light switch OFF while timer is counting, timer
stops counting and BCM turns on/off lamps according to headlamp function, front fog lamp function, auto
light function and headlamp battery save function.
Delay timer control mode can be changed by the function setting of CONSULT-II.
CAN Communication System DescriptionINFOID:0000000003533370
Refer to LAN-4, "CAN Communication System" .
Major Component and FunctionsINFOID:0000000003533371
Components Functions
BCM• Turns on/off circuits of tail light and headlamp according to signals from light sensor, lighting switch
(AUTO), front door switch LH, front door switch RH, rear door switch, back door latch (door ajar
switch), and ignition switch (ON, OFF).
Optical sensor • Converts ambient light (lux) to voltage, and sends it to BCM. (Detects lightness of 50 to 1,300 lux)
Page 2248 of 3061
AUTO LIGHT SYSTEM
LT-41
< SERVICE INFORMATION >
C
D
E
F
G
H
I
J
L
MA
B
LT
N
O
P
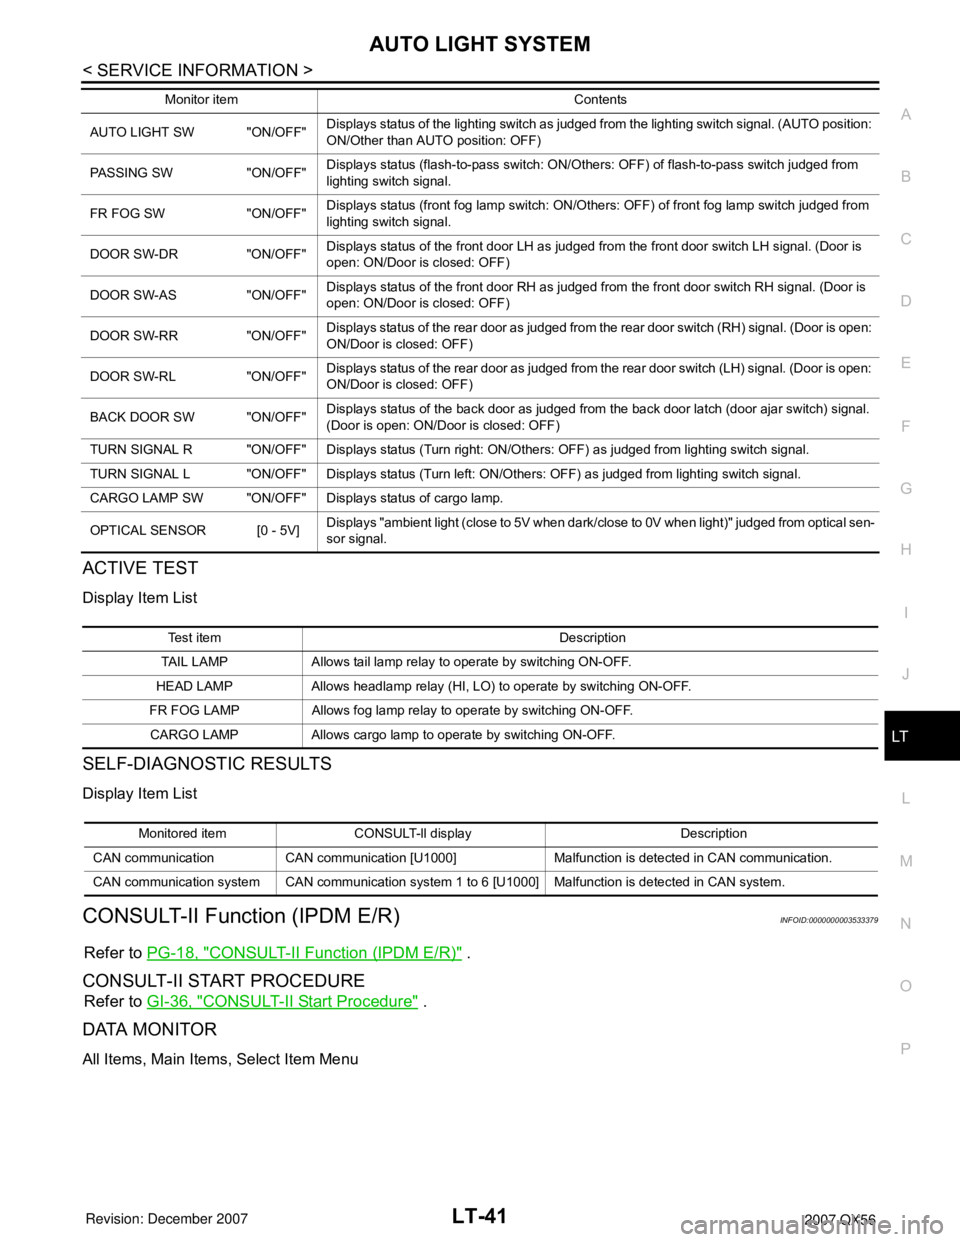
ACTIVE TEST
Display Item List
SELF-DIAGNOSTIC RESULTS
Display Item List
CONSULT-II Function (IPDM E/R)INFOID:0000000003533379
Refer to PG-18, "CONSULT-II Function (IPDM E/R)" .
CONSULT-II START PROCEDURE
Refer to GI-36, "CONSULT-II Start Procedure" .
DATA MONITOR
All Items, Main Items, Select Item Menu
AUTO LIGHT SW "ON/OFF"Displays status of the lighting switch as judged from the lighting switch signal. (AUTO position:
ON/Other than AUTO position: OFF)
PASSING SW "ON/OFF"Displays status (flash-to-pass switch: ON/Others: OFF) of flash-to-pass switch judged from
lighting switch signal.
FR FOG SW "ON/OFF"Displays status (front fog lamp switch: ON/Others: OFF) of front fog lamp switch judged from
lighting switch signal.
DOOR SW-DR "ON/OFF"Displays status of the front door LH as judged from the front door switch LH signal. (Door is
open: ON/Door is closed: OFF)
DOOR SW-AS "ON/OFF"Displays status of the front door RH as judged from the front door switch RH signal. (Door is
open: ON/Door is closed: OFF)
DOOR SW-RR "ON/OFF"Displays status of the rear door as judged from the rear door switch (RH) signal. (Door is open:
ON/Door is closed: OFF)
DOOR SW-RL "ON/OFF"Displays status of the rear door as judged from the rear door switch (LH) signal. (Door is open:
ON/Door is closed: OFF)
BACK DOOR SW "ON/OFF"Displays status of the back door as judged from the back door latch (door ajar switch) signal.
(Door is open: ON/Door is closed: OFF)
TURN SIGNAL R "ON/OFF" Displays status (Turn right: ON/Others: OFF) as judged from lighting switch signal.
TURN SIGNAL L "ON/OFF" Displays status (Turn left: ON/Others: OFF) as judged from lighting switch signal.
CARGO LAMP SW "ON/OFF" Displays status of cargo lamp.
OPTICAL SENSOR [0 - 5V] Displays "ambient light (close to 5V when dark/close to 0V when light)" judged from optical sen-
sor signal. Monitor item Contents
Te s t i t e m D e s c r i p t i o n
TAIL LAMP Allows tail lamp relay to operate by switching ON-OFF.
HEAD LAMP Allows headlamp relay (HI, LO) to operate by switching ON-OFF.
FR FOG LAMP Allows fog lamp relay to operate by switching ON-OFF.
CARGO LAMP Allows cargo lamp to operate by switching ON-OFF.
Monitored item CONSULT-ll display Description
CAN communication CAN communication [U1000] Malfunction is detected in CAN communication.
CAN communication system CAN communication system 1 to 6 [U1000] Malfunction is detected in CAN system.
Page 2265 of 3061

LT-58
< SERVICE INFORMATION >
TURN SIGNAL AND HAZARD WARNING LAMPS
• to rear combination lamp LH terminal 4
• through rear combination signal lamp LH terminal 6
• to grounds B7 and B19.
BCM sends signal to combination meter through CAN communication lines, and turns on turn signal indicator
lamp within combination meter.
RH Turn
When the turn signal switch is moved to the right position, the BCM, interpreting it as turn signal is ON, outputs
turn signal from BCM terminal 61.
The BCM supplies power
• through BCM terminal 61
• to front turn/fog lamp RH terminal 2
• through front turn/fog lamp RH terminal 3
• to grounds E9, E15 and E24,
• to door mirror RH terminal 15
• through door mirror RH terminal 11
• to grounds M57, M61 and M79 and
• to rear combination lamp RH terminal 4
• through rear combination lamp terminal 6
• to grounds B117 and B132.
BCM sends signal to combination meter through CAN communication lines, and turns on turn signal indicator
lamp within combination meter.
HAZARD LAMP OPERATION
Power is supplied at all times
• through 50A fusible link (letter f , located in the fuse and fusible link box)
• to BCM terminal 70, and
• through 10A fuse [No. 19, located in the fuse block (J/B)]
• to combination meter terminal 8.
Ground is supplied
• to BCM terminal 67 and
• to combination meter terminal 17
• through grounds M57, M61 and M79.
When the hazard switch is depressed, ground is supplied
• to BCM terminal 29
• through hazard switch terminal 2
• through hazard switch terminal 1
• through grounds M57, M61 and M79.
When the hazard switch is depressed, the BCM, interpreting it as hazard warning lamps are ON, outputs turn
signal from BCM terminals 60 and 61.
The BCM supplies power
• through BCM terminals 60 and 61
• to front turn/fog lamp LH and RH terminal 2
• through front turn/fog lamp LH and RH terminal 3
• to grounds E9, E15 and E24,
• to door mirror LH and RH terminal 15
• through door mirror LH and RH terminal 11
• to grounds M57, M61 and M79,
• to rear turn signal lamp LH terminal 1
• through rear turn signal lamp LH terminal 3
• to grounds B7 and B19, and
• to rear turn signal lamp RH terminal 4
• through rear turn signal lamp RH terminal 6
• to grounds B117 and B132.
BCM sends signal to combination meter through CAN communication lines, and turns on turn signal indicator
lamps within combination meter.
REMOTE KEYLESS ENTRY SYSTEM OPERATION
Power is supplied at all times
• through 50A fusible link (letter f , located in the fuse and fusible link box)
• to BCM terminal 70, and
• through 10A fuse [No. 19, located in the fuse block (J/B)]
Page 2266 of 3061
TURN SIGNAL AND HAZARD WARNING LAMPS
LT-59
< SERVICE INFORMATION >
C
D
E
F
G
H
I
J
L
MA
B
LT
N
O
P
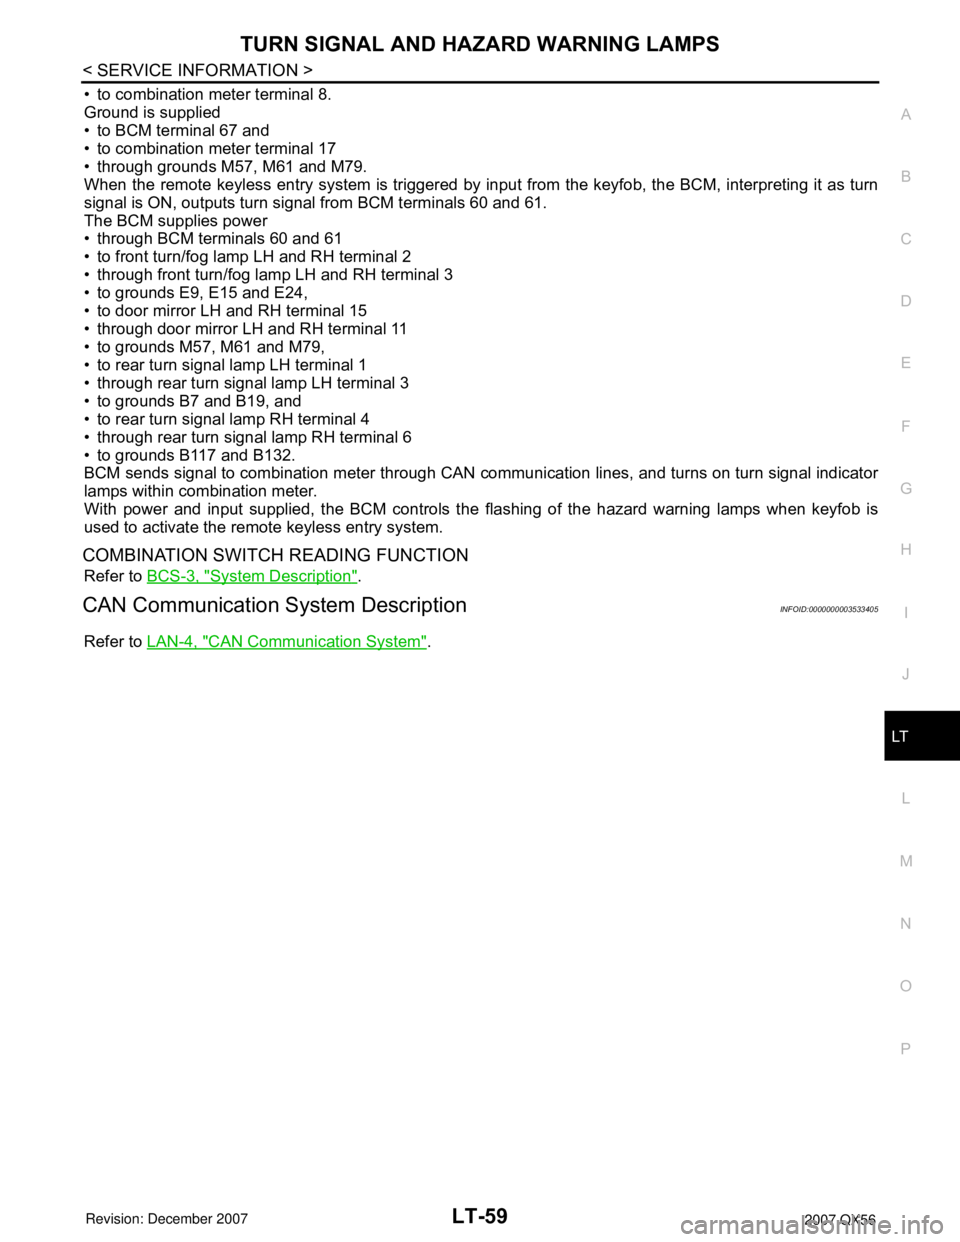
• to combination meter terminal 8.
Ground is supplied
• to BCM terminal 67 and
• to combination meter terminal 17
• through grounds M57, M61 and M79.
When the remote keyless entry system is triggered by input from the keyfob, the BCM, interpreting it as turn
signal is ON, outputs turn signal from BCM terminals 60 and 61.
The BCM supplies power
• through BCM terminals 60 and 61
• to front turn/fog lamp LH and RH terminal 2
• through front turn/fog lamp LH and RH terminal 3
• to grounds E9, E15 and E24,
• to door mirror LH and RH terminal 15
• through door mirror LH and RH terminal 11
• to grounds M57, M61 and M79,
• to rear turn signal lamp LH terminal 1
• through rear turn signal lamp LH terminal 3
• to grounds B7 and B19, and
• to rear turn signal lamp RH terminal 4
• through rear turn signal lamp RH terminal 6
• to grounds B117 and B132.
BCM sends signal to combination meter through CAN communication lines, and turns on turn signal indicator
lamps within combination meter.
With power and input supplied, the BCM controls the flashing of the hazard warning lamps when keyfob is
used to activate the remote keyless entry system.
COMBINATION SWITCH READING FUNCTION
Refer to BCS-3, "System Description".
CAN Communication System DescriptionINFOID:0000000003533405
Refer to LAN-4, "CAN Communication System".
Page 2273 of 3061
LT-66
< SERVICE INFORMATION >
TURN SIGNAL AND HAZARD WARNING LAMPS
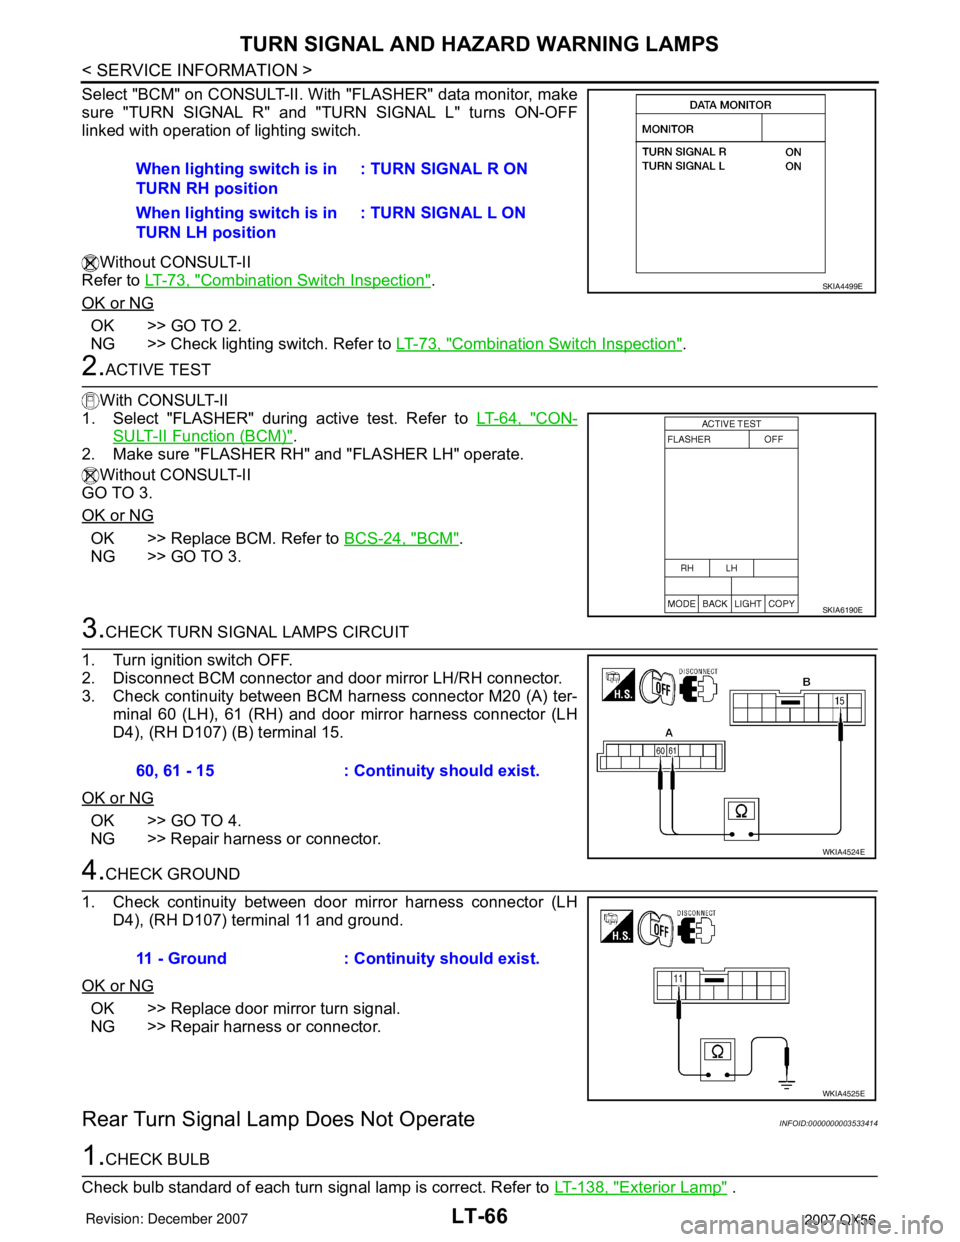
Select "BCM" on CONSULT-II. With "FLASHER" data monitor, make
sure "TURN SIGNAL R" and "TURN SIGNAL L" turns ON-OFF
linked with operation of lighting switch.
Without CONSULT-II
Refer to LT-73, "
Combination Switch Inspection".
OK or NG
OK >> GO TO 2.
NG >> Check lighting switch. Refer to LT-73, "
Combination Switch Inspection".
2.ACTIVE TEST
With CONSULT-II
1. Select "FLASHER" during active test. Refer to LT-64, "
CON-
SULT-II Function (BCM)".
2. Make sure "FLASHER RH" and "FLASHER LH" operate.
Without CONSULT-II
GO TO 3.
OK or NG
OK >> Replace BCM. Refer to BCS-24, "BCM".
NG >> GO TO 3.
3.CHECK TURN SIGNAL LAMPS CIRCUIT
1. Turn ignition switch OFF.
2. Disconnect BCM connector and door mirror LH/RH connector.
3. Check continuity between BCM harness connector M20 (A) ter-
minal 60 (LH), 61 (RH) and door mirror harness connector (LH
D4), (RH D107) (B) terminal 15.
OK or NG
OK >> GO TO 4.
NG >> Repair harness or connector.
4.CHECK GROUND
1. Check continuity between door mirror harness connector (LH
D4), (RH D107) terminal 11 and ground.
OK or NG
OK >> Replace door mirror turn signal.
NG >> Repair harness or connector.
Rear Turn Signal Lamp Does Not OperateINFOID:0000000003533414
1.CHECK BULB
Check bulb standard of each turn signal lamp is correct. Refer to LT-138, "
Exterior Lamp" . When lighting switch is in
TURN RH position: TURN SIGNAL R ON
When lighting switch is in
TURN LH position: TURN SIGNAL L ON
SKIA4499E
SKIA6190E
60, 61 - 15 : Continuity should exist.
WKIA4524E
11 - Ground : Continuity should exist.
WKIA4525E
Page 2286 of 3061
STOP LAMP
LT-79
< SERVICE INFORMATION >
C
D
E
F
G
H
I
J
L
MA
B
LT
N
O
P
The stop lamp bulbs are not serviceable separately. Replace rear combination lamp. Refer to LT-93, "Removal
and Installation".
Removal and InstallationINFOID:0000000003533430
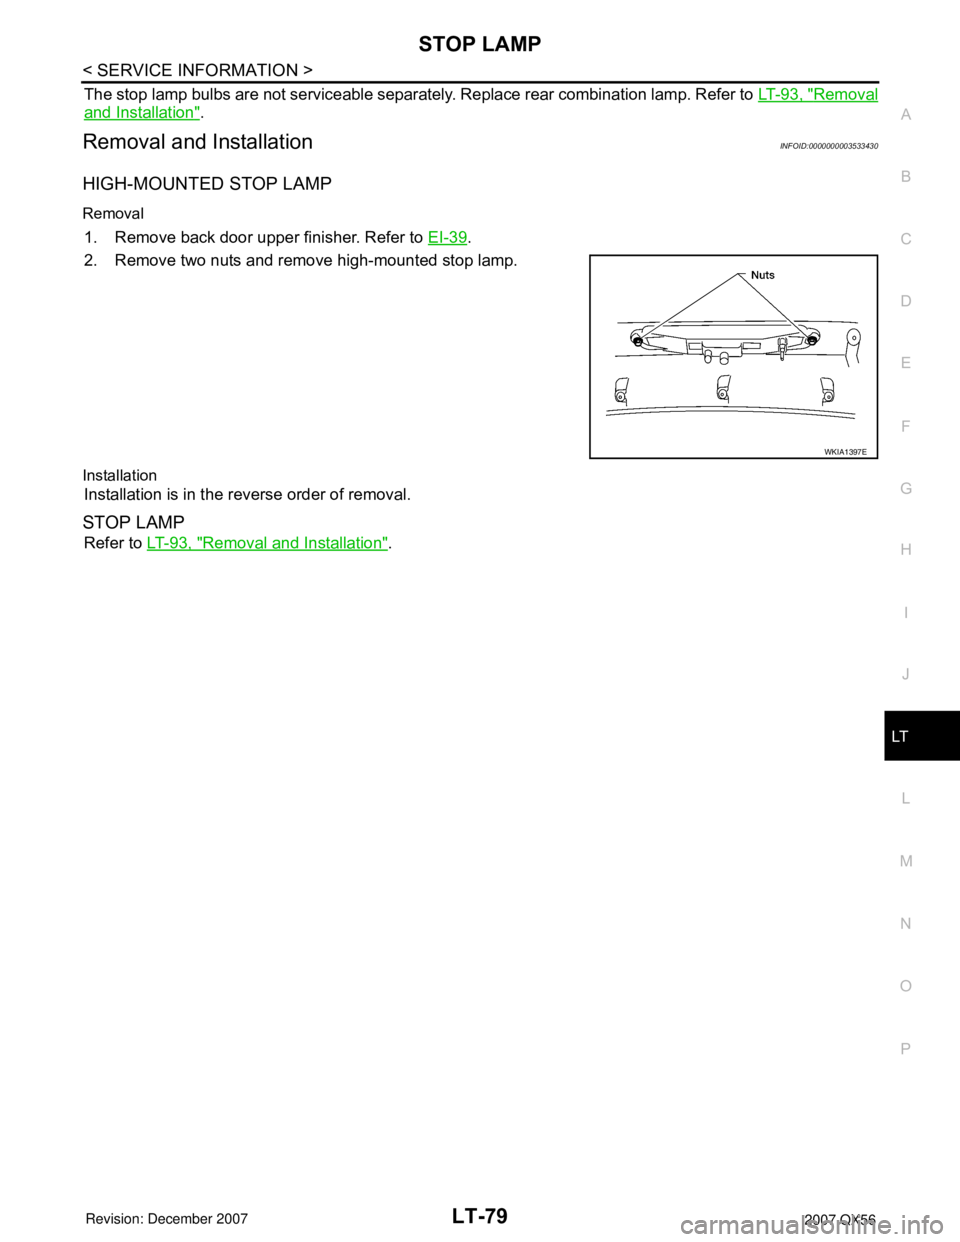
HIGH-MOUNTED STOP LAMP
Removal
1. Remove back door upper finisher. Refer to EI-39.
2. Remove two nuts and remove high-mounted stop lamp.
Installation
Installation is in the reverse order of removal.
STOP LAMP
Refer to LT-93, "Removal and Installation".
WKIA1397E