Page 913 of 2000

ST–102GR-FE STARTING – STARTER
ST
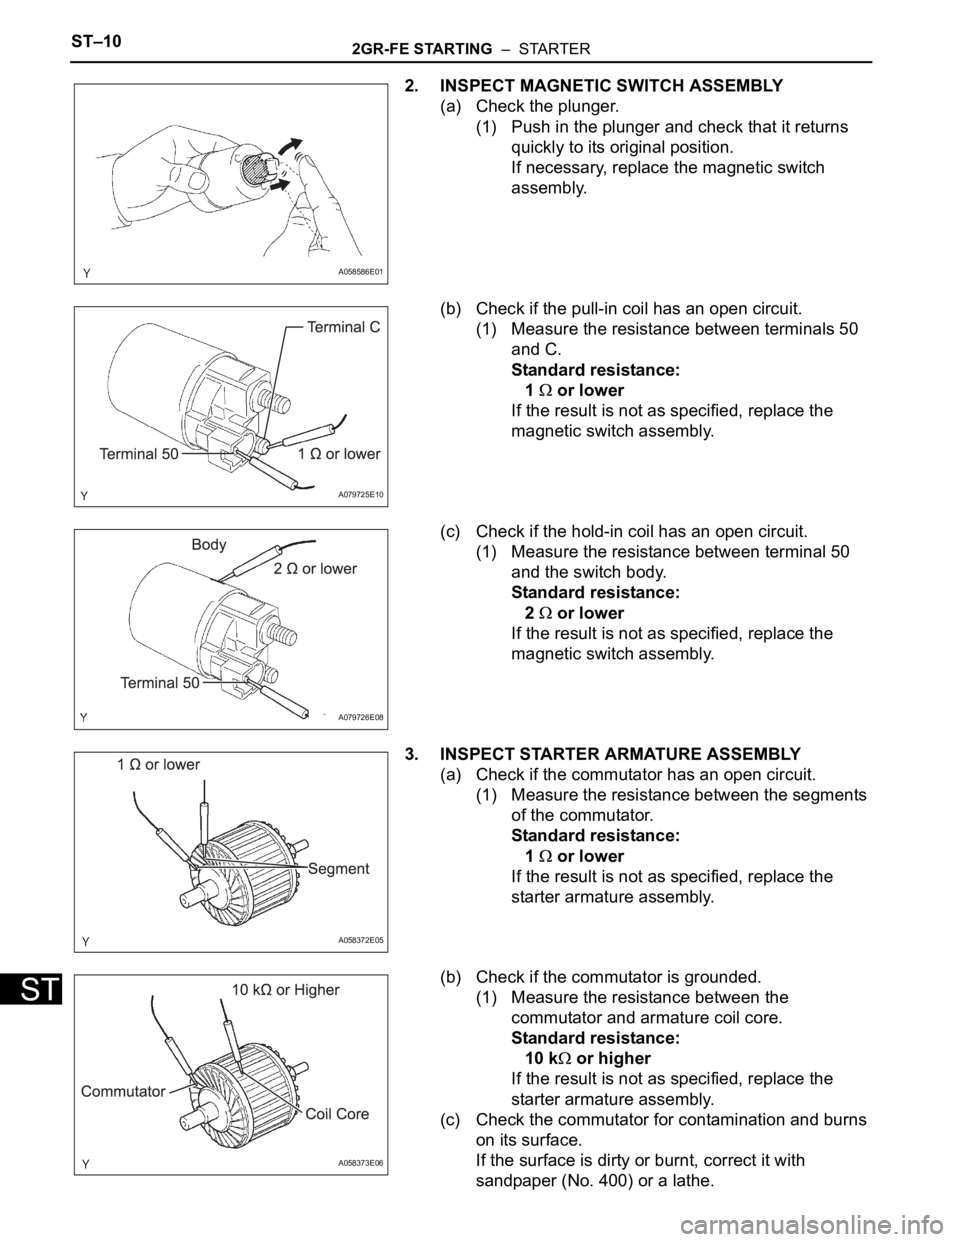
2. INSPECT MAGNETIC SWITCH ASSEMBLY
(a) Check the plunger.
(1) Push in the plunger and check that it returns
quickly to its original position.
If necessary, replace the magnetic switch
assembly.
(b) Check if the pull-in coil has an open circuit.
(1) Measure the resistance between terminals 50
and C.
Standard resistance:
1
or lower
If the result is not as specified, replace the
magnetic switch assembly.
(c) Check if the hold-in coil has an open circuit.
(1) Measure the resistance between terminal 50
and the switch body.
Standard resistance:
2
or lower
If the result is not as specified, replace the
magnetic switch assembly.
3. INSPECT STARTER ARMATURE ASSEMBLY
(a) Check if the commutator has an open circuit.
(1) Measure the resistance between the segments
of the commutator.
Standard resistance:
1
or lower
If the result is not as specified, replace the
starter armature assembly.
(b) Check if the commutator is grounded.
(1) Measure the resistance between the
commutator and armature coil core.
Standard resistance:
10 k
or higher
If the result is not as specified, replace the
starter armature assembly.
(c) Check the commutator for contamination and burns
on its surface.
If the surface is dirty or burnt, correct it with
sandpaper (No. 400) or a lathe.
A058586E01
A079725E10
A079726E08
A058372E05
A058373E06
Page 914 of 2000

2GR-FE STARTING – STARTERST–11
ST
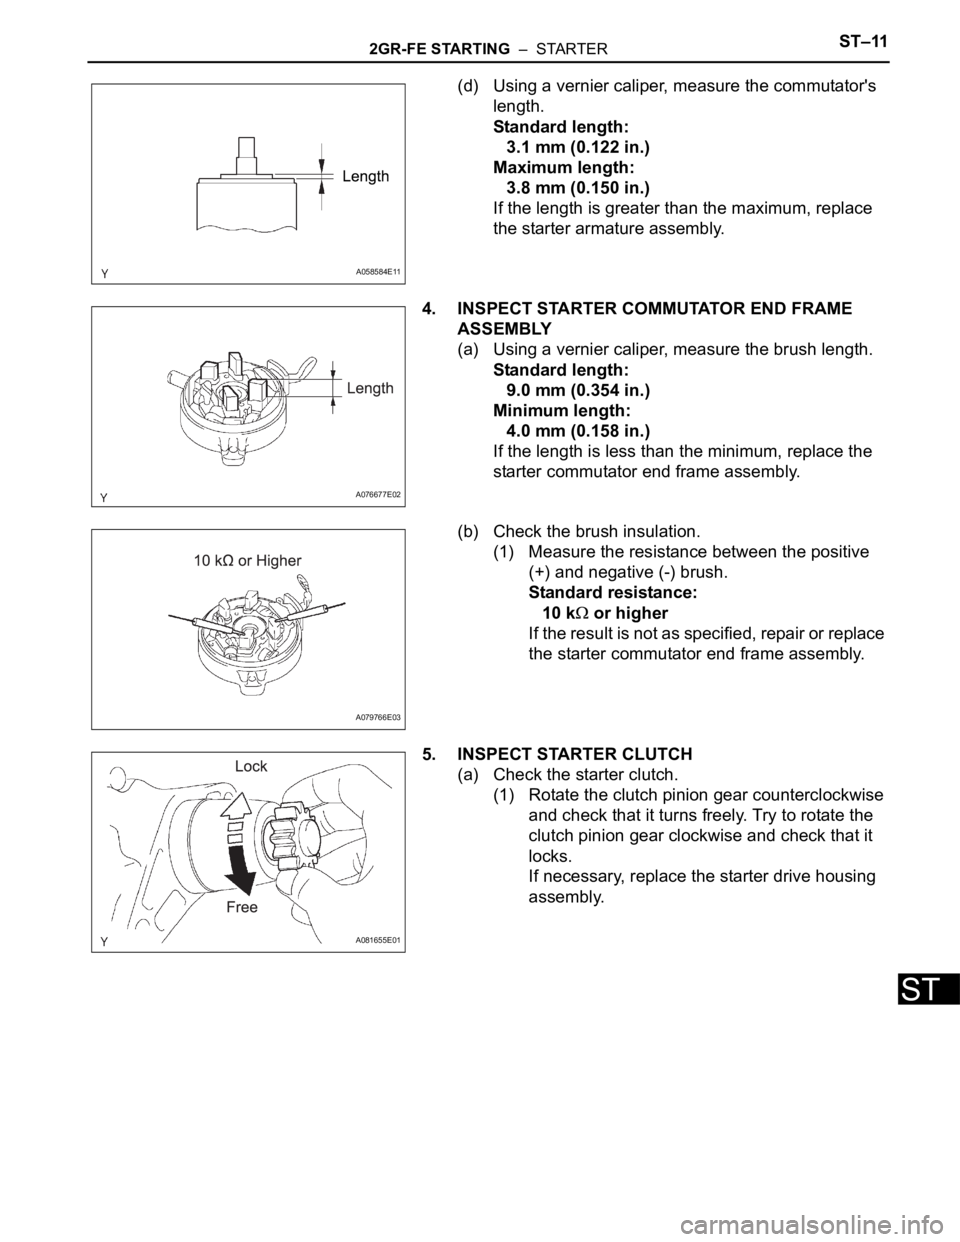
(d) Using a vernier caliper, measure the commutator's
length.
Standard length:
3.1 mm (0.122 in.)
Maximum length:
3.8 mm (0.150 in.)
If the length is greater than the maximum, replace
the starter armature assembly.
4. INSPECT STARTER COMMUTATOR END FRAME
ASSEMBLY
(a) Using a vernier caliper, measure the brush length.
Standard length:
9.0 mm (0.354 in.)
Minimum length:
4.0 mm (0.158 in.)
If the length is less than the minimum, replace the
starter commutator end frame assembly.
(b) Check the brush insulation.
(1) Measure the resistance between the positive
(+) and negative (-) brush.
Standard resistance:
10 k
or higher
If the result is not as specified, repair or replace
the starter commutator end frame assembly.
5. INSPECT STARTER CLUTCH
(a) Check the starter clutch.
(1) Rotate the clutch pinion gear counterclockwise
and check that it turns freely. Try to rotate the
clutch pinion gear clockwise and check that it
locks.
If necessary, replace the starter drive housing
assembly.
A058584E11
A076677E02
A079766E03
A081655E01
Page 915 of 2000
ST–122GR-FE STARTING – STARTER
ST
REASSEMBLY
HINT:
Use high-temperature grease to lubricate the bearings,
gears, return spring and steel ball when assembling the
starter.
1. INSTALL PLANETARY GEAR
(a) Apply grease to the planetary gears and pin parts of
the planetary shaft.
(b) Install the 3 planetary gears.
2. INSTALL STARTER ARMATURE ASSEMBLY
(a) Apply grease to the plate washers and the armature
shaft.
(b) Install the starter armature assembly to the starter
commutator end frame assembly.
(c) Using snap ring pliers, install the plate washer and a
new snap ring.
(d) Using a vernier caliper, measure the length of the
snap ring.
Maximum length:
5.0 mm (0.197 in.)
If the length is greater than the maximum, replace it
with a new snap ring.
3. INSTALL STARTER COMMUTATOR END FRAME
COVER
(a) Install the starter commutator end frame cover to
the starter commutator end frame assembly.
A081656E07
A082440E01
A058810E12
A081178E01
Page 916 of 2000

2GR-FE STARTING – STARTERST–13
ST
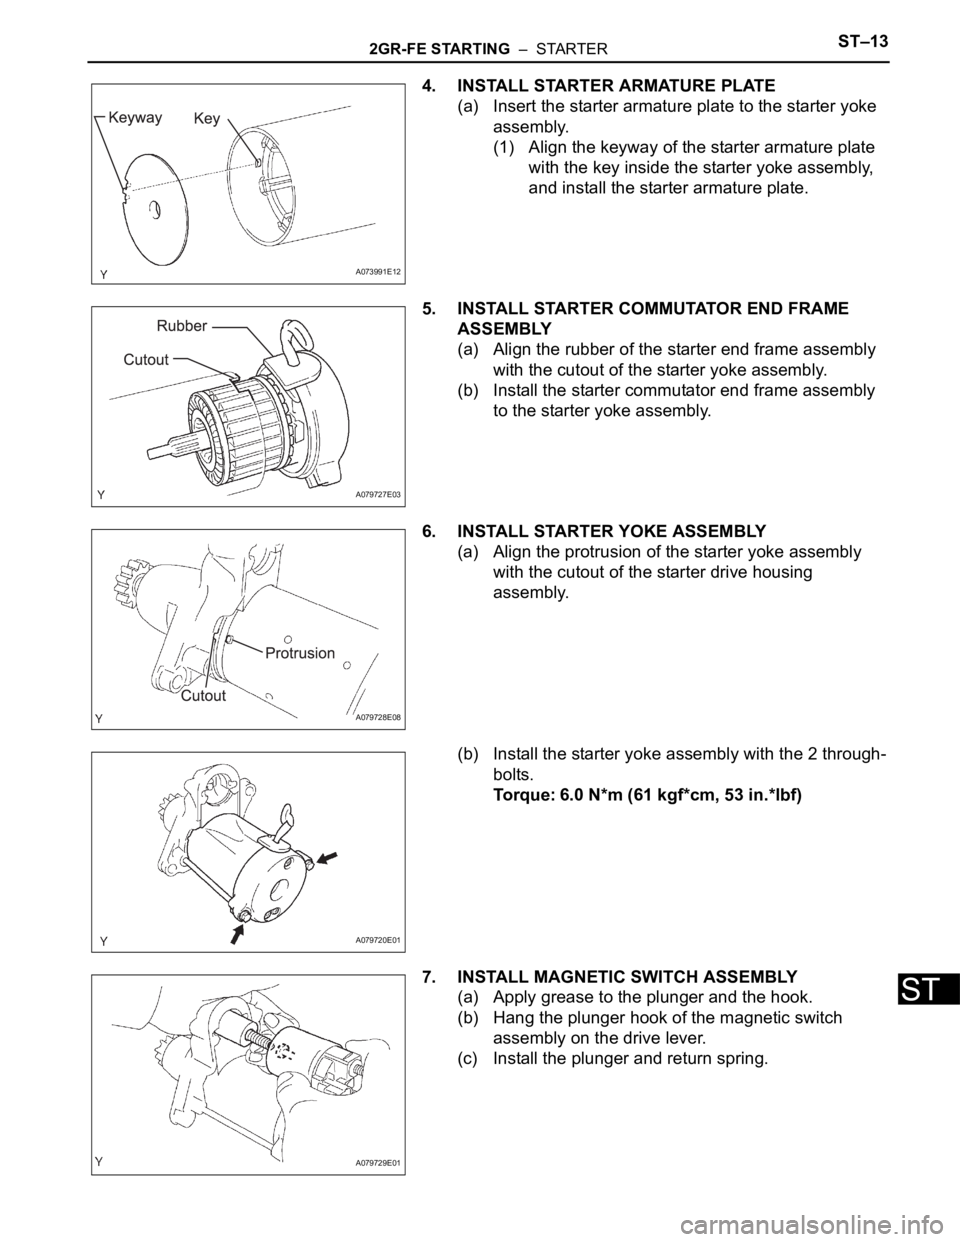
4. INSTALL STARTER ARMATURE PLATE
(a) Insert the starter armature plate to the starter yoke
assembly.
(1) Align the keyway of the starter armature plate
with the key inside the starter yoke assembly,
and install the starter armature plate.
5. INSTALL STARTER COMMUTATOR END FRAME
ASSEMBLY
(a) Align the rubber of the starter end frame assembly
with the cutout of the starter yoke assembly.
(b) Install the starter commutator end frame assembly
to the starter yoke assembly.
6. INSTALL STARTER YOKE ASSEMBLY
(a) Align the protrusion of the starter yoke assembly
with the cutout of the starter drive housing
assembly.
(b) Install the starter yoke assembly with the 2 through-
bolts.
Torque: 6.0 N*m (61 kgf*cm, 53 in.*lbf)
7. INSTALL MAGNETIC SWITCH ASSEMBLY
(a) Apply grease to the plunger and the hook.
(b) Hang the plunger hook of the magnetic switch
assembly on the drive lever.
(c) Install the plunger and return spring.
A073991E12
A079727E03
A079728E08
A079720E01
A079729E01
Page 917 of 2000
ST–142GR-FE STARTING – STARTER
ST
(d) Install the magnetic switch with the 2 screws.
Torque: 7.5 N*m (76 kgf*cm, 66 in.*lbf)
(e) Connect the lead wire to the magnetic switch with
the nut.
Torque: 10 N*m (102 kgf*cm, 7 ft.*lbf)
INSTALLATION
1. INSTALL STARTER ASSEMBLY
(a) Install the starter with the 2 bolts.
Torque: 37 N*m (377 kgf*cm, 27 ft.*lbf)
(b) Connect the starter connector.
(c) Install the terminal nut and cover the nut with the
cap.
Torque: 9.8 N*m (100 kgf*cm, 88 in.*lbf)
2. INSTALL BATTERY BRACKET REINFORCEMENT
(a) Install the battery bracket reinforcement with the 2
bolts.
Torque: 20 N*m (204 kgf*cm, 15 ft.*lbf)
A079719E01
A079718E01
A126955
A126954
A124828
Page 918 of 2000
2GR-FE STARTING – STARTERST–15
ST
3. INSTALL FRONT BATTERY CARRIER
(a) Install the front battery carrier with the 4 bolts.
Torque: 20 N*m (204 kgf*cm, 15 ft.*lbf)
(b) Connect the 2 clamps of the engine wire.
4. INSTALL BATTERY TRAY
5. INSTALL BATTERY
6. INSTALL BATTERY INSULATOR
7. INSTALL BATTERY CLAMP SUB-ASSEMBLY
(a) Install the battery clamp by tightening the bolt and
nut.
Torque: 5.0 N*m (51 kgf*cm, 44 in.*lbf) for nut
8.5 N*m (87 kgf*cm, 75 in.*lbf) for bolt
8. CONNECT CABLE TO NEGATIVE BATTERY
TERMINAL
A124827
Page 919 of 2000
2GR-FE STARTING – IGNITION SWITCHST–19
ST
INSTALLATION
1. INSTALL IGNITION SWITCH ASSEMBLY
(a) Install the ignition switch with the 2 screws.
(b) Connect the ignition key cylinder light connector.
(c) Connect the ignition switch connector.
2. INSTALL STEERING COLUMN COVER LOWER
(a) Install the steering column cover lower (see page
SR-20).
3. CONNECT CABLE TO NEGATIVE BATTERY
TERMINAL
A124915
A124916
Page 928 of 2000

2GR-FE CHARGING – CHARGING SYSTEMCH–5
CH
ON-VEHICLE INSPECTION
1. CHECK BATTERY CONDITION
NOTICE:
If the battery is weak or if the engine is difficult to
start, perform the following procedures.
(a) Check the battery for damage and deformation. If
severe damage, deformation or leakage is found,
replace the battery.
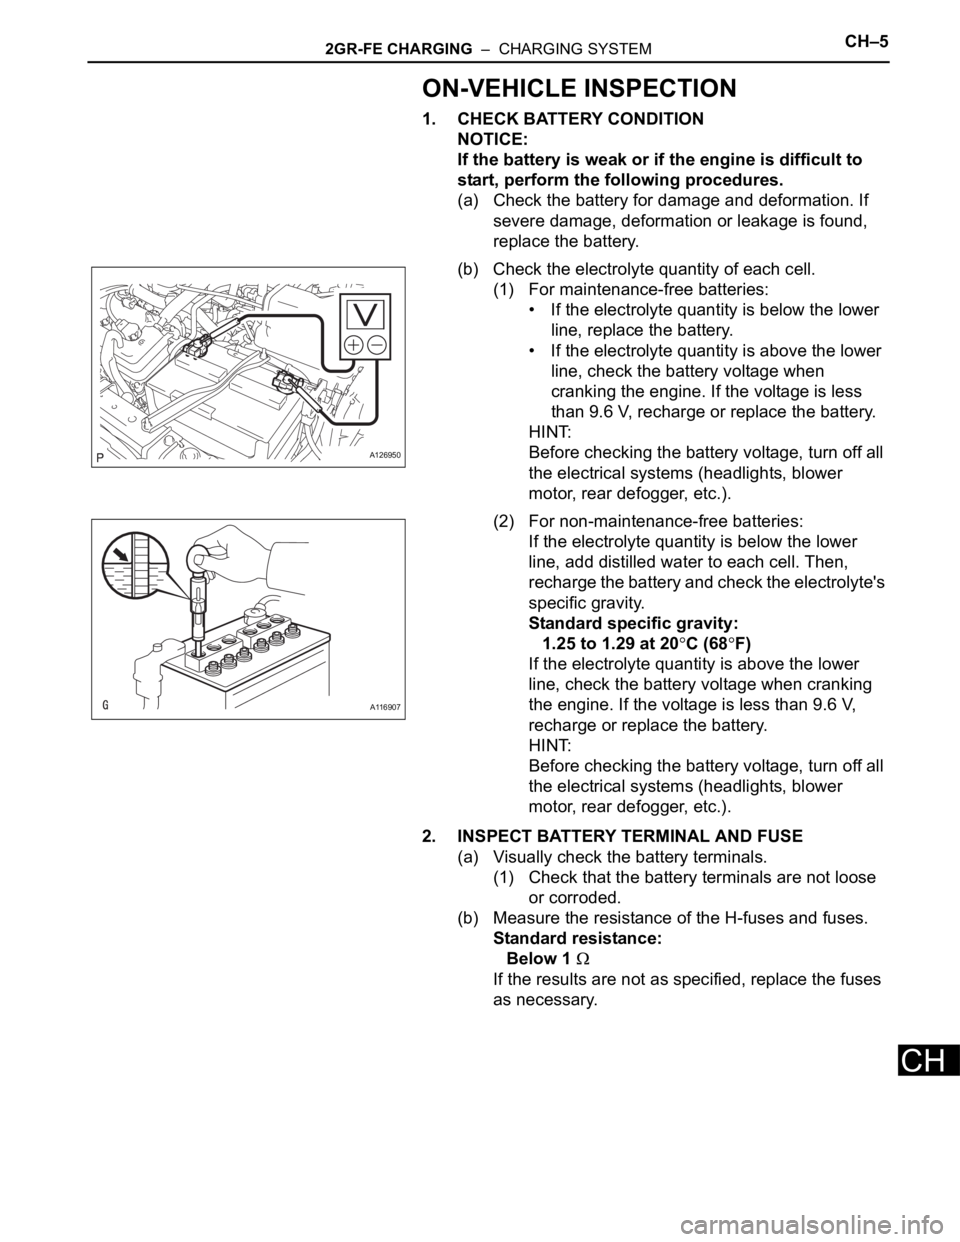
(b) Check the electrolyte quantity of each cell.
(1) For maintenance-free batteries:
• If the electrolyte quantity is below the lower
line, replace the battery.
• If the electrolyte quantity is above the lower
line, check the battery voltage when
cranking the engine. If the voltage is less
than 9.6 V, recharge or replace the battery.
HINT:
Before checking the battery voltage, turn off all
the electrical systems (headlights, blower
motor, rear defogger, etc.).
(2) For non-maintenance-free batteries:
If the electrolyte quantity is below the lower
line, add distilled water to each cell. Then,
recharge the battery and check the electrolyte's
specific gravity.
Standard specific gravity:
1.25 to 1.29 at 20
C (68F)
If the electrolyte quantity is above the lower
line, check the battery voltage when cranking
the engine. If the voltage is less than 9.6 V,
recharge or replace the battery.
HINT:
Before checking the battery voltage, turn off all
the electrical systems (headlights, blower
motor, rear defogger, etc.).
2. INSPECT BATTERY TERMINAL AND FUSE
(a) Visually check the battery terminals.
(1) Check that the battery terminals are not loose
or corroded.
(b) Measure the resistance of the H-fuses and fuses.
Standard resistance:
Below 1
If the results are not as specified, replace the fuses
as necessary.
A126950
A116907