Page 937 of 2000
CH–182GR-FE CHARGING – GENERATOR
CH
(d) Install the 4 bolts.
Torque: 5.8 N*m (59 kgf*cm, 51 in.*lbf)
2. INSTALL GENERATOR BRUSH HOLDER ASSEMBLY
(a) While pushing the 2 brushes into the generator
brush holder, insert a
1.0 mm (0.039 in.) pin into
the generator brush holder.
(b) Install the generator brush holder with the 2 screws.
Torque: 1.8 N*m (18 kgf*cm, 16 in.*lbf)
(c) Pull the pin out of the generator brush holder.
(d) Install the terminal insulator onto the generator
rectifier end frame.
(e) Install the generator rear end cover with the 3 nuts.
Torque: 4.6 N*m (47 kgf*cm, 41 in.*lbf)
A136842
A079315E04
A079316E02
A136840
A136839
Page 938 of 2000
2GR-FE CHARGING – GENERATORCH–19
CH
(f) Install the bracket with the bolt.
Torque: 20 N*m (204 kgf*cm, 15 ft.*lbf)
(g) Install the wire harness clamp stay.
Torque: 8.4 N*m (86 kgf*cm, 74 in.*lbf)
3. INSTALL GENERATOR PULLEY WITH CLUTCH
(a) Install the pulley by hand.
(b) Install SST to the pulley as shown in the illustration.
SST 09820-63020
(c) Turn SST (B) counterclockwise to tighten the pulley.
Torque: 111 N*m (1125 kgf*cm, 81 ft.*lbf)
(d) Install a new cap to the pulley.
(e) Check that the generator pulley rotates smoothly.
INSTALLATION
1. INSTALL GENERATOR ASSEMBLY
(a) Install the generator with the 2 bolts.
Torque: 43 N*m (438 kgf*cm, 32 ft.*lbf)
A132435
A132434
A136849E01
A136850E01
A132433
Page 939 of 2000
CH–202GR-FE CHARGING – GENERATOR
CH
(b) Install the bolt to the cylinder block.
Torque: 20 N*m (204 kgf*cm, 15 ft.*lbf)
(c) Connect the generator connector to the generator.
(d) Connect the generator wire with the nut.
Torque: 9.8 N*m (100 kgf*cm, 88 in.*lbf)
(e) Install the terminal cap.
(f) Connect the 2 wire harness clamps.
2. INSTALL FAN AND GENERATOR V BELT (See page
EM-8)
3. INSTALL RADIATOR RESERVOIR TANK (See page
CO-21)
4. INSTALL FRONT SUSPENSION MEMBER
REINFORCEMENT RH (See page EM-9)
5. INSTALL ENGINE UNDER COVER REAR RH (See
page EM-41)
6. INSTALL FRONT WHEEL RH
7. INSTALL RADIATOR ASSEMBLY
(a) Install the radiator (see page CO-40).
A132432E01
A132431
A132430
Page 1381 of 2000
DRIVE SHAFT – FRONT DRIVE SHAFT ASSEMBLY (for 2WD)DS–25
DS
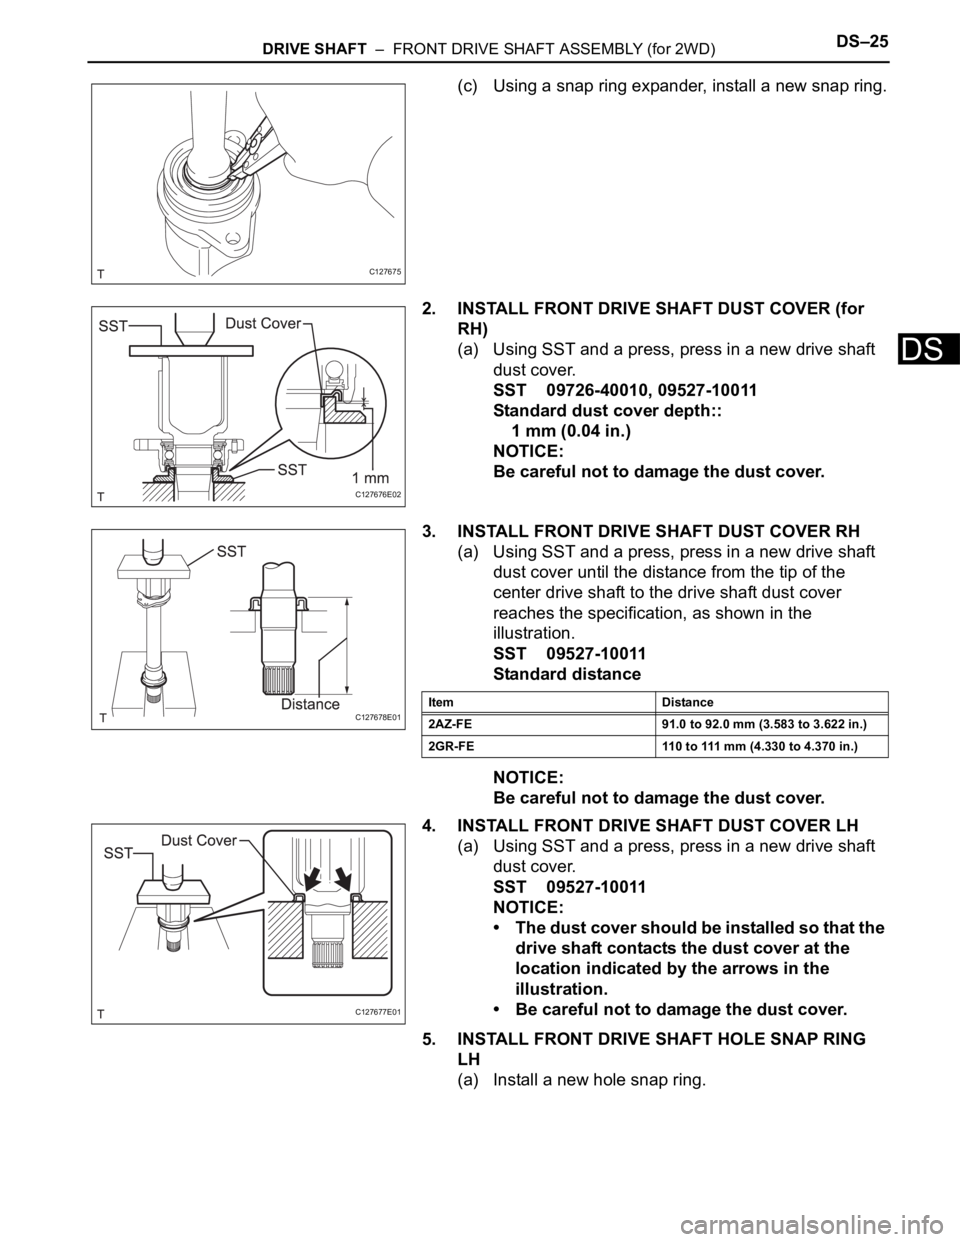
(c) Using a snap ring expander, install a new snap ring.
2. INSTALL FRONT DRIVE SHAFT DUST COVER (for
RH)
(a) Using SST and a press, press in a new drive shaft
dust cover.
SST 09726-40010, 09527-10011
Standard dust cover depth::
1 mm (0.04 in.)
NOTICE:
Be careful not to damage the dust cover.
3. INSTALL FRONT DRIVE SHAFT DUST COVER RH
(a) Using SST and a press, press in a new drive shaft
dust cover until the distance from the tip of the
center drive shaft to the drive shaft dust cover
reaches the specification, as shown in the
illustration.
SST 09527-10011
Standard distance
NOTICE:
Be careful not to damage the dust cover.
4. INSTALL FRONT DRIVE SHAFT DUST COVER LH
(a) Using SST and a press, press in a new drive shaft
dust cover.
SST 09527-10011
NOTICE:
• The dust cover should be installed so that the
drive shaft contacts the dust cover at the
location indicated by the arrows in the
illustration.
• Be careful not to damage the dust cover.
5. INSTALL FRONT DRIVE SHAFT HOLE SNAP RING
LH
(a) Install a new hole snap ring.
C127675
C127676E02
C127678E01Item Distance
2AZ-FE 91.0 to 92.0 mm (3.583 to 3.622 in.)
2GR-FE 110 to 111 mm (4.330 to 4.370 in.)
C127677E01
Page 1382 of 2000
DS–26DRIVE SHAFT – FRONT DRIVE SHAFT ASSEMBLY (for 2WD)
DS
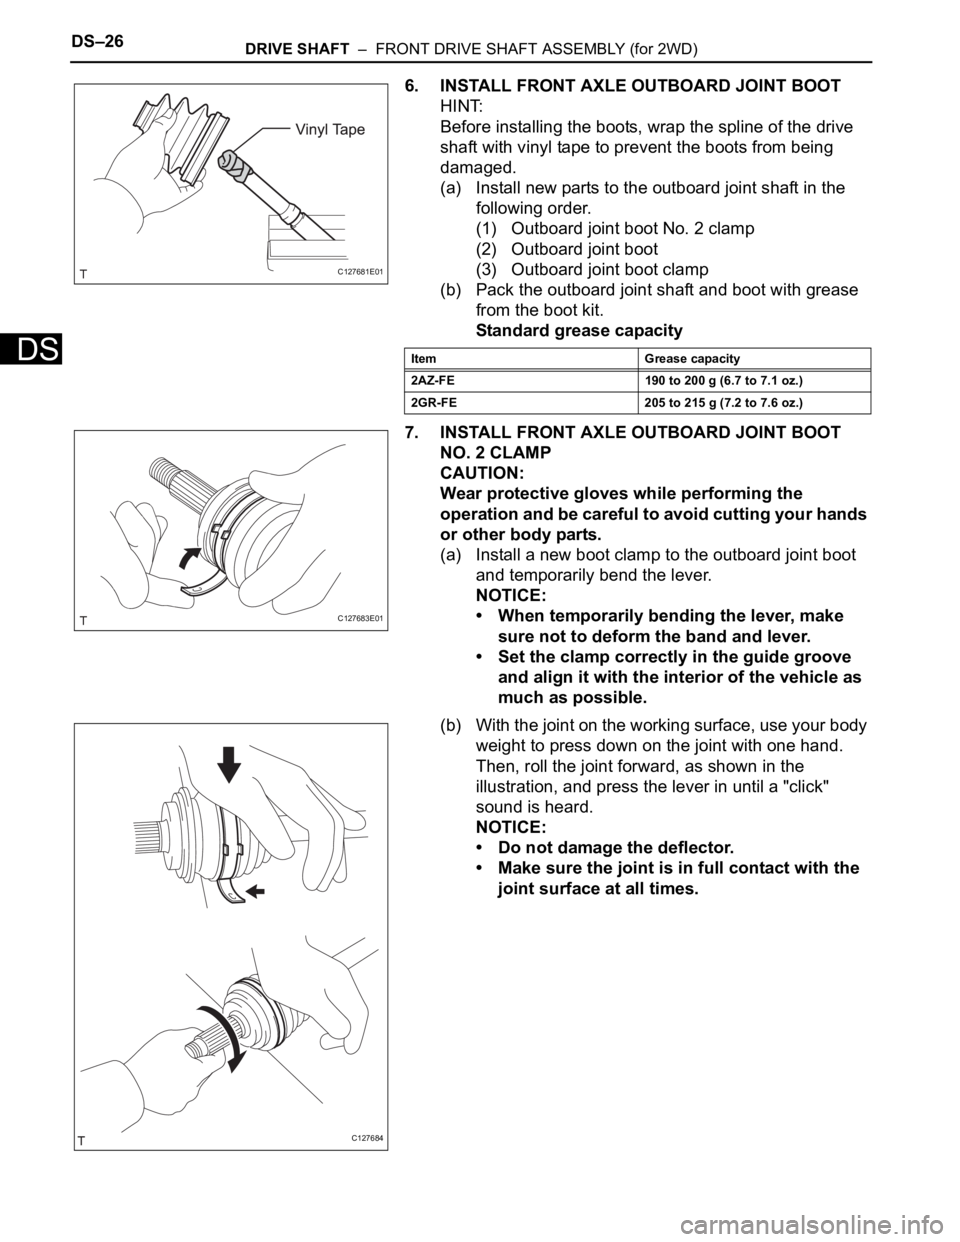
6. INSTALL FRONT AXLE OUTBOARD JOINT BOOT
HINT:
Before installing the boots, wrap the spline of the drive
shaft with vinyl tape to prevent the boots from being
damaged.
(a) Install new parts to the outboard joint shaft in the
following order.
(1) Outboard joint boot No. 2 clamp
(2) Outboard joint boot
(3) Outboard joint boot clamp
(b) Pack the outboard joint shaft and boot with grease
from the boot kit.
Standard grease capacity
7. INSTALL FRONT AXLE OUTBOARD JOINT BOOT
NO. 2 CLAMP
CAUTION:
Wear protective gloves while performing the
operation and be careful to avoid cutting your hands
or other body parts.
(a) Install a new boot clamp to the outboard joint boot
and temporarily bend the lever.
NOTICE:
• When temporarily bending the lever, make
sure not to deform the band and lever.
• Set the clamp correctly in the guide groove
and align it with the interior of the vehicle as
much as possible.
(b) With the joint on the working surface, use your body
weight to press down on the joint with one hand.
Then, roll the joint forward, as shown in the
illustration, and press the lever in until a "click"
sound is heard.
NOTICE:
• Do not damage the deflector.
• Make sure the joint is in full contact with the
joint surface at all times.
C127681E01
Item Grease capacity
2AZ-FE 190 to 200 g (6.7 to 7.1 oz.)
2GR-FE 205 to 215 g (7.2 to 7.6 oz.)
C127683E01
C127684
Page 1387 of 2000
DRIVE SHAFT – FRONT DRIVE SHAFT ASSEMBLY (for 2WD)DS–31
DS
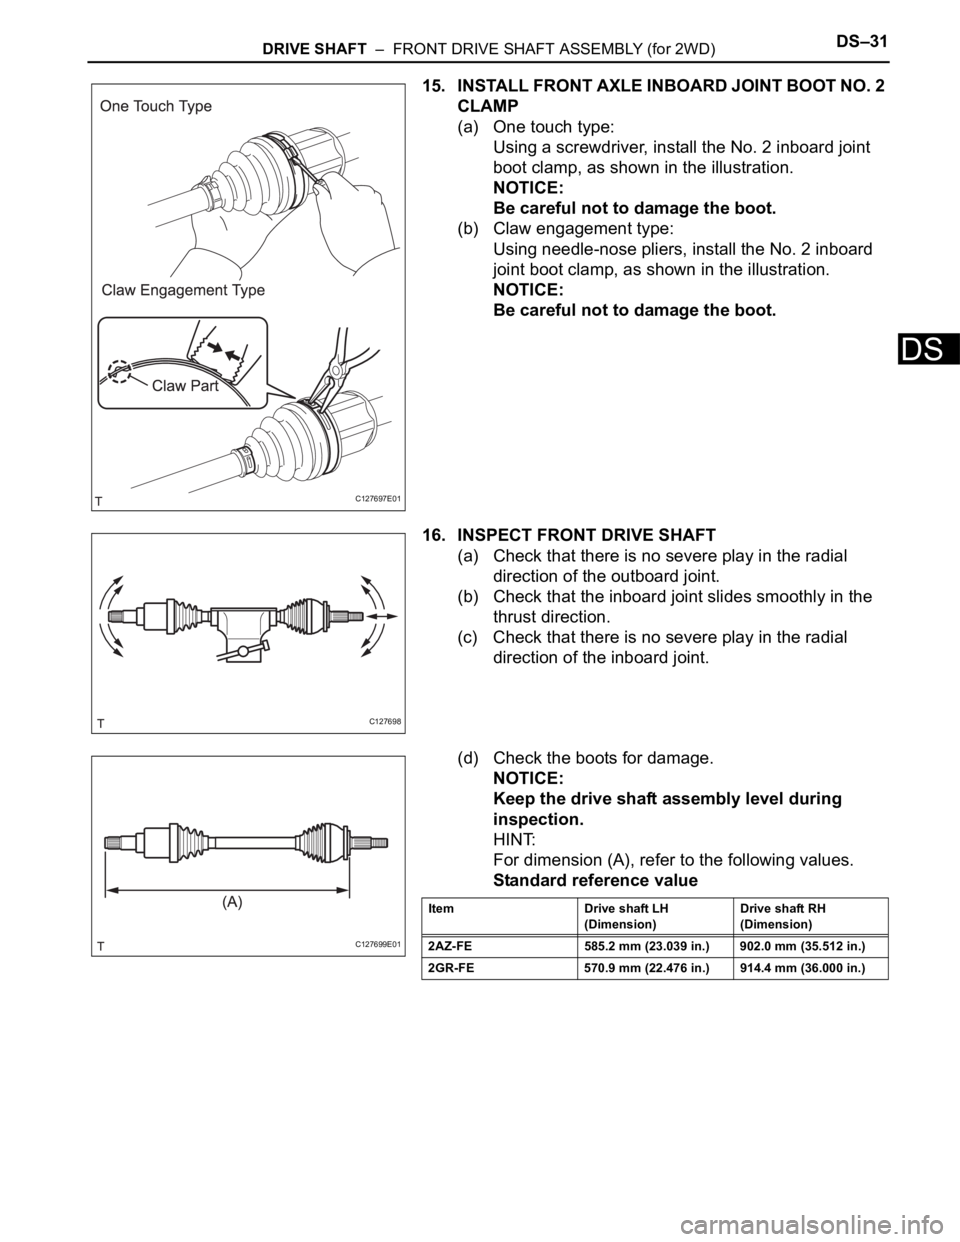
15. INSTALL FRONT AXLE INBOARD JOINT BOOT NO. 2
CLAMP
(a) One touch type:
Using a screwdriver, install the No. 2 inboard joint
boot clamp, as shown in the illustration.
NOTICE:
Be careful not to damage the boot.
(b) Claw engagement type:
Using needle-nose pliers, install the No. 2 inboard
joint boot clamp, as shown in the illustration.
NOTICE:
Be careful not to damage the boot.
16. INSPECT FRONT DRIVE SHAFT
(a) Check that there is no severe play in the radial
direction of the outboard joint.
(b) Check that the inboard joint slides smoothly in the
thrust direction.
(c) Check that there is no severe play in the radial
direction of the inboard joint.
(d) Check the boots for damage.
NOTICE:
Keep the drive shaft assembly level during
inspection.
HINT:
For dimension (A), refer to the following values.
Standard reference value
C127697E01
C127698
C127699E01
Item Drive shaft LH
(Dimension)Drive shaft RH
(Dimension)
2AZ-FE 585.2 mm (23.039 in.) 902.0 mm (35.512 in.)
2GR-FE 570.9 mm (22.476 in.) 914.4 mm (36.000 in.)
Page 1413 of 2000
DRIVE SHAFT – FRONT DRIVE SHAFT ASSEMBLY (for 4WD)DS–59
DS
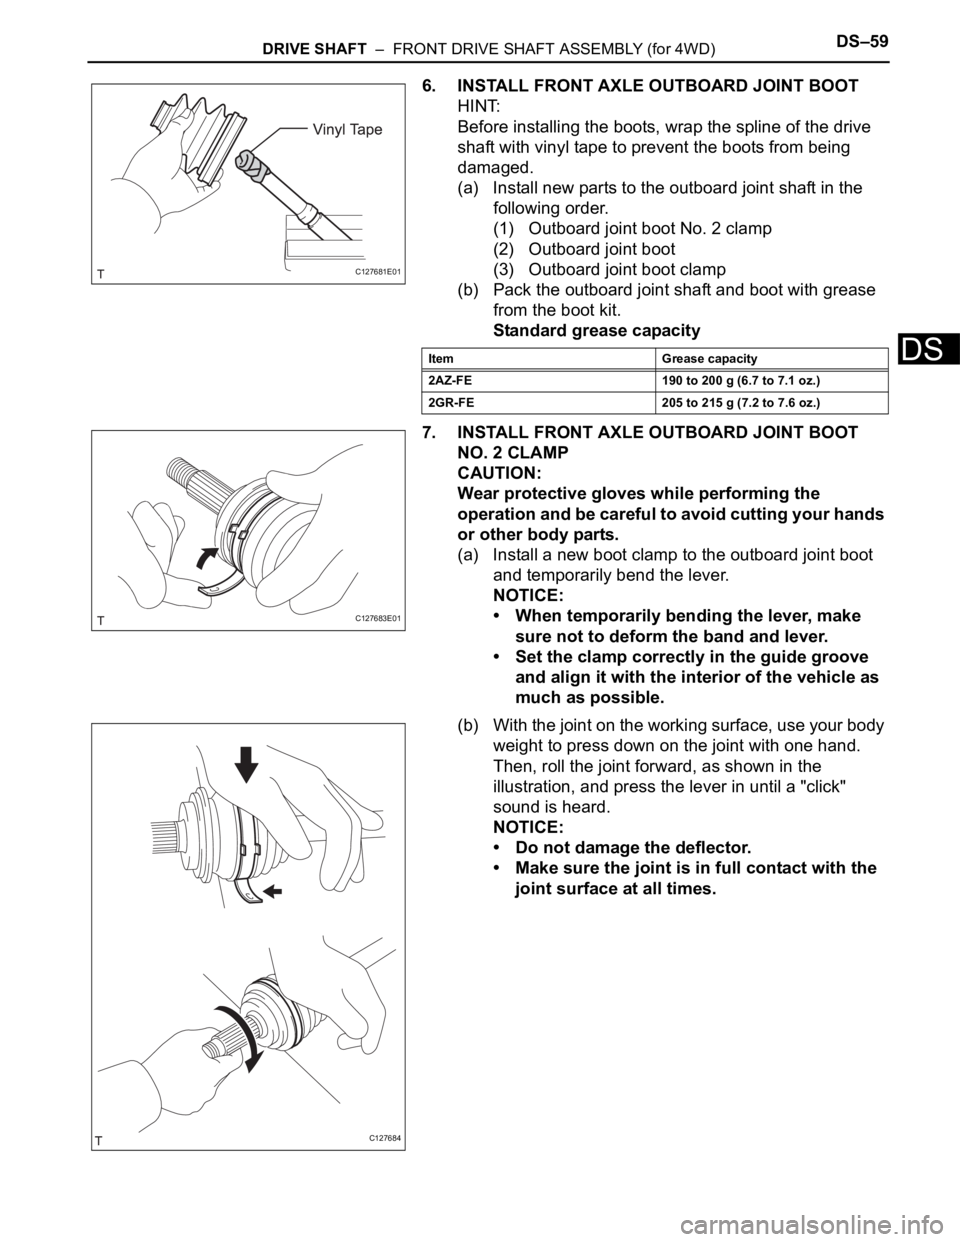
6. INSTALL FRONT AXLE OUTBOARD JOINT BOOT
HINT:
Before installing the boots, wrap the spline of the drive
shaft with vinyl tape to prevent the boots from being
damaged.
(a) Install new parts to the outboard joint shaft in the
following order.
(1) Outboard joint boot No. 2 clamp
(2) Outboard joint boot
(3) Outboard joint boot clamp
(b) Pack the outboard joint shaft and boot with grease
from the boot kit.
Standard grease capacity
7. INSTALL FRONT AXLE OUTBOARD JOINT BOOT
NO. 2 CLAMP
CAUTION:
Wear protective gloves while performing the
operation and be careful to avoid cutting your hands
or other body parts.
(a) Install a new boot clamp to the outboard joint boot
and temporarily bend the lever.
NOTICE:
• When temporarily bending the lever, make
sure not to deform the band and lever.
• Set the clamp correctly in the guide groove
and align it with the interior of the vehicle as
much as possible.
(b) With the joint on the working surface, use your body
weight to press down on the joint with one hand.
Then, roll the joint forward, as shown in the
illustration, and press the lever in until a "click"
sound is heard.
NOTICE:
• Do not damage the deflector.
• Make sure the joint is in full contact with the
joint surface at all times.
C127681E01
Item Grease capacity
2AZ-FE 190 to 200 g (6.7 to 7.1 oz.)
2GR-FE 205 to 215 g (7.2 to 7.6 oz.)
C127683E01
C127684
Page 1418 of 2000
DS–64DRIVE SHAFT – FRONT DRIVE SHAFT ASSEMBLY (for 4WD)
DS
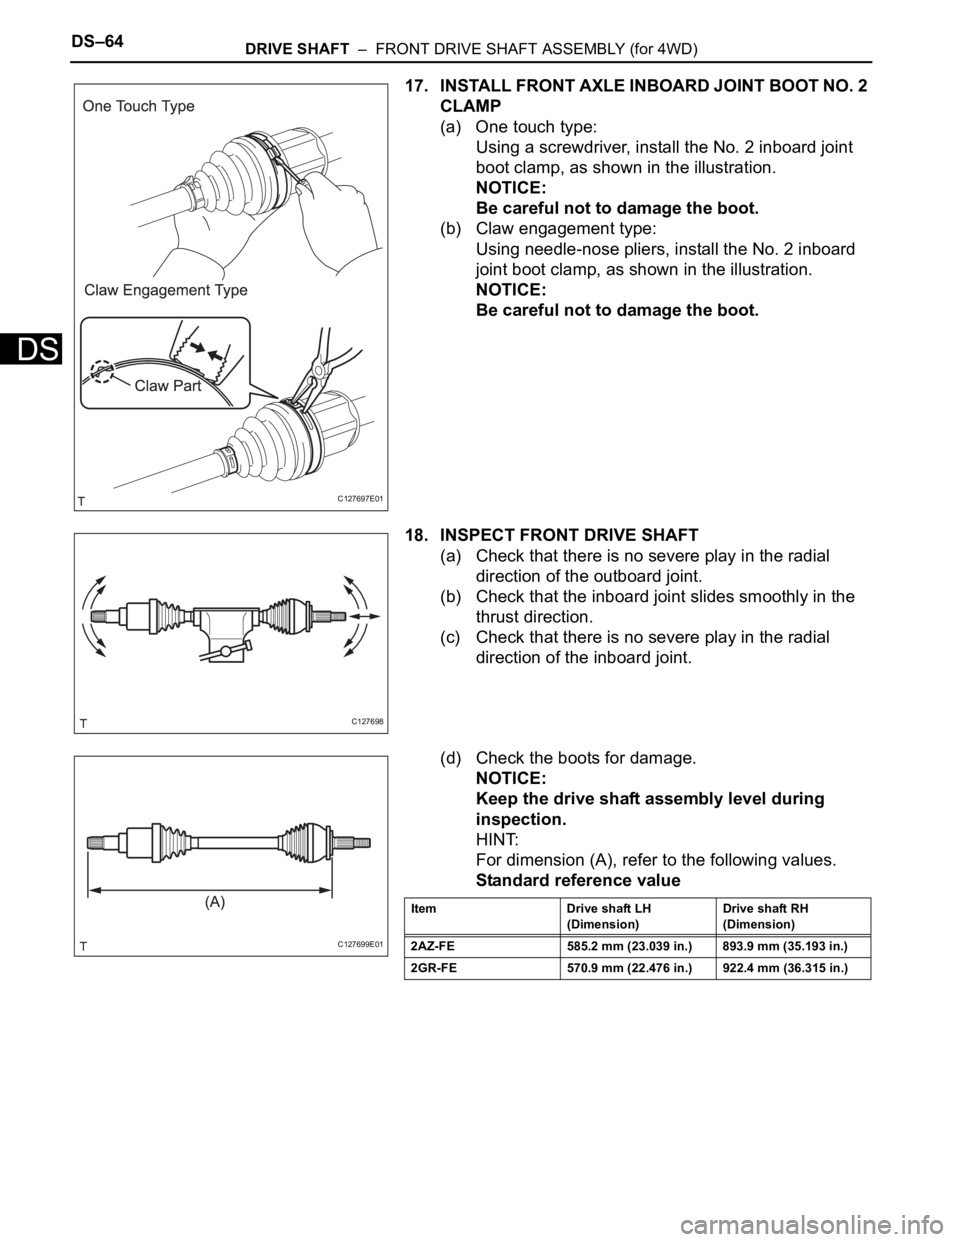
17. INSTALL FRONT AXLE INBOARD JOINT BOOT NO. 2
CLAMP
(a) One touch type:
Using a screwdriver, install the No. 2 inboard joint
boot clamp, as shown in the illustration.
NOTICE:
Be careful not to damage the boot.
(b) Claw engagement type:
Using needle-nose pliers, install the No. 2 inboard
joint boot clamp, as shown in the illustration.
NOTICE:
Be careful not to damage the boot.
18. INSPECT FRONT DRIVE SHAFT
(a) Check that there is no severe play in the radial
direction of the outboard joint.
(b) Check that the inboard joint slides smoothly in the
thrust direction.
(c) Check that there is no severe play in the radial
direction of the inboard joint.
(d) Check the boots for damage.
NOTICE:
Keep the drive shaft assembly level during
inspection.
HINT:
For dimension (A), refer to the following values.
Standard reference value
C127697E01
C127698
C127699E01
Item Drive shaft LH
(Dimension)Drive shaft RH
(Dimension)
2AZ-FE 585.2 mm (23.039 in.) 893.9 mm (35.193 in.)
2GR-FE 570.9 mm (22.476 in.) 922.4 mm (36.315 in.)