Page 406 of 2000

SP–10SUSPENSION – FRONT SHOCK ABSORBER WITH COIL SPRING
SP
DISASSEMBLY
HINT:
• Use the same procedures for the RH side and LH side.
• The procedures listed below are for the LH side.
1. REMOVE FRONT SUSPENSION SUPPORT PLATE LH
(a) Remove the plate from the shock absorber.
2. REMOVE FRONT SUSPENSION SUPPORT DUST
COVER LH
(a) Using a screwdriver, remove the dust cover from the
suspension support.
HINT:
Tape the screwdriver tip before use.
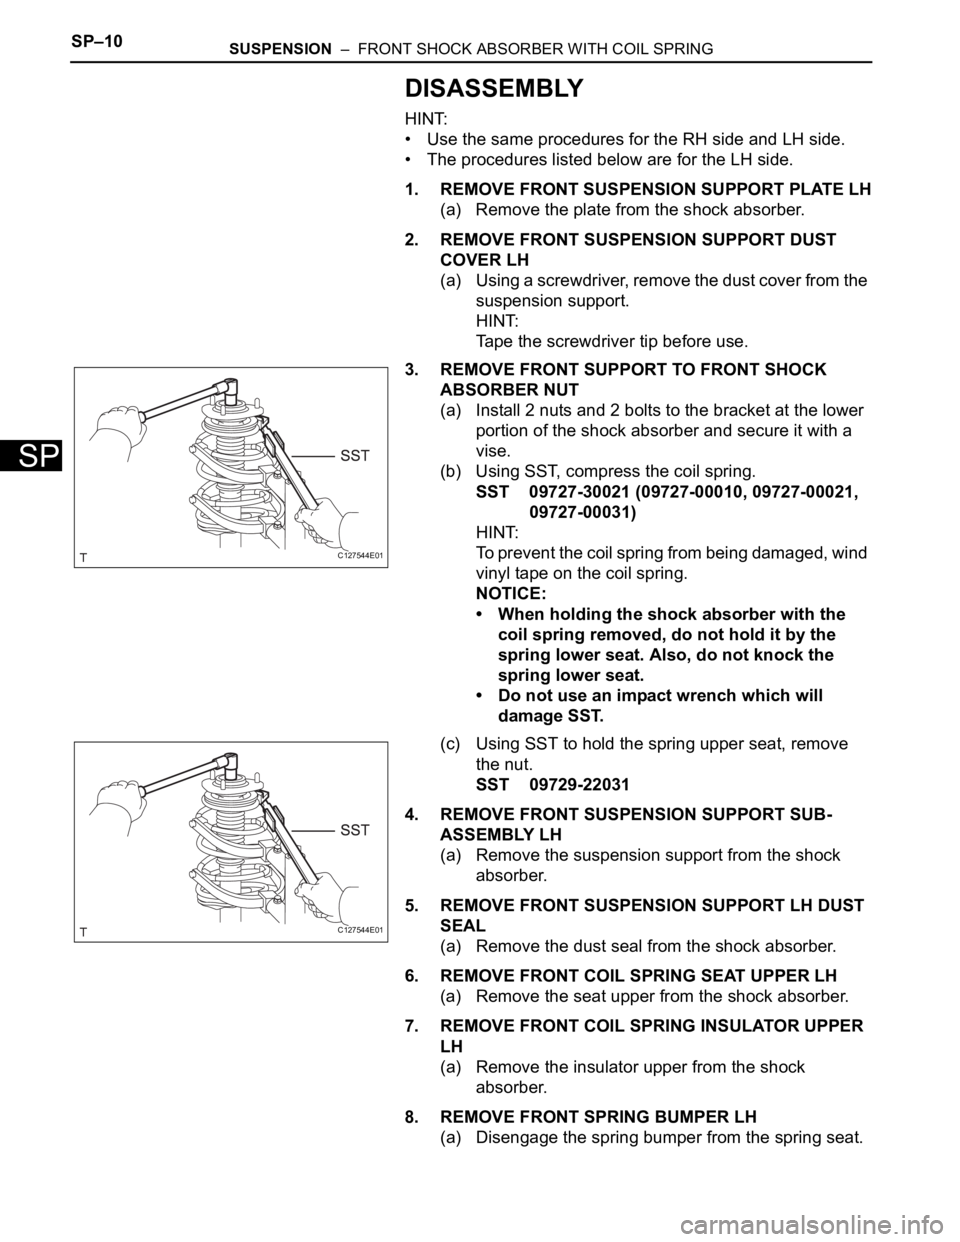
3. REMOVE FRONT SUPPORT TO FRONT SHOCK
ABSORBER NUT
(a) Install 2 nuts and 2 bolts to the bracket at the lower
portion of the shock absorber and secure it with a
vise.
(b) Using SST, compress the coil spring.
SST 09727-30021 (09727-00010, 09727-00021,
09727-00031)
HINT:
To prevent the coil spring from being damaged, wind
vinyl tape on the coil spring.
NOTICE:
• When holding the shock absorber with the
coil spring removed, do not hold it by the
spring lower seat. Also, do not knock the
spring lower seat.
• Do not use an impact wrench which will
damage SST.
(c) Using SST to hold the spring upper seat, remove
the nut.
SST 09729-22031
4. REMOVE FRONT SUSPENSION SUPPORT SUB-
ASSEMBLY LH
(a) Remove the suspension support from the shock
absorber.
5. REMOVE FRONT SUSPENSION SUPPORT LH DUST
SEAL
(a) Remove the dust seal from the shock absorber.
6. REMOVE FRONT COIL SPRING SEAT UPPER LH
(a) Remove the seat upper from the shock absorber.
7. REMOVE FRONT COIL SPRING INSULATOR UPPER
LH
(a) Remove the insulator upper from the shock
absorber.
8. REMOVE FRONT SPRING BUMPER LH
(a) Disengage the spring bumper from the spring seat.
C127544E01
C127544E01
Page 408 of 2000

SP–12SUSPENSION – FRONT SHOCK ABSORBER WITH COIL SPRING
SP
REASSEMBLY
HINT:
• Use the same procedures for the RH side and LH side.
• The procedures listed below are for the LH side.
1. INSTALL FRONT COIL SPRING INSULATOR LOWER
LH
(a) Install the insulator lower to the shock absorber.
2. INSTALL FRONT SPRING BUMPER LH
(a) Engage the spring bumper to the spring seat.
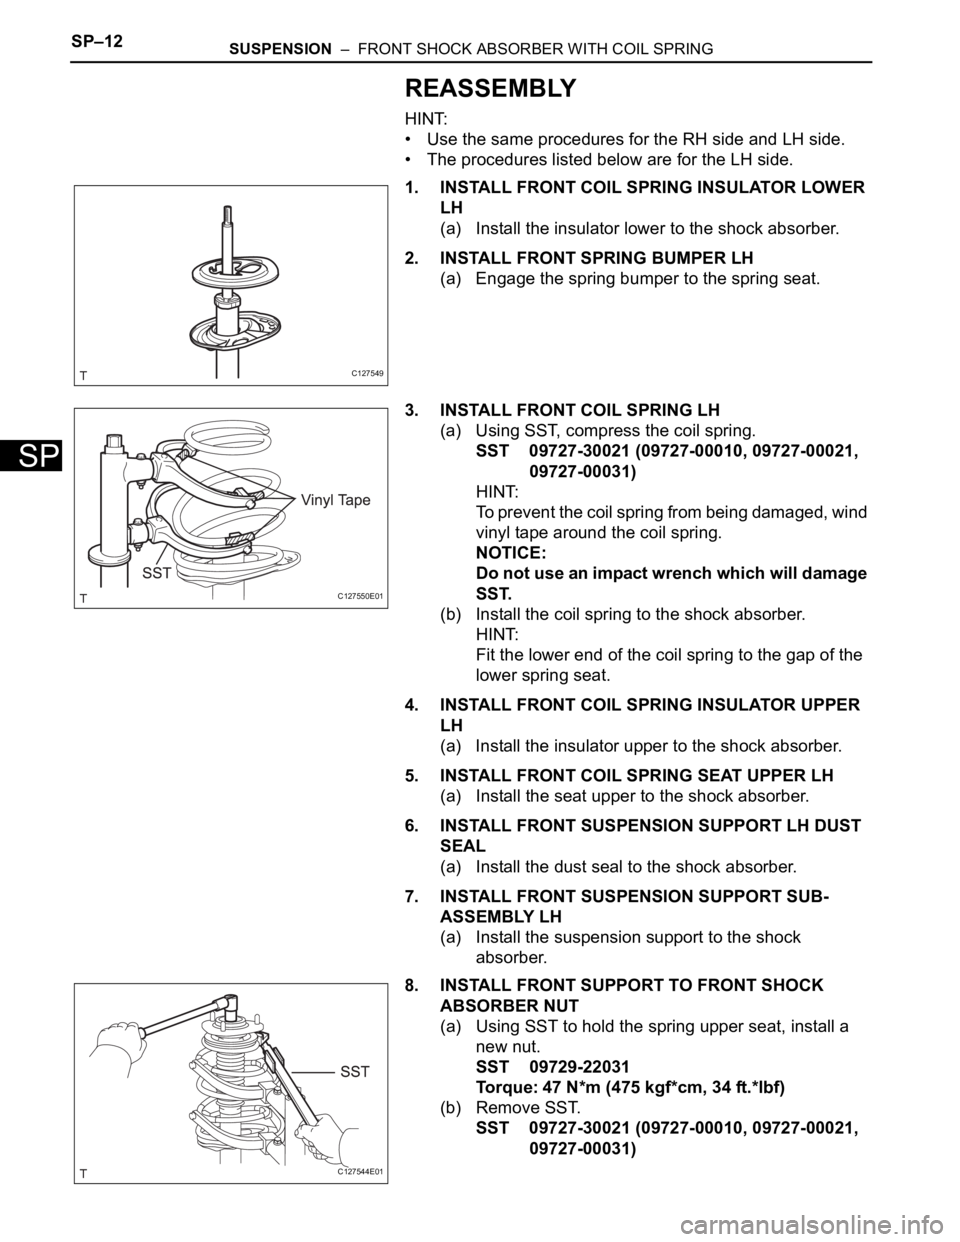
3. INSTALL FRONT COIL SPRING LH
(a) Using SST, compress the coil spring.
SST 09727-30021 (09727-00010, 09727-00021,
09727-00031)
HINT:
To prevent the coil spring from being damaged, wind
vinyl tape around the coil spring.
NOTICE:
Do not use an impact wrench which will damage
SST.
(b) Install the coil spring to the shock absorber.
HINT:
Fit the lower end of the coil spring to the gap of the
lower spring seat.
4. INSTALL FRONT COIL SPRING INSULATOR UPPER
LH
(a) Install the insulator upper to the shock absorber.
5. INSTALL FRONT COIL SPRING SEAT UPPER LH
(a) Install the seat upper to the shock absorber.
6. INSTALL FRONT SUSPENSION SUPPORT LH DUST
SEAL
(a) Install the dust seal to the shock absorber.
7. INSTALL FRONT SUSPENSION SUPPORT SUB-
ASSEMBLY LH
(a) Install the suspension support to the shock
absorber.
8. INSTALL FRONT SUPPORT TO FRONT SHOCK
ABSORBER NUT
(a) Using SST to hold the spring upper seat, install a
new nut.
SST 09729-22031
Torque: 47 N*m (475 kgf*cm, 34 ft.*lbf)
(b) Remove SST.
SST 09727-30021 (09727-00010, 09727-00021,
09727-00031)
C127549
C127550E01
C127544E01
Page 510 of 2000

ET–4EXTERIOR – FRONT BUMPER
ET
REMOVAL
1. DISCONNECT CABLE FROM NEGATIVE BATTERY
TERMINAL
CAUTION:
Wait at least 90 seconds after disconnecting the
cable from the negative (-) battery terminal to
prevent airbag and seat belt pretensioner activation.
2. REMOVE FRONT FENDER LINER LH
(a) Using a screwdriver, remove the fender liner
retainer.
(b) Remove the screw, nut and bolt.
(c) w/ Splash Shield:
Remove the front fender splash shield LH.
(d) Partially remove the fender liner.
HINT:
It is not necessary to fully remove the fender liner.
Partially remove it so that the bumper cover can be
removed later.
3. REMOVE FRONT FENDER LINER RH
HINT:
Use the same procedures described for the LH side.
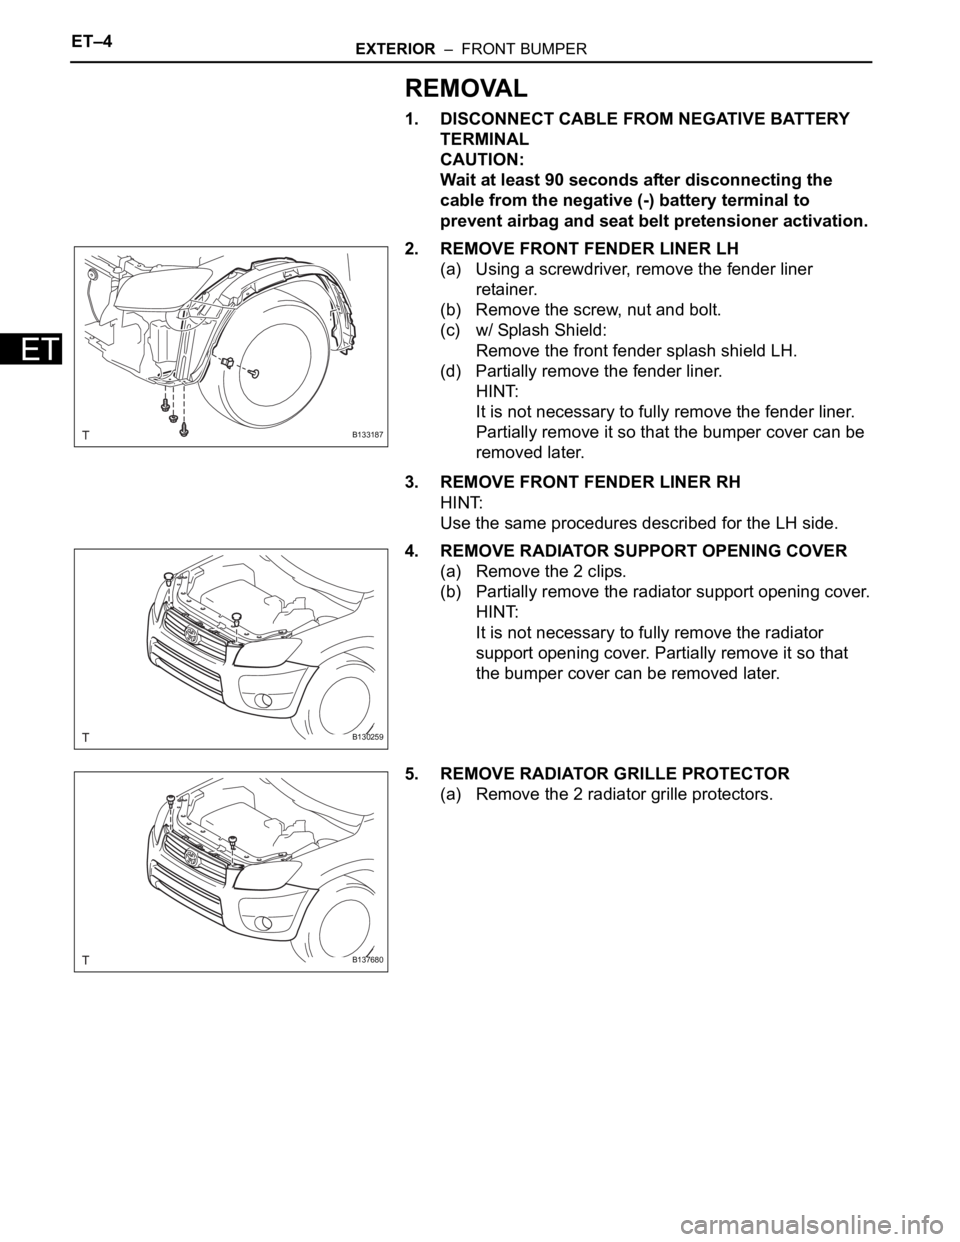
4. REMOVE RADIATOR SUPPORT OPENING COVER
(a) Remove the 2 clips.
(b) Partially remove the radiator support opening cover.
HINT:
It is not necessary to fully remove the radiator
support opening cover. Partially remove it so that
the bumper cover can be removed later.
5. REMOVE RADIATOR GRILLE PROTECTOR
(a) Remove the 2 radiator grille protectors.
B133187
B130259
B137680
Page 511 of 2000
EXTERIOR – FRONT BUMPERET–5
ET
6. REMOVE FRONT BUMPER COVER
(a) Remove the 8 screws.
(b) Apply protective tape under the front fender and
headlight.
(c) Using a screwdriver, detach the 4 claws.
HINT:
Tape the screwdriver tip before use.
(d) w/ Fog Light:
Disconnect the 2 fog light connectors.
(e) Using a clip remover, remove the hood cushion
center.
(f) Using a clip remover, remove the 4 clips and
remove the front bumper cover.
7. REMOVE NO. 2 FRONT BUMPER ENERGY
ABSORBER
(a) Remove the absorber.
B136793
B127932
B136791
B136792
B139377
Page 512 of 2000
ET–6EXTERIOR – FRONT BUMPER
ET
8. REMOVE FRONT BUMPER RETAINER
(a) Remove the bolt and retainer.
9. REMOVE FRONT BUMPER REINFORCEMENT SUB-
ASSEMBLY
(a) Detach 5 clamps and remove the wire harness.
(b) Remove the 8 bolts and reinforcement.
10. REMOVE FRONT BUMPER SIDE RETAINER LH
(a) Remove the bolt.
(b) Using a screwdriver, detach the clip and remove
the bumper side retainer.
HINT:
Tape the screwdriver tip before use.
11. REMOVE FRONT BUMPER SIDE RETAINER RH
HINT:
Use the same procedures described for the LH side.
DISASSEMBLY
1. REMOVE RADIATOR GRILLE SUB-ASSEMBLY
(a) Remove the 4 bolts and 4 nuts.
B139376
B137681
B137682
B127934
B135282
Page 513 of 2000
EXTERIOR – FRONT BUMPERET–7
ET
(b) Detach the 6 claws and remove the radiator grille.
2. REMOVE NO. 1 RADIATOR GRILLE LOWER
(a) Detach the 18 claws and remove the radiator grille.
3. REMOVE NO. 2 RADIATOR GRILLE LOWER
(a) Detach the 16 claws and remove the radiator grille.
4. REMOVE FRONT BUMPER ARM HOLE COVER LH
(a) Detach the 2 claws and disconnect the arm hole
cover.
(b) Remove the hook and bumper arm hole cover.
5. REMOVE FRONT BUMPER ARM HOLE COVER RH
(a) Use the same procedures described for the LH side.
B136794
B135283
B135284
B127941
Page 514 of 2000

ET–8EXTERIOR – FRONT BUMPER
ET
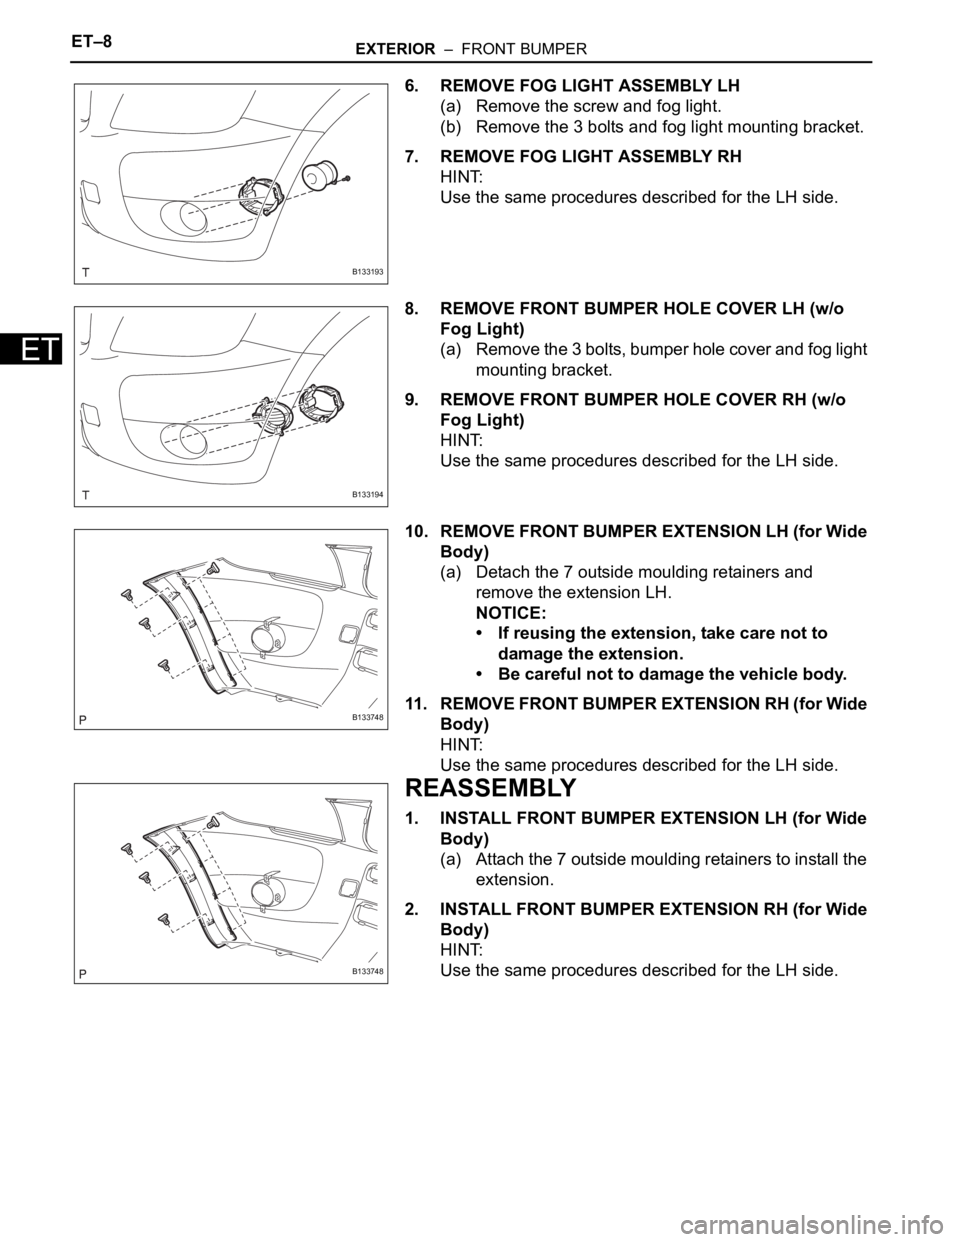
6. REMOVE FOG LIGHT ASSEMBLY LH
(a) Remove the screw and fog light.
(b) Remove the 3 bolts and fog light mounting bracket.
7. REMOVE FOG LIGHT ASSEMBLY RH
HINT:
Use the same procedures described for the LH side.
8. REMOVE FRONT BUMPER HOLE COVER LH (w/o
Fog Light)
(a) Remove the 3 bolts, bumper hole cover and fog light
mounting bracket.
9. REMOVE FRONT BUMPER HOLE COVER RH (w/o
Fog Light)
HINT:
Use the same procedures described for the LH side.
10. REMOVE FRONT BUMPER EXTENSION LH (for Wide
Body)
(a) Detach the 7 outside moulding retainers and
remove the extension LH.
NOTICE:
• If reusing the extension, take care not to
damage the extension.
• Be careful not to damage the vehicle body.
11. REMOVE FRONT BUMPER EXTENSION RH (for Wide
Body)
HINT:
Use the same procedures described for the LH side.
REASSEMBLY
1. INSTALL FRONT BUMPER EXTENSION LH (for Wide
Body)
(a) Attach the 7 outside moulding retainers to install the
extension.
2. INSTALL FRONT BUMPER EXTENSION RH (for Wide
Body)
HINT:
Use the same procedures described for the LH side.
B133193
B133194
B133748
B133748
Page 515 of 2000
EXTERIOR – FRONT BUMPERET–9
ET
3. INSTALL FRONT BUMPER HOLE COVER LH (w/o
Fog Light)
(a) Install the bumper hole cover with the fog light
mounting bracket and 3 bolts.
4. INSTALL FRONT BUMPER HOLE COVER RH (w/o
Fog Light)
HINT:
Use the same procedures described for the LH side.
5. INSTALL FOG LIGHT ASSEMBLY LH
(a) Install the fog light mounting bracket with the 3 bolts.
(b) Install the fog light with the screw.
6. INSTALL FOG LIGHT ASSEMBLY RH
HINT:
Use the same procedures described for the LH side.
7. INSTALL FRONT BUMPER ARM HOLE COVER LH
(a) Install the hook.
(b) Attach the 2 claws and install the hole cover.
8. INSTALL FRONT BUMPER ARM HOLE COVER RH
HINT:
Use the same procedures described for the LH side.
9. INSTALL NO. 2 RADIATOR GRILLE LOWER
(a) Install the radiator grille and attach the 16 claws.
10. INSTALL NO. 1 RADIATOR GRILLE LOWER
(a) Install the radiator grille and attach the 18 claws.
B133194
B133193
B127941
B135284
B135283