Page 801 of 2000

2GR-FE FUEL – FUEL SYSTEMFU–9
FU
ON-VEHICLE INSPECTION
1. CHECK FUEL PUMP OPERATION
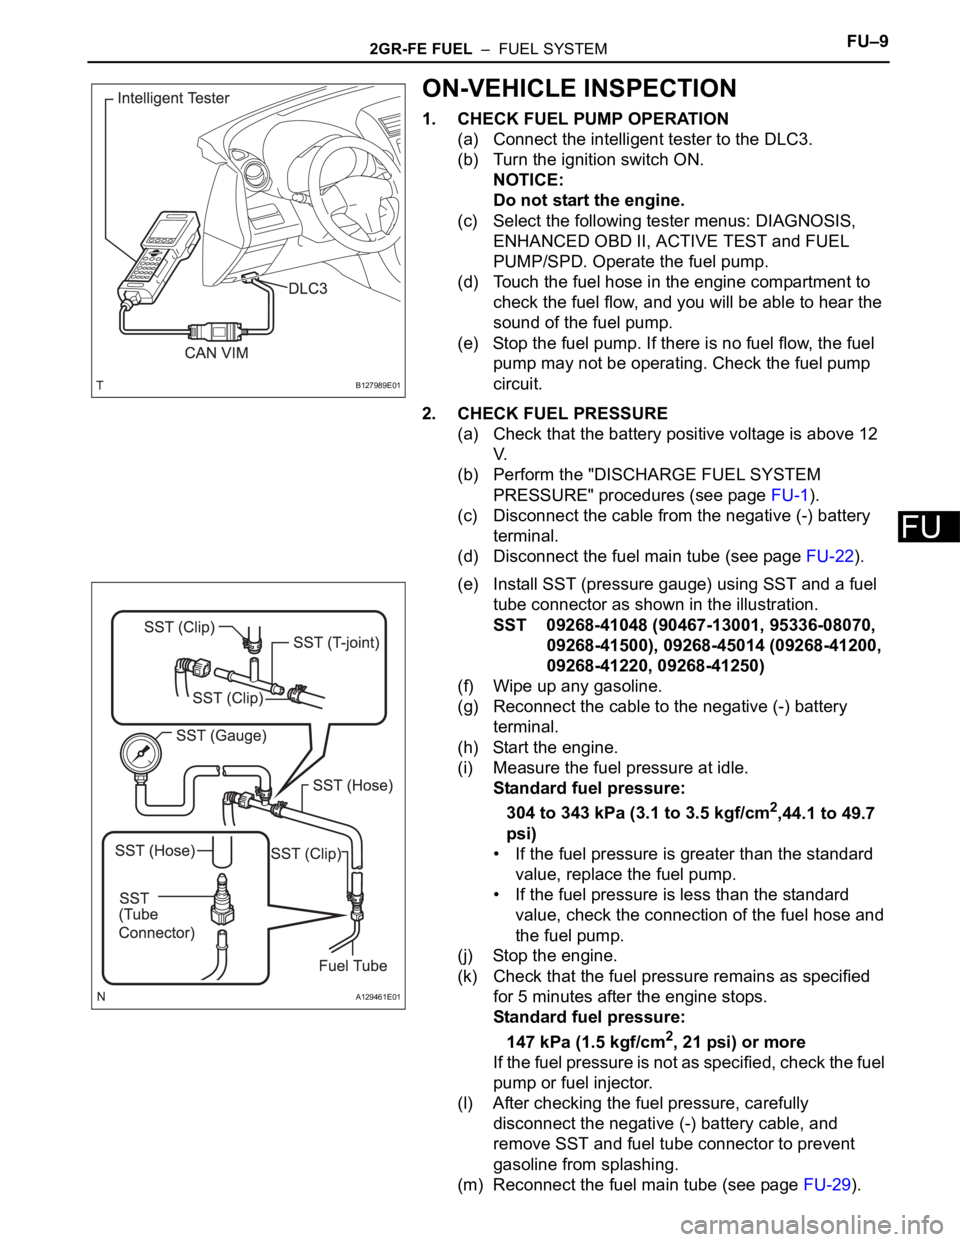
(a) Connect the intelligent tester to the DLC3.
(b) Turn the ignition switch ON.
NOTICE:
Do not start the engine.
(c) Select the following tester menus: DIAGNOSIS,
ENHANCED OBD II, ACTIVE TEST and FUEL
PUMP/SPD. Operate the fuel pump.
(d) Touch the fuel hose in the engine compartment to
check the fuel flow, and you will be able to hear the
sound of the fuel pump.
(e) Stop the fuel pump. If there is no fuel flow, the fuel
pump may not be operating. Check the fuel pump
circuit.
2. CHECK FUEL PRESSURE
(a) Check that the battery positive voltage is above 12
V.
(b) Perform the "DISCHARGE FUEL SYSTEM
PRESSURE" procedures (see page FU-1).
(c) Disconnect the cable from the negative (-) battery
terminal.
(d) Disconnect the fuel main tube (see page FU-22).
(e) Install SST (pressure gauge) using SST and a fuel
tube connector as shown in the illustration.
SST 09268-41048 (90467-13001, 95336-08070,
09268-41500), 09268-45014 (09268-41200,
09268-41220, 09268-41250)
(f) Wipe up any gasoline.
(g) Reconnect the cable to the negative (-) battery
terminal.
(h) Start the engine.
(i) Measure the fuel pressure at idle.
Standard fuel pressure:
304 to 343 kPa (3.1 to 3.5 kgf/cm
2,44.1 to 49.7
psi)
• If the fuel pressure is greater than the standard
value, replace the fuel pump.
• If the fuel pressure is less than the standard
value, check the connection of the fuel hose and
the fuel pump.
(j) Stop the engine.
(k) Check that the fuel pressure remains as specified
for 5 minutes after the engine stops.
Standard fuel pressure:
147 kPa (1.5 kgf/cm
2, 21 psi) or more
If the fuel pressure is not as specified, check the fuel
pump or fuel injector.
(l) After checking the fuel pressure, carefully
disconnect the negative (-) battery cable, and
remove SST and fuel tube connector to prevent
gasoline from splashing.
(m) Reconnect the fuel main tube (see page FU-29).
B127989E01
A129461E01
Page 803 of 2000

2GR-FE FUEL – FUEL INJECTORFU–13
FU
REMOVAL
CAUTION:
Do not allow fuel to spray when removing the pipe
between the high pressure side fuel pump and the fuel
injector. The fuel in the pipe is highly pressurized.
1. DISCHARGE FUEL SYSTEM PRESSURE
CAUTION:
• The "DISCHARGE FUEL SYSTEM PRESSURE"
procedures must be performed before
disconnecting any part of the fuel system.
• After performing the "DISCHARGE FUEL SYSTEM
PRESSURE" procedures, pressure will remain in
the fuel line. When disconnecting the fuel line,
place a cloth or equivalent over fittings to reduce
the risk of fuel spray.
(a) Remove the console box (see page IP-16).
(b) Start the engine. After the engine has stopped, turn
the ignition switch OFF.
HINT:
DTC P0171/P0172 (system too lean) may be set.
(c) Check that the engine does not start.
(d) Remove the fuel tank cap, and let the air out of the
fuel tank.
(e) Connect the connector.
(f) Install the console box (see page IP-23).
2. DISCONNECT CABLE FROM NEGATIVE BATTERY
TERMINAL
CAUTION:
Wait at least 90 seconds after disconnecting the
cable from the negative (-) battery terminal to
prevent airbag and seat belt pretensioner activation.
3. REMOVE ENGINE ASSEMBLY
(a) Remove the engine (see page EM-21).
4. REMOVE INTAKE AIR SURGE TANK ASSEMBLY
(See page EM-27)
5. DISCONNECT FUEL MAIN TUBE
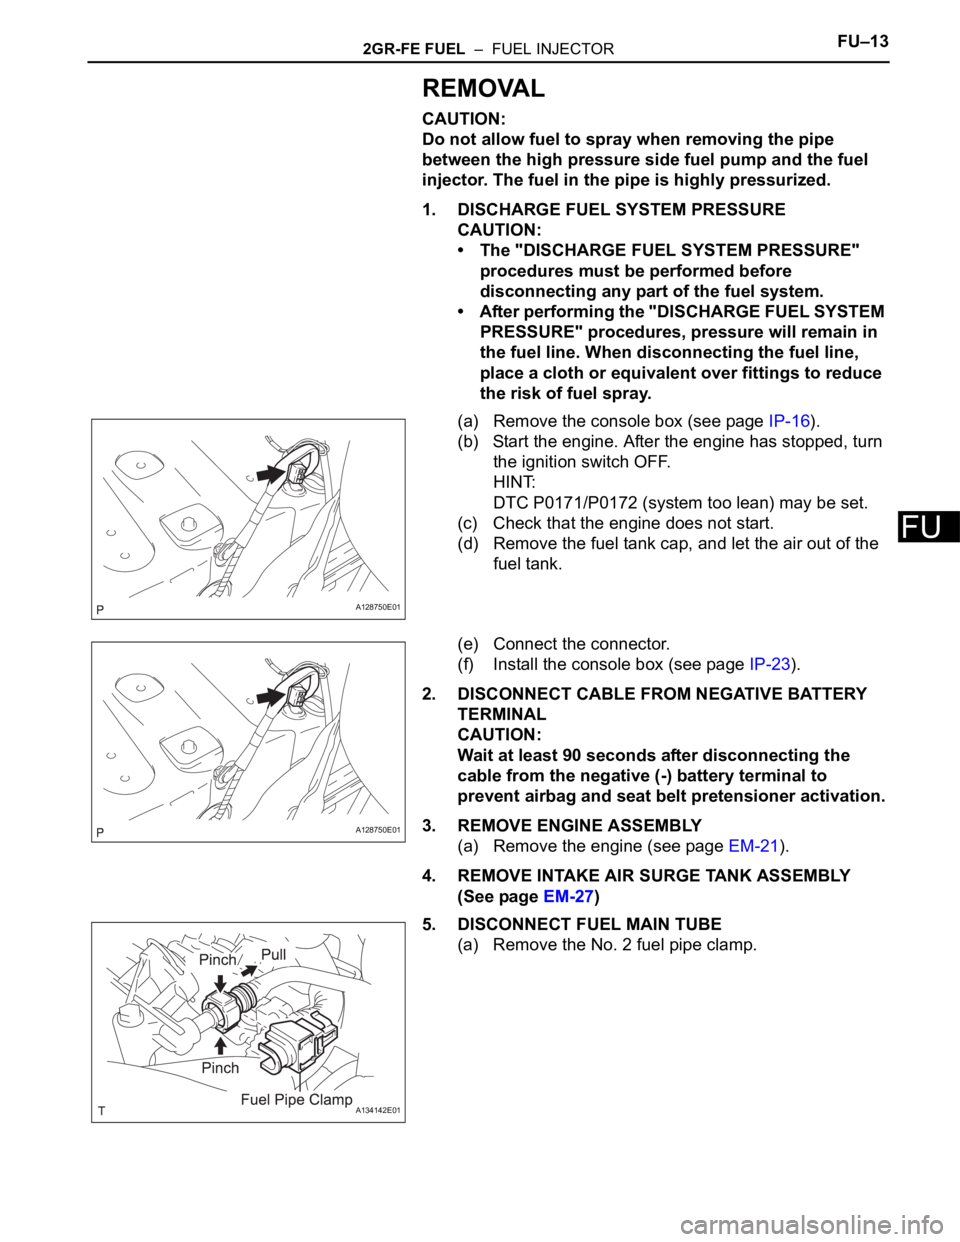
(a) Remove the No. 2 fuel pipe clamp.
A128750E01
A128750E01
A134142E01
Page 854 of 2000

CO–62GR-FE COOLING – COOLING FAN SYSTEM
CO
ON-VEHICLE INSPECTION
HINT:
It is normal for the cooling fan to sometimes rotate when the
ignition switch is turned from ACC to ON.
1. CHECK COOLING FAN OPERATION AT LOW
TEMPERATURES (Below 94
C (201F))
(a) Turn the ignition switch ON with the A/C switch OFF.
(b) Check that the cooling fan stops.
If it does not, check the cooling fan relays and
engine coolant temperature sensor, and then check
for disconnection of the connector or wire breaks
between the cooling fan relay and engine coolant
temperature sensor.
(c) Disconnect the engine coolant temperature sensor
connector.
(d) Check that the cooling fan rotates.
If it does not, check the fuses, cooling fan relays,
ECM and cooling fan, and then check for an open
circuit between the cooling fan relay and engine
coolant temperature sensor.
(e) Reconnect the engine coolant temperature sensor
connector.
2. CHECK COOLING FAN OPERATION AT HIGH
TEMPERATURES (Above 96
C (205F))
(a) Start the engine, and then raise the coolant
temperature to above 96
C (205F).
HINT:
Coolant temperature is the value detected by the
engine coolant temperature sensor on the cylinder
head.
(b) Check that the A/C switch is OFF.
A132414
A126963
A132415
Page 885 of 2000

2AZ-FE IGNITION – IGNITION SYSTEMIG–5
IG
ON-VEHICLE INSPECTION
1. CHECK IGNITION COIL ASSEMBLY AND PERFORM
SPARK TEST
NOTICE:
In this section, the terms "cold" and "hot" refer to
the temperature of the coils. "Cold" means
approximately -10 to 50
C (14 to 122F). "Hot" means
approximately 50 to 100
C (122 to 212F).
(a) Check the DTCs.
NOTICE:
If a DTC is present, perform troubleshooting in
accordance with the procedure for that DTC.
(b) Check that sparks occur.
(1) Remove the No. 1 engine cover.
(2) Remove the bolt and ignition coil.
(3) Using a 16 mm spark plug wrench, remove the
spark plug.
(4) Disconnect the 4 fuel injector connectors.
(5) Install the spark plug into the ignition coil, and
then connect the ignition coil connectors.
(6) Ground the spark plug.
(7) Check that sparks occur at the spark plug while
the engine is being cranked.
NOTICE:
• Be sure to ground the spark plugs when
checking them.
• If the ignition coil has been struck or
dropped, replace it.
• Do not crank the engine for more than 2
seconds.
If sparks do not occur, Perform the spark test.
(8) Using a 16 mm plug wrench, install the spark
plug.
Torque: 25 N*m (254 kgf*cm, 18 ft.*lbf)
A124849E01
A097448E01
A124396
Page 886 of 2000

IG–62AZ-FE IGNITION – IGNITION SYSTEM
IG
(9) Install the ignition coil with the bolt.
Torque: 9.0 N*m (92 kgf*cm, 80 in.*lbf)
(10) Connect the 4 fuel injector connectors.
(11) Install the No. 1 engine cover.
(c) Spark test flow chart.
(1) Check that the ignition coil connector is
securely connected.
Result
(2) Perform the spark test on each ignition coil.
1. Replace the ignition coil with a normal one.
2. Perform the spark test again.
Result
(3) Check the power supply to the ignition coil.
1. Disconnect the ignition coil connector.
2. Turn the ignition switch ON.
3. Measure the voltage of the wire harness
side connector.
Standard voltage
Result
(4) Check the resistance of the camshaft position
sensor.
Standard resistance
Result
(5) Check the resistance of the crankshaft position
sensor.
Standard resistance
Result Proceed to
NG Connect securely
OK Go to next step
Result Proceed to
OK Replace ignition coil
NG Go to next step
A124397
Tester Connection Specified Condition
1 (+B) - 4 (GND) 9 to 14 V
Result Proceed to
NG Check wire harness and connector
OK Go to next step
Temperature Condition Specified Condition
Cold 835 to 1,400
Hot 1,060 to 1,645
Result Proceed to
NG Replace camshaft position sensor
OK Go to next step
Temperature Condition Specified Condition
Cold 985 to 1,600
Hot 1,265 to 1,890
Page 887 of 2000

2AZ-FE IGNITION – IGNITION SYSTEMIG–7
IG
Result
(6) Check the IGT signal from the ECM.
Result
2. CHECK SPARK PLUG
(a) Check the electrode.
(1) Using a megohmmeter, measure the insulation
resistance.
Standard insulation resistance:
10 M
or more
HINT:
• If a megohmmeter is not available, perform
the following simple inspection instead.
• If the result is 10 M
or less, clean the plug
and measure the resistance again.
(b) Alternative inspection method:
(1) Quickly accelerate the engine to 4,000 rpm 5
times.
(2) Remove the spark plug.
(3) Visually check the spark plug.
If the electrode is dry, the spark plug is
functioning properly. If the electrode is damp,
proceed to the next step.
(c) Check the spark plug for any damage on its threads
and insulator.
If there is damage, replace the spark plug.
Recommended spark plug
(d) Check the spark plug electrode gap.
Maximum electrode gap for used spark plug:
1.3 mm (0.051 in.)
If the gap is greater than the maximum, replace the
spark plug.
Electrode gap for new spark plug:
1.0 to 1.1 mm (0.039 to 0.043 in.)
Result Proceed to
NG Replace crankshaft position sensor
OK Go to next step
Result Proceed to
NG Check ECM (see page ES-183)
OK Repair wiring between ignition coil
and ECM
I039522E10
A126881
Manufacturer Spark plug type
DENSO SK20R11
NGK IFR6A11
A126880E01
Page 888 of 2000
IG–82AZ-FE IGNITION – IGNITION SYSTEM
IG
(e) Clean the spark plugs.
If the electrode has traces of wet carbon, clean the
electrode with a spark plug cleaner and then dry it.
Standard air pressure:
588 kPa (6 kgf*cm
2, 85 psi)
Standard duration:
20 seconds or less
HINT:
Only use the spark plug cleaner when the electrode
is free of oil. If the electrode has traces of oil, use
gasoline to clean off the oil before using the spark
plug cleaner.
B062019E01
Page 895 of 2000

2GR-FE IGNITION – IGNITION SYSTEMIG–5
IG
ON-VEHICLE INSPECTION
1. CHECK IGNITION COIL ASSEMBLY AND PERFORM
SPARK TEST
NOTICE:
In this section, the terms "Cold" and "Hot" refer to
the temperature of the sensor. "Cold" means
approximately -10 to 50
C (14 to 122F). "Hot" means
approximately 50 to 100
C (122 to 212F).
(a) Check the DTCs.
NOTICE:
If a DTC is present, perform troubleshooting in
accordance with the procedure for that DTC.
(b) Check that sparks occur.
(1) Remove the V-bank cover.
(2) Remove the intake air surge tank (see page
EM-27).
(3) Remove the bolt and ignition coil.
(4) Using a 16 mm spark plug wrench, remove the
spark plug.
(5) Disconnect the 6 fuel injector connectors.
(6) Install the spark plug into the ignition coil, and
then connect the ignition coil connectors.
(7) Ground the spark plug.
(8) Check that sparks occur at the spark plug while
the engine is being cranked.
NOTICE:
• Be sure to ground the spark plugs when
checking them.
• If the ignition coil has been struck or
dropped, replace it.
• Do not crank the engine for more than 2
seconds.
If sparks do not occur, perform troubleshooting
using the spark test flowchart.
(9) Using a 16 mm plug wrench, install the spark
plug.
Torque: 25 N*m (254 kgf*cm, 18 ft.*lbf)
(10) Install the ignition coil with the bolt.
Torque: 10 N*m (102 kgf*cm, 7 ft.*lbf)
(11) Connect the 6 fuel injector connectors.
(12) Install the intake air surge tank (see page EM-
34).
(13) Install the V-bank cover.
A136823
A136826