Page 20 of 2000
ENGINE - 2AZ-FE ENGINE
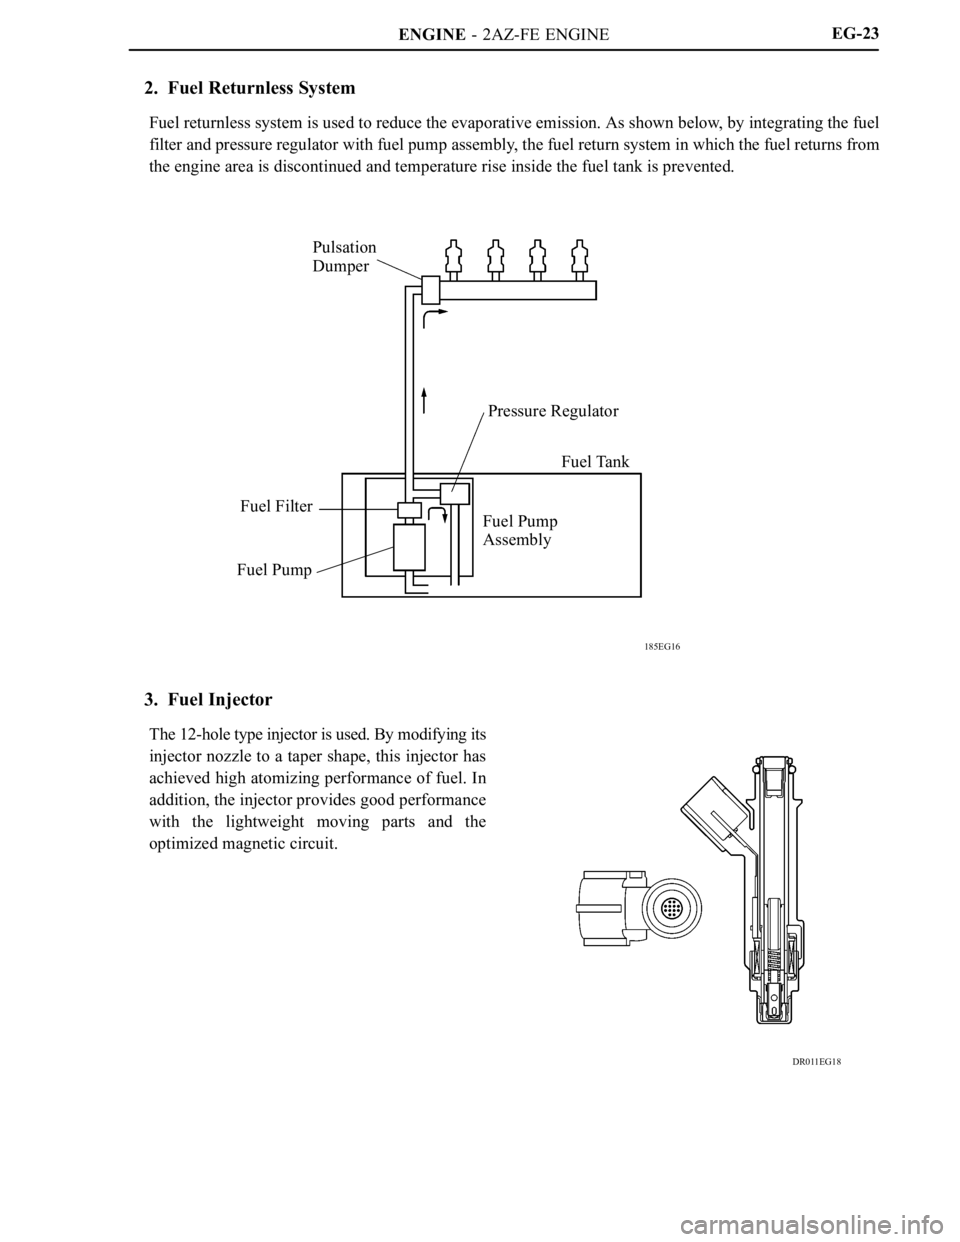
185EG16
Pulsation
Dumper
Pressure Regulator
Fuel Pump
AssemblyFuel Tank
Fuel Filter
Fuel Pump
DR011EG18
EG-23
2. Fuel Returnless System
Fuel returnless system is used to reduce the evaporative emission. As shown below, by integrating the fuel
filter and pressure regulator with fuel pump assembly, the fuel return system in which the fuel returns from
the engine area is discontinued and temperature rise inside the fuel tank is prevented.
3. Fuel Injector
The 12-hole type injector is used. By modifying its
injector nozzle to a taper shape, this injector has
achieved high atomizing performance of fuel. In
addition, the injector provides good performance
with the lightweight moving parts and the
optimized magnetic circuit.
Page 381 of 2000
SS–14SERVICE SPECIFICATIONS – 2AZ-FE ENGINE MECHANICAL
SS
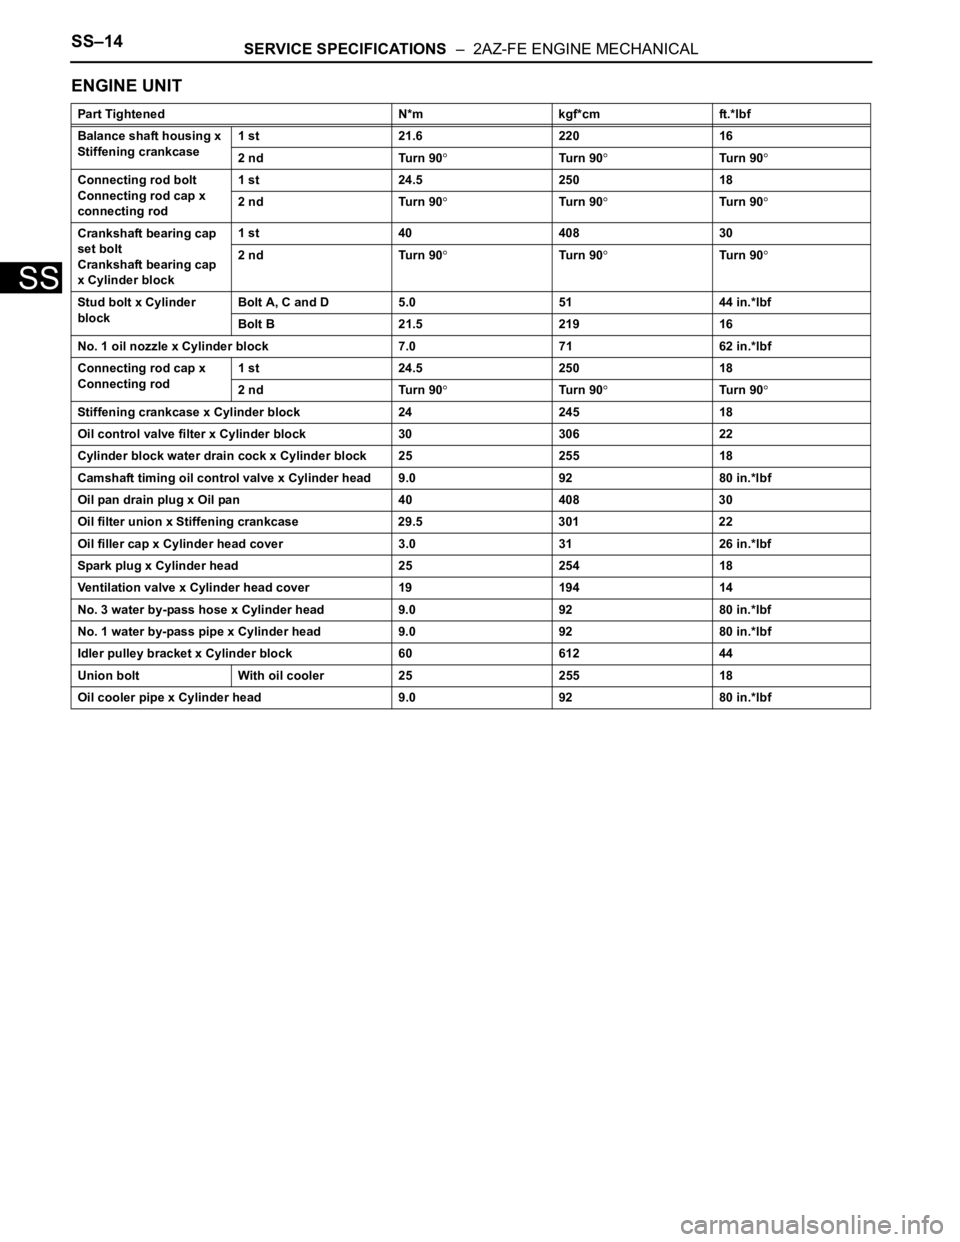
ENGINE UNIT
Part Tightened N*m kgf*cm ft.*lbf
Balance shaft housing x
Stiffening crankcase1 st 21.6 220 16
2 nd Turn 90
Tu r n 9 0Tu r n 9 0
Connecting rod bolt
Connecting rod cap x
connecting rod1 st 24.5 250 18
2 nd Turn 90
Tu r n 9 0Tu r n 9 0
Crankshaft bearing cap
set bolt
Crankshaft bearing cap
x Cylinder block1 st 40 408 30
2 nd Turn 90
Tu r n 9 0Tu r n 9 0
Stud bolt x Cylinder
blockBolt A, C and D 5.0 51 44 in.*lbf
Bolt B 21.5 219 16
No. 1 oil nozzle x Cylinder block 7.0 71 62 in.*lbf
Connecting rod cap x
Connecting rod1 st 24.5 250 18
2 nd Turn 90
Tu r n 9 0Tu r n 9 0
Stiffening crankcase x Cylinder block 24 245 18
Oil control valve filter x Cylinder block 30 306 22
Cylinder block water drain cock x Cylinder block 25 255 18
Camshaft timing oil control valve x Cylinder head 9.0 92 80 in.*lbf
Oil pan drain plug x Oil pan 40 408 30
Oil filter union x Stiffening crankcase 29.5 301 22
Oil filler cap x Cylinder head cover 3.0 31 26 in.*lbf
Spark plug x Cylinder head 25 254 18
Ventilation valve x Cylinder head cover 19 194 14
No. 3 water by-pass hose x Cylinder head 9.0 92 80 in.*lbf
No. 1 water by-pass pipe x Cylinder head 9.0 92 80 in.*lbf
Idler pulley bracket x Cylinder block 60 612 44
Union bolt With oil cooler 25 255 18
Oil cooler pipe x Cylinder head 9.0 92 80 in.*lbf
Page 384 of 2000
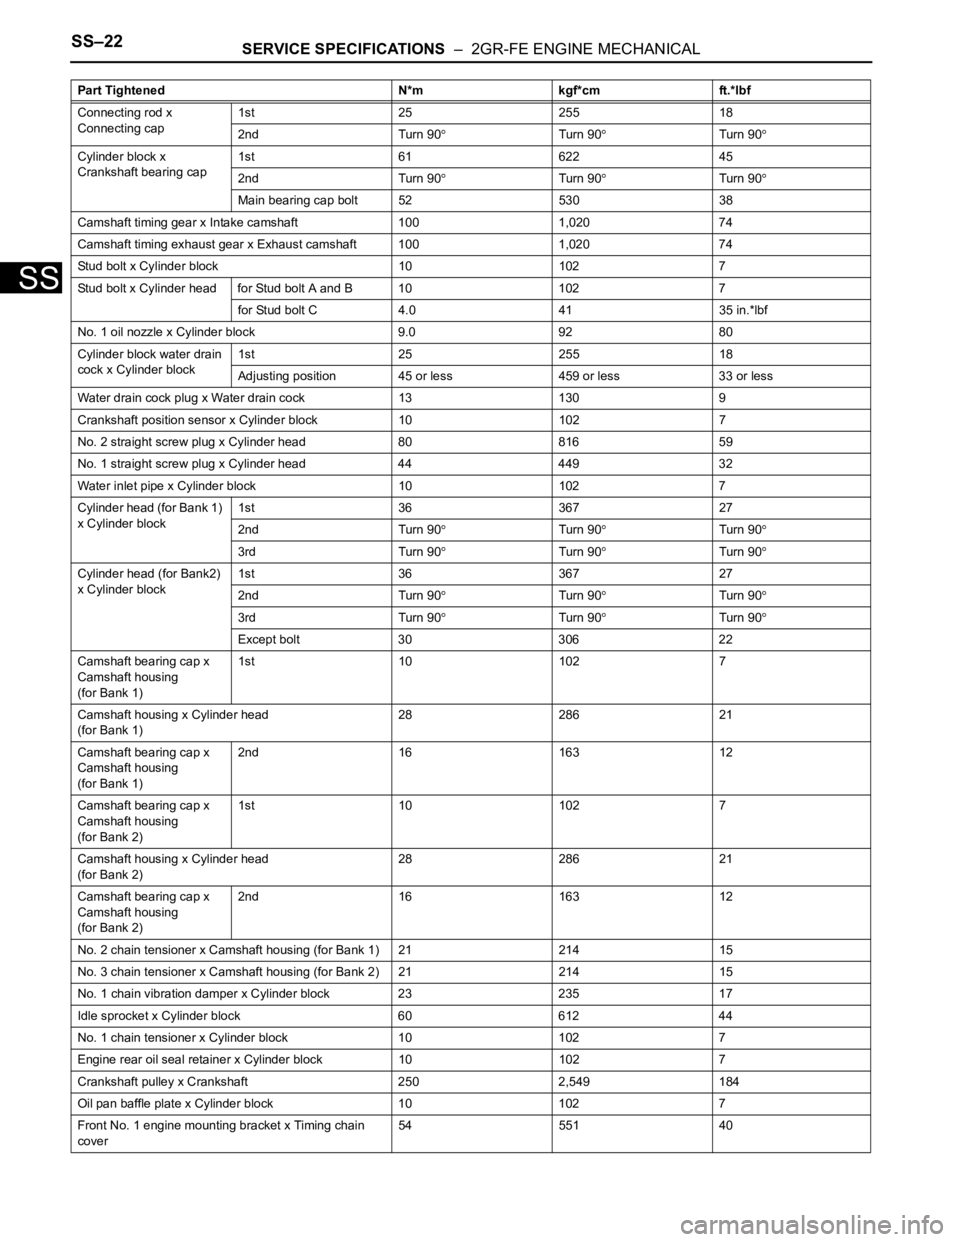
SS–22SERVICE SPECIFICATIONS – 2GR-FE ENGINE MECHANICAL
SS
Connecting rod x
Connecting cap1st 25 255 18
2nd Turn 90
Turn 90Turn 90
Cylinder block x
Crankshaft bearing cap1st 61 622 45
2nd Turn 90
Turn 90Turn 90
Main bearing cap bolt 52 530 38
Camshaft timing gear x Intake camshaft 100 1,020 74
Camshaft timing exhaust gear x Exhaust camshaft 100 1,020 74
Stud bolt x Cylinder block 10 102 7
Stud bolt x Cylinder head for Stud bolt A and B 10 102 7
for Stud bolt C 4.0 41 35 in.*lbf
No. 1 oil nozzle x Cylinder block 9.0 92 80
Cylinder block water drain
cock x Cylinder block1st 25 255 18
Adjusting position 45 or less 459 or less 33 or less
Water drain cock plug x Water drain cock 13 130 9
Crankshaft position sensor x Cylinder block 10 102 7
No. 2 straight screw plug x Cylinder head 80 816 59
No. 1 straight screw plug x Cylinder head 44 449 32
Water inlet pipe x Cylinder block 10 102 7
Cylinder head (for Bank 1)
x Cylinder block1st 36 367 27
2nd Turn 90
Turn 90Turn 90
3rd Turn 90Turn 90Turn 90
Cylinder head (for Bank2)
x Cylinder block1st 36 367 27
2nd Turn 90
Turn 90Turn 90
3rd Turn 90Turn 90Turn 90
Except bolt 30 306 22
Camshaft bearing cap x
Camshaft housing
(for Bank 1)1st 10 102 7
Camshaft housing x Cylinder head
(for Bank 1)28 286 21
Camshaft bearing cap x
Camshaft housing
(for Bank 1)2nd 16 163 12
Camshaft bearing cap x
Camshaft housing
(for Bank 2)1st 10 102 7
Camshaft housing x Cylinder head
(for Bank 2)28 286 21
Camshaft bearing cap x
Camshaft housing
(for Bank 2)2nd 16 163 12
No. 2 chain tensioner x Camshaft housing (for Bank 1) 21 214 15
No. 3 chain tensioner x Camshaft housing (for Bank 2) 21 214 15
No. 1 chain vibration damper x Cylinder block 23 235 17
Idle sprocket x Cylinder block 60 612 44
No. 1 chain tensioner x Cylinder block 10 102 7
Engine rear oil seal retainer x Cylinder block 10 102 7
Crankshaft pulley x Crankshaft 250 2,549 184
Oil pan baffle plate x Cylinder block 10 102 7
Front No. 1 engine mounting bracket x Timing chain
cover54 551 40 Part Tightened N*m kgf*cm ft.*lbf
Page 665 of 2000
EM–1382AZ-FE ENGINE MECHANICAL – ENGINE UNIT
EM
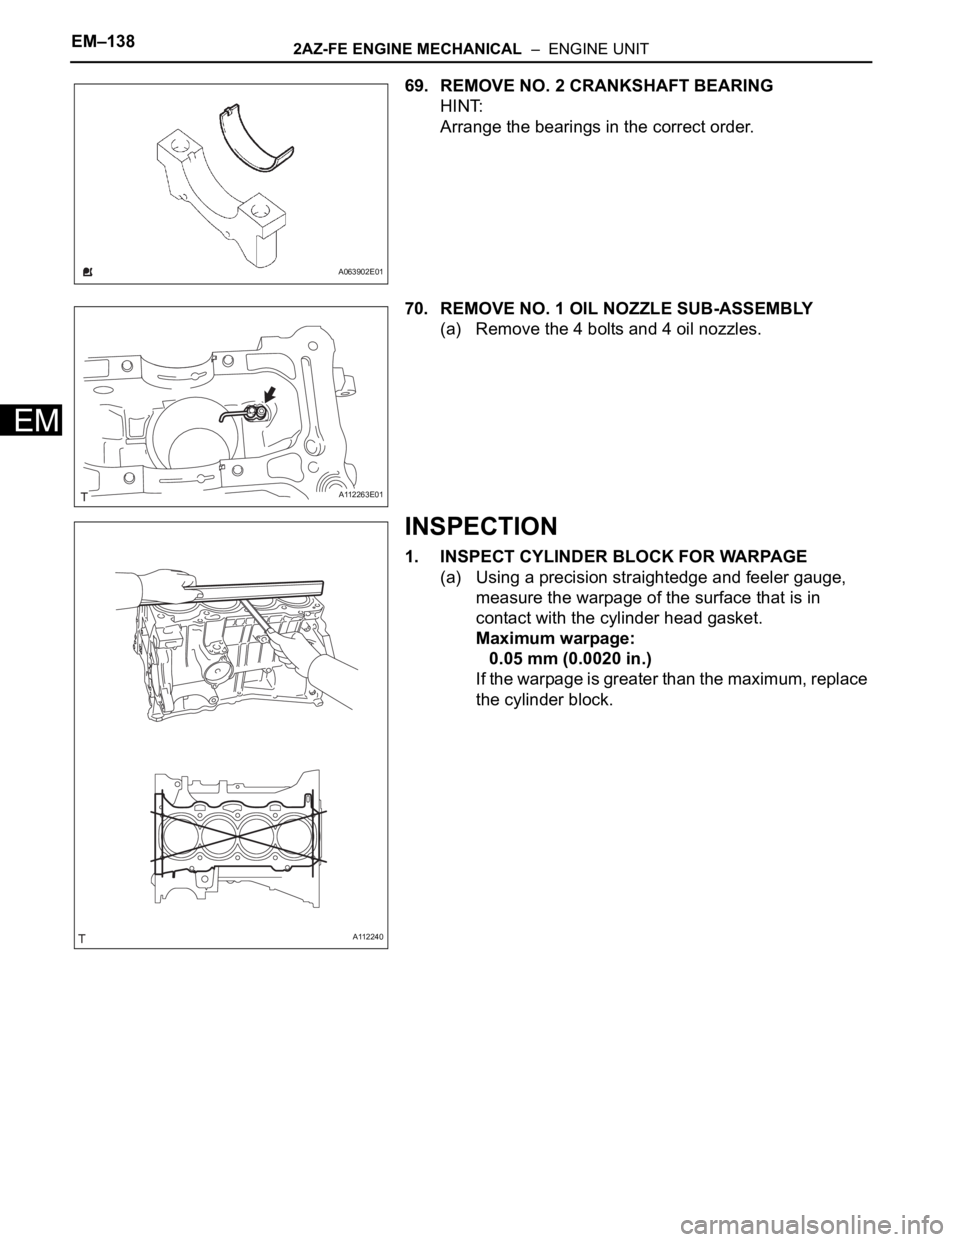
69. REMOVE NO. 2 CRANKSHAFT BEARING
HINT:
Arrange the bearings in the correct order.
70. REMOVE NO. 1 OIL NOZZLE SUB-ASSEMBLY
(a) Remove the 4 bolts and 4 oil nozzles.
INSPECTION
1. INSPECT CYLINDER BLOCK FOR WARPAGE
(a) Using a precision straightedge and feeler gauge,
measure the warpage of the surface that is in
contact with the cylinder head gasket.
Maximum warpage:
0.05 mm (0.0020 in.)
If the warpage is greater than the maximum, replace
the cylinder block.
A063902E01
A112263E01
A112240
Page 710 of 2000
2GR-FE ENGINE MECHANICAL – ENGINE UNITEM–73
EM
(v) Remove the upper bearings and upper thrust
washers from the cylinder block.
HINT:
Arrange the bearings and thrust washers in the
correct order.
57. REMOVE CYLINDER BLOCK WATER DRAIN COCK
SUB-ASSEMBLY
(a) Remove the 2 water drain cocks from the cylinder
block.
(b) Remove the water drain cock plugs from the water
drain cocks.
58. REMOVE NO. 1 OIL NOZZLE SUB-ASSEMBLY
(a) Using a 5 mm hexagon wrench, remove the 3 oil
nozzles.
(b) Check the oil nozzles for damage or clogging.
If necessary, replace the oil nozzle.
59. REMOVE PISTON RING SET
HINT:
Arrange the piston rings in the correct order.
(a) Using a piston ring expander, remove the 2
compression rings.
(b) Using a piston ring expander, remove the 2 side
rails.
(c) Remove the oil ring expander by hand.
A132018
A132017E01
A131986
A131938E01
Page 742 of 2000
2GR-FE ENGINE MECHANICAL – ENGINE UNITEM–105
EM
REASSEMBLY
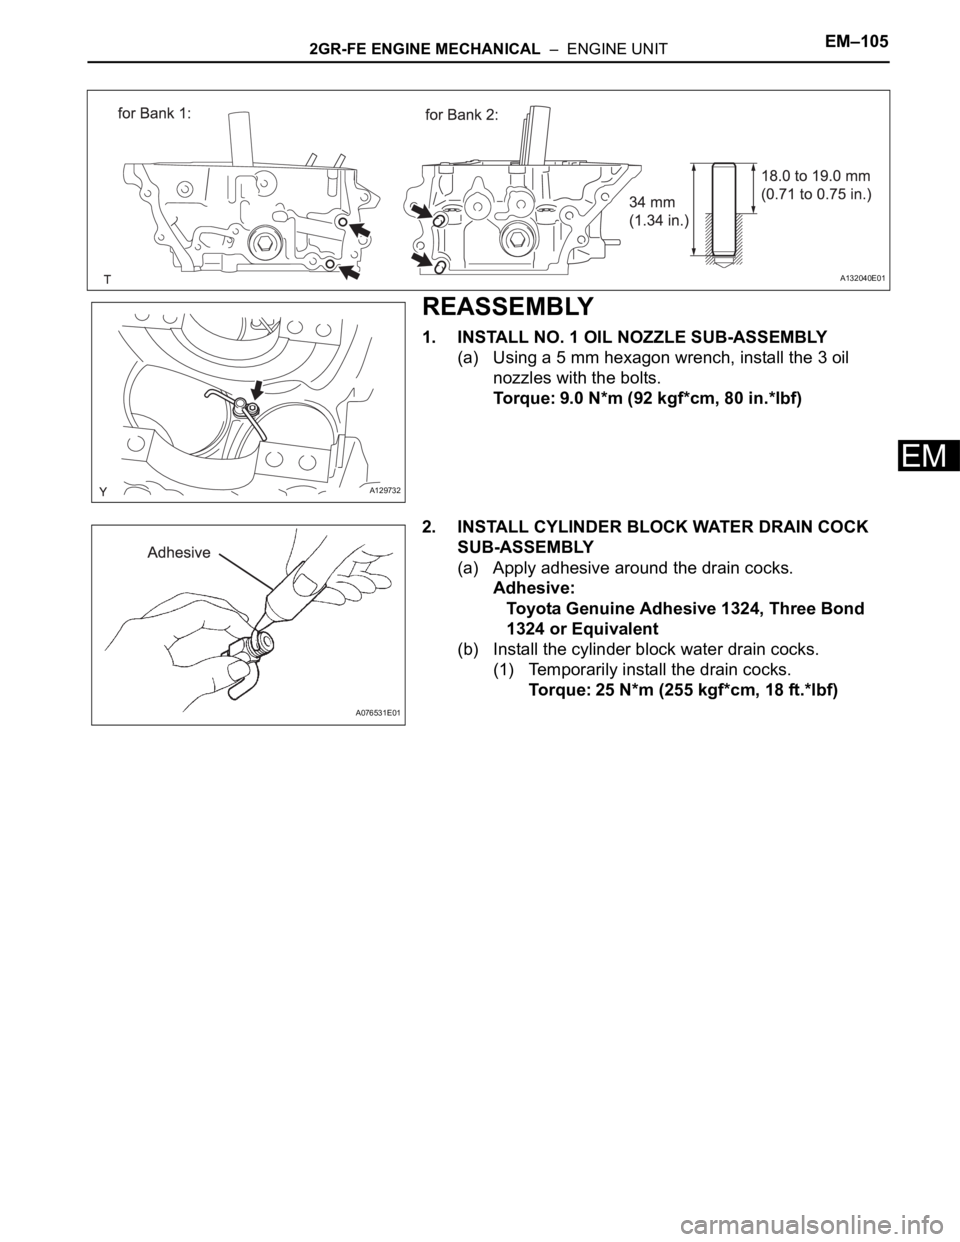
1. INSTALL NO. 1 OIL NOZZLE SUB-ASSEMBLY
(a) Using a 5 mm hexagon wrench, install the 3 oil
nozzles with the bolts.
Torque: 9.0 N*m (92 kgf*cm, 80 in.*lbf)
2. INSTALL CYLINDER BLOCK WATER DRAIN COCK
SUB-ASSEMBLY
(a) Apply adhesive around the drain cocks.
Adhesive:
Toyota Genuine Adhesive 1324, Three Bond
1324 or Equivalent
(b) Install the cylinder block water drain cocks.
(1) Temporarily install the drain cocks.
Torque: 25 N*m (255 kgf*cm, 18 ft.*lbf)
A132040E01
A129732
A076531E01
Page 786 of 2000
FU–322AZ-FE FUEL – FUEL PUMP
FU
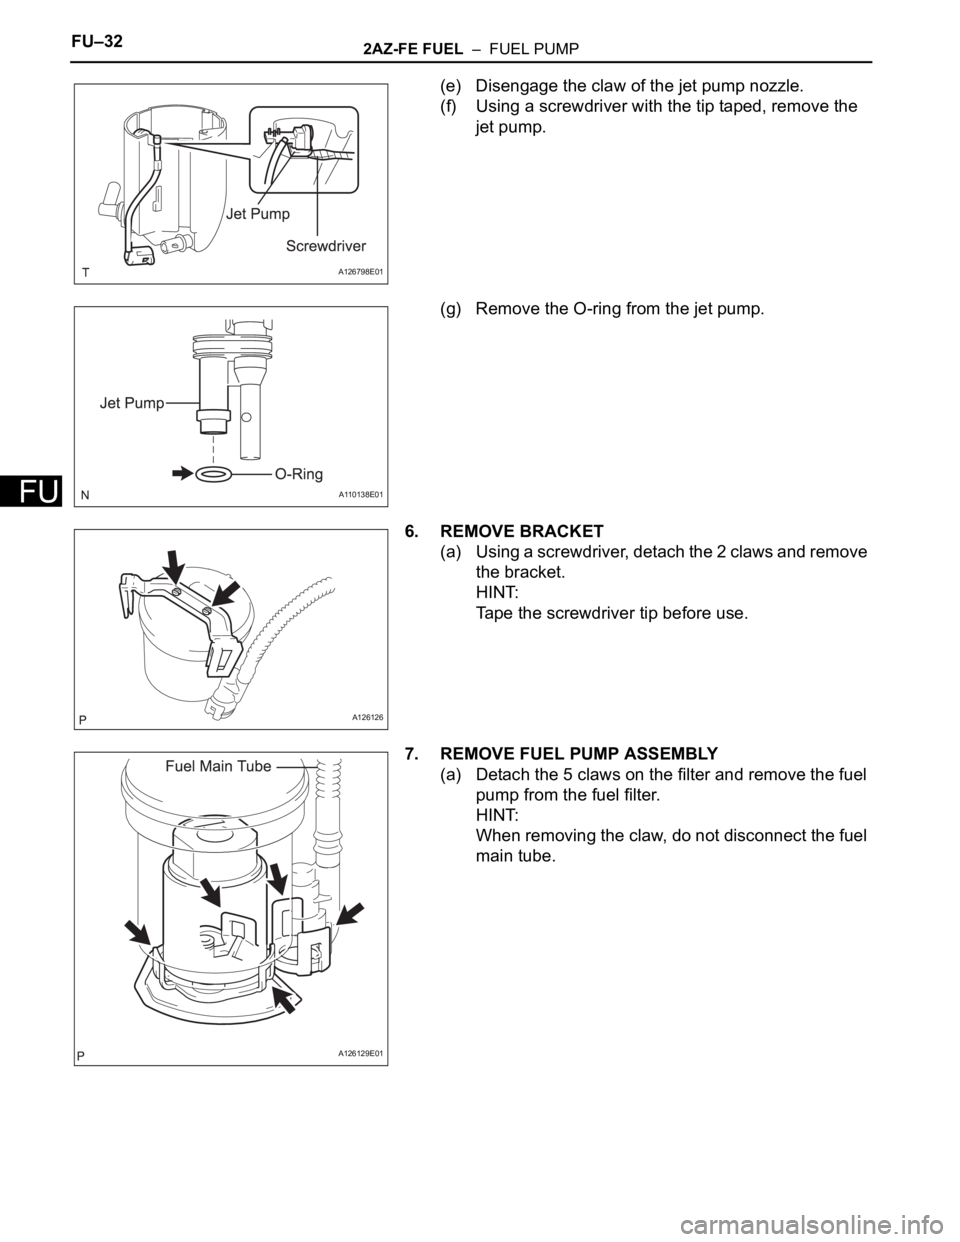
(e) Disengage the claw of the jet pump nozzle.
(f) Using a screwdriver with the tip taped, remove the
jet pump.
(g) Remove the O-ring from the jet pump.
6. REMOVE BRACKET
(a) Using a screwdriver, detach the 2 claws and remove
the bracket.
HINT:
Tape the screwdriver tip before use.
7. REMOVE FUEL PUMP ASSEMBLY
(a) Detach the 5 claws on the filter and remove the fuel
pump from the fuel filter.
HINT:
When removing the claw, do not disconnect the fuel
main tube.
A126798E01
A110138E01
A126126
A126129E01
Page 789 of 2000
2AZ-FE FUEL – FUEL PUMPFU–35
FU
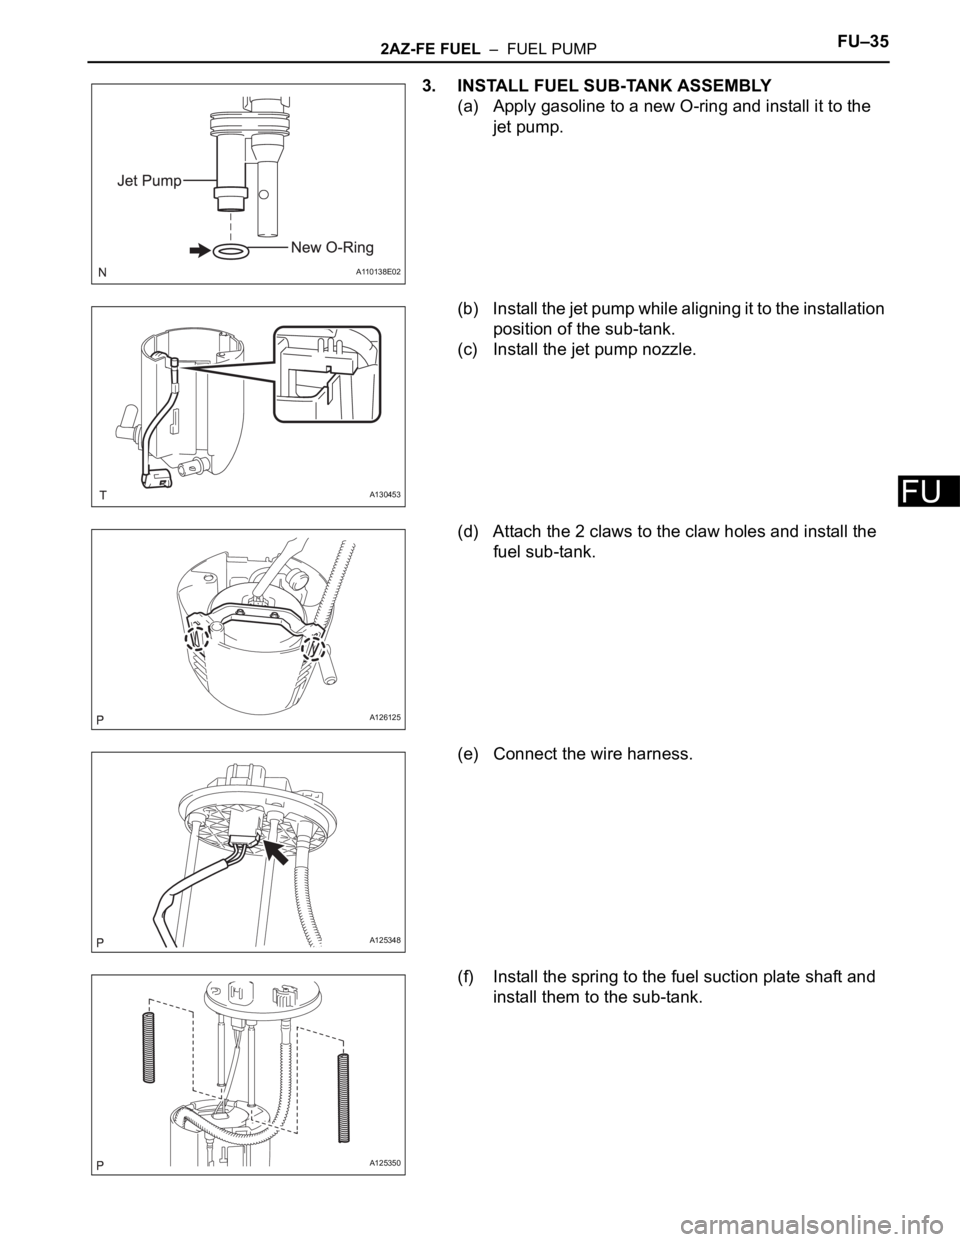
3. INSTALL FUEL SUB-TANK ASSEMBLY
(a) Apply gasoline to a new O-ring and install it to the
jet pump.
(b) Install the jet pump while aligning it to the installation
position of the sub-tank.
(c) Install the jet pump nozzle.
(d) Attach the 2 claws to the claw holes and install the
fuel sub-tank.
(e) Connect the wire harness.
(f) Install the spring to the fuel suction plate shaft and
install them to the sub-tank.
A110138E02
A130453
A126125
A125348
A125350