2006 MERCEDES-BENZ SPRINTER ignition
[x] Cancel search: ignitionPage 897 of 2305
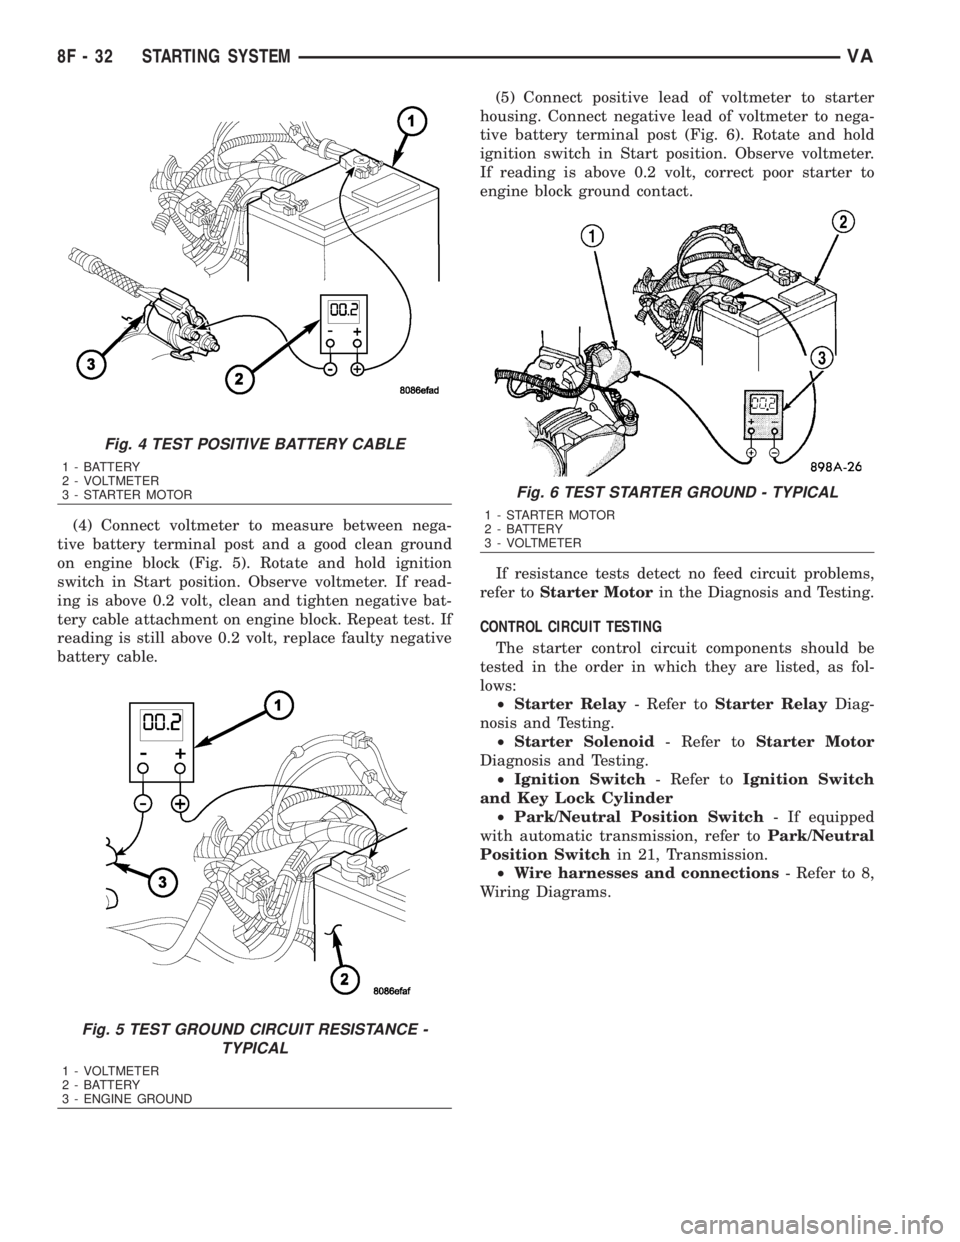
(4) Connect voltmeter to measure between nega-
tive battery terminal post and a good clean ground
on engine block (Fig. 5). Rotate and hold ignition
switch in Start position. Observe voltmeter. If read-
ing is above 0.2 volt, clean and tighten negative bat-
tery cable attachment on engine block. Repeat test. If
reading is still above 0.2 volt, replace faulty negative
battery cable.(5) Connect positive lead of voltmeter to starter
housing. Connect negative lead of voltmeter to nega-
tive battery terminal post (Fig. 6). Rotate and hold
ignition switch in Start position. Observe voltmeter.
If reading is above 0.2 volt, correct poor starter to
engine block ground contact.
If resistance tests detect no feed circuit problems,
refer toStarter Motorin the Diagnosis and Testing.
CONTROL CIRCUIT TESTING
The starter control circuit components should be
tested in the order in which they are listed, as fol-
lows:
²Starter Relay- Refer toStarter RelayDiag-
nosis and Testing.
²Starter Solenoid- Refer toStarter Motor
Diagnosis and Testing.
²Ignition Switch- Refer toIgnition Switch
and Key Lock Cylinder
²Park/Neutral Position Switch- If equipped
with automatic transmission, refer toPark/Neutral
Position Switchin 21, Transmission.
²Wire harnesses and connections- Refer to 8,
Wiring Diagrams.
Fig. 4 TEST POSITIVE BATTERY CABLE
1 - BATTERY
2 - VOLTMETER
3 - STARTER MOTOR
Fig. 5 TEST GROUND CIRCUIT RESISTANCE -
TYPICAL
1 - VOLTMETER
2 - BATTERY
3 - ENGINE GROUND
Fig. 6 TEST STARTER GROUND - TYPICAL
1 - STARTER MOTOR
2 - BATTERY
3 - VOLTMETER
8F - 32 STARTING SYSTEMVA
Page 900 of 2305
INSTALLATION
(1) Raise and support vehicle.
(2) Position starter motor to transmission housing.
(3) Install 2 mounting bolts. Refer to Torque Spec-
ifications.
(4) Lower vehicle.
(5) Connect battery cable and solenoid wiring to
solenoid (2 nuts). Refer to Torque Specifications.
(6) Position wiring harness trough and install
retaining bolt.
(7) Install new nylon tie-wraps to wiring trough.
(8) Connect negative battery cable.
STARTER MOTOR RELAY
DESCRIPTION
The starter relay is an electromechanical device
that switches battery current to the pull-in coil of the
starter solenoid when ignition switch is turned to
Start position. The starter relay is located in the
Fuse/Relay Block. The Fuse/Relay Block is located
under, and to the left side of the drivers seat. See
Fuse/Relay Block cover for relay identification and
location.
The starter relay is an International Standards
Organization (ISO) relay. Relays conforming to ISO
specifications have common physical dimensions, cur-rent capacities, terminal patterns, and terminal func-
tions.
The starter relay cannot be repaired or adjusted
and, if faulty or damaged, it must be replaced.
REMOVAL
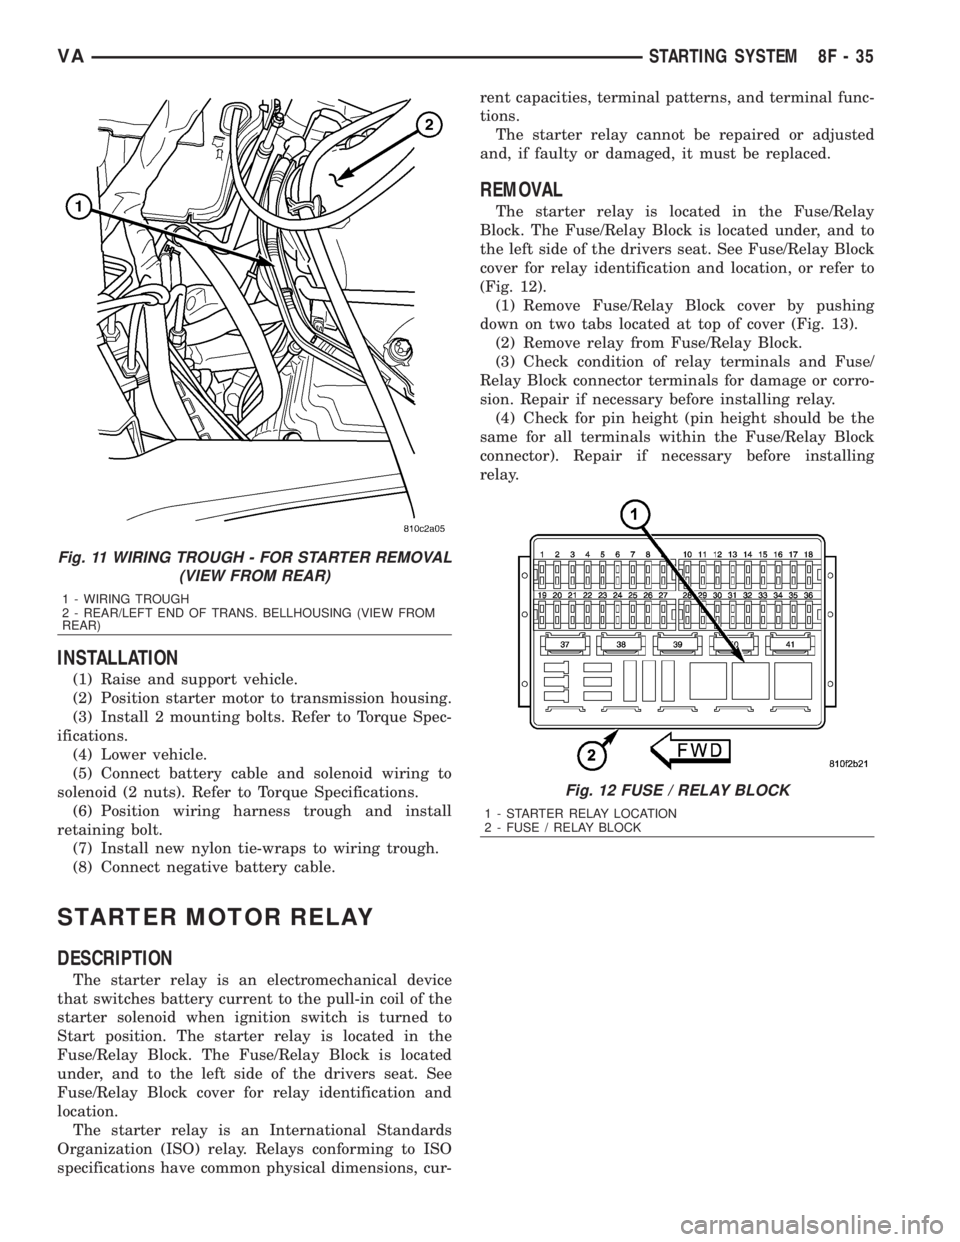
The starter relay is located in the Fuse/Relay
Block. The Fuse/Relay Block is located under, and to
the left side of the drivers seat. See Fuse/Relay Block
cover for relay identification and location, or refer to
(Fig. 12).
(1) Remove Fuse/Relay Block cover by pushing
down on two tabs located at top of cover (Fig. 13).
(2) Remove relay from Fuse/Relay Block.
(3) Check condition of relay terminals and Fuse/
Relay Block connector terminals for damage or corro-
sion. Repair if necessary before installing relay.
(4) Check for pin height (pin height should be the
same for all terminals within the Fuse/Relay Block
connector). Repair if necessary before installing
relay.
Fig. 11 WIRING TROUGH - FOR STARTER REMOVAL
(VIEW FROM REAR)
1 - WIRING TROUGH
2 - REAR/LEFT END OF TRANS. BELLHOUSING (VIEW FROM
REAR)
Fig. 12 FUSE / RELAY BLOCK
1 - STARTER RELAY LOCATION
2 - FUSE / RELAY BLOCK
VASTARTING SYSTEM 8F - 35
Page 903 of 2305
relays which allows battery current to flow to the
rear window defogger grid lines. The heated grid
lines heat the rear glass to help clear the rear win-
dow surfaces of fog or frost.
The electric backlight (EBL) system is controlled
by the EBL timing circuity, which is integral to the
rear window defogger module. A yellow indicator in
the switch will illuminate to indicate when the EBL
system is turned on.
NOTE: The EBL system turns off automatically after
approximately 10 minutes of initial operation. Each
following activation cycle of the EBL system will
last approximately five minutes.
The EBL system will be automatically turned off
after a programmed time interval of about ten min-
utes. After the initial time interval has expired, if the
rear window defogger switch is pressed to the On
position again during the same ignition cycle, the
EBL system will automatically turn off after about
five minutes.
The EBL system will automatically shut off if the
ignition switch is turned to the Off position, or it can
be turned off manually by pressing the defogger
switch a second time.
DIAGNOSIS AND TESTING
ELECTRIC BACKLIGHT (EBL) SYSTEM
NOTE: Illumination of the defogger switch indicator
lamp means that there is electrical current available
at the output of the rear window defogger logic cir-
cuitry, but does not confirm that the electrical cur-
rent is reaching the rear glass heating grid lines.
NOTE: For circuit descriptions and diagrams of the
EBL system, refer to 8W - WIRING DIAGRAM
INFORMATION.
Operation of the electrical backlight (EBL) system
can be confirmed by the following:
(1) Turn the ignition switch to the On position. Set
the rear window defogger switch in the On position.
The rear window defogger operation can be checked
by feeling the rear window glass. A distinct difference
in temperature between the grid lines and the adja-
cent clear glass should be detected within three to
four minutes of operation.
(2) If a temperature difference is not detected, use
a 12-volt DC voltmeter and contact the rear glass
heating grid terminal B with the negative lead, and
terminal A with the positive lead (Fig. 2). The volt-
meter should read battery voltage. If the voltmeter
does not read battery voltage, check the following:²Confirm that the ignition switch is in the On
position.
²Make sure that the rear glass heating grid feed
wires and ground wires are connected to the window
terminals. Confirm that the ground wires have conti-
nuity to ground.
²Check that fuse 7 (15 amp) in fuse block #1 and
fuse 10 (30 amp) in the fuse/relay block are OK. The
fuses must be tight in there receptacles and all elec-
trical connections must be secure.
(3) When the above steps have been completed and
the rear glass heating grid is still inoperative, one or
more of the following is faulty.
²Rear window defogger switch in the instrument
panel.
²Rear window defogger (EBL) relays in the fuse/
relay block.
²Rear window defogger (EBL) relay control circu-
ity in the rear window defogger module.
²Check for a loose wire connector or a wire
pushed out of a connector.
²Rear window grid lines (all grid lines would
have to be broken, or the power feed or ground wire
not connected, for the entire heating grid to be inop-
erative).
(4) If the system operation has been verified but
the defogger switch indicator does not illuminate,
check for voltage at the defogger indicator from the
rear window defogger module when the defogger
switch is activated. If power is present, replace the
rear window defogger switch.
(5) If broken defogger grid lines are suspected, use
a 12-volt DC voltmeter and contact terminal B with
the negative lead and each rear glass heating grid
line at it's mid-point with the positive lead. The volt-
meter should read approximately 6 volts at each grid
line mid-point C. If the voltmeter does not read
approximately 6 volts, repair the open grid line(s)
(Refer to 8 - ELECTRICAL/HEATED GLASS/REAR
WINDOW DEFOGGER GRID - STANDARD PROCE-
DURE).
8G - 2 HEATED GLASSVA
Page 906 of 2305
energizes the timing circuit of the rear window defog-
ger module which then activates the rear window
defogger (EBL) relays. The EBL relays controls the
current flow to the rear window defogger grids. The
EBL system will operate for approximately five min-
utes or until the rear window defogger switch or igni-
tion switch is turned off. Refer to 8 - ELECTRICAL/
HEATED GLASS - DIAGNOSIS AND TESTING for
diagnosis and testing of the rear window defogger
switch.
The rear window defogger switch cannot be
repaired and, if faulty or damaged, it must be
replaced.
DIAGNOSIS AND TESTING
REAR WINDOW DEFOGGER SWITCH
WARNING: On vehicles equipped with airbags, dis-
able the airbag system before attempting any steer-
ing wheel, steering column, or instrument panel
component diagnosis or service. Disconnect and
isolate the battery negative (ground) cable, then
wait two minutes for the airbag system capacitor to
discharge before performing further diagnosis or
service. This is the only sure way to disable the air-
bag system. Failure to take the proper precautions
could result in an accidental airbag deployment and
possible personal injury.
NOTE: The rear window defogger switch may be
tested in the vehicle or out of the vehicle, on a
bench.
NOTE: For circuit descriptions and diagrams of the
rear window defogger system, refer to 8W - WIRING
DIAGRAM INFORMATION.
(1) Remove the rear window defogger switch from
the instrument panel, but leave the switch connected
(Refer to 8 - ELECTRICAL/HEATED GLASS/REAR
WINDOW DEFOGGER SWITCH - REMOVAL).
(2) Turn the ignition switch ON.
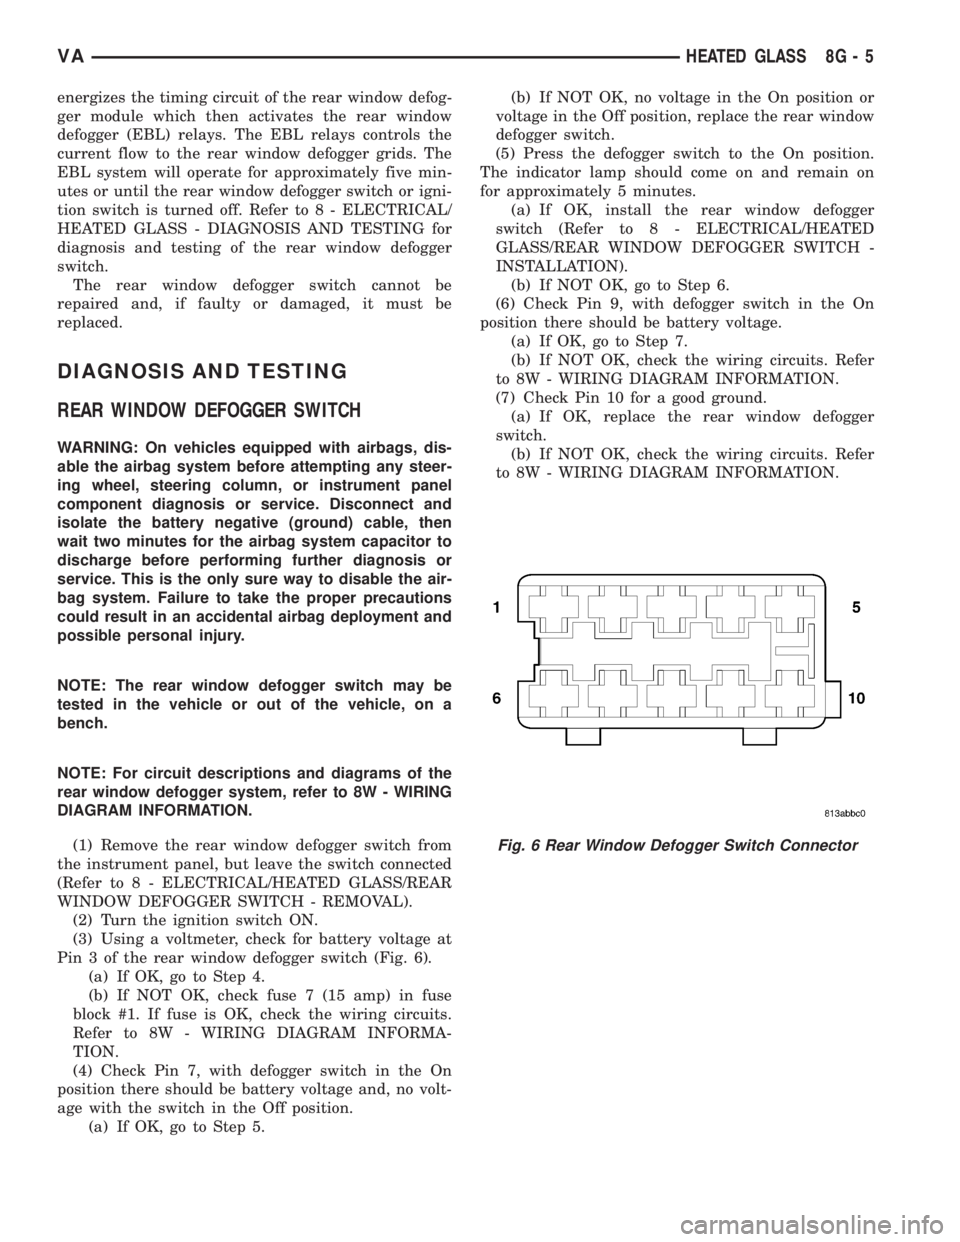
(3) Using a voltmeter, check for battery voltage at
Pin 3 of the rear window defogger switch (Fig. 6).
(a) If OK, go to Step 4.
(b) If NOT OK, check fuse 7 (15 amp) in fuse
block #1. If fuse is OK, check the wiring circuits.
Refer to 8W - WIRING DIAGRAM INFORMA-
TION.
(4) Check Pin 7, with defogger switch in the On
position there should be battery voltage and, no volt-
age with the switch in the Off position.
(a) If OK, go to Step 5.(b) If NOT OK, no voltage in the On position or
voltage in the Off position, replace the rear window
defogger switch.
(5) Press the defogger switch to the On position.
The indicator lamp should come on and remain on
for approximately 5 minutes.
(a) If OK, install the rear window defogger
switch (Refer to 8 - ELECTRICAL/HEATED
GLASS/REAR WINDOW DEFOGGER SWITCH -
INSTALLATION).
(b) If NOT OK, go to Step 6.
(6) Check Pin 9, with defogger switch in the On
position there should be battery voltage.
(a) If OK, go to Step 7.
(b) If NOT OK, check the wiring circuits. Refer
to 8W - WIRING DIAGRAM INFORMATION.
(7) Check Pin 10 for a good ground.
(a) If OK, replace the rear window defogger
switch.
(b) If NOT OK, check the wiring circuits. Refer
to 8W - WIRING DIAGRAM INFORMATION.
Fig. 6 Rear Window Defogger Switch Connector
VAHEATED GLASS 8G - 5
Page 907 of 2305
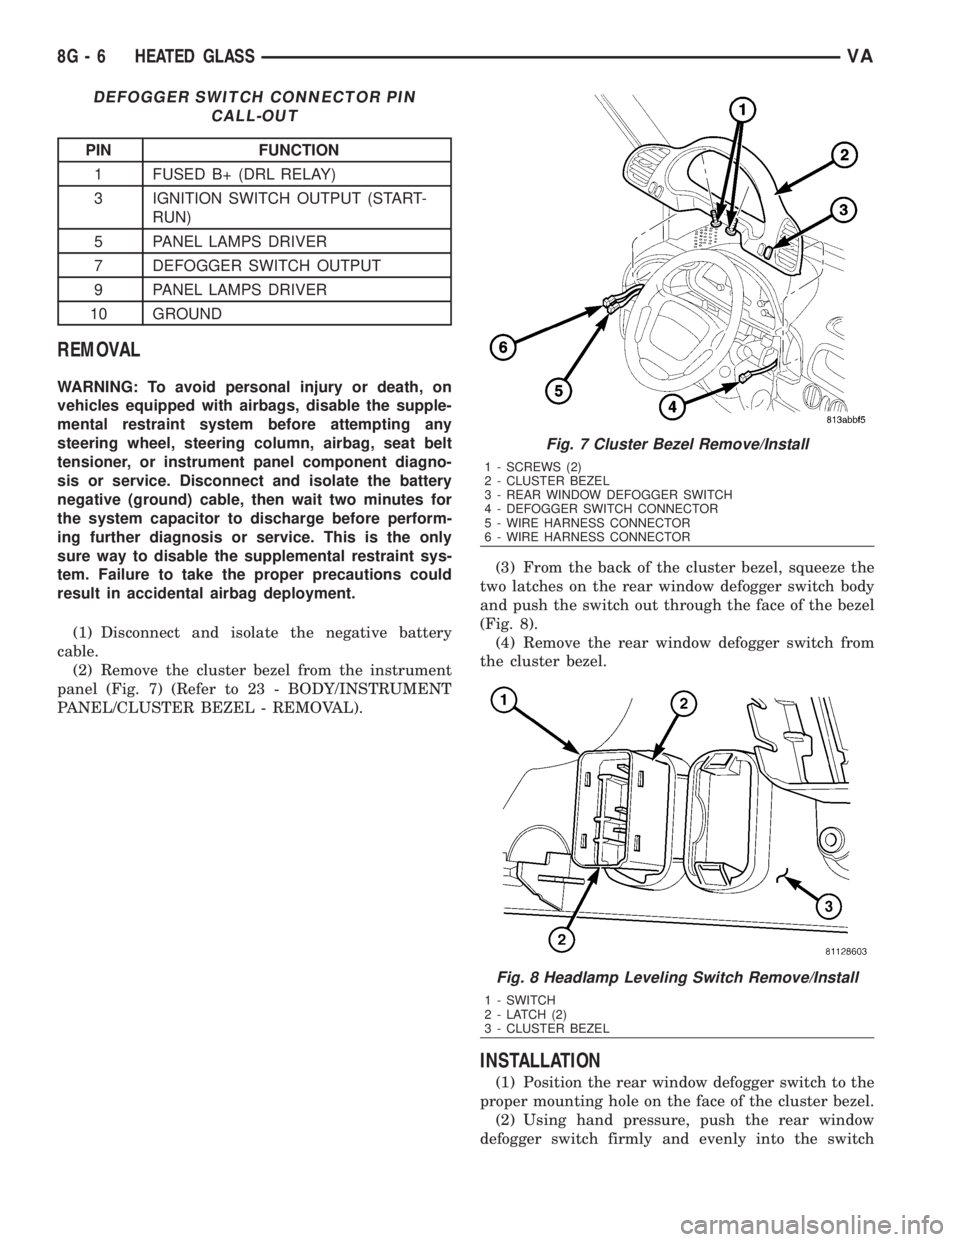
DEFOGGER SWITCH CONNECTOR PIN
CALL-OUT
PIN FUNCTION
1 FUSED B+ (DRL RELAY)
3 IGNITION SWITCH OUTPUT (START-
RUN)
5 PANEL LAMPS DRIVER
7 DEFOGGER SWITCH OUTPUT
9 PANEL LAMPS DRIVER
10 GROUND
REMOVAL
WARNING: To avoid personal injury or death, on
vehicles equipped with airbags, disable the supple-
mental restraint system before attempting any
steering wheel, steering column, airbag, seat belt
tensioner, or instrument panel component diagno-
sis or service. Disconnect and isolate the battery
negative (ground) cable, then wait two minutes for
the system capacitor to discharge before perform-
ing further diagnosis or service. This is the only
sure way to disable the supplemental restraint sys-
tem. Failure to take the proper precautions could
result in accidental airbag deployment.
(1) Disconnect and isolate the negative battery
cable.
(2) Remove the cluster bezel from the instrument
panel (Fig. 7) (Refer to 23 - BODY/INSTRUMENT
PANEL/CLUSTER BEZEL - REMOVAL).(3) From the back of the cluster bezel, squeeze the
two latches on the rear window defogger switch body
and push the switch out through the face of the bezel
(Fig. 8).
(4) Remove the rear window defogger switch from
the cluster bezel.
INSTALLATION
(1) Position the rear window defogger switch to the
proper mounting hole on the face of the cluster bezel.
(2) Using hand pressure, push the rear window
defogger switch firmly and evenly into the switch
Fig. 7 Cluster Bezel Remove/Install
1 - SCREWS (2)
2 - CLUSTER BEZEL
3 - REAR WINDOW DEFOGGER SWITCH
4 - DEFOGGER SWITCH CONNECTOR
5 - WIRE HARNESS CONNECTOR
6 - WIRE HARNESS CONNECTOR
Fig. 8 Headlamp Leveling Switch Remove/Install
1 - SWITCH
2 - LATCH (2)
3 - CLUSTER BEZEL
8G - 6 HEATED GLASSVA
Page 910 of 2305

HEATED MIRRORS
TABLE OF CONTENTS
page page
HEATED MIRRORS
DESCRIPTION..........................9OPERATION............................9
HEATED MIRRORS
DESCRIPTION
The available heated outside rear view mirror sys-
tem is operational anytime the ignition switch is in
the Run position (Fig. 1). When energized, each of
these heater grids produce heat to help clear the out-
side mirrors of ice, snow, or fog.
OPERATION
The electric heater grid located behind the glass of
each of the outside rear view mirrors is energized
when the ignition switch is turned to the Run posi-
tion. The heater grids heat the glass surface of the
outside rear view mirrors.
If the outside mirror heating grids are inoperative,
refer to 8W - WIRING DIAGRAM INFORMATION.
The heating grid behind each outside mirror glass
cannot be repaired and, if faulty or damaged, the
mirror glass must be replaced (Refer to 23 - BODY/
EXTERIOR/MIRROR-SIDE VIEW - GLASS -
REMOVAL).
Fig. 1 SIDE VIEW MIRROR - GLASS
1 - MIRROR GLASS
2 - ELECTRICAL CONNECTORS
3 - GUIDES
VAHEATED MIRRORS 8G - 9
Page 912 of 2305

The heated seat system components operate on
battery current received through a fuse in the Fuse
Block on a fused ignition switch output (run-acc) cir-
cuit so that the system will only operate when the
ignition switch is in the On or Accessory positions.
The heated seat system will be turned Off automati-
cally whenever the ignition switch is turned to any
position except On or Accessory. Also, the heated seat
system will not operate when the surface tempera-
ture of the seat cushion cover at either heated seat
sensor is above the designed temperature set points
of the system.DIAGNOSIS AND TESTING - HEATED SEATS
Refer toWiringfor the appropriate wiring infor-
mation. The wiring information includes wiring dia-
grams, proper wire and connector repair procedures,
further details on wire harness routing and reten-
tion, as well as pin-out and location views for the
various wire harness connectors, splices and grounds.
HEATED SEAT SYSTEM DIAGNOSIS
CONDITION POSSIBLE CAUSES CORRECTION
NO HEATED SEAT SWITCH
ILLUMINATION WITH IGNI-
TION ON1. Faulty fuse. 1. Check heated seat fuse in Fuse Block. Re-
place fuse, if required.
2. Wiring faulty. 2. Check fused ignition switch output (run-acc)
circuit from heated seat switch connector to igni-
tion switch. Repair, if required.
3. Ground faulty. 3. Check for ground at heated seat switch con-
nector. Repair, if required.
4. Faulty switch. 4. Refer to Heated Seat Switch for the proper
switch diagnosis and testing procedures.
DRIVER HEATED SEAT
SWITCH
DESCRIPTION
The heated seat switches are located on the instru-
ment panel, in the accessory switch bezel. The two,
momentary rocker type switches provide a signal to
the Heated Seat Relay through separate hard wired
circuits. Each switch contains two light emitting
diodes (LED), one for each High and Low setting to
let the occupant know that the seat heater system is
on.
The heated seat switches and their LED's cannot
be repaired. If either switch is faulty or damaged the
entire switch must be replaced.
OPERATION
There are three modes that can be selected with
each of the heated seat switches: Off, Low, and High.
When the top of the switch rocker is depressed, the
low mode is selected and the low mode LED indicator
illuminates. Depressing the top of the switch rocker a
second time will turn the heated seat to Off. This
same process is repeated for High heat setting. The
heated seats will automatically return to the Off
mode anytime the vehicle ignition switch is turned
Off.Both switches provide separate hard wire inputs to
the Heated Seat Relay to indicate the selected mode.
The Heated Seat Relay responds to the heated seat
switch messages by controlling the output to the seat
heater elements of the selected seat.
DIAGNOSIS AND TESTING - DRIVER HEATED
SEAT SWITCH
For circuit description and diagrams, refer toWir-
ing.
(1) Inspect the Heated Seat Switches for apparent
damage or sticking/binding and replace if required.
Refer to Heated Seat Switch Removal and Installa-
tion in this section.
(2) Replace the heated seat switch with a known
good unit and retest the heated seat system.
REMOVAL
(1) Disconnect and isolate the negative battery
cable.
(2) Remove the gear selector bezel trim. Refer to
the Body section for the procedure.
(3) Remove the storage bin. Refer to the Body sec-
tion for the procedure.
(4) Remove the switch bezel retaining screw and
remove the switch bezel from the instrument panel.
Refer to the Body section for the procedure.
(5) Disconnect electrical connections.
VAHEATED SEATS 8G - 11
Page 915 of 2305
second time will turn the heated seat to Off. This
same process is repeated for High heat setting. The
heated seats will automatically return to the Off
mode anytime the vehicle ignition switch is turned
Off.
Both switches provide separate hard wire inputs to
the Heated Seat Relay to indicate the selected mode.
The Heated Seat Relay responds to the heated seat
switch messages by controlling the output to the seat
heater elements of the selected seat.
DIAGNOSIS AND TESTING - PASSENGER
HEATED SEAT SWITCH
For circuit description and diagrams, refer toWir-
ing.
(1) Inspect the Heated Seat Switches for apparent
damage or sticking/binding and replace if required.
Refer to Heated Seat Switch Removal and Installa-
tion in this section.
(2) Replace the heated seat switch with a known
good unit and retest the heated seat system.
REMOVAL
(1) Disconnect and isolate the negative battery
cable.
(2) Remove the gear selector bezel trim. Refer to
the Body section for the procedure.
(3) Remove the storage bin. Refer to the Body sec-
tion for the procedure.
(4) Remove the switch bezel retaining screw and
remove the switch bezel from the instrument panel.
Refer to the Body section for the procedure.
(5) Disconnect electrical connections.
(6) Working from the underside of the switch, gen-
tly rock the switch back and forth out of its mounting
location in the switch bezel.
INSTALLATION
(1) Install the heated seat switch in its mounting
location in the switch bezel.
(2) Connect electrical connections.
(3) Position the switch bezel and install the retain-
ing screw. Refer to the Body section for the proce-
dure.
(4) Install the storage bin. Refer to the Body sec-
tion for the procedure.
(5) Install the gear selector bezel trim. Refer to the
Body section for the procedure.
(6) Connect the negative battery cable.
8G - 14 HEATED SEATSVA