Page 9 of 58
9
Before Use
If necessary
Rear View
Monitor
MEMO
MAZDA6_NAVI_EA.book Page 9 Wednesday, December 28, 2005 1:36 PM
Page 10 of 58
10
Before Use
Navigation
Set Up
RDM-TMCIf
necessary
Rear View
Monitor
Names and Functions
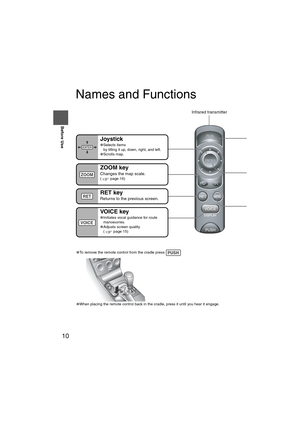
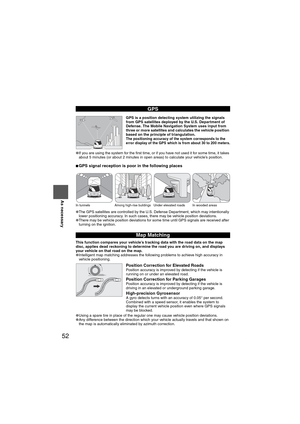
●To remove the remote control from the cradle press
●When placing the remote control back in the cradle, press it until you hear it engage. PUSH
Joystick
●Selects items
by tilting it up, down, right, and left.
●Scrolls map.
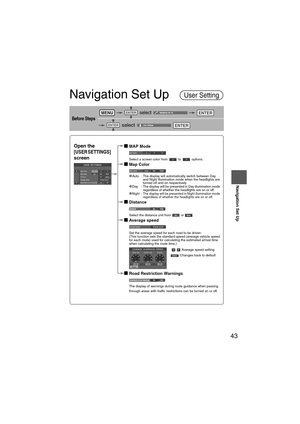
ZOOM key
Changes the map scale.( page 16)
RET key
Returns to the previous screen.
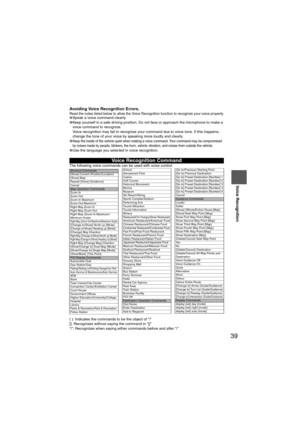
VOIC E key
●Initiates vocal guidance for route
manoeuvres.
●Adjusts screen quality.
( page 15)
POS (
Displays
ENTE
●Execute
●Display
MENU
Select a(pag
Infrared transmitter
VOICE
POS
ENTER
MENU
ENTER
ZOOM
RET
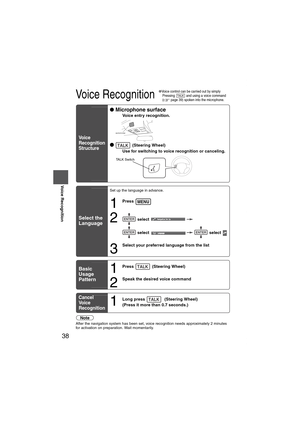
TA L K
Use for s
recognitTALK
MAZDA6_NAVI_EA.book Page 10 Wednesday, December 28, 2005 1:36 PM
Page 11 of 58
 11
Before Use
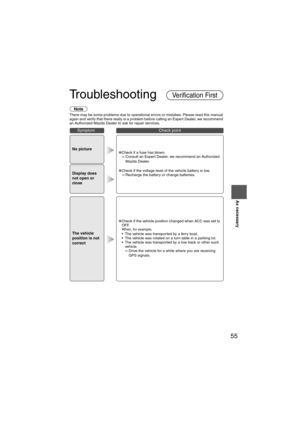
If necessary
Rear View
Monitor
u hear it engage.
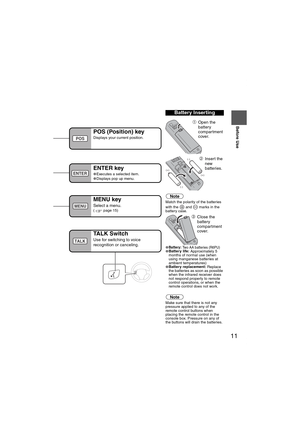
Note
Match the polarity of the batteries
with the and marks in the
battery case.
●
Battery:
Two AA batteries (R6PU)●Battery")
11
Before Use
If necessary
Rear View
Monitor
u hear it engage.
Note
Match the polarity of the batteries
with the and marks in the
battery case.
●
Battery:
Two AA batteries (R6PU)●Battery life:
Approximately 5
months of normal use (when
using manganese batteries at
ambient temperatures)
●Battery replacement:
Replace
the batteries as soon as possible
when the infrared receiver does
not respond properly to remote
control operations, or when the
remote control does not work.
Note
Make sure that there is not any
pressure applied to any of the
remote control buttons when
placing the remote control in the
console box. Pressure on any of
the buttons will drain the batteries.
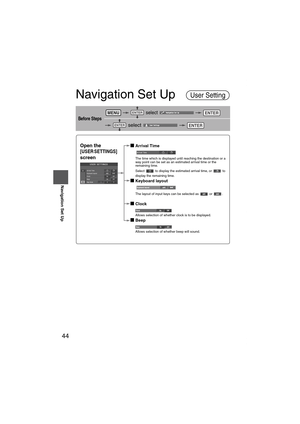
Battery Inserting
➀Open the
battery
compartment
cover.
➁Insert the
new
batteries.
➂Close the
battery
compartment
cover.
POS (Position) key
Displays your current position.
ENTER key
●Executes a selected item.
●Displays pop up menu.
MENU key
Select a menu.( page 15)
nfrared transmitter
POS
ENTER
MENU
TALK Switch
Use for switching to voice
recognition or canceling.TALK
MAZDA6_NAVI_EA.book Page 11 Wednesday, December 28, 2005 1:36 PM
Page 12 of 58
 12
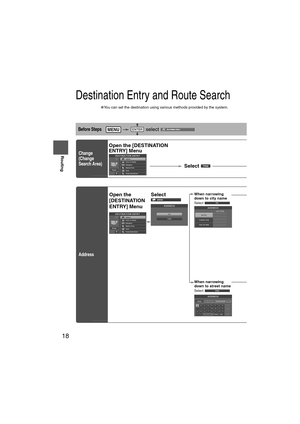
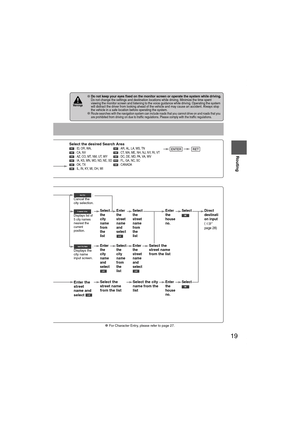
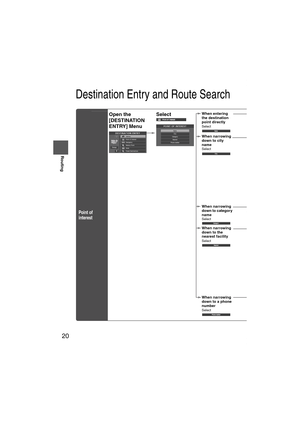
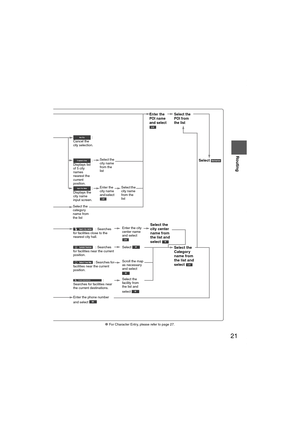
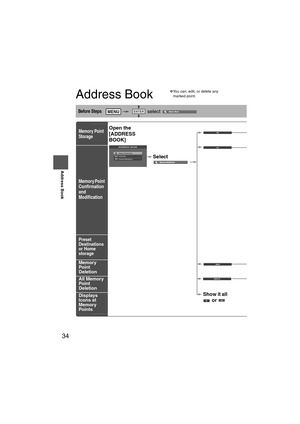
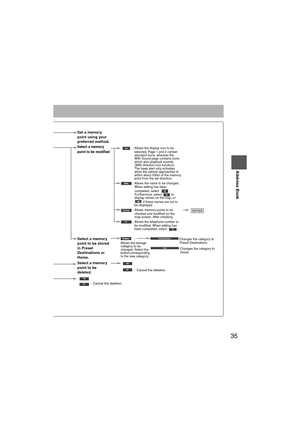
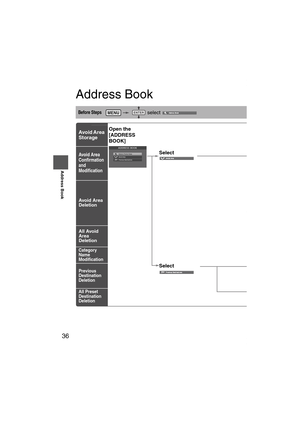
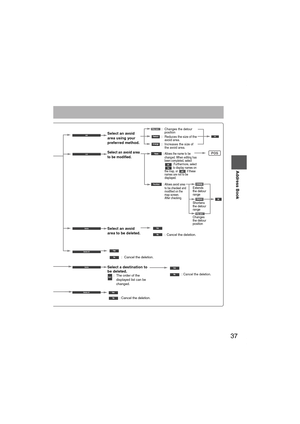
RoutingAddress
Book
Getting started
Activation
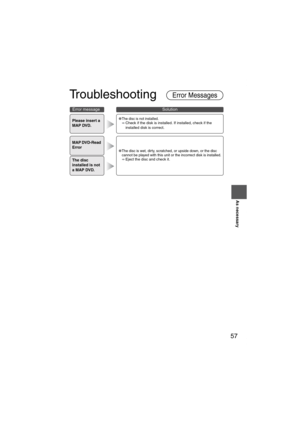
Insert the map disc into the unit to start the Mobile Navigation System.
Note
●The map disc cannot be inserted or ejected while the ignition switch")
12
RoutingAddress
Book
Getting started
Activation
Insert the map disc into the unit to start the Mobile Navigation System.
Note
●The map disc cannot be inserted or ejected while the ignition switch is in the OFF position.
●Remember that the battery can run down if the ignition switch is kept in the ON or ACC
position for a long time while the engine not running.
■Map Disc
●Refer to “Handling and Care of Map Discs” to know how to handle a map
disc (
page 58).
1
Turn the ignition switch
to the ON position and
press
to open
the display.
Note
●This display angle can be adjusted by pressing .
When the is
pressed, the display
angle changes in
stages.
●Press to close the display.
2
Insert the map disc
with the printed side
facing up.Note
●The main unit is located under the front passenger
seat.
●Condensation may form on the optical lens or the
map disc inside the unit when the temperature in
the vehicle increases in a short time such as when
heating the car on a cold day. This condensation
may cause malfunctions. If so, unload the map disc
and do not operate the unit for approximately 1
hour. Wipe the condensation off the map disc with a
soft cloth.
If the unit does not operate correctly after 1 hour,
consult an Authorized Mazda Dealer.
Cautions
OPENTILT
TILT
OPEN
(CAUTION) screen
MAZDA6_NAVI_EA.book Page 12 Wednesday, December 28, 2005 1:36 PM
Page 13 of 58
13
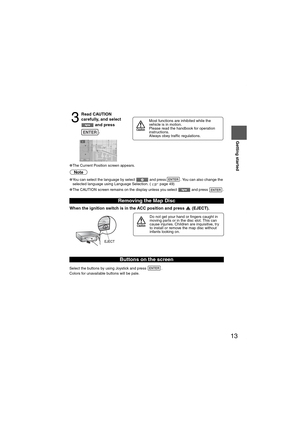
Getting started
●The Current Position screen appears.
Note
●You can select the language by select and press . You can also change the
selected language using Language Selection. ( page 49)
●The CAUTION screen remains on the display unless you select and press .
When the ignition switch is in the ACC position and press (EJECT).
Select the buttons by using Joystick and press .
Colors for unavailable buttons will be pale.
3
Read CAUTION
carefully, and select
and press
.
Removing the Map Disc
Buttons on the screen
ENTER
Most functions are inhibited while the
vehicle is in motion.
Please read the handbook for operation
instructions.
Always obey traffic regulations.
Caution
ENTER
ENTER
Do not get your hand or fingers caught in
moving parts or in the disc slot. This can
cause injuries. Children are inquisitive, try
to install or remove the map disc without
infants looking on.
Caution
EJECT
ENTER
MAZDA6_NAVI_EA.book Page 13 Wednesday, December 28, 2005 1:36 PM
Page 14 of 58
 14
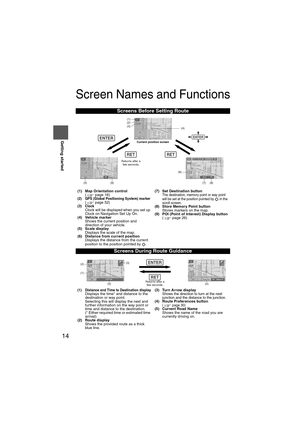
RoutingAddress
Book
Getting started
Screen Names and Functions
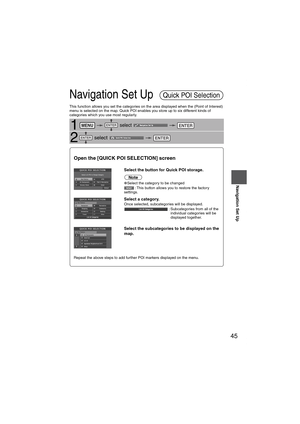
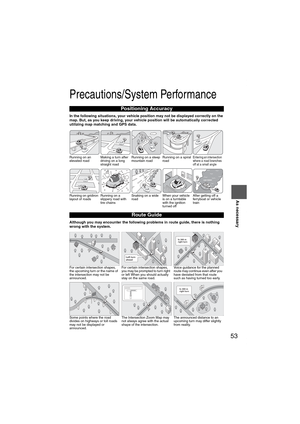
Screens Before Setting Route
(1) Map Orientation control
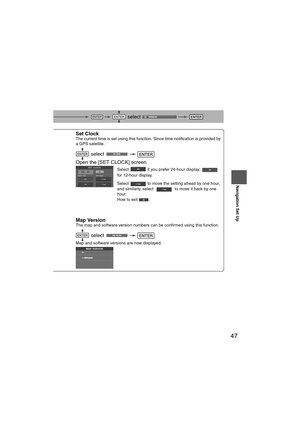
( page 16)
(2) GPS (Global Positioning System) marker( page 52)(3) ClockCloc")
14
RoutingAddress
Book
Getting started
Screen Names and Functions
Screens Before Setting Route
(1) Map Orientation control
( page 16)
(2) GPS (Global Positioning System) marker( page 52)(3) ClockClock will be displayed when you set up
Clock on Navigation Set Up On.
(4) Vehicle marker
Shows the current position and
direction of your vehicle.
(5) Scale display
Displays the scale of the map.
(6) Distance from current position
Displays the distance from the current
position to the position pointed by .(7) Set Destination button
The destination, memory point or way point
will be set at the position pointed by in the
scroll screen.
(8) Store Memory Point button
Stores markers on the map.
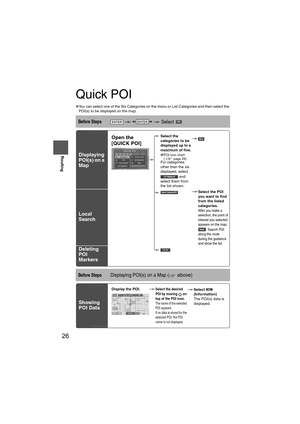
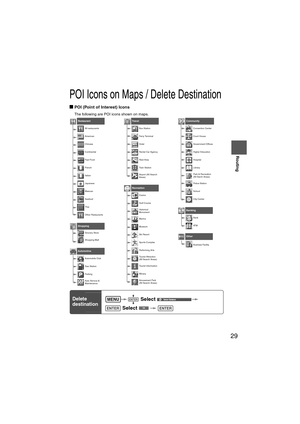
(9) POI (Point of Interest) Display button
( page 26)
Screens During Route Guidance
(1) Distance and Time to Destination displayDisplays the time* and distance to the
destination or way point.
Selecting this will display the next and
further information on the way point or
time and distance to the destination.
(* Either required time or estimated time
arrival)
(2) Route display
Shows the provided route as a thick
blue line.(3) Turn Arrow displayShows the direction to turn at the next
junction and the distance to the junction.
(4) Route Preferences button( page 30)(5) Current Road Name
Shows the name of the road you are
currently driving on.
RET
ENTERENTER
(6)
(7) (9)
(4) (3)
(1)(2)
(8)
RET
(5)
Current position screen
Returns after a
few seconds.
ENTER
(4) (3)
(1)
(2)
Returns after a
few seconds.RET
(5)
MAZDA6_NAVI_EA.book Page 14 Wednesday, December 28, 2005 1:36 PM
Page 15 of 58
 15
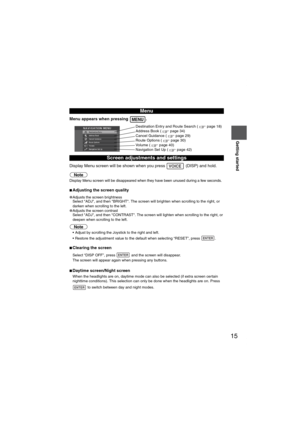
Getting started
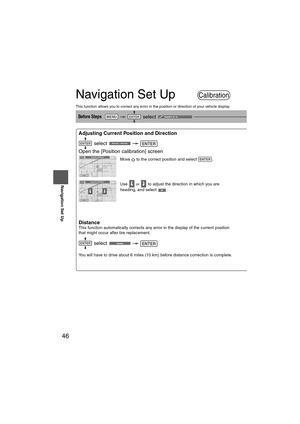
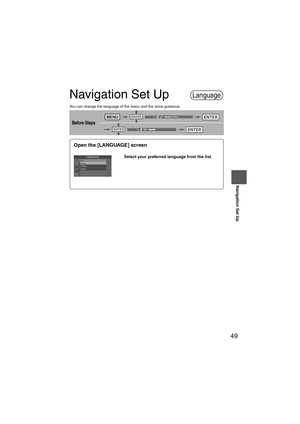
Menu appears when pressing .
Display Menu screen will be shown when you press (DISP) and hold.
Note
Display Menu screen will be disappeared when they have been unused during a f")
15
Getting started
Menu appears when pressing .
Display Menu screen will be shown when you press (DISP) and hold.
Note
Display Menu screen will be disappeared when they have been unused during a few seconds.
■Adjusting the screen quality
●Adjusts the screen brightness
Select "ADJ", and then "BRIGHT". The screen will brighten when scrolling to the right, or
darken when scrolling to the left.
●Adjusts the screen contrast
Select "ADJ", and then "CONTRAST". The screen will lighten when scrolling to the right, or
deepen when scrolling to the left.
Note
Adjust by scrolling the Joystick to the right and left.
Restore the adjustment value to the default when selecting “RESET”, press .
■Clearing the screen
Select “DISP OFF”, press and the screen will disappear.
The screen will appear again when pressing any buttons.
■Daytime screen/Night screen
When the headlights are on, daytime mode can also be selected (if extra screen certain
nighttime conditions). This selection can only be done when the headlights are on. Press
to switch between day and night modes.
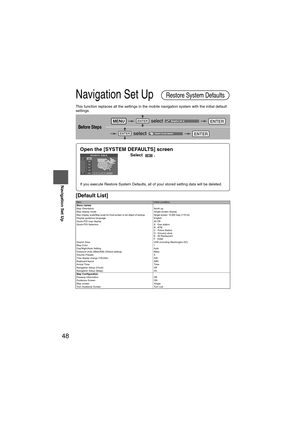
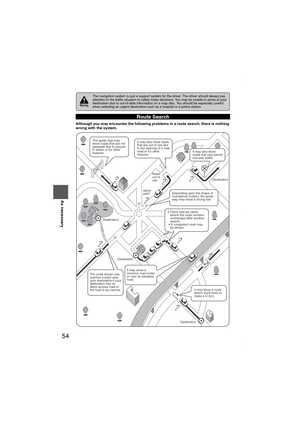
Menu
Screen adjustments and settings
MENU
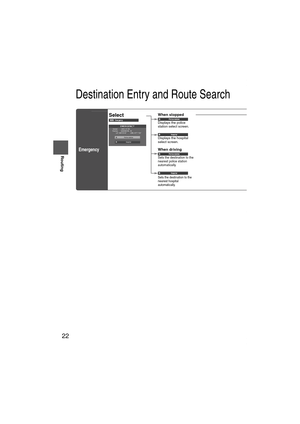
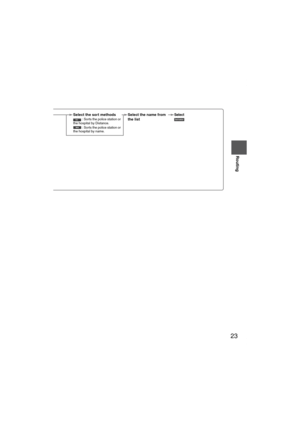
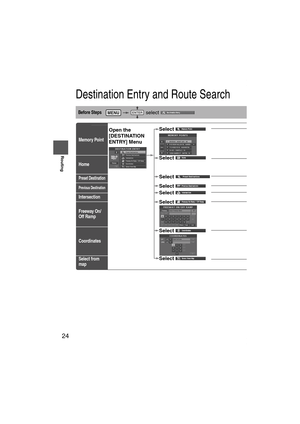
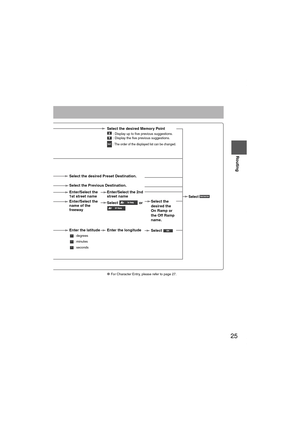
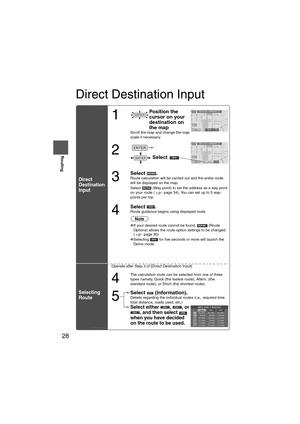
Destination Entry and Route Search ( page 18)
Address Book ( page 34)
Cancel Guidance ( page 29)
Route Options ( page 30)
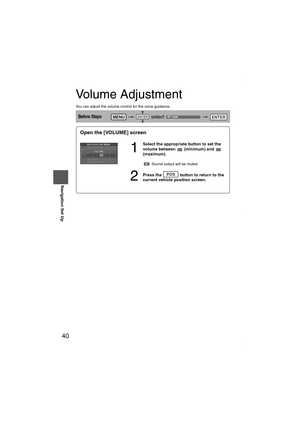
Volume ( page 40)
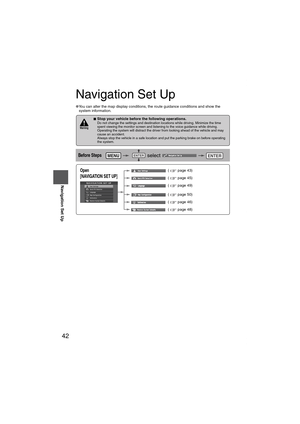
Navigation Set Up ( page 42)
VOICE
ENTER
ENTER
ENTER
MAZDA6_NAVI_EA.book Page 15 Wednesday, December 28, 2005 1:36 PM
Page 16 of 58
 16
RoutingAddress
Book
Getting started
Screen change
■Do not keep your eyes fixed on the monitor screen or operate the system
while driving
Do not change the settings and destination locations wh")
16
RoutingAddress
Book
Getting started
Screen change
■Do not keep your eyes fixed on the monitor screen or operate the system
while driving
Do not change the settings and destination locations while driving. Minimize the time
spent viewing the monitor screen and listening to the voice guidance while driving.
Operating the system will distract the driver from looking ahead of the vehicle and may
cause an accident. Always stop the vehicle in a safe location and use the parking brake
before operating the system.
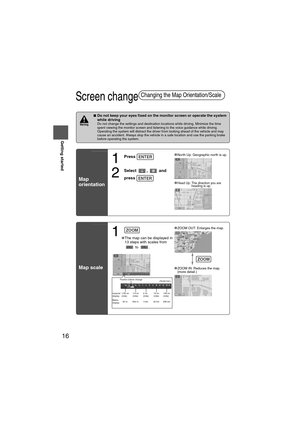
Map
orientation
Map scale
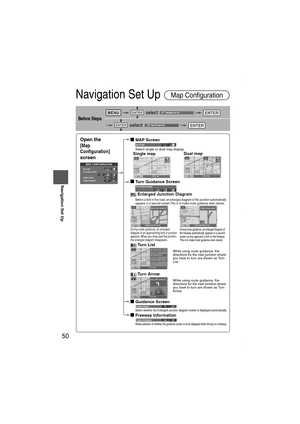
Changing the Map Orientation/Scale
Wa r n i n g
1
Press
2
Select , and
press
●North Up: Geographic north is up.
●Head Up: The direction you are
heading is up.
ENTER
ENTER
1 ●The map can be displayed in
13 steps with scales from
to .●
ZOOM OUT: Enlarges the map.
●ZOOM IN: Reduces the map.
(more detail.)
ZOOM
Position before change
Imperial
display1/32 mi
(mile)1/4 mi
(mile)2 mi
(mile)16 mi
(mile)128 mi
(mile)
Metric
display50 m 500 m 4 km 32 km 256 km
ZOOM
MAZDA6_NAVI_EA.book Page 16 Wednesday, December 28, 2005 1:36 PM


 9
Before Use
If necessary
Rear View
Monitor
MEMO
MAZDA6_NAVI_EA.book Page 9 Wednesday, December 28, 2005 1:36 PM")
 10
Before Use
Navigation
Set Up
RDM-TMCIf
necessary
Rear View
Monitor
Names and Functions
●To remove the remote control from the cradle press
●When placing the remote control back in the cradl")
 13
Getting started
●The Current Position screen appears.
Note
●You can select the language by select and press . You can also change the
selected language using Language Selection. ( page 49)")