2006 LAND ROVER FRELANDER 2 warning light
[x] Cancel search: warning lightPage 2886 of 3229
Maintenance
166
L
3. Clean the filler cap before removing to
prevent dirt from entering the reservoir.
4. Remove the filler cap.
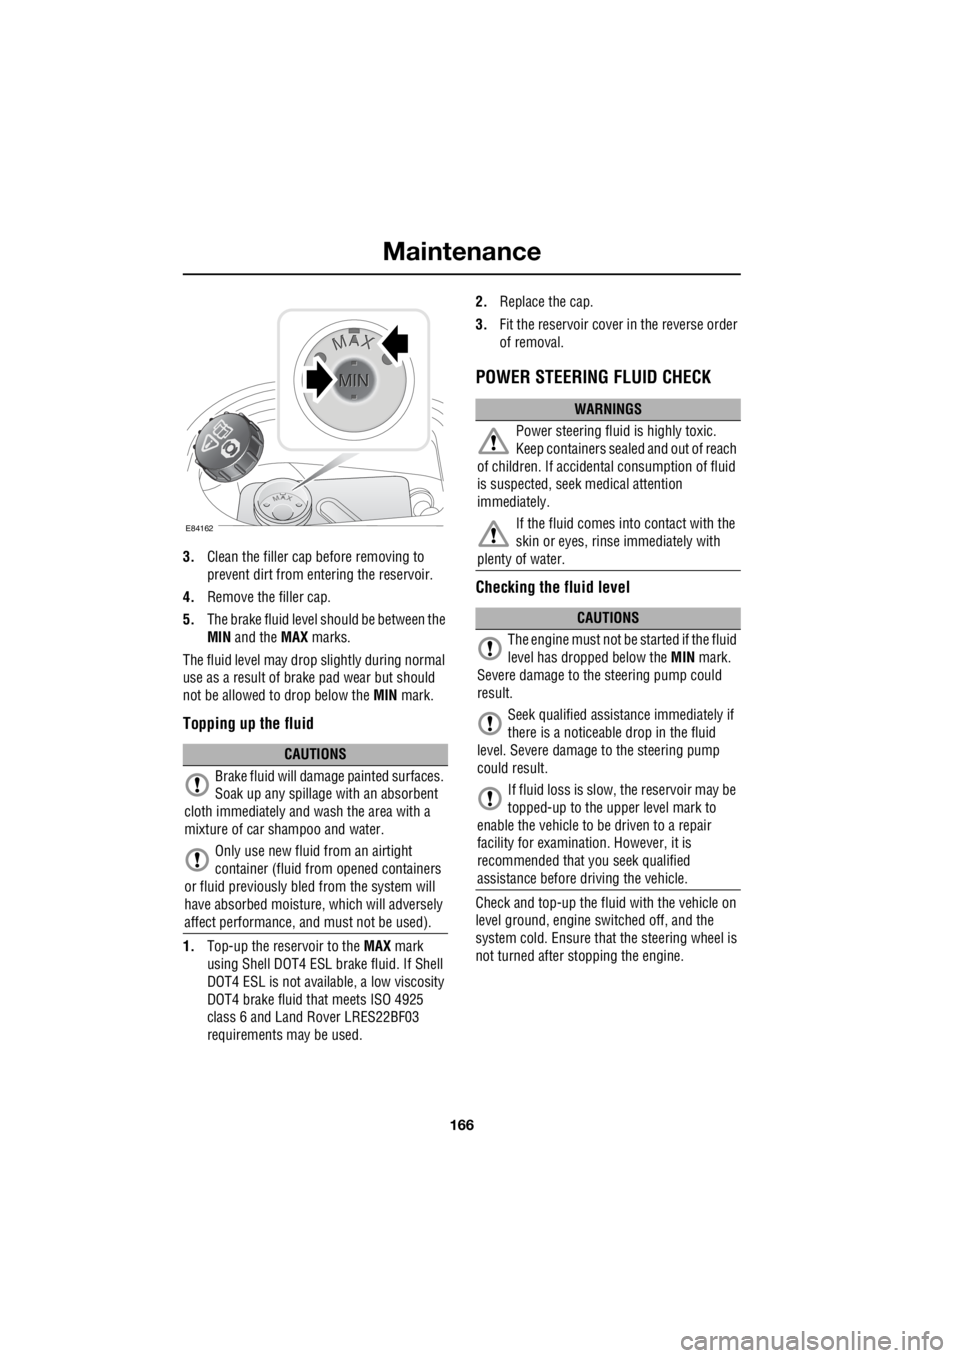
5. The brake fluid level should be between the
MIN and the MAX marks.
The fluid level may drop slightly during normal
use as a result of brake pad wear but should
not be allowed to drop below the MIN mark.
Topping up the fluid
1.Top-up the reservoir to the MAX mark
using Shell DOT4 ESL brake fluid. If Shell
DOT4 ESL is not availa ble, a low viscosity
DOT4 brake fluid that meets ISO 4925
class 6 and Land Rover LRES22BF03
requirements ma y be used. 2.
Replace the cap.
3. Fit the reservoir cover in the reverse order
of removal.
POWER STEERING FLUID CHECK
Checking the fluid level
Check and top-up the fluid with the vehicle on
level ground, engine switched off, and the
system cold. Ensure that the steering wheel is
not turned after stopping the engine.
CAUTIONS
Brake fluid will damage painted surfaces.
Soak up any spillage with an absorbent
cloth immediately and wash the area with a
mixture of car sh ampoo and water.
Only use new fluid from an airtight
container (fluid from opened containers
or fluid previously bled from the system will
have absorbed moisture, which will adversely
affect performance, and must not be used).
E84162
WARNINGS
Power steering fluid is highly toxic.
Keep containers sealed and out of reach
of children. If accidental consumption of fluid
is suspected, seek medical attention
immediately.
If the fluid comes into contact with the
skin or eyes, rinse immediately with
plenty of water.
CAUTIONS
The engine must not be started if the fluid
level has dropped below the MIN mark.
Severe damage to th e steering pump could
result.
Seek qualified assistance immediately if
there is a noticeable drop in the fluid
level. Severe damage to the steering pump
could result.
If fluid loss is slow, the reservoir may be
topped-up to the uppe r level mark to
enable the vehicle to be driven to a repair
facility for examinatio n. However, it is
recommended that you seek qualified
assistance before driving the vehicle.
Page 2895 of 3229
175
Vehicle battery
R
Effects of disconnecting
Disconnecting the battery can affect a number
of vehicle systems, especially if there is
insufficient battery power prior to
disconnection. For example, the alarm may
trigger depending on it's state when the battery
was disconnected. If the alarm does sound,
use the remote control in the normal way to
disarm the security system. The windows may
need resetting to enable the one-shot feature to
operate correctly. See ELECTRIC WINDOWS
(page 93).
Replacement batteries
Battery disposal
Note: Used batteries must be disposed of
correctly as they contain a number of harmful
substances. Seek advice on disposal from your
Land Rover Dealer/Authoris ed Repairer, and/or
your local authority.
Refitting
A new battery should be supplied with plastic
terminal covers. Leave the covers in place
when fitting the battery, and remove them one
at a time to fit the battery cable clamps.
Refitting is an exact reversal of the removal
procedure. If you are in any doubt about fitting
a battery seek qualified assistance before
attempting to fit the battery.
WARNING
Only fit a battery of the correct type and
rating. Fitting an in correct battery may
result in a fire, or damage to the electrical
system. If you are in any doubt when fitting a
battery seek qualified assistance.
WARNING
When refitting the battery ensure that
no metal objects , or vehicle
components, come into contact with the
battery terminals. Metal objects can cause a
spark or short circuit, both of which may result
in an explosion.
CAUTIONS
Ensure that when fitting a battery to the
vehicle, the terminals and battery clamps
are clean, and lightly coated with petroleum
jelly. This will ensure good electrical
connections are made, and help to prevent
corrosion.
Always follow the battery manufacturers
instructions. Failure to do so may result
in damage to the vehicl e and/or the electrical
system.
Page 2898 of 3229
Wheels and tyres
178
L
All of the vehicle's tyres (including the spare)
should be checked regularly for damage, wear
and distortion. If you ar e in any doubt about the
condition of a tyre, have it checked immediately
by a tyre repair centre, or your Land Rover
Dealer/Authorised repairer.
Tyre wear
Good driving practise w ill improve the mileage
you obtain from your tyres, and avoid
unnecessary damage.
• Always ensure that the tyre pressures are
correctly adjusted.
• Always observe the posted speed limits,
and advisory speeds for bends.
• Avoid pulling away quickly, or hard
acceleration.
• Avoid making fast turns or braking
sharply.
• Wherever possible, avoid potholes, or
obstacles on the road.
• Do not drive up kerbs, or rub the tyres
against them when parking.
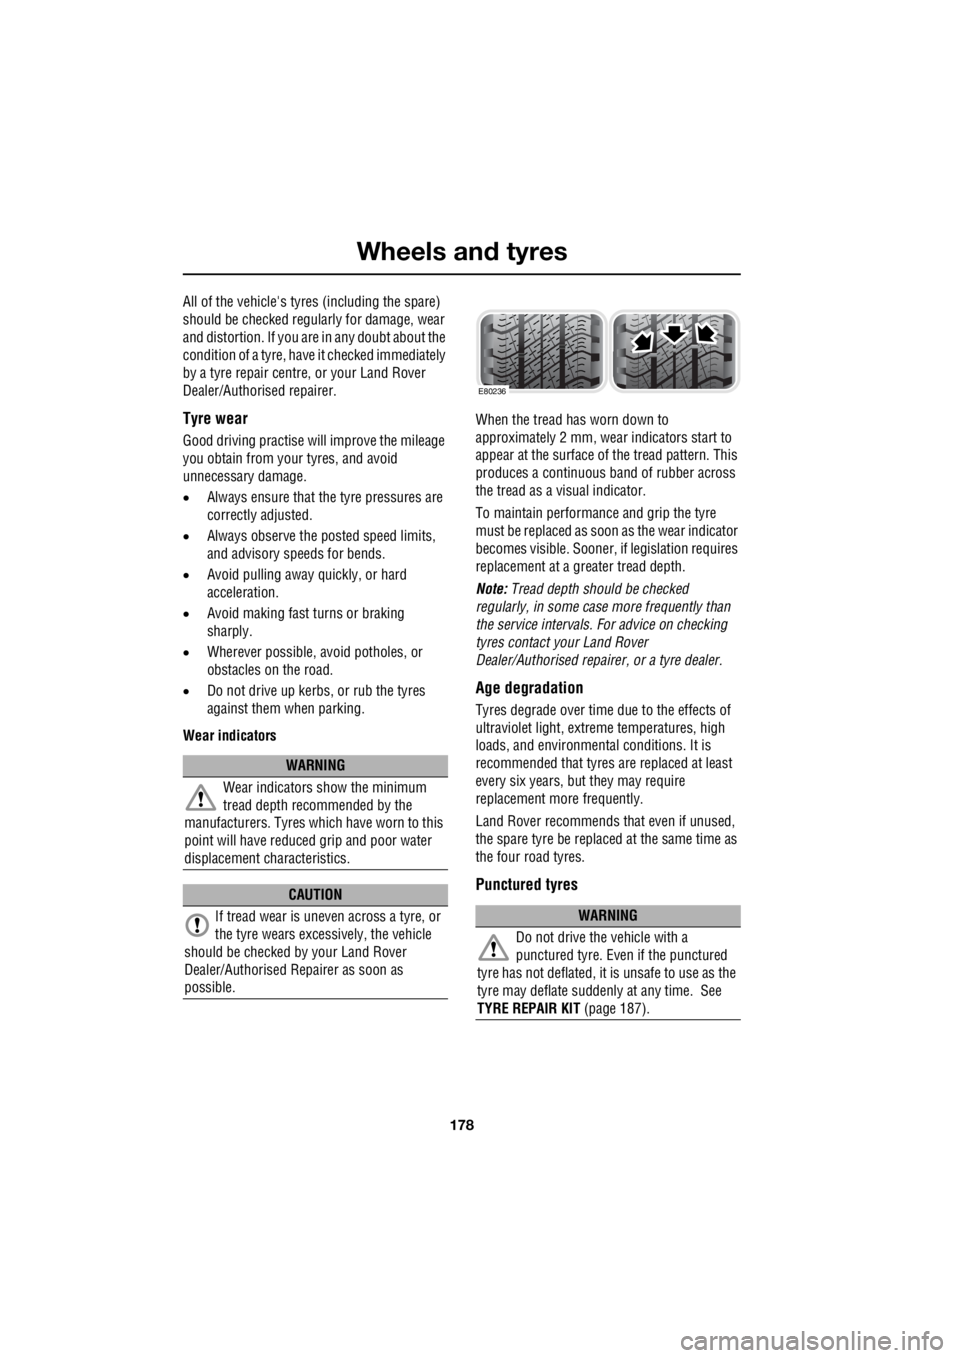
Wear indicators When the tread has worn down to
approximately 2 mm, wear indicators start to
appear at the surface of the tread pattern. This
produces a continuous ba nd of rubber across
the tread as a visual indicator.
To maintain performance and grip the tyre
must be replaced as s oon as the wear indicator
becomes visible. Sooner, if legislation requires
replacement at a greater tread depth.
Note: Tread depth should be checked
regularly, in some case more frequently than
the service intervals. For advice on checking
tyres contact your Land Rover
Dealer/Authorised repairer, or a tyre dealer.
Age degradation
Tyres degrade over time due to the effects of
ultraviolet light, extreme temperatures, high
loads, and environmen tal conditions. It is
recommended that tyres are replaced at least
every six years, but they may require
replacement more frequently.
Land Rover recommends that even if unused,
the spare tyre be replaced at the same time as
the four road tyres.
Punctured tyres
WARNING
Wear indicators show the minimum
tread depth recommended by the
manufacturers. Tyres whic h have worn to this
point will have reduced grip and poor water
displacement characteristics.
CAUTION
If tread wear is uneve n across a tyre, or
the tyre wears excessively, the vehicle
should be checked by your Land Rover
Dealer/Authorised Repairer as soon as
possible.
WARNING
Do not drive the vehicle with a
punctured tyre. Even if the punctured
tyre has not deflated, it is unsafe to use as the
tyre may deflat e suddenly at an y time. See
TYRE REPAIR KIT (page 187).
E80236
Page 2900 of 3229
Wheels and tyres
180
L
Directional tyres
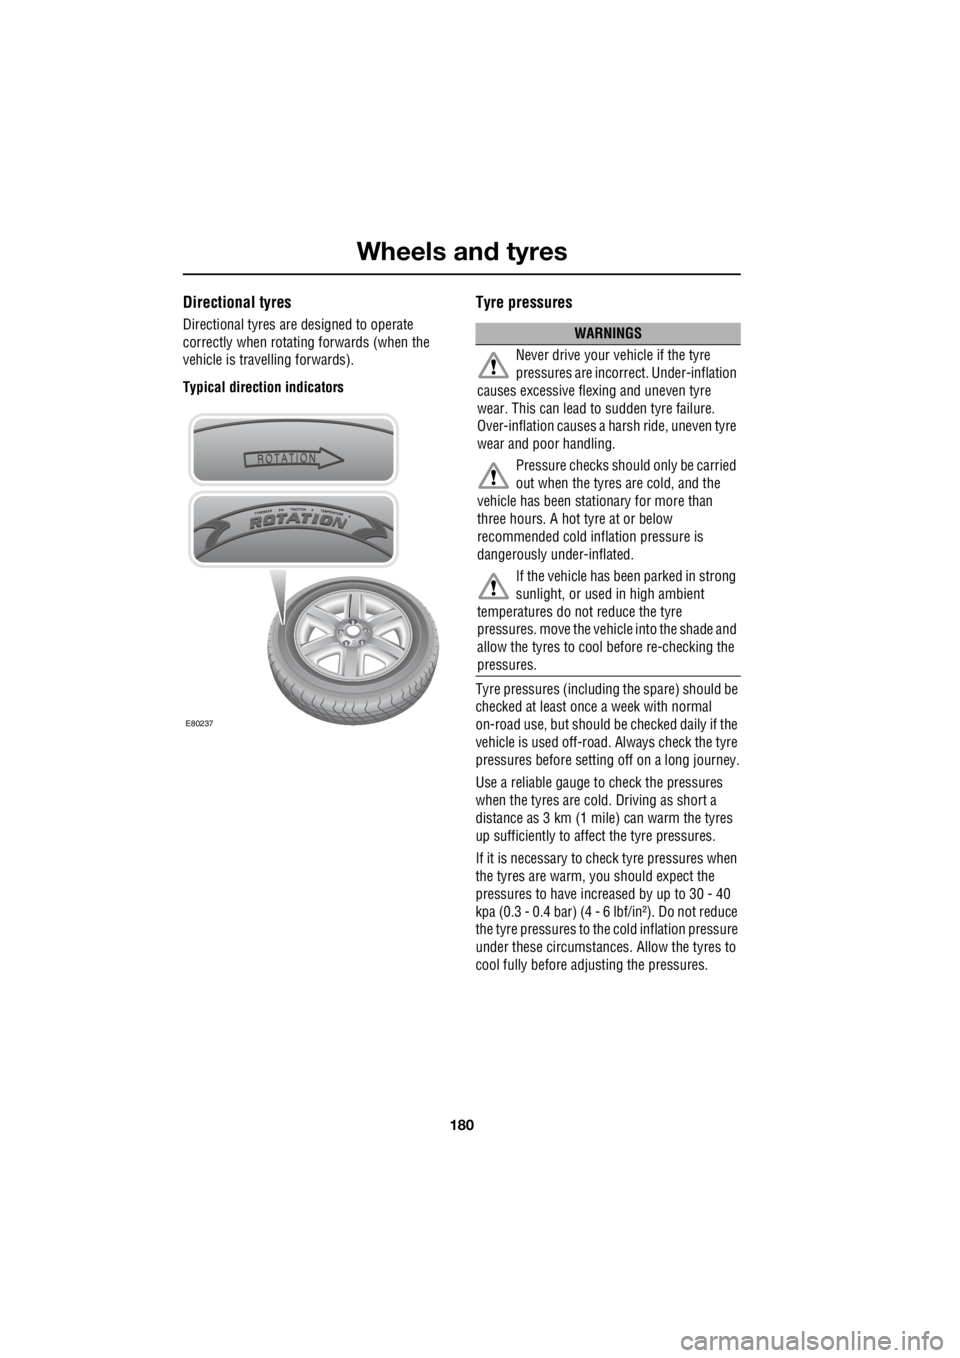
Directional tyres are designed to operate
correctly when rotati ng forwards (when the
vehicle is travelling forwards).
Typical direction indicators
Tyre pressures
Tyre pressures (including the spare) should be
checked at least once a week with normal
on-road use, but should be checked daily if the
vehicle is used off-road. Always check the tyre
pressures before setti ng off on a long journey.
Use a reliable gauge to check the pressures
when the tyres are cold. Driving as short a
distance as 3 km (1 mile) can warm the tyres
up sufficiently to affect the tyre pressures.
If it is necessary to check tyre pressures when
the tyres are warm, you should expect the
pressures to have incr eased by up to 30 - 40
kpa (0.3 - 0.4 bar) (4 - 6 lbf/in²). Do not reduce
the tyre pressures to the cold inflation pressure
under these circumstances. Allow the tyres to
cool fully before ad justing the pressures.
E80237
WARNINGS
Never drive your vehicle if the tyre
pressures are incorrect. Under-inflation
causes excessive flex ing and uneven tyre
wear. This can lead to sudden tyre failure.
Over-inflation causes a ha rsh ride, uneven tyre
wear and poor handling.
Pressure checks shoul d only be carried
out when the tyres are cold, and the
vehicle has been stationary for more than
three hours. A hot tyre at or below
recommended cold inflation pressure is
dangerously under-inflated.
If the vehicle has been parked in strong
sunlight, or used in high ambient
temperatures do not reduce the tyre
pressures. move the vehicle into the shade and
allow the tyres to cool before re-checking the
pressures.
Page 2904 of 3229
Wheels and tyres
184
L
Wheel changing safety
Before raising the vehicl e, or changing a wheel
ensure that you read, and comply with the
following warnings.
WARNINGS
Always find a safe pl ace to stop, off of
the highway and away from traffic.
Ensure that the vehicle is on firm level
ground.
Disconnect traile r/caravan from
vehicle.
Switch on the hazard warning lamps.
Ensure that all passengers, and
animals, are out of the vehicle, and in a
safe place away from the highway.
Place a warning triangle at a suitable
distance behind th e vehicle, facing
towards oncoming traffic.
Ensure that the front wheels are in the
straight ahead positi on, and engage the
steering lock.
Apply the parking br ake, and engage
Park in vehicles fitted with an automatic
transmission.
Apply the parking br ake, and engage
1st or reverse gear in vehicles fitted
with a manual transmission.
Ensure that the jack is on firm level
ground.
Never place anything between the jack
and the ground, or the jack and the
vehicle.
Always chock the whee ls using suitable
wheel chocks. Place the chocks on both
sides of the wheel diagonally opposite the
wheel to be changed.
If jacking the vehicle on a slight slope is
unavoidable, place the chocks on the
downhill side of the two opposite wheels.
Take care when lifting the spare wheel,
and removing the punctured wheel. The
wheels are heavy, and ca n cause injuries if not
handled correctly.
Remove the spare wheel prior to
jacking the vehicle. To avoid
destabilising the vehicle when raised.
Take care when loosening the wheel
nuts. The wheel brace may slip off if not
properly attached, and the wheel nuts may
give way suddenly. Either unexpected
movement may cause an injury.
WARNINGS
Page 2905 of 3229
185
Wheels and tyres
R
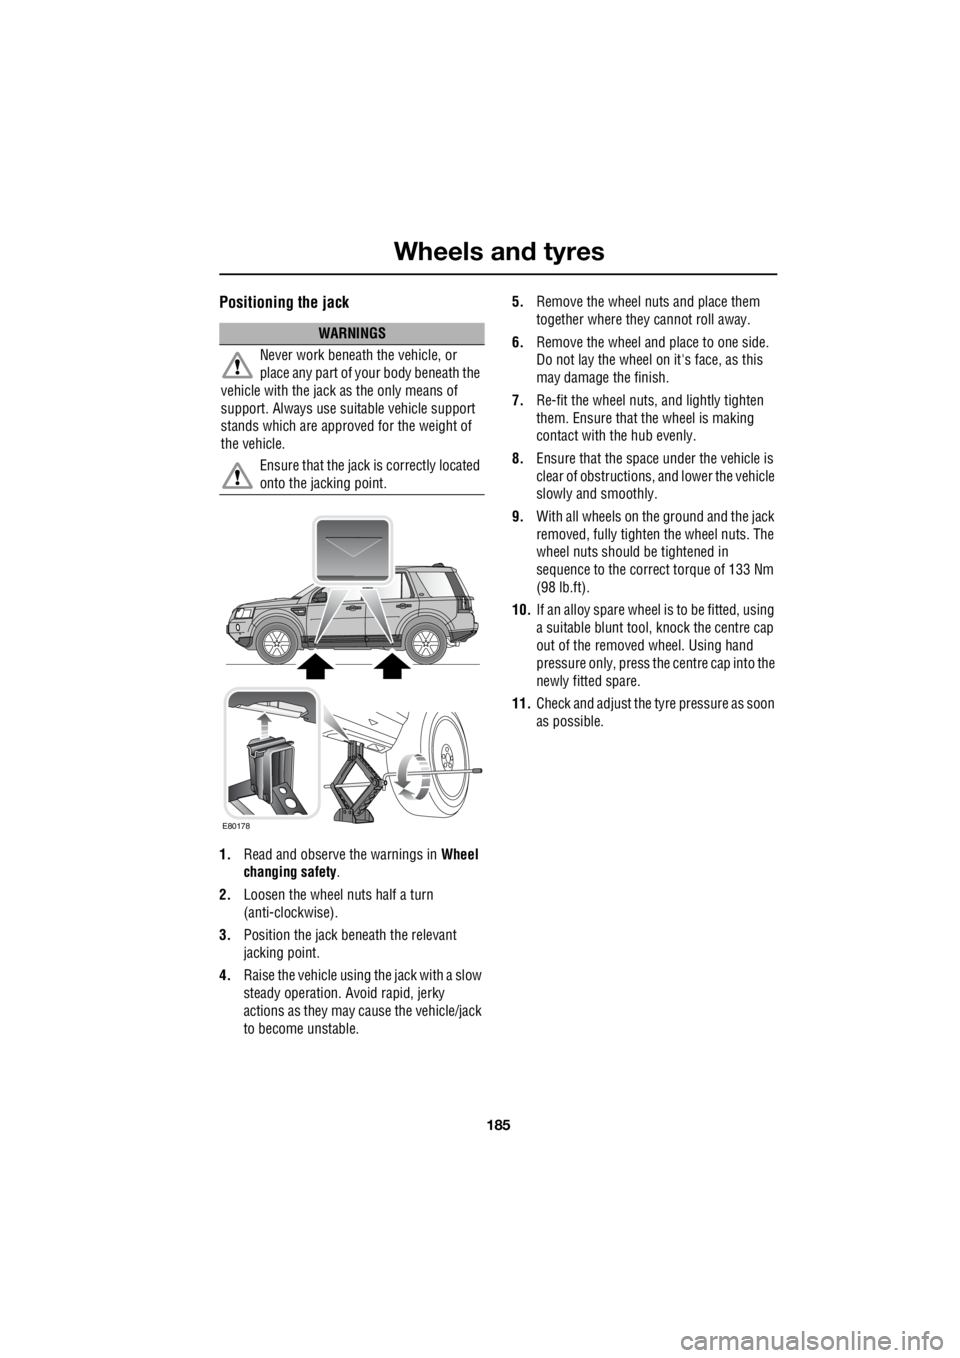
Positioning the jack
1. Read and observe the warnings in Wheel
changing safety .
2. Loosen the wheel nuts half a turn
(anti-clockwise).
3. Position the jack be neath the relevant
jacking point.
4. Raise the vehicle using the jack with a slow
steady operation. Avoid rapid, jerky
actions as they may cause the vehicle/jack
to become unstable. 5.
Remove the wheel nuts and place them
together where they cannot roll away.
6. Remove the wheel and place to one side.
Do not lay the wheel on it's face, as this
may damage the finish.
7. Re-fit the wheel nuts, and lightly tighten
them. Ensure that the wheel is making
contact with the hub evenly.
8. Ensure that the space under the vehicle is
clear of obstructions, and lower the vehicle
slowly and smoothly.
9. With all wheels on the ground and the jack
removed, fully tighte n the wheel nuts. The
wheel nuts should be tightened in
sequence to the correct torque of 133 Nm
(98 lb.ft).
10. If an alloy spare wheel is to be fitted, using
a suitable blunt tool, knock the centre cap
out of the removed wheel. Using hand
pressure only, press the centre cap into the
newly fitted spare.
11. Check and adjust the tyre pressure as soon
as possible.
WARNINGS
Never work beneath the vehicle, or
place any part of yo ur body beneath the
vehicle with the jack as the only means of
support. Always use su itable vehicle support
stands which are approved for the weight of
the vehicle.
Ensure that the jack is correctly located
onto the jacking point.
E80178
Page 2910 of 3229

Wheels and tyres
190
L
Using the Land Rover tyre repair kit
Note: All vehicle drivers and occupants should
be made aware that a temporary repair has
been made to a tyre fitted to the vehicle. They
should also be made aware of the special
driving conditions im posed when using a
repaired tyre. Repair procedure
1. Open the tyre repair kit and peel off the
maximum speed label. Attach the label to
the facia in the driver's field of view. Take
care not to obstruct any of the instruments
or warning lights.
2. Uncoil the compressor power cable and
the inflation hose.
3. Unscrew the orange cap from the sealant
bottle receiver, and the sealant bottle cap.
4. Screw the sealant bottle into the receiver
(clockwise) until tight.
• Screwing the bottle onto the receiver will
pierce the bottle's se al. Do not unscrew
a full, or partly us ed bottle from the
receiver. Doing so will result in the
sealant leaking from the bottle.
5. Remove the valve cap from the damaged
tyre.
6. Remove the protective cap from the
inflation hose, and c onnect the inflation
hose to the tyre valve. Ensure that the hose
is screwed on firmly.
7. Ensure that the compressor switch is in
the off ( O) position.
8. Insert the power cable connector into an
auxiliary power socket. See AUXILIARY
POWER SOCKETS (page 110).
9. Unless the vehicle is in an enclosed or
poorly ventilated area , start the engine.
10. Set the compressor switch to the on ( l)
position.
11. Inflate the tyre to a minimum of 1.8 bar (26
lb/in²) and a maximum of 3.5 bar (51
lb/in²).
†
WARNINGS
Avoid skin contact with the sealant
which contains natu ral rubber latex.
Do not unscrew the sealant bottle from the
receiver until it is empty, as sealant will leak
out.
If the tyre inflation pressure does not
reach 1.8 bar (26 lb/in²) within seven
minutes, the tyre may have suffered excessive
damage. A temporary repair will not be
possible, and the vehicle should not be driven
until the tyre has been replaced.
CAUTIONS
Before attempting a tyre repair, ensure
that the vehicle is parked safely, as far
away from passing traffic as possible.
Ensure that the parki ng brake is applied,
and P is selected if an automatic
transmission is fitted.
Do not attempt to remove foreign objects
such as nails, screws, etc from the tyre.
Always run the engine when using the
compressor, unless the vehicle is in an
enclosed, or poorly ventilated space.
To prevent overheating do not operate
the compressor continuously for longer
than ten minutes.
Page 2925 of 3229
205
Status after a collision
R
Status after a collisionDRIVING AFTER A COLLISION
Before starting or driving
If the vehicle has been involved in an accident
it should be checke d thoroughly before
attempting to start the engine or drive the
vehicle.
Check for :-
• Fuel leaks.
• Fluid leaks.
• Battery damage.
• Damage to wiring.
• Damage to lights.
• Damage to steering, suspension, wheels
or tyres.
• Sharp or protruding bodywork.
• Operation of doors and locks.
• Condition and operation of seat belts and
SRS components.
• Condition of chil d seats and their
mounting/attach ment points.
Note: This list is not exhaustive.
Resetting the fuel cut-off
The fuel system cut-off forms part of the Safety
and Restraint System (SRS) fitted to your
vehicle. Following an im pact, and depending on
the severity, the fuel pump may be switched
off.
1. Switch the ignition off, and wait for one
minute.
2. Turn the ignition on for 30 seconds.
3. Check the vehicle thoroughly for fuel leaks.
If a leak is detected switch the ignition off
immediately.
• The vehicle must not be started if a leak
is present. Seek qualified advice, and
have the vehicle recovered.
4. If no leaks are detected, start the vehicle.
When driving
When driving a vehicle which has been
involved in a collision use caution and pay extra
attention to the operation of the vehicle. If any
changes in vehicle operati on after the collision
are noted when compared to it's operation
before the collision, do not continue to drive
the vehicle. Stop the vehicle as soon as it is
safe to do so, and have the vehicle recovered.
Pay particular attent ion to changes in :-
• Steering.
• Braking.
• Unusual noises.
• Warning lights or messages displayed.
• Problems with electrical systems.
WARNING
If the vehicle is involved in a collision it
should be checked by a Land Rover
Dealer/Authorised repairer, or suitably
qualified persons before starting or driving.
WARNING
The fuel cut-off s hould never be reset
if you can smell fuel , or a leak can be
seen. Doing so can lead to a fire which
may cause personal injury or death.