2006 LAND ROVER FRELANDER 2 tyre pressure
[x] Cancel search: tyre pressurePage 2909 of 3229
189
Wheels and tyres
R
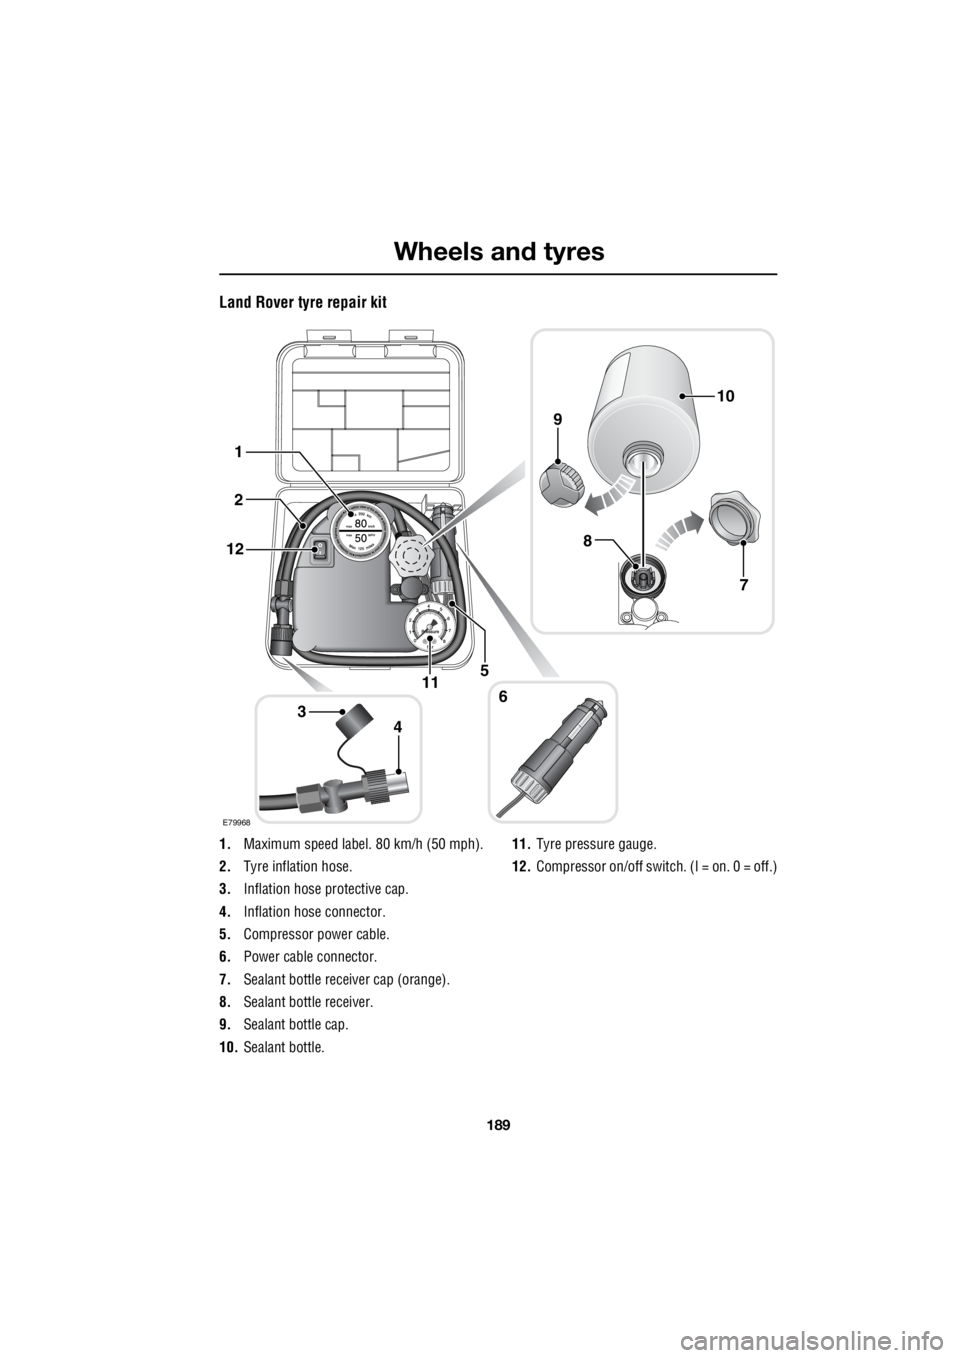
Land Rover tyre repair kit
1. Maximum speed label. 80 km/h (50 mph).
2. Tyre inflation hose.
3. Inflation hose protective cap.
4. Inflation hose connector.
5. Compressor power cable.
6. Power cable connector.
7. Sealant bottle receiver cap (orange).
8. Sealant bottle receiver.
9. Sealant bottle cap.
10. Sealant bottle. 11.
Tyre pressure gauge.
12. Compressor on/off switch. (I = on. 0 = off.)
E79968
34
2
6
5
1
12
11
8
9
10
7
Page 2910 of 3229

Wheels and tyres
190
L
Using the Land Rover tyre repair kit
Note: All vehicle drivers and occupants should
be made aware that a temporary repair has
been made to a tyre fitted to the vehicle. They
should also be made aware of the special
driving conditions im posed when using a
repaired tyre. Repair procedure
1. Open the tyre repair kit and peel off the
maximum speed label. Attach the label to
the facia in the driver's field of view. Take
care not to obstruct any of the instruments
or warning lights.
2. Uncoil the compressor power cable and
the inflation hose.
3. Unscrew the orange cap from the sealant
bottle receiver, and the sealant bottle cap.
4. Screw the sealant bottle into the receiver
(clockwise) until tight.
• Screwing the bottle onto the receiver will
pierce the bottle's se al. Do not unscrew
a full, or partly us ed bottle from the
receiver. Doing so will result in the
sealant leaking from the bottle.
5. Remove the valve cap from the damaged
tyre.
6. Remove the protective cap from the
inflation hose, and c onnect the inflation
hose to the tyre valve. Ensure that the hose
is screwed on firmly.
7. Ensure that the compressor switch is in
the off ( O) position.
8. Insert the power cable connector into an
auxiliary power socket. See AUXILIARY
POWER SOCKETS (page 110).
9. Unless the vehicle is in an enclosed or
poorly ventilated area , start the engine.
10. Set the compressor switch to the on ( l)
position.
11. Inflate the tyre to a minimum of 1.8 bar (26
lb/in²) and a maximum of 3.5 bar (51
lb/in²).
†
WARNINGS
Avoid skin contact with the sealant
which contains natu ral rubber latex.
Do not unscrew the sealant bottle from the
receiver until it is empty, as sealant will leak
out.
If the tyre inflation pressure does not
reach 1.8 bar (26 lb/in²) within seven
minutes, the tyre may have suffered excessive
damage. A temporary repair will not be
possible, and the vehicle should not be driven
until the tyre has been replaced.
CAUTIONS
Before attempting a tyre repair, ensure
that the vehicle is parked safely, as far
away from passing traffic as possible.
Ensure that the parki ng brake is applied,
and P is selected if an automatic
transmission is fitted.
Do not attempt to remove foreign objects
such as nails, screws, etc from the tyre.
Always run the engine when using the
compressor, unless the vehicle is in an
enclosed, or poorly ventilated space.
To prevent overheating do not operate
the compressor continuously for longer
than ten minutes.
Page 2911 of 3229
191
Wheels and tyres
R
12. During the inflation, switch the
compressor off briefly to check the tyre
pressure using the gauge mounted on the
compressor.
• It should not take longer than seven
minutes to inflate the tyre. If after seven
minutes the tyre ha s not reached the
minimum pressure, the tyre should not
be used.
13. Once the tyre has been inflated switch off
the compressor. If desired the engine may
be turned off after the compressor has
been turned off.
14. Remove the power connector from the
auxiliary power socket.
15. Remove the inflation hose from the tyre
valve by unscrewing it as quickly as
possible (anti-clockwise).
16. Replace the inflation hose protective cap,
and the tyre valve cap.
17. Do not remove the sealant bottle from the
receiver.
18. Ensure that the tyre repair kit (including
the bottle, and receiver caps) are placed
securely in the vehicle. You will need to
use the kit to check the tyre pressure after
3km (2 miles) so ensure they are easily
accessible.
19. Immediately drive the vehicle for 3 km (2
miles) to allow the sealant to coat the inner
surface of the tyre and form a seal at the
puncture.
†When pumping the sealant through the tyre
valve, the pressure may rise up to 6 bar (87
lb/in²). The pressure will drop again after
approximately 30 seconds.
Checking the tyre pressure after a repair
1. Drive the vehicle for 3 km (2 miles) then
stop in a safe place. Carry out a visual
examination of the tyres condition.
2. Remove the protective cap from the
inflation hose.
3. Screw the inflation hos e connector firmly
onto the tyre valve.
4. Read the tyre pressure from the gauge.
5. If the pressure of the sealant filled tyre is
above 1.3 bar (19 lb/in²) adjust the
pressure to the correct value. See
TECHNICAL SPECIFICATIONS (page 194).
6. Ensure that the compressor switch is in
the off position ( O), and insert the power
cable connector into an auxiliary power
socket. See AUXILIARY POWER
SOCKETS (page 110).
7. If the vehicle is in a well ventilated area,
start the engine.
8. Switch on the compressor ( I), and inflate
the tyre to the correct pressure.
WARNINGS
When driving the vehicle, if you
experience vibr ations, abnormal
steering, or noises, re duce speed immediately.
Drive with extreme caution and reduced speed
to the first safe place to stop the vehicle.
Visually examine the tyre, and check it's
pressure. If there are any signs of damage or
deformity to the tyre, or the tyre pressure is
below 1.3 bar (19 lb/i n²) do not continue
driving.
Consult a tyre repair centre, or your
Land Rover Dealer/Authorised repairer
for advice concerning the replacement of a
tyre after using a tyre repair kit.
Page 2912 of 3229
Wheels and tyres
192
L
9. To check the tyre pressure turn off the
compressor then read the pressure from
the gauge.
10. When the compressor is off, if the tyre
pressure is too high, release the required
amount of pressure using the pressure
relief valve.
11. Once the tyre is inflated to the correct
pressure, switch off the compressor and
remove the power plug from the auxiliary
socket.
12. Unscrew the inflation hose connector from
the tyre valve, replace the tyre valve cap
and the inflation hose connector protective
cap.
13. Do not remove the sealant bottle from the
receiver.
14. Ensure that the tyre repair kit (including
the bottle, and receiver caps) are placed
securely in the vehicle.
15. Drive to the nearest tyre repair centre, or
Land Rover Dealer/Autho rised repairer for
a replacement tyre to be fitted. Ensure that
you make the repair centre aware that the
tyre repair kit has been used before the tyre
is removed.
16. Both the tyre inflation hose, and the sealant
bottle should be replac ed once a new tyre
has been fitted.
Only sealant bottles which are
completely empty should be
disposed of with normal household
waste. Sealant bottles which contain some
sealant, and the tyre in flation hose, should be
disposed of by a tyre specialist, or your Land
Rover Dealer/Authorised repairer in
compliance with local waste disposal
regulations.USING SNOW CHAINS
Land Rover approved trac tion devices may be
used to improve traction on a hard road surface
in heavy snow conditions . They should not be
used in off-road conditions.
If it becomes necessary to fit traction devices,
the following points should be observed:-
• Single sided Spike-spyder traction devices
can only be fitted to the front wheels of
vehicles fitted with 17 or 18 inch diameter
wheels.
• The wheels and tyres fitted must
conform to the specifications of the
original equipment.
• No traction devices should be fitted to the
rear wheels.
• Only Land Rover approved traction devices
should be used on the vehicle. Only Land
Rover approved tracti on devices have been
tested to ensure that they do not cause
damage to the vehicl e. Contact your Land
Rover Dealer/Authorised repairer for
information.
• Always read, understa nd, and follow the
snow chain manufacturer's instructions.
Pay particular attention to the maximum
speed, and fitti ng instructions.
WARNING
Only use traction devices in heavy snow
conditions, on hard road surfaces.
Dynamic Stability Control (DSC) must be
switched off when using traction devices. DSC
limits wheel spin which is required to maintain
traction in deep snow conditions.
Never exceed 50 km/h (30 mph) when traction
devices are fitted.
Never fit traction devices to a temporary use
spare wheel.
Page 2913 of 3229

193
Wheels and tyres
R
• Avoid tyre/vehicle damage by removing
the traction devices as soon as the
conditions allow.
TYRE GLOSSARY
Terms used
lbf/in² or psi
Pounds per square inch, an imperial unit of
measure for pressure.
kPa
Kilo Pascal, a metric unit of measure for
pressure.
Cold tyre pressure
The air pressure in a tyre which has been
standing in excess of th ree hours, or driven for
less than one mile.
Maximum inflation pressure
The maximum pressure to which the tyre
should be inflated. This pressure is given on
the tyre side wall in lbf/in² (psi) and kPa.
Note: This pressure is the maximum allowed
by the tyre manufacturer. It is not the pressure
recommended for use. See TECHNICAL
SPECIFICATIONS (page 194).
Kerb weight
The weight of a standa rd vehicle, including a
full tank of fuel, any optional equipment fitted,
and with the correct coolant and oil levels.
Gross vehicle weight
The maximum permissible weight of a vehicle
with driver, passengers, load, luggage,
equipment, and towbar load.
Accessory weight
The combined weight (in excess of those items
replaced) of items available as factory installed
equipment. Production options weight
The combined weight of options installed
which weigh in excess of 1.4 kg (3 lb) more
than the standard items that they replaced, and
are not already considered in kerb or accessory
weights. Items such as heavy duty brakes, high
capacity battery, special trim etc.
Vehicle capacity weight
The number of seats multiplied by 68 kg (150
lb) plus the rated amount of load/luggage.
Maximum loaded vehicle weight
The sum of kerb wei ght, accessory weight,
vehicle capacity weig ht, plus any production
option weights.
Rim
The metal support for a ty re, or tyre and tube,
upon which the tyre beads are seated.
Bead
The inner edge of a tyre th at is shaped to fit to
the rim and form an air tight seal. The bead is
constructed of steel wires which are wrapped,
or reinforced, by the ply cords.
Page 2914 of 3229
Wheels and tyres
194
L
TECHNICAL SPECIFICATIONS
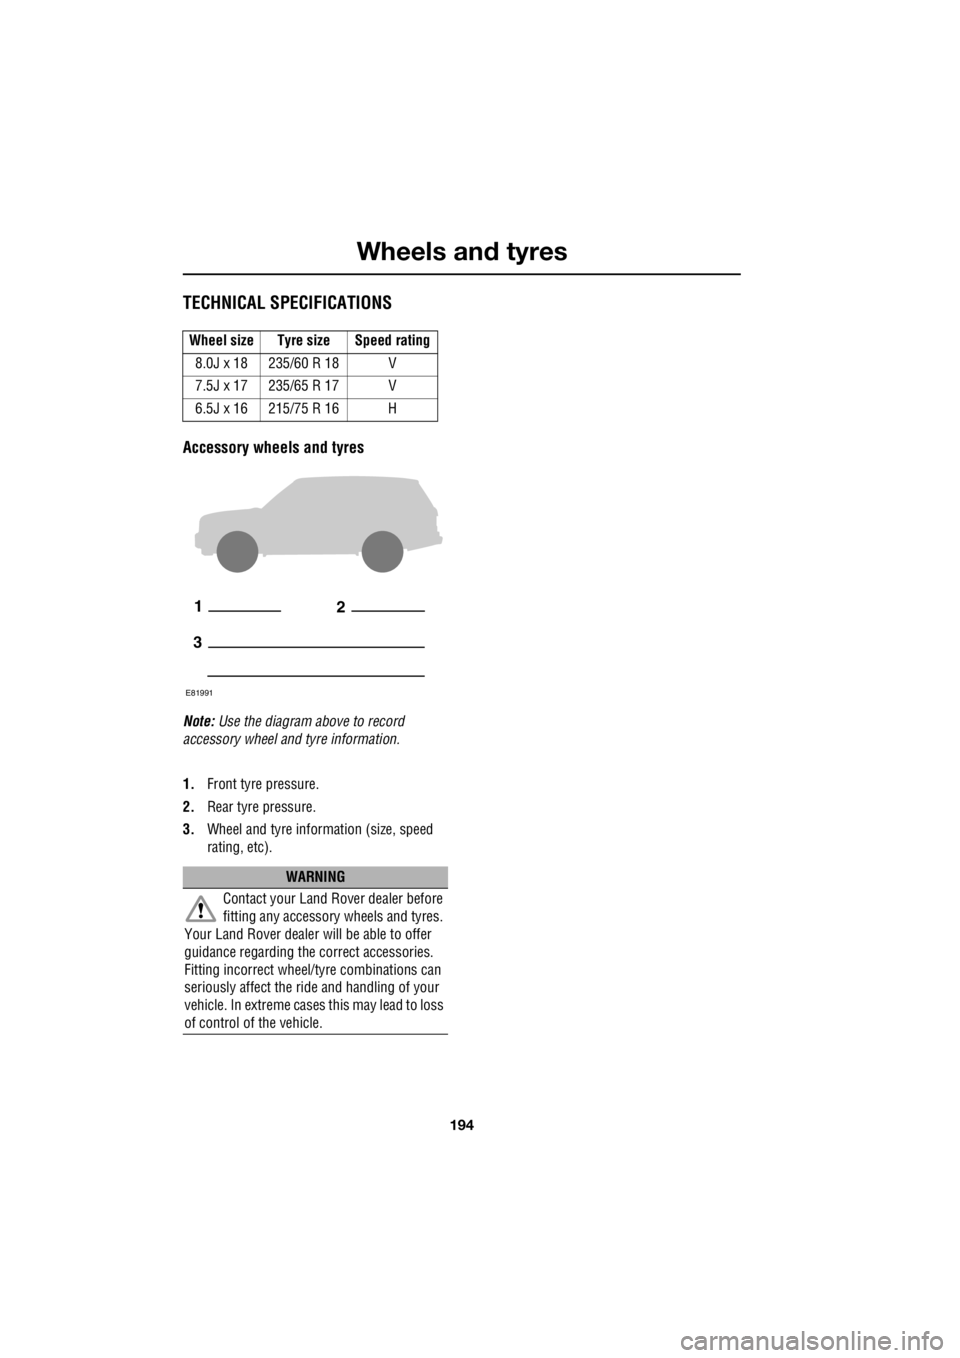
Accessory wheels and tyres
Note: Use the diagram above to record
accessory wheel and tyre information.
1. Front tyre pressure.
2. Rear tyre pressure.
3. Wheel and tyre information (size, speed
rating, etc).
Wheel size Tyre size Speed rating
8.0J x 18 235/60 R 18 V
7.5J x 17 235/65 R 17 V
6.5J x 16 215/75 R 16 H
WARNING
Contact your Land Rover dealer before
fitting any accessory wheels and tyres.
Your Land Rover dealer wi ll be able to offer
guidance regarding the correct accessories.
Fitting incorrect wheel/tyre combinations can
seriously affect the ride and handling of your
vehicle. In extreme cases this may lead to loss
of control of the vehicle.
12
3
E81991
Page 2930 of 3229
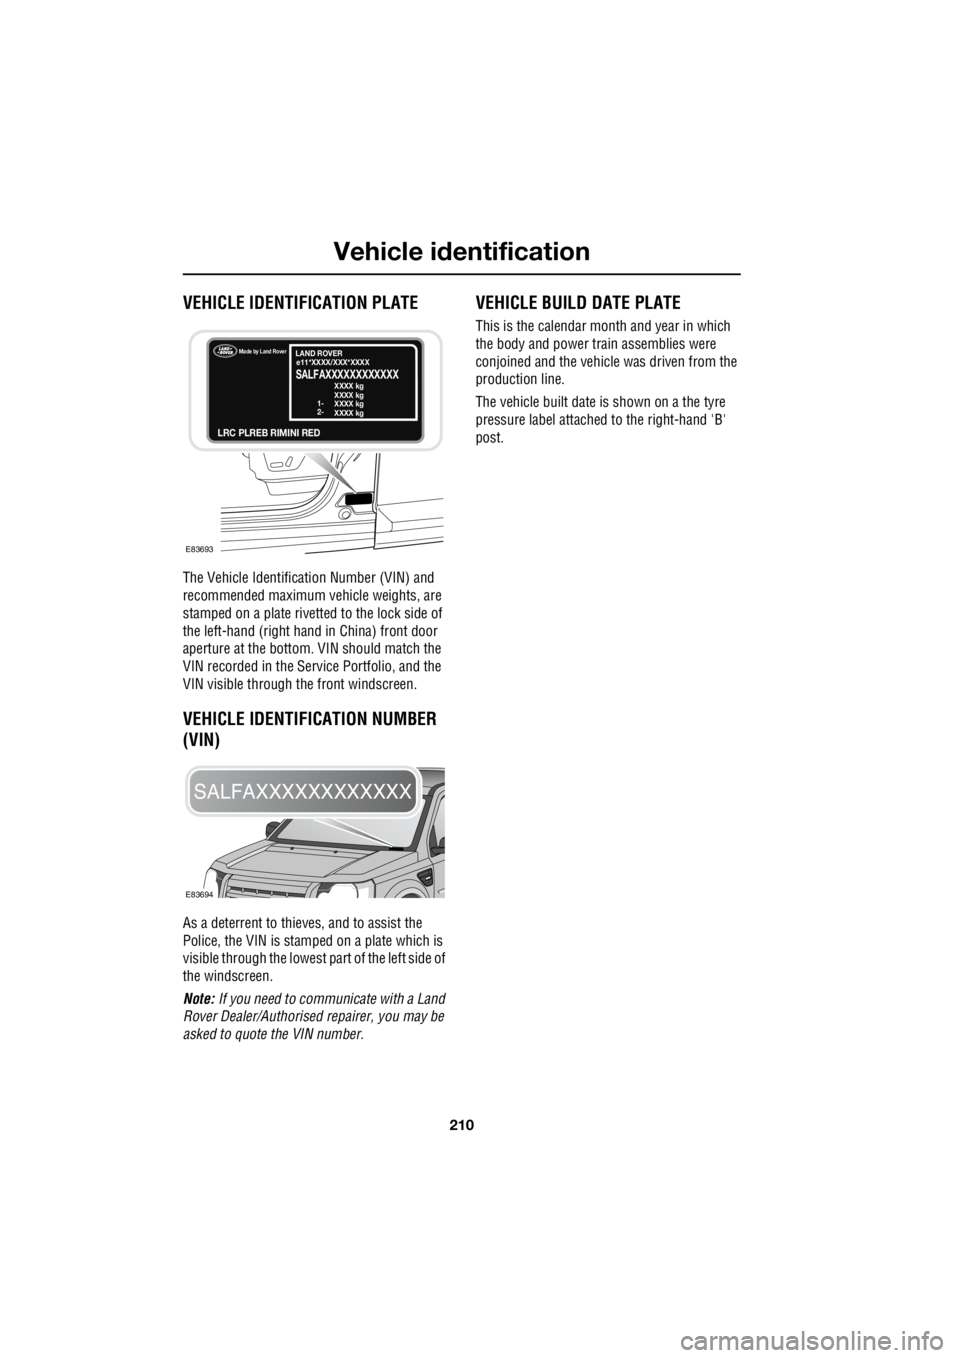
Vehicle identification
210
L
Vehicle identificationVEHICLE IDENTIFICATION PLATE
The Vehicle Identification Number (VIN) and
recommended maximum vehicle weights, are
stamped on a plate rivetted to the lock side of
the left-hand (right hand in China) front door
aperture at the bottom. VIN should match the
VIN recorded in the Serv ice Portfolio, and the
VIN visible through the front windscreen.
VEHICLE IDENTIFICATION NUMBER
(VIN)
As a deterrent to thieves, and to assist the
Police, the VIN is stam ped on a plate which is
visible through the lowest pa rt of the left side of
the windscreen.
Note: If you need to communicate with a Land
Rover Dealer/Authorised repairer, you may be
asked to quote the VIN number.
VEHICLE BUILD DATE PLATE
This is the calendar mont h and year in which
the body and power train assemblies were
conjoined and the vehicle was driven from the
production line.
The vehicle built date is shown on a the tyre
pressure label attached to the right-hand 'B'
post.
E83693
Made by Land Rover
LRC PLREB RIMINI RED
LAND ROVER
SALFAXXXXXXXXXXXXe11*XXXX/XXX*XXXX
XXXX kg
XXXX kg
1-
2- XXXX kg
XXXX kg
E83694
SALFAXXXXXXXXXXXX
Page 2993 of 3229

Index
273
R
Driving after a collision . . . . . . . . . . . . . . 205 Before starting or driving . . . . . . . . . . 205
Resetting the fuel cut-off . . . . . . . . . . 205
When driving . . . . . . . . . . . . . . . . . . . 205
E
Economical driving . . . . . . . . . . . . . . . . . 129
Driving tips for economy . . . . . . . . . . 129
Maintenance and fuel economy . . . . . 129
Ejecting compact discs . . . . . . . . . . . . . . 246
Ejecting multiple compact discs . . . . . . . 246
Electric exterior mirrors . . . . . . . . . . . . . . 95 Adjusting and folding . . . . . . . . . . . . . . 95
Mirror dip when reversing . . . . . . . . . . 96
Electric seats . . . . . . . . . . . . . . . . . . . . . . . 49 Driving position memory . . . . . . . . . . . 50
Electric sunroof . . . . . . . . . . . . . . . . . . . . 105 Anti-trap mechanism . . . . . . . . . . . . . 105
Calibration . . . . . . . . . . . . . . . . . . . . . 106
Operation . . . . . . . . . . . . . . . . . . . . . . 105
Sunroof blinds . . . . . . . . . . . . . . . . . . 106
Electric windows . . . . . . . . . . . . . . . . . . . . 93
One shot operation . . . . . . . . . . . . . . . . 93
Overriding anti-trap protec tion . . . . . . . 93
Window isolator . . . . . . . . . . . . . . . . . . 94
Window reset . . . . . . . . . . . . . . . . . . . . 94
Engine compartment overview . . . . . . . . 161 1. Engine oil filler caps (Black) . . . . . . 161
2. Engine oil dipsticks (Yellow) . . . . . . 161
3. Brake fluid reservoi r cap (Black) . . . 161
4. Coolant reservoir ca p (Black) . . . . . 161
5. Washer fluid reserv oir cap (Blue) . . 161
6. Power steering flui d reservoir cap (Black)
161
Engine coolant check . . . . . . . . . . . . . . . 163 Checking the coolant level . . . . . . . . . 163
Topping up the coolant . . . . . . . . . . . . 164
Engine oil check . . . . . . . . . . . . . . . . . . . 162 Checking the oil level . . . . . . . . . . . . . 162
Engine oil specification . . . . . . . . . . . . 163
Topping up the oil . . . . . . . . . . . . . . . . 163
Engine specifications. . . . . . . . . . . . . . . . 211
Enhanced other network (RDS-EON). . . . 229
Essential towing checks . . . . . . . . . . . . . 151
Event data recording . . . . . . . . . . . . . . . . . 37 Exterior mirrors . . . . . . . . . . . . . . . . . . . . . 94
Proximity mirror (Japan only) . . . . . . . . 94
F
Fast forward/reverse . . . . . . . . . . . . . . . . . 247
Fastening the seat belts . . . . . . . . . . . . . . . 56 Releasing the seat belts . . . . . . . . . . . . . 56
Filling station information . . . . . . . . . . . . . . 33 Engine coolant specification. . . . . . . . . . 34
Engine oil specification . . . . . . . . . . . . . 34
Fuel filler flap . . . . . . . . . . . . . . . . . . . . . 33
Tyre pressures . . . . . . . . . . . . . . . . . . . . 34
Front fog lamps . . . . . . . . . . . . . . . . . . . . . 72
Fuel and refuelling Technical specifications . . . . . . . . . . . . 146
Fuel burning heater. . . . . . . . . . . . . . . . . . 104
Fuel consumption . . . . . . . . . . . . . . . . . . . 146
Fuel cut-off . . . . . . . . . . . . . . . . . . . . . . . . 144 Resetting the fuel cut-off . . . . . . . . . . . 144
Fuel filler flap . . . . . . . . . . . . . . . . . . . . . . 144
Fuel quality . . . . . . . . . . . . . . . . . . . . . . . . 142 Alternative fuels for petrol engines. . . . 143
Diesel engined vehicles . . . . . . . . . . . . 143
Petrol engined vehicles . . . . . . . . . . . . 142
Fuse box locations . . . . . . . . . . . . . . . . . . 195
Fuse specification chart . . . . . . . . . . . . . . 196 Engine compartment fuse box . . . . . . . 196
Luggage compartment fuse box . . . . . 201
Passenger compartment fuse box . . . . 199
G
General driving points . . . . . . . . . . . . . . . 128 Battery charging - red . . . . . . . . . . . . . 128
Low oil pressure - red . . . . . . . . . . . . . 128
General information on ra dio frequencies. . 40
H
Handbrake . . . . . . . . . . . . . . . . . . . . . . . . 124
Hazard warning flashers . . . . . . . . . . . 74, 204
HDC . . . . . . . . . . . . . . . . . . . . . . . . . . . . . 137
Head restraints . . . . . . . . . . . . . . . . . . . . . . 51
Headlamp adjustment . . . . . . . . . . . . . . . . . 73
Headlamp levelling . . . . . . . . . . . . . . . . . . . 73 Halogen headlamps . . . . . . . . . . . . . . . . 73
Xenon headlamps . . . . . . . . . . . . . . . . . 73
Headlamp washers . . . . . . . . . . . . . . . . . . . 88
Headphones . . . . . . . . . . . . . . . . . . . . . . . 253