2006 LAND ROVER FRELANDER 2 check engine
[x] Cancel search: check enginePage 2878 of 3229
Maintenance
158
L
One or both types of serv ice interval (distance
and time) may be displayed. For example, if an
engine oil service is du e based on mileage, and
a brake fluid change is due based on time, both
distance and time c ountdowns will display.
Service Portfolio
The Service Portfolio book includes a Service
Record section, which enables a record to be
kept of all the servicing and inspections that are
carried out on the vehicle. This section of the
book also has an area for brake fluid changes
to be recorded.
Ensure your service provider signs and stamps
the book after each se rvice and inspection.
Owner Maintenance
In addition to the routine maintenance, a
number of simple checks must be carried out
more frequently. Advice is given on the pages
that follow.
Daily checks
• Operation of lamps, horn, direction
indicators, wipers, washers and warning
indicators.
• Operation of seat belts and brakes.
• Look for fluid deposits underneath the
vehicle that might indicate a leak.
Weekly checks
• Engine oil level. See ENGINE OIL CHECK
(page 162).
• Engine coolant check. See ENGINE
COOLANT CHECK (page 163).
• Brake/clutch fluid level. See BRAKE AND
CLUTCH FLUID CHECK (page 165). •
Power steering fluid level. See POWER
STEERING FLUID CHECK (page 166).
• Screen washer fluid level. See WASHER
FLUID CHECK (page 167).
• Tyre pressure s and condition.
• Operate air conditioning.
Note: The engine oil leve l should be checked
more frequently if the vehicle is driven for
prolonged periods at high speeds.
Driving in arduous conditions
When a vehicle is operated in extremely
arduous conditions, more frequent attention
must be paid to servicing requirements.
For example, if your vehicle experiences deep
wading conditions, even daily servicing could
be necessary to ensure the continued safe and
reliable operation of the vehicle.
Arduous driving conditions include:
• Driving in dusty and/or sandy conditions.
• Driving on rough and/or muddy roads
and/or wading.
• Driving in extremely hot conditions.
• Towing a trailer or driving in mountainous
conditions.
Contact a Land Rover Dealer/Authorised
Repairer for advice.
Emission control
Your vehicle is fitted with various items of
emission and evaporative control equipment,
designed to meet sp ecific territorial
requirements. You should be aware that
unauthorised replacemen t, modification or
tampering with this equipment by an owner or
repair shop, may be unlawful and subject to
legal penalties.
CAUTION
Any significant or sudden drop in fluid
levels, or uneven tyre wear, should be
reported to a qualified technician without
delay.
Page 2882 of 3229
Maintenance
162
L
ENGINE OIL CHECK
The oil consumption of an engine is influenced
by many factors. Under high loads an engine
will consume more oil than usual. Diesel
engines consume slightly more oil than petrol
engines.
Check the oil level weekly, when the engine is
cold and with the vehicle resting on level
ground.
Checking the oil level
Note: If it is necessary to check the oil level
when the engine is hot, switch off the engine
and let the vehicle stand for five minutes to
allow the oil to drain back into the sump. Do not
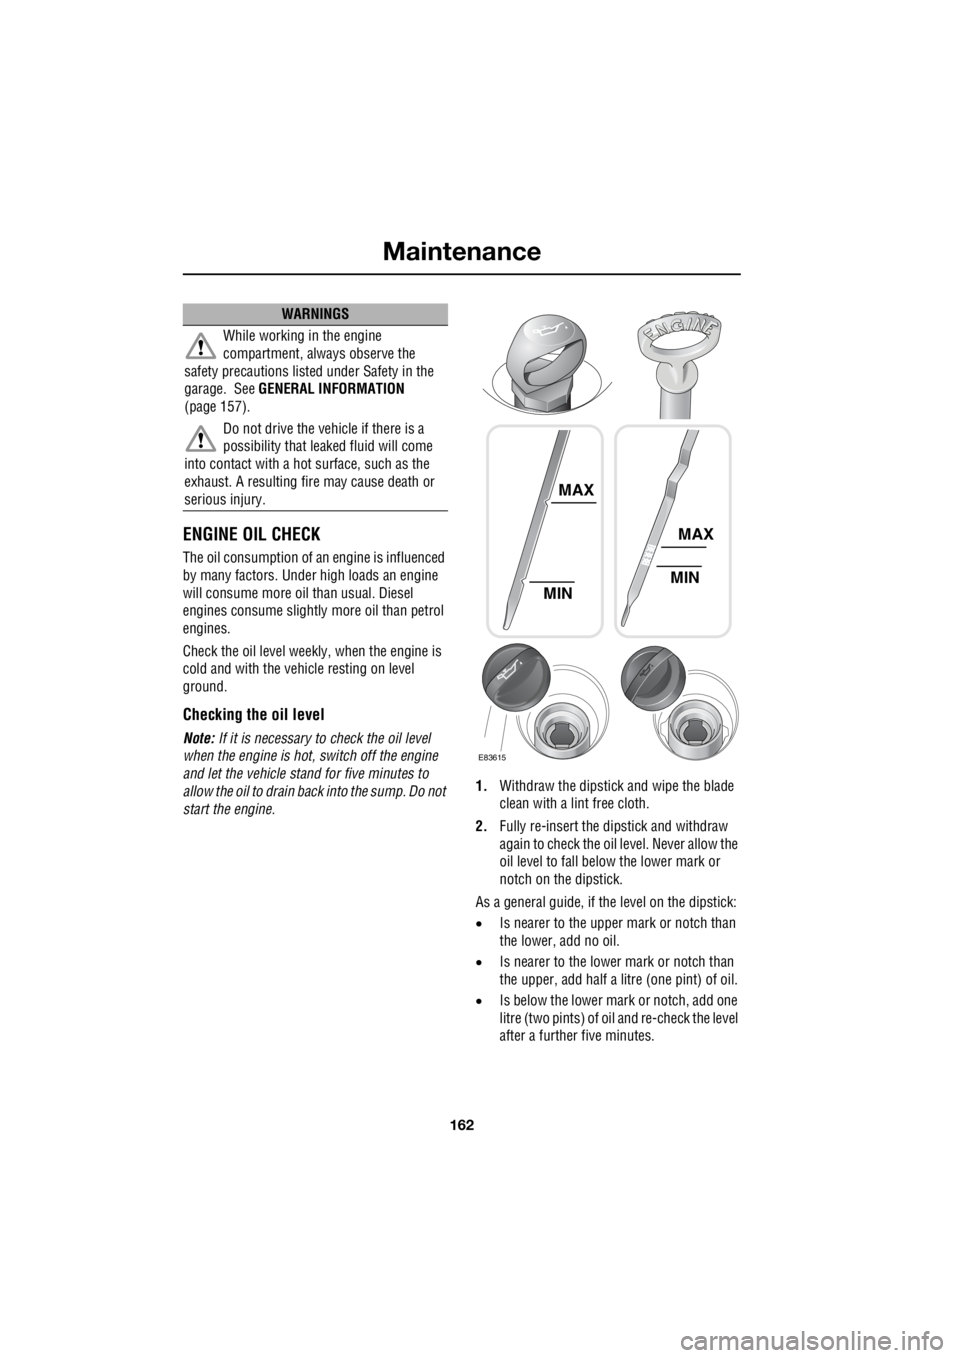
start the engine. 1.
Withdraw the dipstick and wipe the blade
clean with a lint free cloth.
2. Fully re-insert the dipstick and withdraw
again to check the oil level. Never allow the
oil level to fall belo w the lower mark or
notch on the dipstick.
As a general guide, if th e level on the dipstick:
• Is nearer to the upper mark or notch than
the lower, add no oil.
• Is nearer to the lower mark or notch than
the upper, add half a li tre (one pint) of oil.
• Is below the lower mark or notch, add one
litre (two pints) of oil and re-check the level
after a further five minutes.
WARNINGS
While working in the engine
compartment, always observe the
safety precautions liste d under Safety in the
garage. See GENERAL INFORMATION
(page 157).
Do not drive the vehicle if there is a
possibility that leaked fluid will come
into contact with a hot surface, such as the
exhaust. A resulting fi re may cause death or
serious injury.
MAX
MIN
E83615
MAX
MIN
Page 2883 of 3229

163
Maintenance
R
Topping up the oil
1. Unscrew the oil filler cap.
2. Add oil to maintain the level between the
MIN and MAX marks or notches on the
dipstick. Clean up any oil spilled during
topping-up.
3. Check the oil level again after 5 minutes.
It is essential to use the correct specification
oil, and to ensure it is suitable for the climatic
conditions in which the vehicle is to be
operated.
Note: The approximate quantity of oil required
to raise the level from MIN to MAX on the
dipstick is 0.8 litres (1.4 pints) - petrol models
or 1.5 litres (2.6 pi nts) - diesel models.
Engine oil specification
Land Rover recommends Castrol oils.
ENGINE COOLANT CHECK
If the quantity of fluid in the coolant
reservoir drops below the
recommended level, an amber
warning indicator in the instrument pack will
illuminate. Stop the vehicle and check the
coolant level.
On vehicles with a message centre, the
message LOW COOLANT LEVEL or COOLING
SYSTEM FAULT MONITOR GAUGE will be
displayed in place of the warning indicator.
Checking the coolant level
The coolant level in the expansion tank should
be checked at least week ly (more frequently in
high mileage or arduous operating conditions).
Always check the level when the system is
cold.
Ensure the coolant level is maintained between
the level indicator marks located on the side of
the expansion tank.
CAUTIONS
Your vehicle warranty may be invalidated
if damage is caused by using oil that
does not meet the required specification.
Failure to use an oil that meets the
required specification could cause
excessive engine wear, a build up of sludge
and deposits, and increase pollution. It could
also lead to engine failure.
Overfilling with oil could result in severe
engine damage. Oil should be added in
small quantities and the level re-checked to
ensure that the engine is not overfilled.
Model Specification
Petrol engine Use only 0W-30 engine oil, meeting ACEA A5 or
B5 specification.
Diesel engine Use only 5W-30 oil meeting Ford 913-B
specification.
CAUTION
Running the engine without coolant will
cause serious engine damage.
E83616
Page 2884 of 3229
Maintenance
164
L
If the level has fallen appreciably, suspect
leakage or overheatin g and arrange for the
vehicle to be exam ined by a qualified
technician.
Topping up the coolant
Top-up to the upper le vel indicator mark
located on the side of the expansion tank. Use
only a 50% mix of water and Texaco XLC
antifreeze.
Note: In an emergency - and only if the
approved antifreeze is unavailable - top-up the
cooling system with clea n water, but be aware
of the resultant reduction in frost protection.
Do not top-up or refill with conventional
antifreeze formulations. If in doubt consult a
qualified technician.
Ensure the cap is tightened fully after top-up is
completed by turning the cap until the ratchet
cap clicks. Antifreeze
Antifreeze contains important corrosion
inhibitors. The antifreeze content of the coolant
must be maintained at 50% ± 5% all year round
(not just in cold conditions). To ensure that the
anti-corrosion properties of the coolant are
retained, the antifreeze content should be
checked once a year and completely renewed
every ten years, regardless of distance
travelled. Failure to do so may cause corrosion
of the radiator and engine components.
The specific gravity of a 50% antifreeze
solution at 20°C (68°F) is 1.068 and protects
against frost down to -40°C (-40°F).
WARNINGS
Never remove the filler cap when the
engine is hot - escaping steam or
scalding water could ca use serious personal
injury.
Avoid spilling antifreeze onto a hot
engine - a fire may result.
Unscrew the filler cap slowly, allowing
the pressure to escape before removing
completely.
CAUTION
When travelling in territories where the
water supply contains salt, always
ensure you carry a supply of fresh (rain or
distilled) water. Topping up with salt water will
cause serious engine damage.
WARNINGS
Antifreeze is poisonous and can be fatal
if swallowed - keep containers sealed
and out of the reach of children. If accidental
consumption is suspec ted, seek medical
attention immediately.
If the fluid comes into contact with the
skin or eyes, rinse immediately with
plenty of water.
CAUTIONS
The use of non-approved antifreeze will
have an adverse ef fect on the engine
cooling system and therefore engine
durability.
Antifreeze will damage painted surfaces;
soak up any spillage with an absorbent
cloth immediately and wash the area with a
mixture of car shampoo and water.
Page 2885 of 3229
165
Maintenance
R
BRAKE AND CLUTCH FLUID CHECK
If the quantity of fluid in the
brake/clutch rese rvoir drops below
the recommended level, a red
warning indicator in the instrument pack will
illuminate or the message CHECK BRAKE
FLUID will be displayed in the message centre.
Note: If the warning indicator illuminates, or
the message is displayed while the vehicle is
being driven, stop the vehi cle as soon as safety
permits by gently applying the brakes.
Check and top-up the flui d level if necessary.
Checking the fluid level
With the vehicle on level ground, check the
fluid level at least every week (more frequently
in high mileage or arduous operating
conditions).
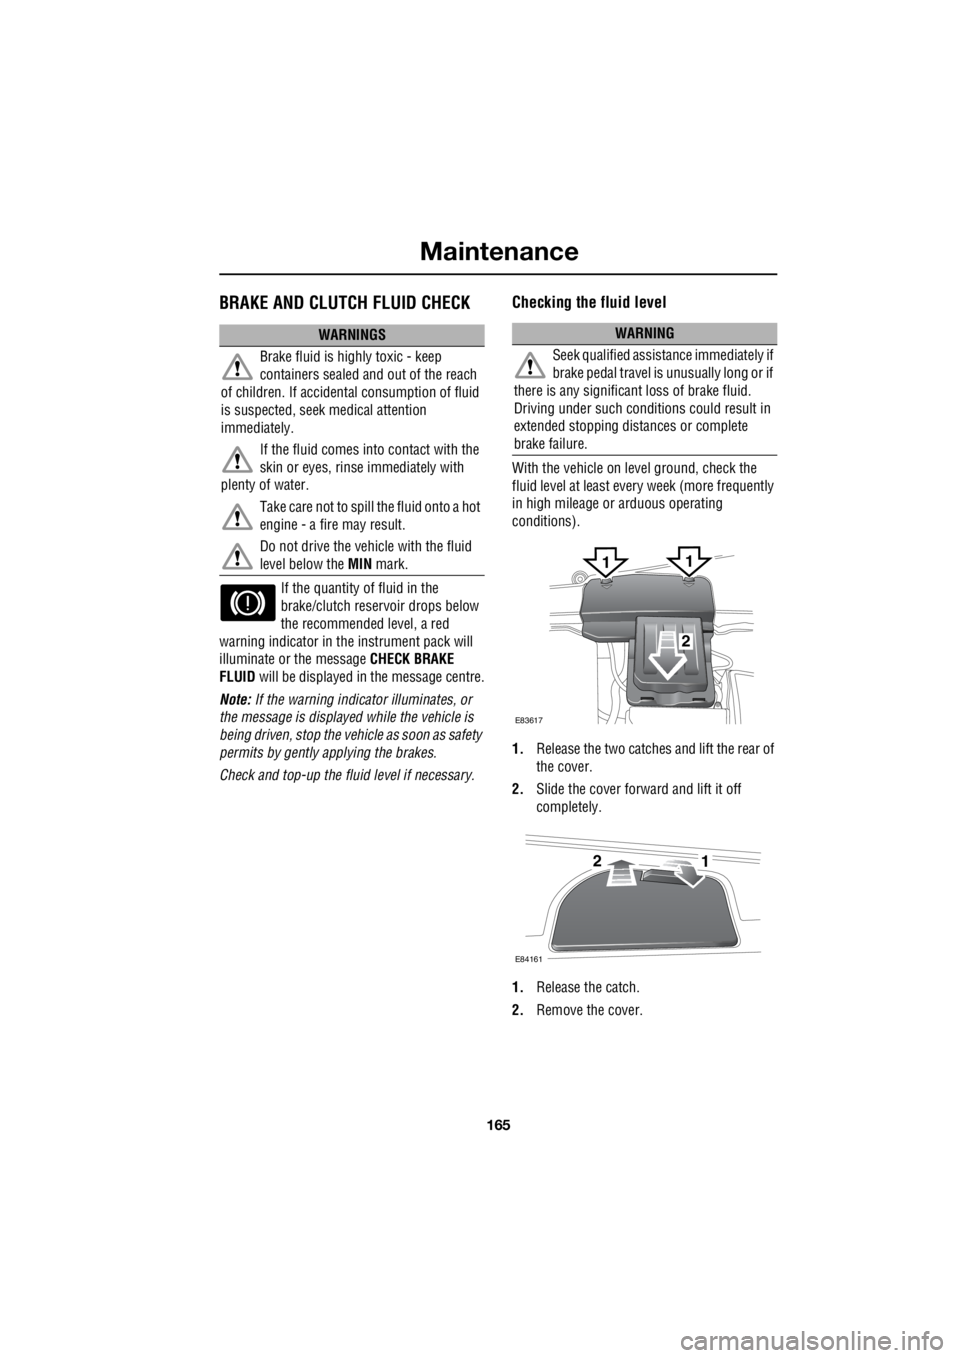
1. Release the two catches and lift the rear of
the cover.
2. Slide the cover forward and lift it off
completely.
1. Release the catch.
2. Remove the cover.
WARNINGS
Brake fluid is highly toxic - keep
containers sealed a nd out of the reach
of children. If accident al consumption of fluid
is suspected, seek medical attention
immediately.
If the fluid comes into contact with the
skin or eyes, rinse immediately with
plenty of water.
Take care not to spill the fluid onto a hot
engine - a fire may result.
Do not drive the vehicle with the fluid
level below the MIN mark.WARNING
Seek qualified assistance immediately if
brake pedal travel is unusually long or if
there is any significant loss of brake fluid.
Driving under such condi tions could result in
extended stopping distances or complete
brake failure.
E83617
2
11
E84161
21
Page 2886 of 3229
Maintenance
166
L
3. Clean the filler cap before removing to
prevent dirt from entering the reservoir.
4. Remove the filler cap.
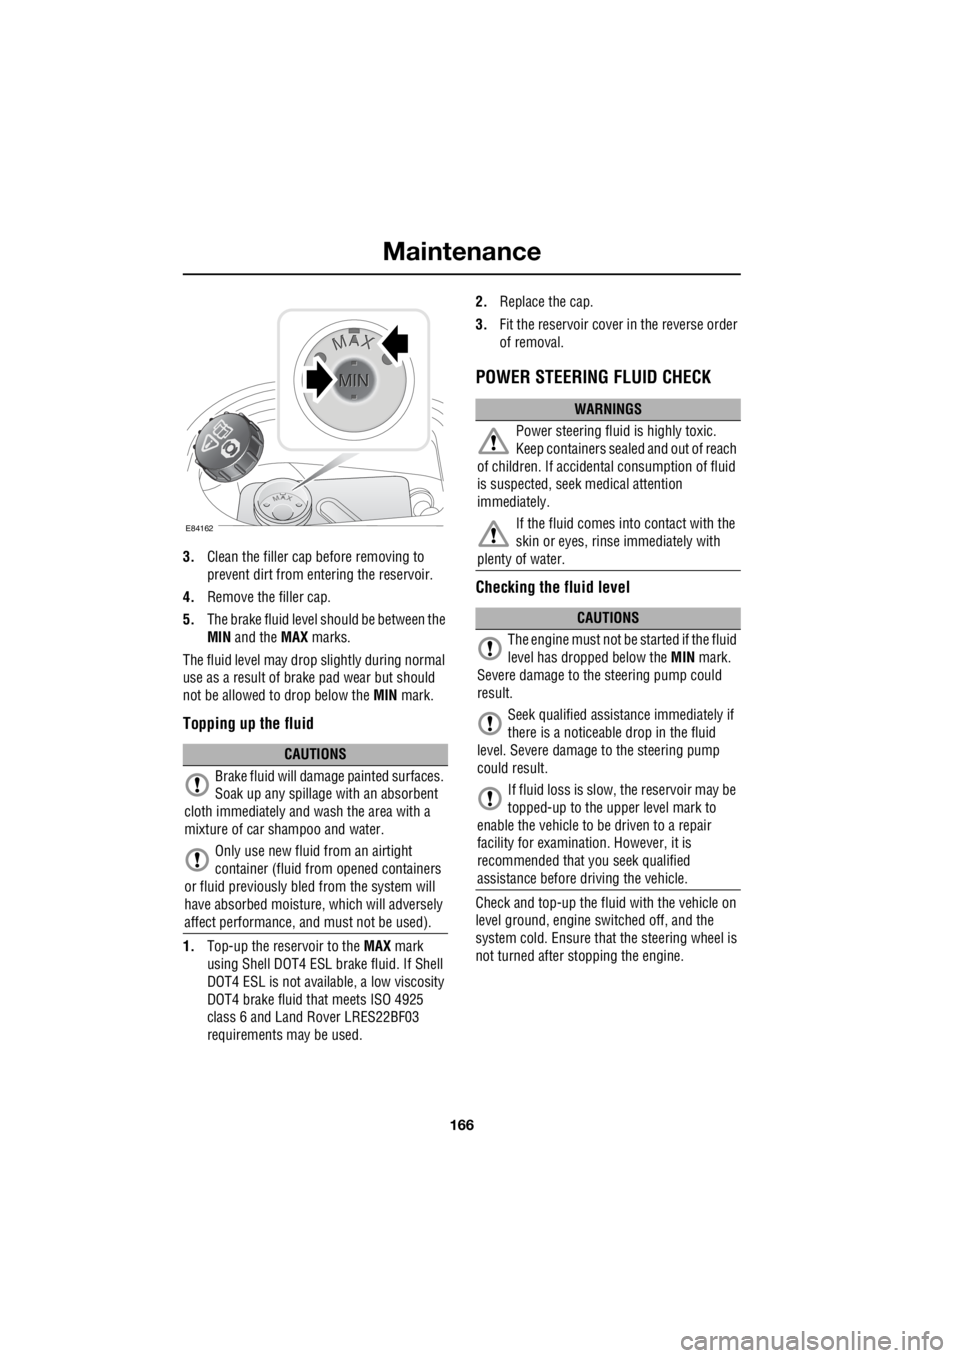
5. The brake fluid level should be between the
MIN and the MAX marks.
The fluid level may drop slightly during normal
use as a result of brake pad wear but should
not be allowed to drop below the MIN mark.
Topping up the fluid
1.Top-up the reservoir to the MAX mark
using Shell DOT4 ESL brake fluid. If Shell
DOT4 ESL is not availa ble, a low viscosity
DOT4 brake fluid that meets ISO 4925
class 6 and Land Rover LRES22BF03
requirements ma y be used. 2.
Replace the cap.
3. Fit the reservoir cover in the reverse order
of removal.
POWER STEERING FLUID CHECK
Checking the fluid level
Check and top-up the fluid with the vehicle on
level ground, engine switched off, and the
system cold. Ensure that the steering wheel is
not turned after stopping the engine.
CAUTIONS
Brake fluid will damage painted surfaces.
Soak up any spillage with an absorbent
cloth immediately and wash the area with a
mixture of car sh ampoo and water.
Only use new fluid from an airtight
container (fluid from opened containers
or fluid previously bled from the system will
have absorbed moisture, which will adversely
affect performance, and must not be used).
E84162
WARNINGS
Power steering fluid is highly toxic.
Keep containers sealed and out of reach
of children. If accidental consumption of fluid
is suspected, seek medical attention
immediately.
If the fluid comes into contact with the
skin or eyes, rinse immediately with
plenty of water.
CAUTIONS
The engine must not be started if the fluid
level has dropped below the MIN mark.
Severe damage to th e steering pump could
result.
Seek qualified assistance immediately if
there is a noticeable drop in the fluid
level. Severe damage to the steering pump
could result.
If fluid loss is slow, the reservoir may be
topped-up to the uppe r level mark to
enable the vehicle to be driven to a repair
facility for examinatio n. However, it is
recommended that you seek qualified
assistance before driving the vehicle.
Page 2890 of 3229

Maintenance
170
L
Capacities
The quoted capacities are approximate and
provided as a guide only. All oil levels must be
checked using the dipsti ck or level plugs as
applicable. Item Variant Capacity
Fuel tank Diesel vehi cles 68 litres (15 gallons)
Petrol vehicles 70 litres (15.4 gallons)
Engine oil refill and filter change Di esel vehicles 5.86 litres (10.31 pints)
Petrol vehicles 7.7 litres (13.55 pints)
Engine oil MIN to MAX on
dipstick Diesel vehicles 1.5
litres (2.64 pints)
Petrol vehicles 0.8 litres (1.4 pints)
Manual gearbox All vehicles 2.0 litres (3.52 pints)
Automatic gearbox All vehicl es 7 litres (12.32 pints)
Power transfer unit All vehi cles 0.75 litres (1.32 pints)
Rear differential All vehi cles 0.7 litres (1.23 pints)
Rear differential coupling unit All vehicles 0.65 litres (1.14 pints)
Washer reservoir With headlamp wash 5.8 litres (10.2 pints)
Washer reservoir Without headla mp wash 3.1 litres (5.45 pints)
Cooling system (fill from dry) Al l vehicles 8.0 litres (14.07 pints)
Page 2893 of 3229
173
Vehicle battery
R
USING BOOSTER CABLES
Note: Before connecting boos ter cables ensure
that the battery connections on the disabled
vehicle are correct, and that all electrical
equipment has been switched off.
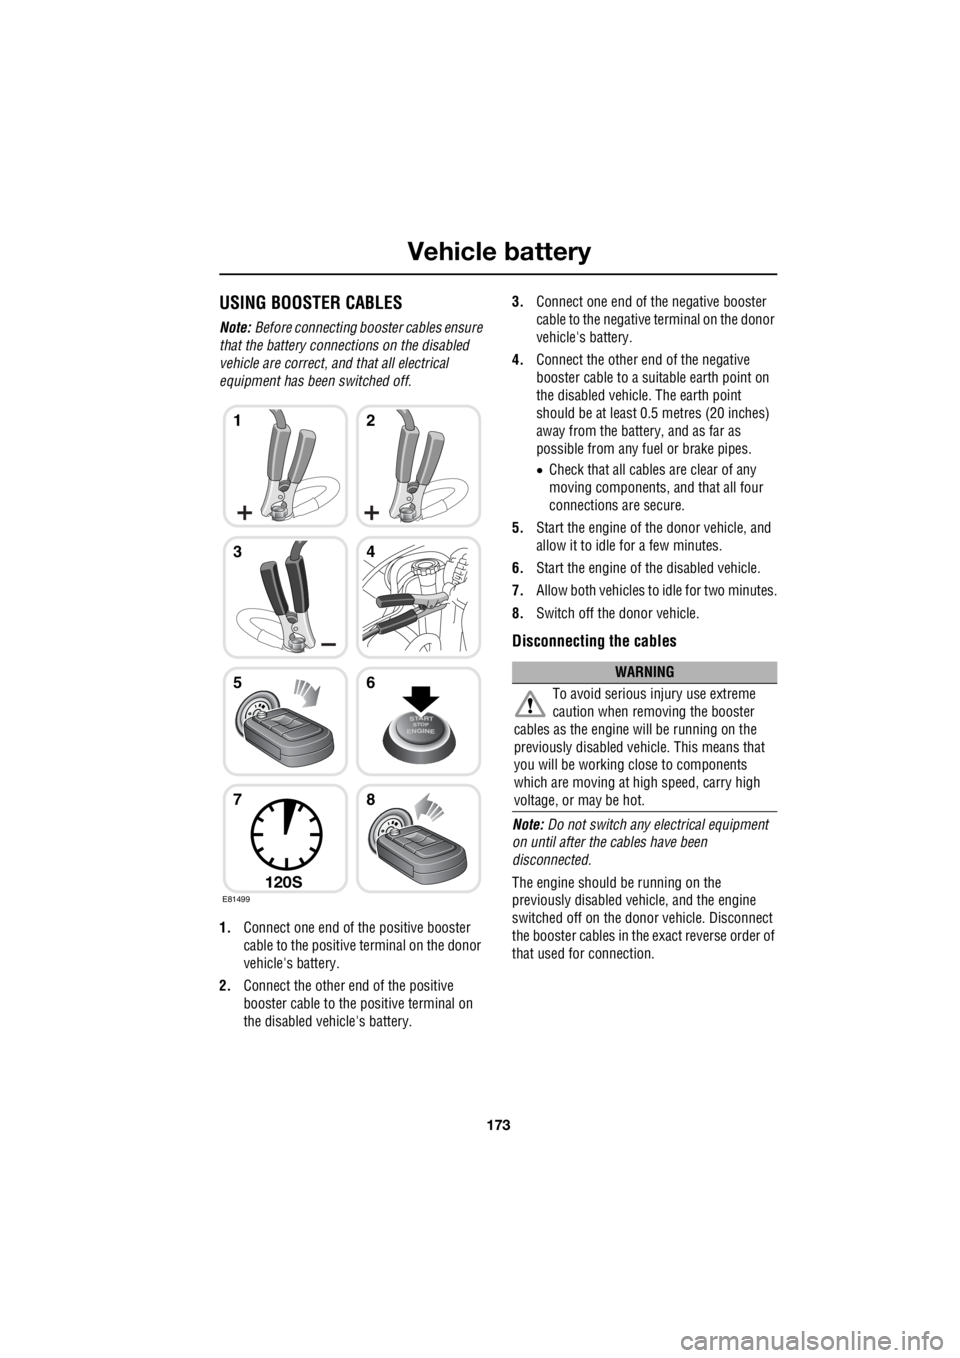
1. Connect one end of the positive booster
cable to the positive terminal on the donor
vehicle's battery.
2. Connect the other e nd of the positive
booster cable to the positive terminal on
the disabled vehicle's battery. 3.
Connect one end of the negative booster
cable to the negative terminal on the donor
vehicle's battery.
4. Connect the other en d of the negative
booster cable to a suit able earth point on
the disabled vehicle. The earth point
should be at least 0.5 metres (20 inches)
away from the battery, and as far as
possible from any fuel or brake pipes.
• Check that all cables are clear of any
moving components, and that all four
connections are secure.
5. Start the engine of the donor vehicle, and
allow it to idle for a few minutes.
6. Start the engine of the disabled vehicle.
7. Allow both vehicles to idle for two minutes.
8. Switch off the donor vehicle.
Disconnecting the cables
Note: Do not switch any electrical equipment
on until after the cables have been
disconnected.
The engine should be running on the
previously disabled ve hicle, and the engine
switched off on the donor vehicle. Disconnect
the booster cables in the exact reverse order of
that used for connection.
E81499
12
34
56
78
120S
WARNING
To avoid serious in jury use extreme
caution when removing the booster
cables as the engine will be running on the
previously disabled vehicle. This means that
you will be working close to components
which are moving at high speed, carry high
voltage, or may be hot.