2006 LAND ROVER FRELANDER 2 belt
[x] Cancel search: beltPage 2561 of 3229
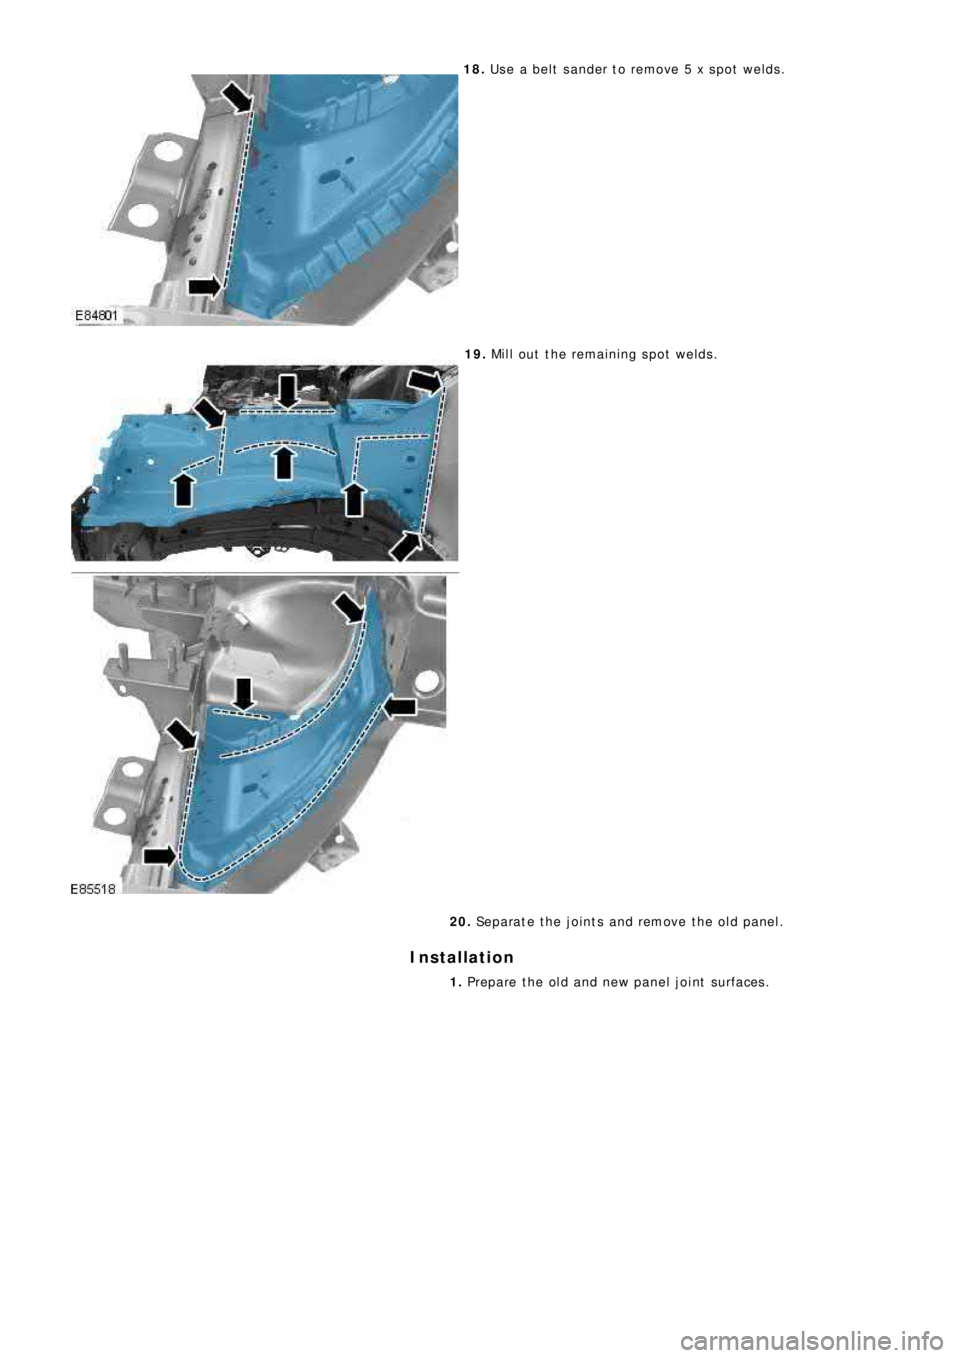
18. Use a belt sander to remove 5 x spot welds.
19. Mill out the remaining spot welds.
20. Separate the joints and remove the old panel.
Installation
1. Prepare the old and new panel joint surfaces.
Page 2568 of 3229
Publ is hed: 11-May-2011
Front End Sheet Metal Repairs - Fender Apron Lower Panel
Removal and Installation
Removal
• NOTE: The fender apron lower panel is to be removed from the fender apron panel service panel; it is not available
separately.
• NOTE: The panel is serviced less its weld studs
1. T he f e nd e r a p ro n l o we r p a ne l i s re p l a ce d i n co nj unct i o n w i t h:
Front bumper cover
Hood lat ch panel
Both front fenders
2. Fo r a d d i t i o na l i nf o rma t i o n re l a t i ng t o t hi s re p a i r p ro ce d ure
please see the following:
Fo r a d d i t i o na l i nf o rma t i o n, re f e r t o : Body and Frame
(501-26
Body Repairs - Vehicle Specific Information and Tolerance
Checks, Description and Operation) /
St a nd a rd W o rks ho p P ra ct i ce s
(100-00 Ge ne ra l I nf o rma t i o n,
Description and Operation).
3. Remove t he hood l at ch panel.
Fo r a d d i t i o na l i nf o rma t i o n, re f e r t o : H o o d L a t ch P a ne l (501-27,
Removal and Installation).
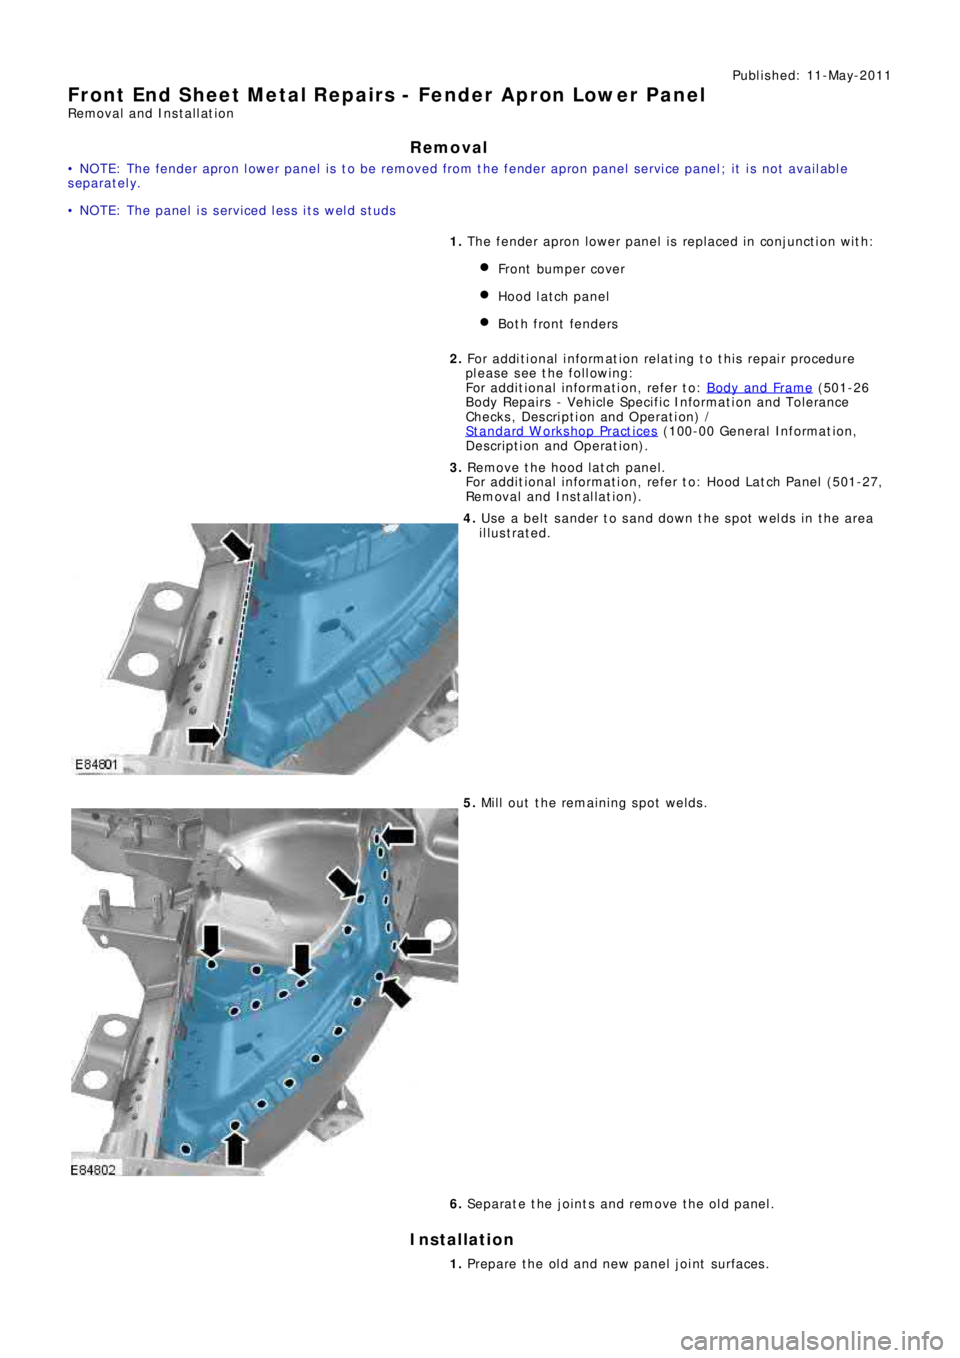
4. Use a belt sander to sand down the spot welds in the area
illustrated.
5. Mill out the remaining spot welds.
6. Separate the joints and remove the old panel.
Installation
1. Prepare the old and new panel joint surfaces.
Page 2580 of 3229
Publ is hed: 11-May-2011
Roof Sheet Metal Repairs - Roof PanelVehicles Without: Sliding Roof
Opening Panel
Removal and Installation
Removal
• NOTE: The roof is serviced as a separate weld on panel, less its reinforcements.
• NOTE: Along the RH and LH sides of the panel, spot welds should be installed adjacent to the originals and not in the
same locations.
1. The roof panel is replaced in conjunction with:
Liftgate
Windshield
2. Fo r a d d i t i o na l i nf o rma t i o n re l a t i ng t o t hi s re p a i r p ro ce d ure
please see the following:
Fo r a d d i t i o na l i nf o rma t i o n, re f e r t o : Body and Frame
(501-26
Body Repairs - Vehicle Specific Information and Tolerance
Checks, Description and Operation) /
St a nd a rd W o rks ho p P ra ct i ce s
(100-00 Ge ne ra l I nf o rma t i o n,
Description and Operation).
3. Disconnect both battery cables.
4. Remove the liftgate.
Fo r a d d i t i o na l i nf o rma t i o n, re f e r t o : Liftgate
(501-03 Body
Closures, Removal and Installation).
5. Remove the windshield glass.
Fo r a d d i t i o na l i nf o rma t i o n, re f e r t o : Windshield Glass
(501-11
Glass, Frames and Mechanisms, Removal and Installation).
6. Remove both front seats.
Fo r a d d i t i o na l i nf o rma t i o n, re f e r t o : Front Seat
(501-10
Seating, Removal and Installation).
7. Remove the rear seat.
8. Remove bot h side air curt ain modules.
Fo r a d d i t i o na l i nf o rma t i o n, re f e r t o : Side Air Bag Module
(501-20B Suppl ement al Res t rai nt Sys t em, Removal and
Installation).
9. Remove both front safety belt retractors.
Fo r a d d i t i o na l i nf o rma t i o n, re f e r t o : Front Safety Belt Retractor
(501-20A Safe t y Bel t Sys t em, Removal and Ins t al l at i on).
10. Remove both rear safety belt retractors.
Fo r a d d i t i o na l i nf o rma t i o n, re f e r t o : Rear Safety Belt Retractor
(501-20A Safe t y Bel t Sys t em, Removal and Ins t al l at i on).
11. Release and lay aside the wiring harness.
Page 2584 of 3229
Publ is hed: 11-May-2011
Roof Sheet Metal Repairs - Roof Front PanelVehicles With: Sliding Roof
Opening Panel
Removal and Installation
Removal
• NOTE: The roof front panel is serviced as a separate weld-on panel.
1. The roof front panel is replaced in conjunction with:
Windshield
Roof opening panel
2. Fo r a d d i t i o na l i nf o rma t i o n re l a t i ng t o t hi s re p a i r p ro ce d ure
please see the following:
Fo r a d d i t i o na l i nf o rma t i o n, re f e r t o : Body and Frame
(501-26
Body Repairs - Vehicle Specific Information and Tolerance
Checks, Description and Operation) /
St a nd a rd W o rks ho p P ra ct i ce s
(100-00 Ge ne ra l I nf o rma t i o n,
Description and Operation).
3. Disconnect both battery cables.
4. Remove the windshield glass.
Fo r a d d i t i o na l i nf o rma t i o n, re f e r t o : Windshield Glass
(501-11
Glass, Frames and Mechanisms, Removal and Installation).
5. Remove both front seats.
Fo r a d d i t i o na l i nf o rma t i o n, re f e r t o : Front Seat
(501-10
Seating, Removal and Installation).
6. Remove the roof opening panel.
Fo r a d d i t i o na l i nf o rma t i o n, re f e r t o : Roof Opening Panel
(501-17 Roof O peni ng Panel , Removal and Ins t al l at i on).
7. Remove bot h side air curt ain modules.
Fo r a d d i t i o na l i nf o rma t i o n, re f e r t o : Si d e A i r Curt a i n Mo d ul e
(501-20B Suppl ement al Res t rai nt Sys t em, Removal and
Installation).
8. Remove both front safety belt retractors.
Fo r a d d i t i o na l i nf o rma t i o n, re f e r t o : Front Safety Belt Retractor
(501-20A Safe t y Bel t Sys t em, Removal and Ins t al l at i on).
9. Remove both rear safety belt retractors.
Fo r a d d i t i o na l i nf o rma t i o n, re f e r t o : Rear Safety Belt Retractor
(501-20A Safe t y Bel t Sys t em, Removal and Ins t al l at i on).
10. Release and lay aside the wiring harness.
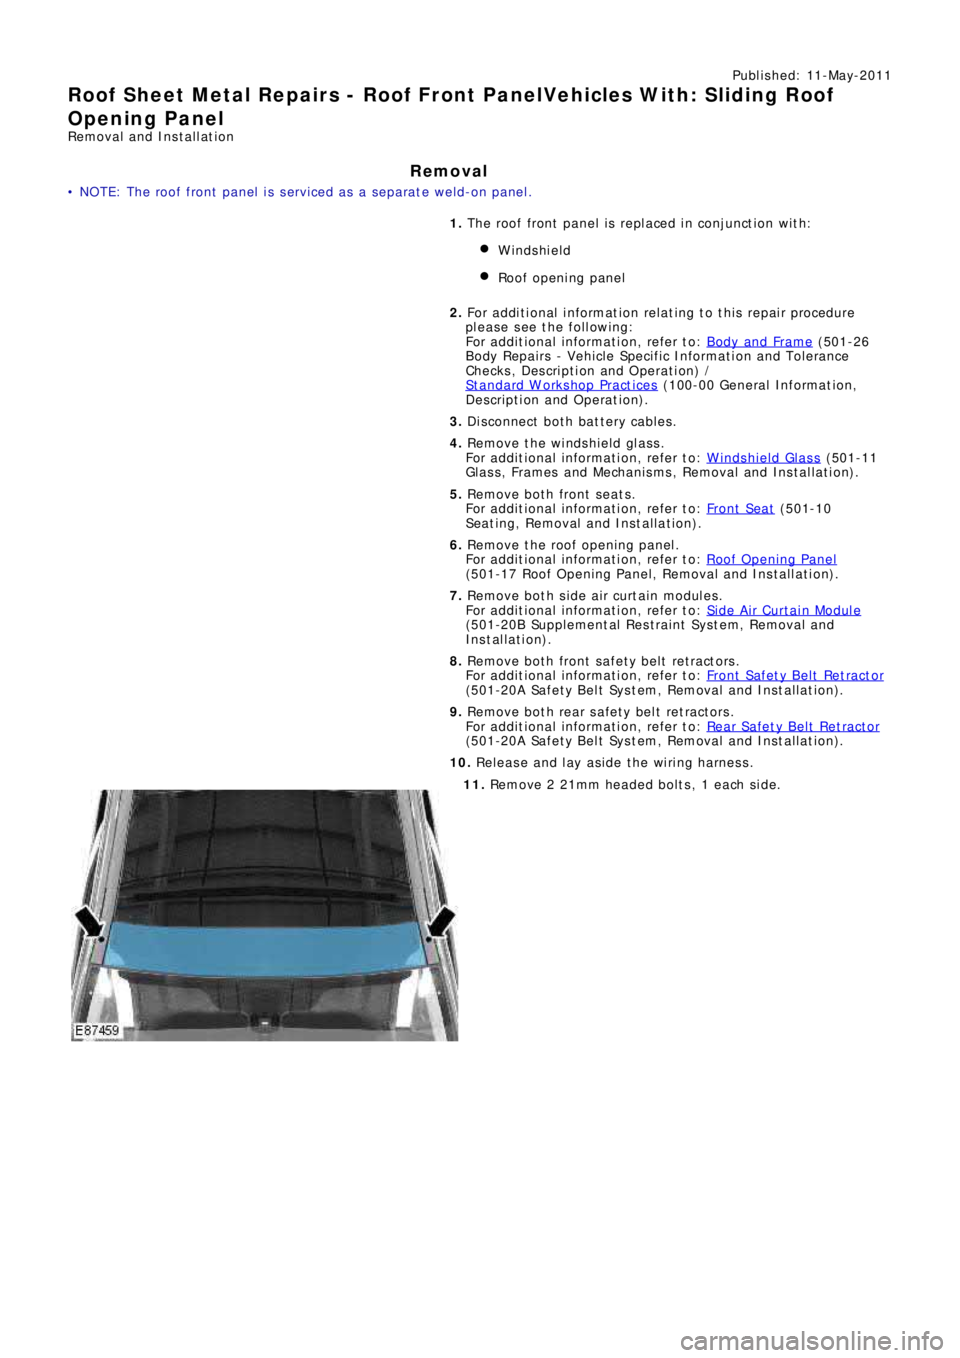
11. Re mo ve 2 21mm he a de d bo l t s , 1 e a ch s i de .
Page 2587 of 3229
Publ is hed: 11-May-2011
Roof Sheet Metal Repairs - Roof Rear PanelVehicles With: Sliding Roof
Opening Panel
Removal and Installation
Removal
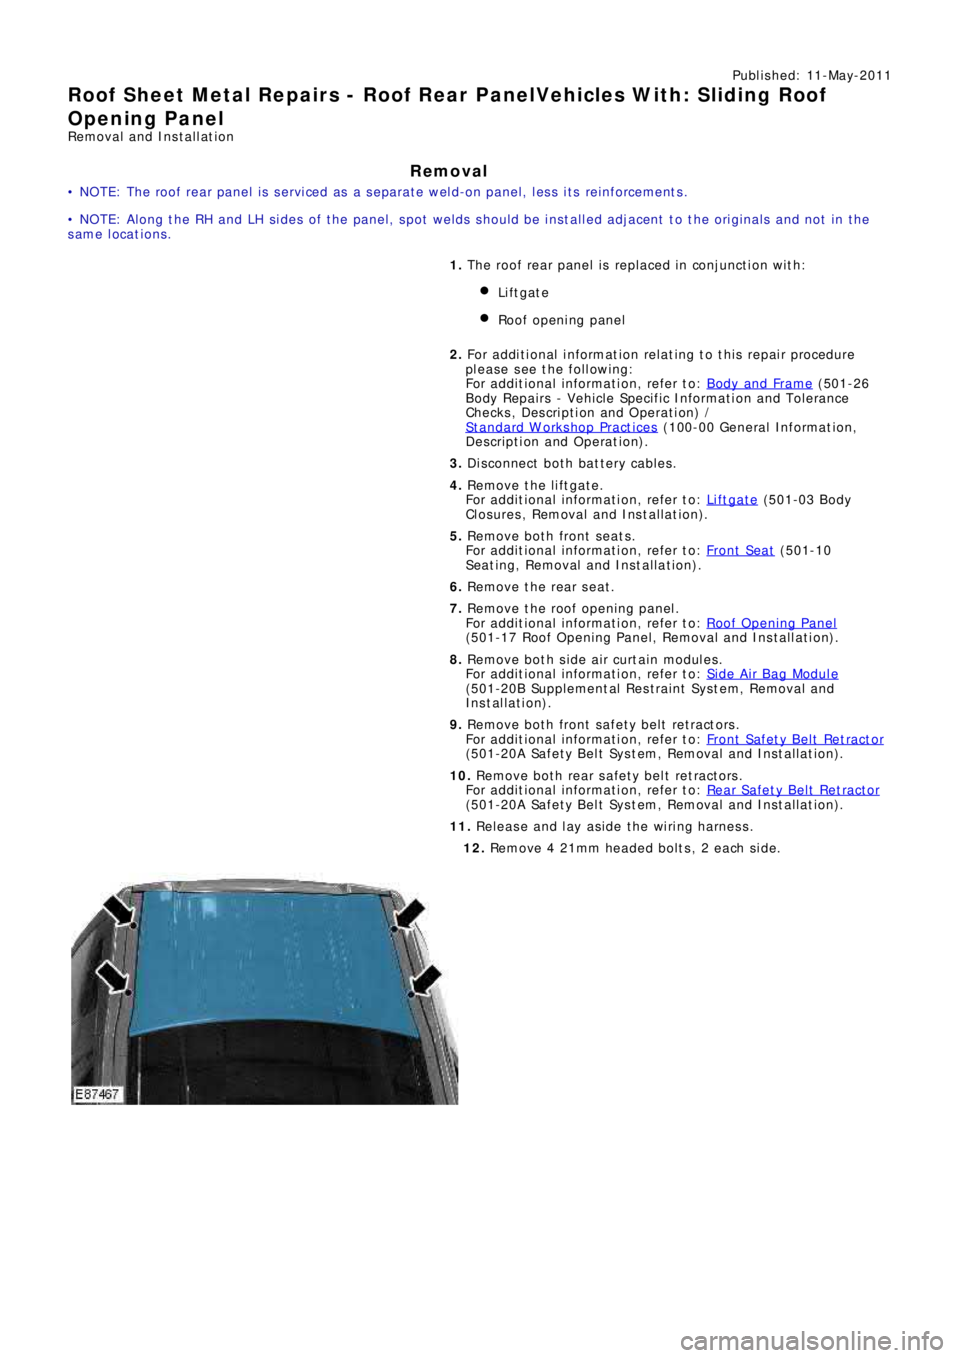
• NOTE: The roof rear panel is serviced as a separate weld-on panel, less its reinforcements.
• NOTE: Along the RH and LH sides of the panel, spot welds should be installed adjacent to the originals and not in the
same locations.
1. T he ro o f re a r p a ne l i s re p l a ce d i n co nj unct i o n w i t h:
Liftgate
Roof opening panel
2. Fo r a d d i t i o na l i nf o rma t i o n re l a t i ng t o t hi s re p a i r p ro ce d ure
please see the following:
Fo r a d d i t i o na l i nf o rma t i o n, re f e r t o : Body and Frame
(501-26
Body Repairs - Vehicle Specific Information and Tolerance
Checks, Description and Operation) /
St a nd a rd W o rks ho p P ra ct i ce s
(100-00 Ge ne ra l I nf o rma t i o n,
Description and Operation).
3. Disconnect both battery cables.
4. Remove the liftgate.
Fo r a d d i t i o na l i nf o rma t i o n, re f e r t o : Liftgate
(501-03 Body
Closures, Removal and Installation).
5. Remove both front seats.
Fo r a d d i t i o na l i nf o rma t i o n, re f e r t o : Front Seat
(501-10
Seating, Removal and Installation).
6. Remove the rear seat.
7. Remove the roof opening panel.
Fo r a d d i t i o na l i nf o rma t i o n, re f e r t o : Roof Opening Panel
(501-17 Roof O peni ng Panel , Removal and Ins t al l at i on).
8. Remove bot h side air curt ain modules.
Fo r a d d i t i o na l i nf o rma t i o n, re f e r t o : Side Air Bag Module
(501-20B Suppl ement al Res t rai nt Sys t em, Removal and
Installation).
9. Remove both front safety belt retractors.
Fo r a d d i t i o na l i nf o rma t i o n, re f e r t o : Front Safety Belt Retractor
(501-20A Safe t y Bel t Sys t em, Removal and Ins t al l at i on).
10. Remove both rear safety belt retractors.
Fo r a d d i t i o na l i nf o rma t i o n, re f e r t o : Rear Safety Belt Retractor
(501-20A Safe t y Bel t Sys t em, Removal and Ins t al l at i on).
11. Release and lay aside the wiring harness.
12. Re mo ve 4 21mm he a de d bo l t s , 2 e a ch s i de .
Page 2593 of 3229
Installation).
18. Remove the front seat.
Fo r a d d i t i o na l i nf o rma t i o n, re f e r t o : Front Seat
(501-10 Seat ing,
Removal and Installation).
19. Remove the floor console.
Fo r a d d i t i o na l i nf o rma t i o n, re f e r t o : Fl oor Cons ol e
(501-12
Instrument Panel and Console, Removal and Installation).
20. Remove the RH & LH rocker panel inner trims.
21. Remove the rear seat cushion.
Fo r a d d i t i o na l i nf o rma t i o n, re f e r t o : Rear Seat Cushion
(501-10
Seating, Removal and Installation).
22. Re mo ve t he re a r ca rp e t s e ct i o n.
23. Remove the B-Pillar side impact sensor.
Fo r a d d i t i o na l i nf o rma t i o n, re f e r t o : B-Pillar Side Impact Sensor
(501-20B Supplement al Res t raint Syst em, Removal and
Installation).
24. Remove the front safety belt retractor.
Fo r a d d i t i o na l i nf o rma t i o n, re f e r t o : Front Safety Belt Retractor
(501-20A Safet y Belt Sys t em, Removal and Ins t al lat ion).
25. Remove the rear safety belt retractor.
Fo r a d d i t i o na l i nf o rma t i o n, re f e r t o : Rear Safety Belt Retractor
(501-20A Safet y Belt Sys t em, Removal and Ins t al lat ion).
26. Release and lay aside the front carpet section.
27. Re mo ve t he re a r ca rp e t s e ct i o n.
28. Remove the front wheel and tire. LINK
29. Remove the rear wheel and tire.
Fo r a d d i t i o na l i nf o rma t i o n, re f e r t o : Wheel and Tire
(204-04
Wheels and Tires, Removal and Installation).
30. Remove the rocker panel out er mouldi ng.
31. Remove the liftgate aperture weatherseal.
32. Remove the forced air extraction grille.
33. Release and lay aside the insulating material at the inner
bulkhead.
34. Release and lay aside the insulating material at the inner quarter
panel.
35. Release and lay aside the wiring harnesses at the A-Pillar,
B-Pillar and rocker panel.
36. Release and lay aside the wiring harness along the inner quarter
panel and back panel.
37. Release and lay aside the insulating material at the inner quarter
panel.
38. RH side: Drain the fuel tank.
Fo r a d d i t i o na l i nf o rma t i o n, re f e r t o : Fuel Tank Draining
(310-00
Fuel Sys t em - General Informat ion, General Procedures).
39. RH side: Remove the fuel tank filler pipe.
Fo r a d d i t i o na l i nf o rma t i o n, re f e r t o : Fuel Tank Filler Pipe
(310-01A
Fuel Tank and Lines - I6 3.2L Petrol, Removal and Installation).
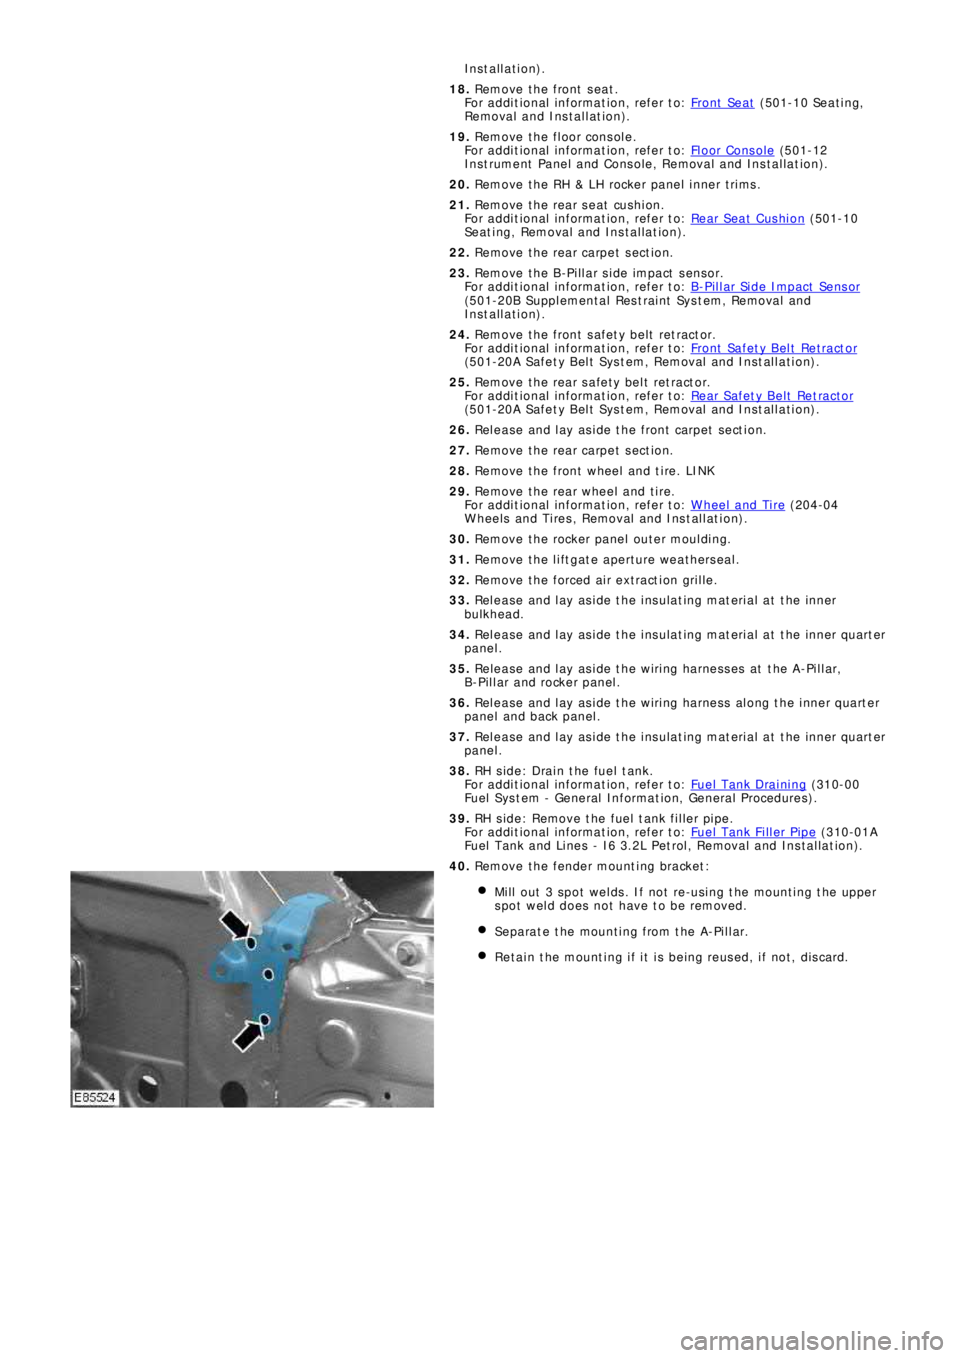
40. Remove the fender mounting bracket:
Mill out 3 spot welds. If not re-using the mounting the upper
spot weld does not have to be removed.
Separate the mounting from the A-Pillar.
Retain the mounting if it is being reused, if not, discard.
Page 2601 of 3229
(501-20B Suppl ement al Res t rai nt Sys t em, Removal and
Installation).
17. Remove the front safety belt retractor.
Fo r a d d i t i o na l i nf o rma t i o n, re f e r t o : Front Safety Belt Retractor
(501-20A Safe t y Bel t Sys t em, Removal and Ins t al l at i on).
18. Release and lay aside the front carpet section.
19. Re mo ve t he re a r ca rp e t s e ct i o n.
20. Remove the roof moulding, front and rear sections.
21. Remove the front wheel and tire.
Fo r a d d i t i o na l i nf o rma t i o n, re f e r t o : Wheel and Tire
(204-04
Wheels and Tires, Removal and Installation).
22. Remove the rocker panel outer moulding.
23. Release and lay aside the insulating material at the inner
bulkhead.
24. Release and lay aside the wiring harnesses at the A-Pillar,
B-Pillar and rocker panel.
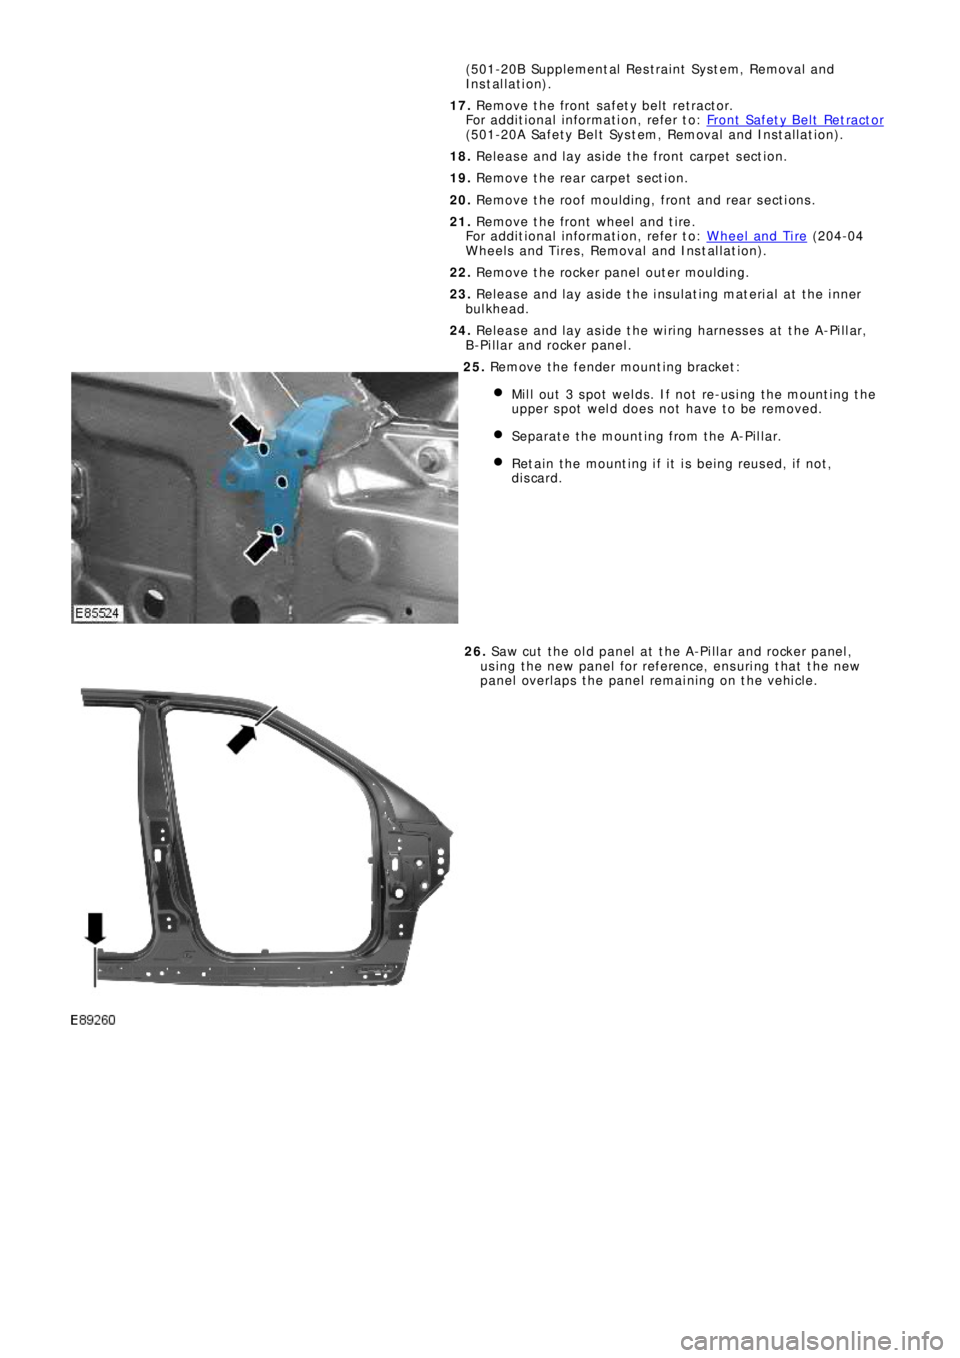
25. Remove the fender mounting bracket:
Mil l out 3 s pot welds . If not re-us i ng t he mount ing t he
upper spot weld does not have to be removed.
Separate the mounting from the A-Pillar.
Retain the mounting if it is being reused, if not,
discard.
26. Saw cut the old panel at the A-Pillar and rocker panel,
us i ng t he ne w p a ne l f o r re f e re nce , e ns uri ng t ha t t he ne w
panel overlaps the panel remaining on the vehicle.
Page 2617 of 3229
Publ is hed: 11-May-2011
Side Panel Sheet Metal Repairs - B-Pillar Outer Panel
Removal and Installation
Removal
CAUTION: The B-Pillar outer panel must be MIG slot brazed to the B-Pillar reinforcement, which is BH300, (Bake
Hardened steel) and the rocker panel inner reinforcement, which is DP600, (Dual Phase steel). MIG plug we lds / spot
we lds, must not be used.
• NOTE: The B-Pillar outer panel is serviced as a separate weld-on panel.
• NOTE: There is an NVH element attached inside this panel, it is not serviced on the new panel. If damaged, a new
element will be required.
• NOTE: If the B-Pillar outer is replaced without the B-Pillar reinforcement, the upper section butt joint can be made lower
down the pillar if required.
1. The B-Pillar out er panel is replaced in conjunct ion wit h:
Front door
Rear door
Headliner
2. Fo r a d d i t i o na l i nf o rma t i o n re l a t i ng t o t hi s re p a i r p ro ce d ure
please see the following:
Fo r a d d i t i o na l i nf o rma t i o n, re f e r t o : Body and Frame
(501-26
Body Repairs - Vehicle Specific Information and Tolerance
Checks, Description and Operation) /
St a nd a rd W o rks ho p P ra ct i ce s
(100-00 Ge ne ra l I nf o rma t i o n,
Description and Operation).
3. Remove the front door.
Fo r a d d i t i o na l i nf o rma t i o n, re f e r t o : Front Door
(501-03 Body
Closures, Removal and Installation).
4. Remove the rear door.
Fo r a d d i t i o na l i nf o rma t i o n, re f e r t o : Rear Door
(501-03 Body
Closures, Removal and Installation).
5. Remove t he upper and l ower door hi nges from t he B-Pi l lar, 4 x
bolts.
6. Remove the front door striker from the B-Pillar.
7. Remove the front seat.
Fo r a d d i t i o na l i nf o rma t i o n, re f e r t o : Front Seat
(501-10
Seating, Removal and Installation).
8. Remove the rear seat cushion.
Fo r a d d i t i o na l i nf o rma t i o n, re f e r t o : Rear Seat Cushion
(501-10
Seating, Removal and Installation).
9. Remove the front safety belt retractor.
Fo r a d d i t i o na l i nf o rma t i o n, re f e r t o : Front Safety Belt Retractor
(501-20A Safe t y Bel t Sys t em, Removal and Ins t al l at i on).
10. Remove t he headli ner.
Fo r a d d i t i o na l i nf o rma t i o n, re f e r t o : Headliner - Vehicles
Without: Tilting Roof Opening Panel (501-05 Int eri or Tri m and
Ornamentation, Removal and Installation) /
Headliner - Vehicles With: Tilting Roof Opening Panel
(501-05
Int erior Trim and Ornamentat ion, Removal and Installat ion).
11. Remove the RH & LH rocker panel inner trims.
12. Remove the B-Pillar side impact sensor.
Fo r a d d i t i o na l i nf o rma t i o n, re f e r t o : B-Pillar Side Impact Sensor
(501-20B Suppl ement al Res t rai nt Sys t em, Removal and
Installation).
13. Re mo ve t he s i d e a i r curt a i n mo d ul e .
Fo r a d d i t i o na l i nf o rma t i o n, re f e r t o : Si d e A i r Curt a i n Mo d ul e
(501-20B Suppl ement al Res t rai nt Sys t em, Removal and
Installation).
14. Remove the roof moulding, front and rear sections.
15. Remove the rocker panel outer moulding.
16. Release and lay aside the front carpet section.
17. Re mo ve t he re a r ca rp e t s e ct i o n.
18. Release and lay aside the wiring harness along the B-Pillar
i nne r a nd i nne r ro cke r p a ne l .