Page 1186 of 3383
REAR SONAR SYSTEMDI-65
C
DE
F
G H
I
J
L
M A
B
DI
Revision: November 2009 2006 QX56
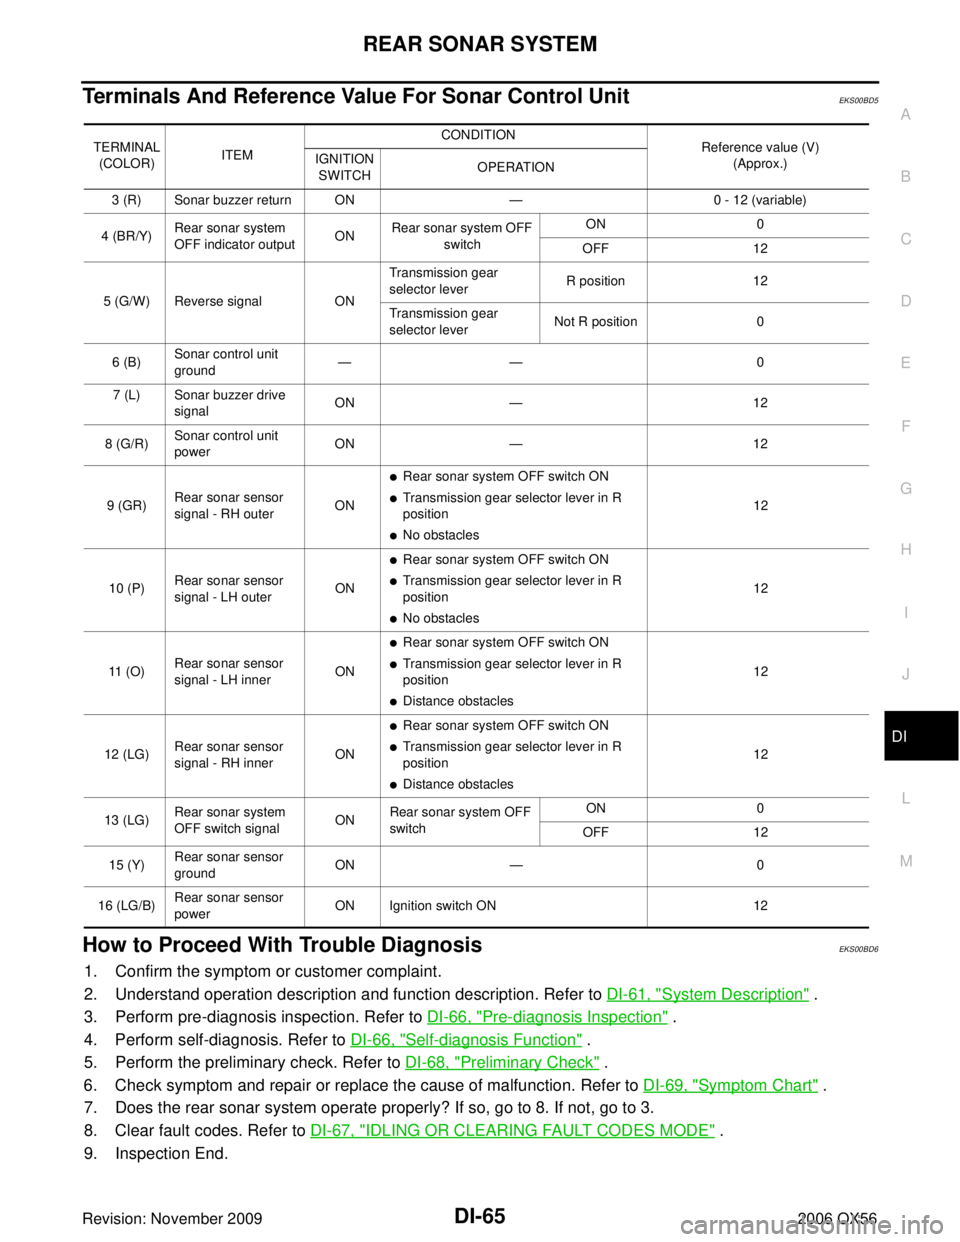
Terminals And Reference Value For Sonar Control UnitEKS00BD5
How to Proceed With Trouble DiagnosisEKS00BD6
1. Confirm the symptom or customer complaint.
2. Understand operation description and function description. Refer to DI-61, "
System Description" .
3. Perform pre-diagnosis inspection. Refer to DI-66, "
Pre-diagnosis Inspection" .
4. Perform self-diagnosis. Refer to DI-66, "
Self-diagnosis Function" .
5. Perform the preliminary check. Refer to DI-68, "
Preliminary Check" .
6. Check symptom and repair or replace the cause of malfunction. Refer to DI-69, "
Symptom Chart" .
7. Does the rear sonar system operate properly? If so, go to 8. If not, go to 3.
8. Clear fault codes. Refer to DI-67, "
IDLING OR CLEARING FAULT CODES MODE" .
9. Inspection End.
TERMINAL (COLOR) ITEM CONDITION
Reference value (V)
(Approx.)
IGNITION
SWITCH OPERATION
3 (R) Sonar buzzer return ON —0 - 12 (variable)
4 (BR/Y) Rear sonar system
OFF indicator output ONRear sonar system OFF
switch ON
0
OFF 12
5 (G/W) Reverse signal ONTransmission gear
selector lever
R position
12
Transmission gear
selector lever Not R position
0
6 (B) Sonar control unit
ground ——
0
7 (L) Sonar buzzer drive signal ON
— 12
8 (G/R) Sonar control unit
power
ON
— 12
9 (GR) Rear sonar sensor
signal - RH outer ON
�Rear sonar system OFF switch ON
�Transmission gear selector lever in R
position
�No obstacles 12
10 (P) Rear sonar sensor
signal - LH outer ON
�Rear sonar system OFF switch ON
�Transmission gear selector lever in R
position
�No obstacles 12
11 ( O ) Rear sonar sensor
signal - LH inner ON
�Rear sonar system OFF switch ON
�Transmission gear selector lever in R
position
�Distance obstacles 12
12 (LG) Rear sonar sensor
signal - RH inner ON
�Rear sonar system OFF switch ON
�Transmission gear selector lever in R
position
�Distance obstacles 12
13 (LG) Rear sonar system
OFF switch signal ONRear sonar system OFF
switch ON
0
OFF 12
15 (Y) Rear sonar sensor
ground ON
— 0
16 (LG/B) Rear sonar sensor
power ON Ignition switch ON
12
Page 1201 of 3383
DI-80
REAR VIEW MONITOR
Revision: November 20092006 QX56
CONSULT-II Function (REARVIEW CAMERA)EKS00BDK
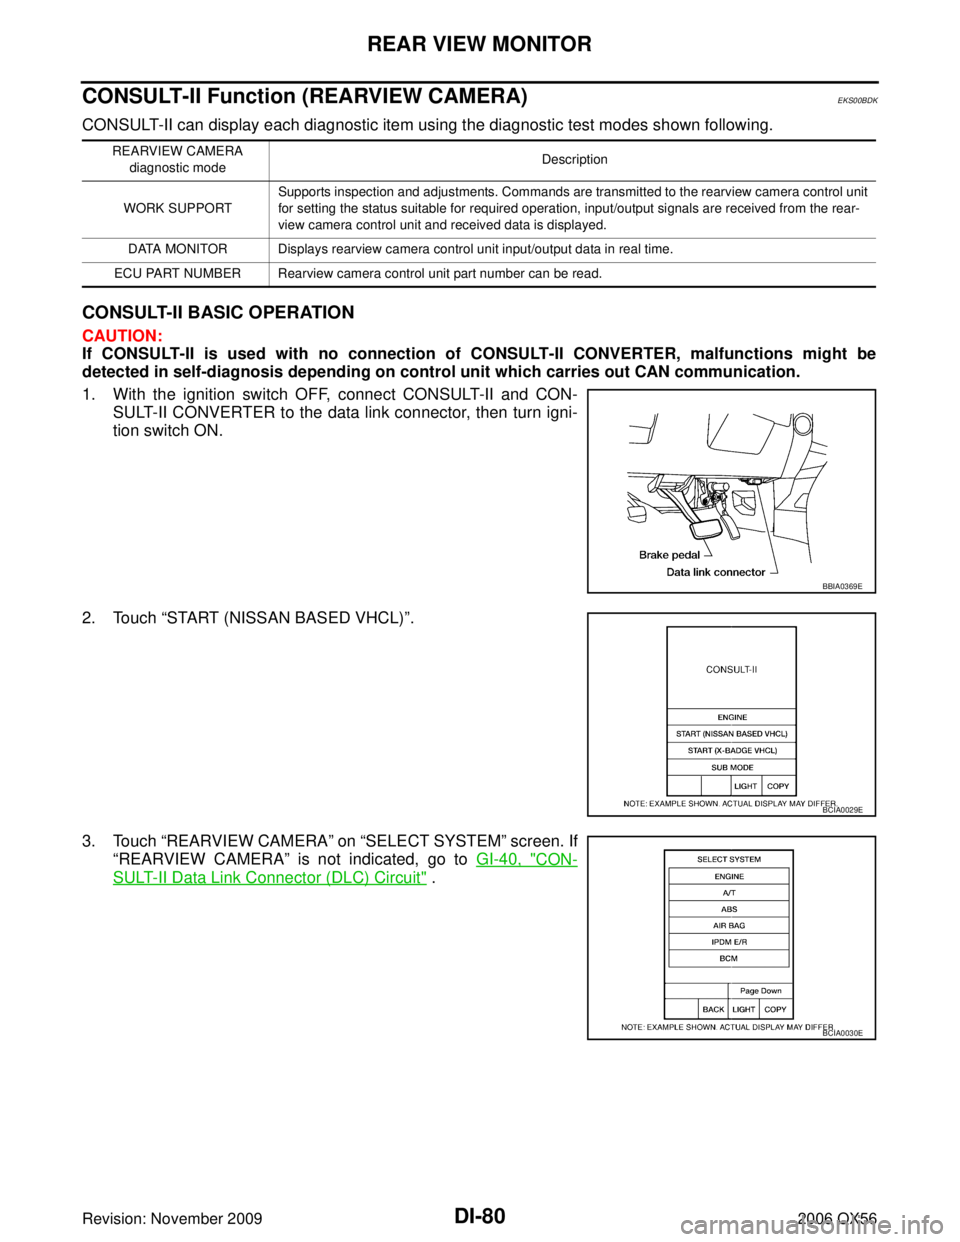
CONSULT-II can display each diagnostic item using the diagnostic test modes shown following.
CONSULT-II BASIC OPERATION
CAUTION:
If CONSULT-II is used with no connection of CONSULT-II CONVERTER, malfunctions might be
detected in self-diagnosis depending on control unit which carries out CAN communication.
1. With the ignition switch OFF, connect CONSULT-II and CON-
SULT-II CONVERTER to the data link connector, then turn igni-
tion switch ON.
2. Touch “START (NISSAN BASED VHCL) ”.
3. Touch “REARVIEW CAMERA ” on “SELECT SYSTEM ” screen. If
“REARVIEW CAMERA ” is not indicated, go to GI-40, "
CON-
SULT-II Data Link Connector (DLC) Circuit" .
REARVIEW CAMERA
diagnostic mode Description
WORK SUPPORT Supports inspection and adjustments. Commands are transmitted to the rearview camera control unit
for setting the status suitable for required operation, input/output signals are received from the rear-
view camera control unit and received data is displayed.
DATA MONITOR Displays rearview camera control unit input/output data in real time.
ECU PART NUMBER Rearview camera control unit part number can be read.
BBIA0369E
BCIA0029E
BCIA0030E
Page 1206 of 3383
REAR VIEW MONITORDI-85
C
DE
F
G H
I
J
L
M A
B
DI
Revision: November 2009 2006 QX56
Rear View Is Not Displayed With The A/T Selector Lever In R PositionEKS00BDN
1. BACK-UP LAMP INSPECTION
1. Turn ignition switch ON.
2. Shift A/T selector lever to R position.
Does back-up lamp illuminate?
YES >> GO TO 2.
NO >> Check back-up lamp system. Refer to LT- 1 0 9 , "
BACK-UP LAMP" .
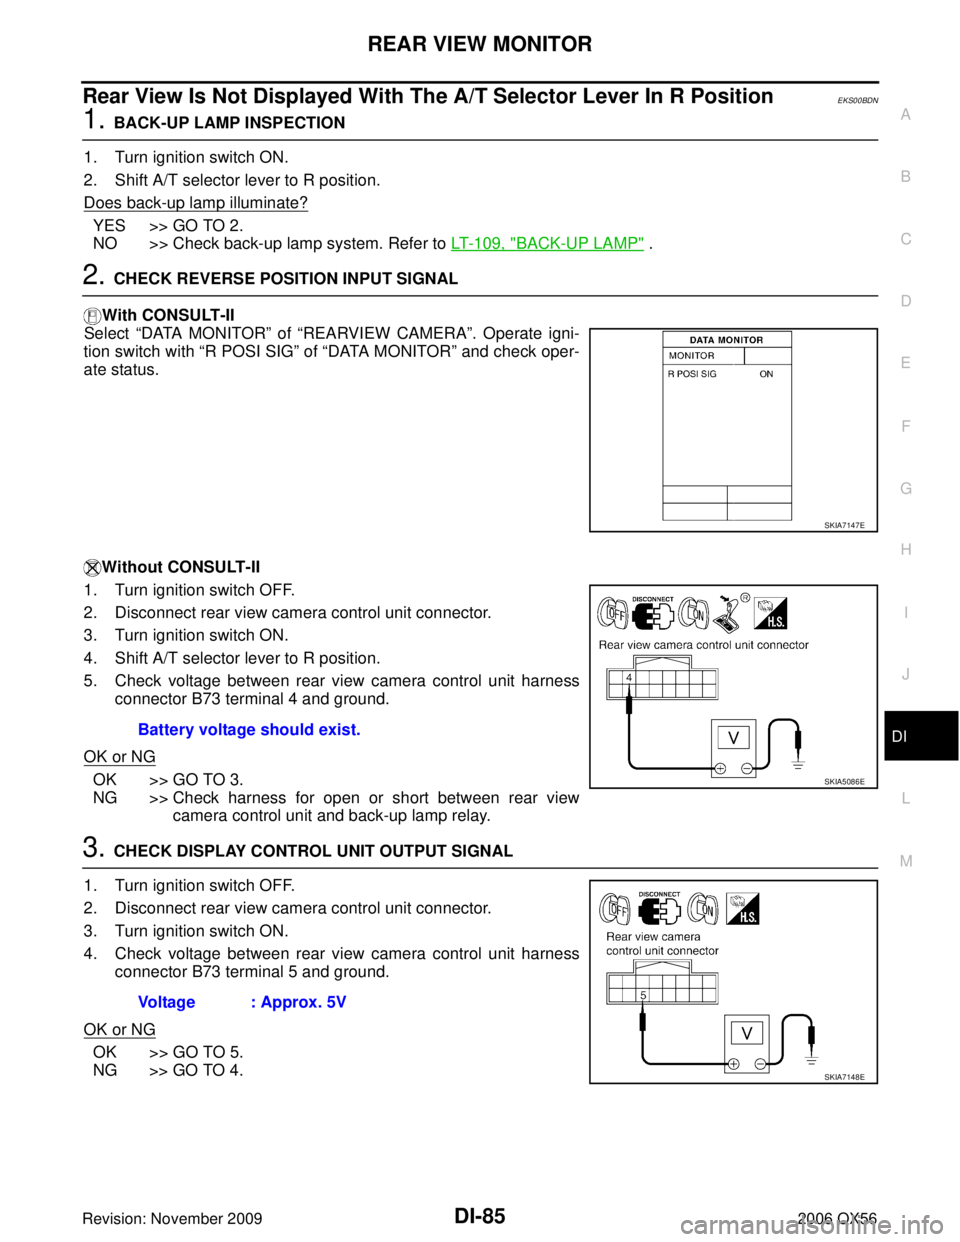
2. CHECK REVERSE POSITION INPUT SIGNAL
With CONSULT-II
Select “DATA MONITOR” of “REARVIEW CAMERA ”. Operate igni-
tion switch with “R POSI SIG” of “DATA MONITOR” and check oper-
ate status.
Without CONSULT-II
1. Turn ignition switch OFF.
2. Disconnect rear view camera control unit connector.
3. Turn ignition switch ON.
4. Shift A/T selector lever to R position.
5. Check voltage between rear view camera control unit harness connector B73 terminal 4 and ground.
OK or NG
OK >> GO TO 3.
NG >> Check harness for open or short between rear view camera control unit and back-up lamp relay.
3. CHECK DISPLAY CONTROL UNIT OUTPUT SIGNAL
1. Turn ignition switch OFF.
2. Disconnect rear view camera control unit connector.
3. Turn ignition switch ON.
4. Check voltage between rear view camera control unit harness connector B73 terminal 5 and ground.
OK or NG
OK >> GO TO 5.
NG >> GO TO 4.
SKIA7147E
Battery voltage should exist.
SKIA5086E
Voltage : Approx. 5V
SKIA7148E
Page 1207 of 3383
DI-86
REAR VIEW MONITOR
Revision: November 20092006 QX56
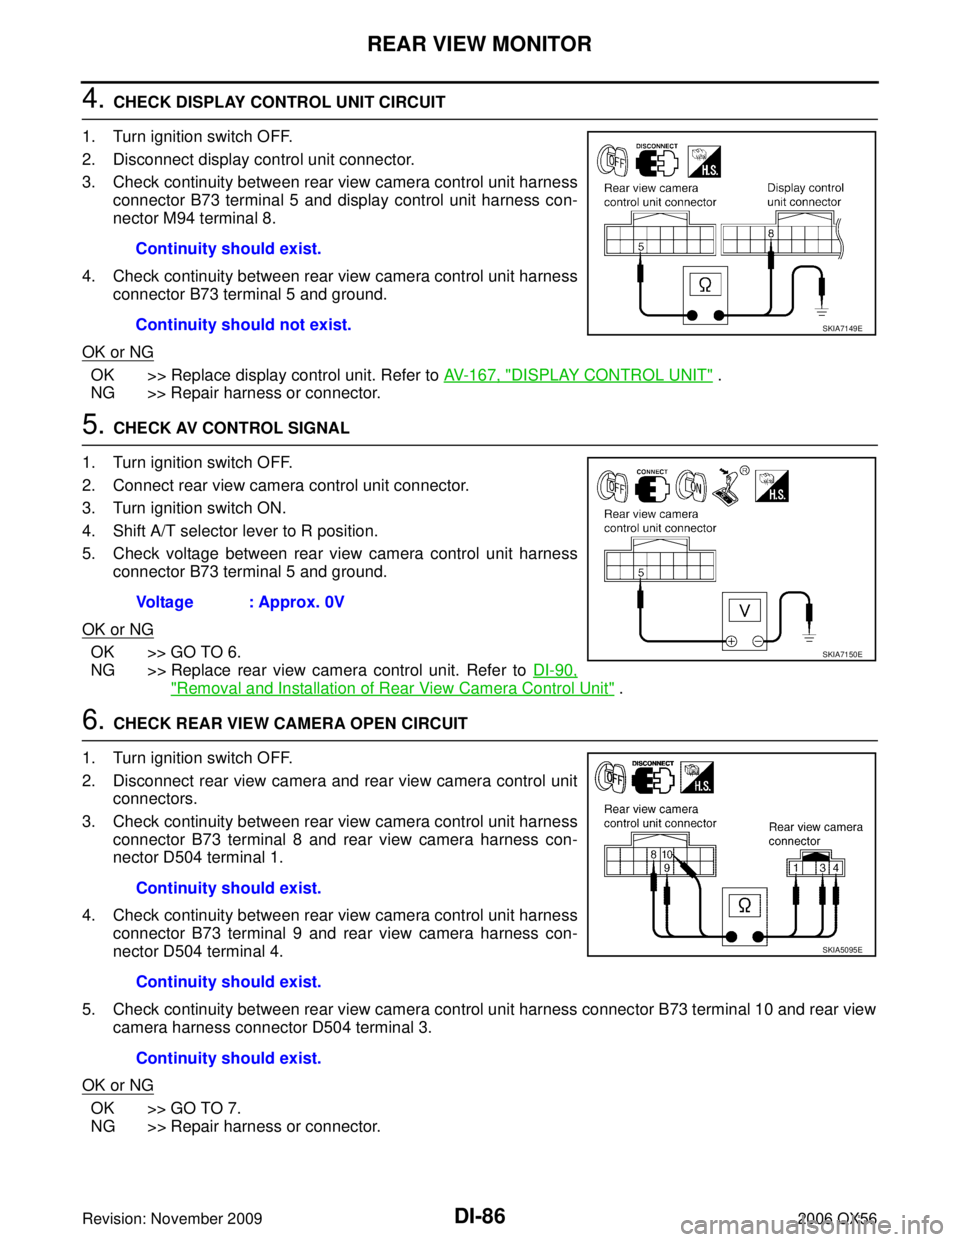
4. CHECK DISPLAY CONTROL UNIT CIRCUIT
1. Turn ignition switch OFF.
2. Disconnect display control unit connector.
3. Check continuity between rear view camera control unit harness connector B73 terminal 5 and display control unit harness con-
nector M94 terminal 8.
4. Check continuity between rear view camera control unit harness connector B73 terminal 5 and ground.
OK or NG
OK >> Replace display control unit. Refer to AV- 1 6 7 , "DISPLAY CONTROL UNIT" .
NG >> Repair harness or connector.
5. CHECK AV CONTROL SIGNAL
1. Turn ignition switch OFF.
2. Connect rear view camera control unit connector.
3. Turn ignition switch ON.
4. Shift A/T selector lever to R position.
5. Check voltage between rear view camera control unit harness connector B73 terminal 5 and ground.
OK or NG
OK >> GO TO 6.
NG >> Replace rear view camera control unit. Refer to DI-90,
"Removal and Installation of Rear View Camera Control Unit" .
6. CHECK REAR VIEW CAMERA OPEN CIRCUIT
1. Turn ignition switch OFF.
2. Disconnect rear view camera and rear view camera control unit connectors.
3. Check continuity between rear view camera control unit harness connector B73 terminal 8 and rear view camera harness con-
nector D504 terminal 1.
4. Check continuity between rear view camera control unit harness connector B73 terminal 9 and rear view camera harness con-
nector D504 terminal 4.
5. Check continuity between rear view camera control unit harness connector B73 terminal 10 and rear view camera harness connector D504 terminal 3.
OK or NG
OK >> GO TO 7.
NG >> Repair harness or connector. Continuity should exist.
Continuity should not exist.
SKIA7149E
Voltage : Approx. 0V
SKIA7150E
Continuity should exist.
Continuity should exist.
Continuity should exist.
SKIA5095E
Page 1208 of 3383
REAR VIEW MONITORDI-87
C
DE
F
G H
I
J
L
M A
B
DI
Revision: November 2009 2006 QX56
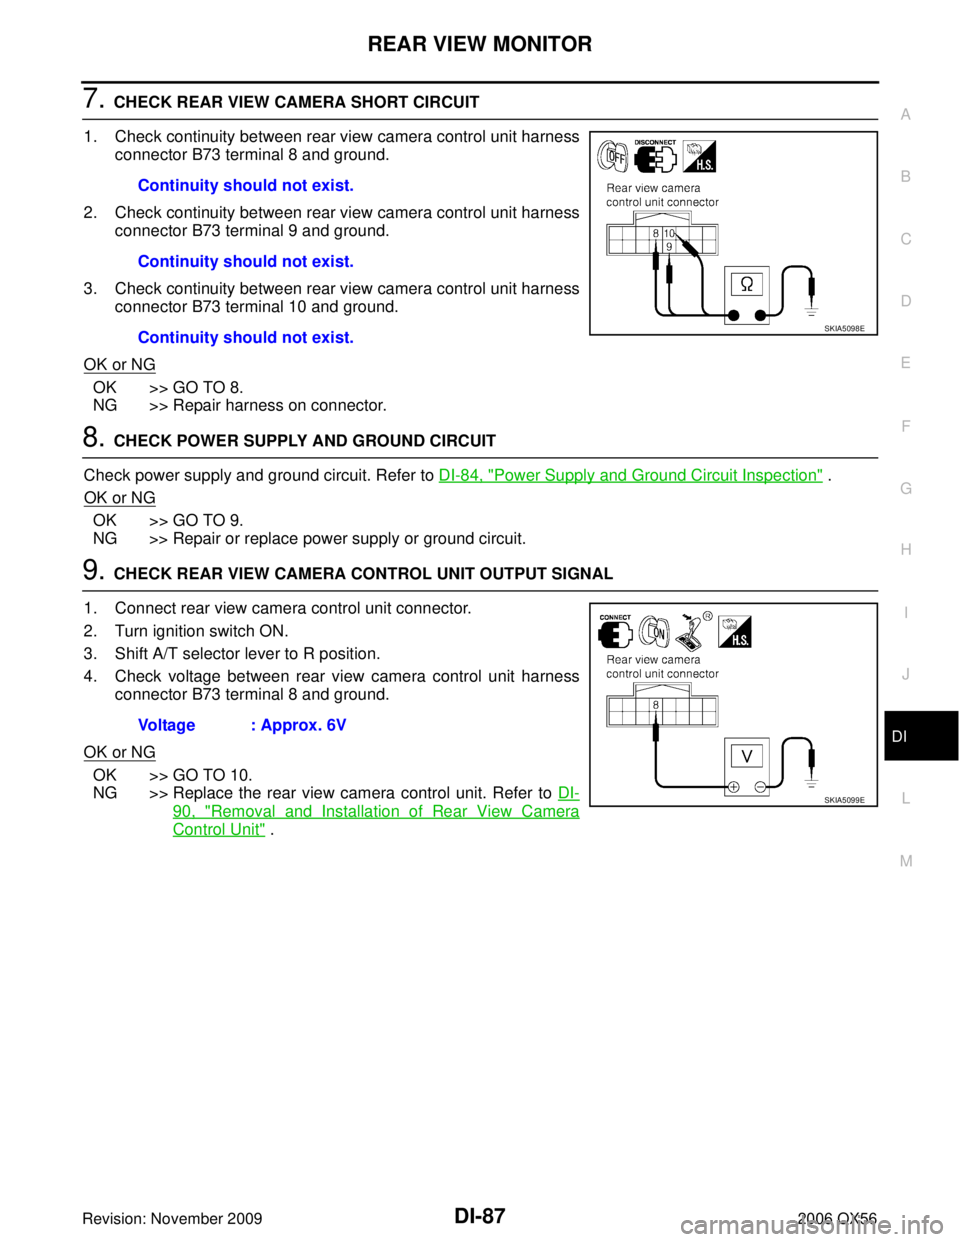
7. CHECK REAR VIEW CAMERA SHORT CIRCUIT
1. Check continuity between rear view camera control unit harness connector B73 terminal 8 and ground.
2. Check continuity between rear view camera control unit harness connector B73 terminal 9 and ground.
3. Check continuity between rear view camera control unit harness connector B73 terminal 10 and ground.
OK or NG
OK >> GO TO 8.
NG >> Repair harness on connector.
8. CHECK POWER SUPPLY AND GROUND CIRCUIT
Check power supply and ground circuit. Refer to DI-84, "
Power Supply and Ground Circuit Inspection" .
OK or NG
OK >> GO TO 9.
NG >> Repair or replace power supply or ground circuit.
9. CHECK REAR VIEW CAMERA CONTROL UNIT OUTPUT SIGNAL
1. Connect rear view camera control unit connector.
2. Turn ignition switch ON.
3. Shift A/T selector lever to R position.
4. Check voltage between rear view camera control unit harness connector B73 terminal 8 and ground.
OK or NG
OK >> GO TO 10.
NG >> Replace the rear view camera control unit. Refer to DI-
90, "Removal and Installation of Rear View Camera
Control Unit" .
Continuity should not exist.
Continuity should not exist.
Continuity should not exist.
SKIA5098E
Voltage : Approx. 6V
SKIA5099E
Page 1209 of 3383
DI-88
REAR VIEW MONITOR
Revision: November 20092006 QX56
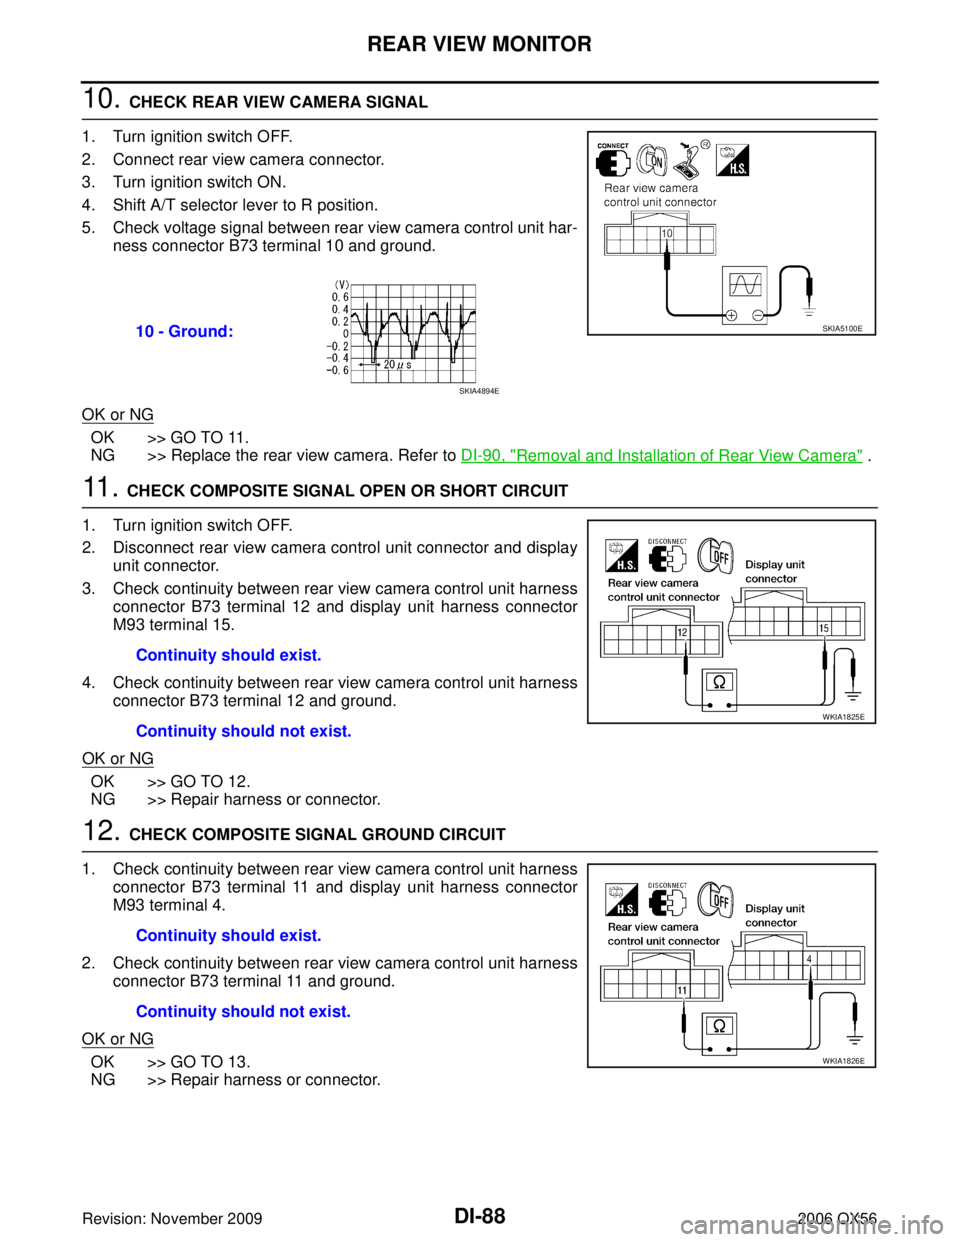
10. CHECK REAR VIEW CAMERA SIGNAL
1. Turn ignition switch OFF.
2. Connect rear view camera connector.
3. Turn ignition switch ON.
4. Shift A/T selector lever to R position.
5. Check voltage signal between rear view camera control unit har- ness connector B73 terminal 10 and ground.
OK or NG
OK >> GO TO 11.
NG >> Replace the rear view camera. Refer to DI-90, "
Removal and Installation of Rear View Camera" .
11 . CHECK COMPOSITE SIGNAL OPEN OR SHORT CIRCUIT
1. Turn ignition switch OFF.
2. Disconnect rear view camera control unit connector and display unit connector.
3. Check continuity between rear view camera control unit harness connector B73 terminal 12 and display unit harness connector
M93 terminal 15.
4. Check continuity between rear view camera control unit harness connector B73 terminal 12 and ground.
OK or NG
OK >> GO TO 12.
NG >> Repair harness or connector.
12. CHECK COMPOSITE SIGNAL GROUND CIRCUIT
1. Check continuity between rear view camera control unit harness connector B73 terminal 11 and display unit harness connector
M93 terminal 4.
2. Check continuity between rear view camera control unit harness connector B73 terminal 11 and ground.
OK or NG
OK >> GO TO 13.
NG >> Repair harness or connector. 10 - Ground:
SKIA5100E
SKIA4894E
Continuity should exist.
Continuity should not exist.
WKIA1825E
Continuity should exist.
Continuity should not exist.
WKIA1826E
Page 1210 of 3383
REAR VIEW MONITORDI-89
C
DE
F
G H
I
J
L
M A
B
DI
Revision: November 2009 2006 QX56
13. CHECK REAR VIEW CAMERA CONTROL UNIT COMPOSITE SIGNAL
1. Connect rear view camera control unit connector and display unit connector.
2. Turn ignition switch ON.
3. Check voltage signal between rear view camera control unit har- ness connector B73 terminal 12 and ground.
OK or NG
OK >> Replace the display unit. Refer to AV- 1 6 7 , "DISPLAY UNIT" .
NG >> Replace the rear view camera control unit. Refer to DI-90, "
Removal and Installation of Rear View
Camera Control Unit" .
12 - Ground:
WKIA1827E
SKIA4896E
Page 1239 of 3383

EC-28Revision: November 2009
AIR CONDITIONING CUT CONTROL
2006 QX56
AIR CONDITIONING CUT CONTROLPFP:23710
Input/Output Signal ChartUBS00KZA
*1: This signal is sent to the ECM through CAN communication line.
*2: ECM determines the start signal status by the signals of engine speed and battery voltage.
System DescriptionUBS00KZB
This system improves engine operation when the air conditioner is used.
Under the following conditions, the air conditioner is turned OFF.
�When the accelerator pedal is fully depressed.
�When cranking the engine.
�At high engine speeds.
�When the engine coolant temperature becomes excessively high.
�When operating power steering during low engine speed or low vehicle speed.
�When engine speed is excessively low.
�When refrigerant pressure is excessively low or high.
SensorInput Signal to ECMECM functionActuator
Air conditioner switch Air conditioner ON signal*
1
Air conditioner
cut controlAir conditioner relay
Accelerator pedal position sensor
Accelerator pedal position
Crankshaft position sensor (POS)
Camshaft position sensor (PHASE) Engine speed*
2
Engine coolant temperature sensor
Engine coolant temperature
Battery Battery voltage*
2
Refrigerant pressure sensorRefrigerant pressure
Power steering pressure sensor Power steering operation
Wheel sensor Vehicle speed*
1