2006 INFINITI M35 ECU
[x] Cancel search: ECUPage 3641 of 5621
GW-122
DOOR MIRROR
Revision: 2006 January2006 M35/M45
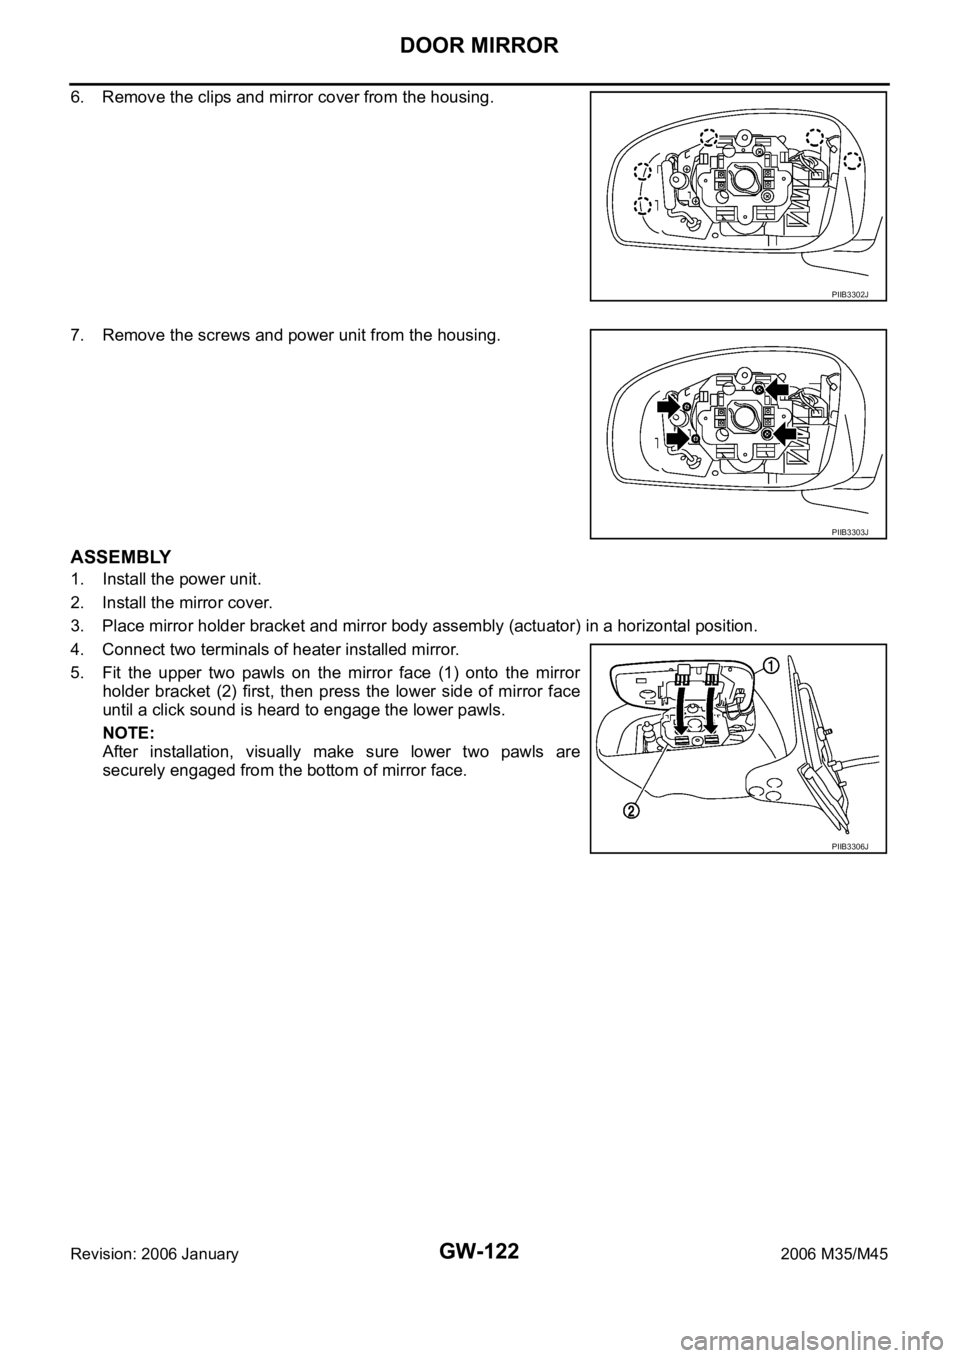
6. Remove the clips and mirror cover from the housing.
7. Remove the screws and power unit from the housing.
ASSEMBLY
1. Install the power unit.
2. Install the mirror cover.
3. Place mirror holder bracket and mirror body assembly (actuator) in a horizontal position.
4. Connect two terminals of heater installed mirror.
5. Fit the upper two pawls on the mirror face (1) onto the mirror
holder bracket (2) first, then press the lower side of mirror face
until a click sound is heard to engage the lower pawls.
NOTE:
After installation, visually make sure lower two pawls are
securely engaged from the bottom of mirror face.
PIIB3302J
PIIB3303J
PIIB3306J
Page 3649 of 5621
IDX-8
ALPHABETICAL INDEX
U
Unified meter and A/C amp. ............................... DI-28
Upper link (front susp.) ..................... FSU-16, FSU-33
V
Vacuum hose (brake system) ............................ BR-21
Valve clearance(VK45DE) .............................. EM-222
Valve clearance(VQ35DE) ................................ EM-93
Valve guide ..................................................... EM-108
Valve guide(VK45DE) ..................................... EM-240
Valve lifter ......................................................... EM-88
Valve seat(VK45DE) ....................................... EM-242
Valve seat(VQ35DE) ...................................... EM-110
Valve spring(VK45DE) .................................... EM-243
Valve spring(VQ35DE) ................................... EM-111
Variable induction air control system (VIAS) EC-1324,
EC-1398
Vehicle security (theft warning) system ........... BL-220
Vehicle speed sensor (VSS) ............. EC-481, EC-597,
EC-1200
VEHSEC - Wiring diagram ............................... BL-226
VENT/V - Wiring diagram EC-429, EC-436, EC-1149,
EC-1156
VIAS - Wiring diagram ................................... EC-1400
VIAS/V - Wiring diagram ................................ EC-1325
VIN registration .................................... EC-95, EC-806
VSS A/T - Wiring diagram ................................ AT-121
W
WARN - Wiring diagram ..................................... DI-43
Warning chime .................................................... DI-60
Warning lamps .................................................... DI-40
Washer, front ..................................................... WW-4
Water control valve(VK45DE) ........................... CO-55
Water pump(VK45DE) ...................................... CO-53
Water pump(VQ35DE) ...................................... CO-24
Water temperature gauge ..................................... DI-5
Wheel alignment (front) ...................... FSU-6, FSU-23
Wheel alignment (rear) ..................................... RSU-5
Wheel balance ........................................ WT-7, MA-33
Wheel bearing (rear) ......................................... RAX-5
Wheel hub (rear) ............................................... RAX-5
Wheel sensor (VDC) ....................................... BRC-57
WINDOW - Wiring diagram ............................... GW-21
Window, door ...................................... GW-63, GW-67
Window, rear ..................................................... GW-61
Windshield ........................................................ GW-11
WIPER - Wiring diagram .................................. WW-13
Wiper, front ........................................................ WW-4
Wiring Diagram (Cell code) list .......................... PG-93
Wiring diagrams .................................................. GI-16
Page 3654 of 5621
SQUEAK AND RATTLE TROUBLE DIAGNOSES
IP-5
C
D
E
F
G
H
J
K
L
MA
B
IP
Revision: 2006 January2006 M35/M45
DUPLICATE THE NOISE AND TEST DRIVE
If possible, drive the vehicle with the customer until the noise is duplicated. Note any additional information on
the Diagnostic Worksheet regarding the conditions or location of the noise. This information can be used to
duplicate the same conditions when you confirm the repair.
If the noise can be duplicated easily during the test drive, to help identify the source of the noise, try to dupli-
cate the noise with the vehicle stopped by doing one or all of the following:
1) Close a door.
2) Tap or push/pull around the area where the noise appears to be coming from.
3) Rev the engine.
4) Use a floor jack to recreate vehicle “twist”.
5) At idle, apply engine load (electrical load, half-clutch on M/T models, drive position on A/T models).
6) Raise the vehicle on a hoist and hit a tire with a rubber hammer.
Drive the vehicle and attempt to duplicate the conditions the customer states exist when the noise occurs.
If it is difficult to duplicate the noise, drive the vehicle slowly on an undulating or rough road to stress the
vehicle body.
CHECK RELATED SERVICE BULLETINS
After verifying the customer concern or symptom, check ASIST for Technical Service Bulletins (TSBs) related
to that concern or symptom.
If a TSB relates to the symptom, follow the procedure to repair the noise.
LOCATE THE NOISE AND IDENTIFY THE ROOT CAUSE
1. Narrow down the noise to a general area. To help pinpoint the source of the noise, use a listening tool
(Chassis Ear: J-39570, Engine Ear and mechanics stethoscope).
2. Narrow down the noise to a more specific area and identify the cause of the noise by:
removing the components in the area that you suspect the noise is coming from.
Do not use too much force when removing clips and fasteners, otherwise clips and fastener can be broken
or lost during the repair, resulting in the creation of new noise.
tapping or pushing/pulling the component that you suspect is causing the noise.
Do not tap or push/pull the component with excessive force, otherwise the noise will be eliminated only
temporarily.
feeling for a vibration with your hand by touching the component(s) that you suspect is (are) causing the
noise.
placing a piece of paper between components that you suspect are causing the noise.
looking for loose components and contact marks.
Refer to IP-6, "
Generic Squeak and Rattle Troubleshooting" .
REPAIR THE CAUSE
If the cause is a loose component, tighten the component securely.
If the cause is insufficient clearance between components:
–separate components by repositioning or loosening and retightening the component, if possible.
–insulate components with a suitable insulator such as urethane pads, foam blocks, felt cloth tape or ure-
thane tape. A Nissan Squeak and Rattle Kit (J-43980) is available through your authorized Nissan Parts
Department.
CAUTION:
Do not use excessive force as many components are constructed of plastic and may be damaged.
NOTE:
Always check with the Parts Department for the latest parts information.
The following materials are contained in the Nissan Squeak and Rattle Kit (J-43980). Each item can be
ordered separately as needed.
URETHANE PADS [1.5 mm (0.059 in) thick]
Insulates connectors, harness, etc.
76268-9E005: 100
135 mm (3.945.31 in)/76884-71L01: 6085 mm (2.363.35 in)/76884-
71L02: 15
25 mm (0.590.98 in)
INSULATOR (Foam blocks)
Insulates components from contact. Can be used to fill space behind a panel.
73982-9E000: 45 mm (1.77 in) thick, 50
50 mm (1.971.97 in)/73982-50Y00:
10 mm (0.39 in) thick, 50
50 mm (1.971.97 in)
Page 3656 of 5621
SQUEAK AND RATTLE TROUBLE DIAGNOSES
IP-7
C
D
E
F
G
H
J
K
L
MA
B
IP
Revision: 2006 January2006 M35/M45
TRUNK
Trunk noises are often caused by a loose jack or loose items put into the trunk by the owner.
In addition look for:
1. Trunk lid dumpers out of adjustment
2. Trunk lid striker out of adjustment
3. The trunk lid torsion bars knocking together
4. A loose license plate or bracket
Most of these incidents can be repaired by adjusting, securing or insulating the item(s) or component(s) caus-
ing the noise.
SUNROOF/HEADLINING
Noises in the sunroof/headlining area can often be traced to one of the following:
1. Sunroof lid, rail, linkage or seals making a rattle or light knocking noise
2. Sunvisor shaft shaking in the holder
3. Front or rear windshield touching headlining and squeaking
Again, pressing on the components to stop the noise while duplicating the conditions can isolate most of these
incidents. Repairs usually consist of insulating with felt cloth tape.
SEATS
When isolating seat noise it's important to note the position the seat is in and the load placed on the seat when
the noise is present. These conditions should be duplicated when verifying and isolating the cause of the
noise.
Cause of seat noise include:
1. Headrest rods and holder
2. A squeak between the seat pad cushion and frame
3. The rear seatback lock and bracket
These noises can be isolated by moving or pressing on the suspected components while duplicating the con-
ditions under which the noise occurs. Most of these incidents can be repaired by repositioning the component
or applying urethane tape to the contact area.
UNDERHOOD
Some interior noise may be caused by components under the hood or on the engine wall. The noise is then
transmitted into the passenger compartment.
Causes of transmitted underhood noise include:
1. Any component mounted to the engine wall
2. Components that pass through the engine wall
3. Engine wall mounts and connectors
4. Loose radiator mounting pins
5. Hood bumpers out of adjustment
6. Hood striker out of adjustment
These noises can be difficult to isolate since they cannot be reached from the interior of the vehicle. The best
method is to secure, move or insulate one component at a time and test drive the vehicle. Also, engine RPM
or load can be changed to isolate the noise. Repairs can usually be made by moving, adjusting, securing, or
insulating the component causing the noise.
Page 3690 of 5621
![INFINITI M35 2006 Factory Service Manual TROUBLE DIAGNOSES WORK FLOW
LAN-21
[CAN]
C
D
E
F
G
H
I
J
L
MA
B
LAN
Revision: 2006 January2006 M35/M45
DESCRIPTION OF “CAN DIAG SUPPORT MNTR” SCREEN
FOR TCM
Display Results (Present)
OK: Normal
N INFINITI M35 2006 Factory Service Manual TROUBLE DIAGNOSES WORK FLOW
LAN-21
[CAN]
C
D
E
F
G
H
I
J
L
MA
B
LAN
Revision: 2006 January2006 M35/M45
DESCRIPTION OF “CAN DIAG SUPPORT MNTR” SCREEN
FOR TCM
Display Results (Present)
OK: Normal
N](/manual-img/42/57023/w960_57023-3689.png)
TROUBLE DIAGNOSES WORK FLOW
LAN-21
[CAN]
C
D
E
F
G
H
I
J
L
MA
B
LAN
Revision: 2006 January2006 M35/M45
DESCRIPTION OF “CAN DIAG SUPPORT MNTR” SCREEN
FOR TCM
Display Results (Present)
OK: Normal
NG: Malfunction
UNKWN: The diagnosed unit does not transmit or receive the applicable data normally.
DESCRIPTION OF “CAN DIAG SUPPORT MNTR” SCREEN
FOR AWD CONTROL UNIT
Display Results (Present)
OK: Normal
NG: Malfunction
UNKWN: The diagnosed unit does not transmit or receive the applicable data normally.
PKIB9793E
“SELECT SYSTEM”
screen“CAN DIAG SUPPORT
MNTR” screenDescription Present
A/TINITIAL DIAG Make sure that microcomputer in ECU works normally.OK/NG
TRANSMIT DIAG Make sure of normal transmission. OK/UNKWN
ECM Make sure of normal reception from ECM. OK/UNKWN
VDC/TCS/ABSMake sure of normal reception from ABS actuator and electric unit
(control unit).OK/UNKWN
METER/M&A Make sure of normal reception from unified meter and A/C amp. OK/UNKWN
ICC/e4WD Make sure of normal reception from ICC sensor integrated unit. OK/UNKWN
AWD/4WD Make sure of normal reception from AWD control unit. OK/UNKWN
PKIA8948E
“SELECT SYSTEM”
screen“CAN DIAG SUPPORT
MNTR” screenDescription Present
ALL MODE AWD/
4WDINITIAL DIAG Make sure that microcomputer in ECU works normally.OK/NG
TRANSMIT DIAG Make sure of normal transmission. OK/UNKWN
VDC/TCS/ABSMake sure of normal reception from ABS actuator and electric
unit (control unit).OK/UNKWN
ECM Make sure of normal reception from ECM. OK/UNKWN
TCM TCM is not diagnosed. UNKWN
METER/M&A Make sure of normal reception from unified meter and A/C amp. OK/UNKWN
Page 3700 of 5621
![INFINITI M35 2006 Factory Service Manual TROUBLE DIAGNOSES WORK FLOW
LAN-31
[CAN]
C
D
E
F
G
H
I
J
L
MA
B
LAN
Revision: 2006 January2006 M35/M45
DESCRIPTION OF “CAN DIAG SUPPORT MNTR” SCREEN
FOR DRIVER SEAT CONTROL UNIT
Display Results ( INFINITI M35 2006 Factory Service Manual TROUBLE DIAGNOSES WORK FLOW
LAN-31
[CAN]
C
D
E
F
G
H
I
J
L
MA
B
LAN
Revision: 2006 January2006 M35/M45
DESCRIPTION OF “CAN DIAG SUPPORT MNTR” SCREEN
FOR DRIVER SEAT CONTROL UNIT
Display Results (](/manual-img/42/57023/w960_57023-3699.png)
TROUBLE DIAGNOSES WORK FLOW
LAN-31
[CAN]
C
D
E
F
G
H
I
J
L
MA
B
LAN
Revision: 2006 January2006 M35/M45
DESCRIPTION OF “CAN DIAG SUPPORT MNTR” SCREEN
FOR DRIVER SEAT CONTROL UNIT
Display Results (Present)
OK: Normal
NG: Malfunction
UNKWN: The diagnosed unit does not transmit or receive the applicable data normally.
DESCRIPTION OF “CAN DIAG SUPPORT MNTR” SCREEN
FOR ABS ACTUATOR AND ELECTRIC UNIT (CONTROL
UNIT)
Display Results (Present)
OK: Normal
NG: Malfunction
UNKWN: The diagnosed unit does not transmit or receive the applicable data normally.
SKIB2360E
“SELECT SYSTEM”
screen“CAN DIAG SUPPORT
MNTR” screenDescription Present
AUTO DRIVE POS.INITIAL DIAG Make sure that microcomputer in ECU works normally.OK/NG
TRANSMIT DIAG TRANSMIT DIAG is not diagnosed. OK
BCM/SEC Make sure of normal reception from BCM. OK/UNKWN
METER/M&A Make sure of normal reception from unified meter and A/C amp. OK/UNKWN
TCM Make sure of normal reception from TCM. OK/UNKWN
PKIB9794E
“SELECT SYSTEM”
screen“CAN DIAG SUPPORT
MNTR” screenDescription Present
ABSINITIAL DIAG Make sure that microcomputer in ECU works normally.OK/NG
TRANSMIT DIAG Make sure of normal transmission. OK/UNKWN
ECM Make sure of normal reception from ECM. OK/UNKWN
TCM Make sure of normal reception from TCM. OK/UNKWN
METER/M&A METER/M&A is not diagnosed. UNKWN
STRG Make sure of normal reception from steering angle sensor. OK/UNKWN
ICC Make sure of normal reception from ICC sensor integrated unit. OK/UNKWN
AWD/4WD Make sure of normal reception from AWD control unit. OK/UNKWN
RAS Make sure of normal reception from RAS control unit. OK/UNKWN
Page 4430 of 5621
LT-3
C
D
E
F
G
H
I
J
L
MA
B
LT
Revision: 2006 January2006 M35/M45 OUTLINE ...........................................................136
AFS OPERATION .............................................137
HEADLAMP AUTO AIMING OPERATION ........139
CAN COMMUNICATION SYSTEM DESCRIP-
TION ..................................................................139
CAN COMMUNICATION UNIT .........................139
Component Parts Description ..............................140
AFS CONTROL UNIT .......................................140
SWIVEL ACTUATOR ........................................140
AIMING MOTOR ...............................................140
AFS SWITCH ....................................................141
HEIGHT SENSOR ............................................141
STEERING ANGLE SENSOR ..........................141
IPDM E/R ..........................................................141
ECM ..................................................................141
TCM ..................................................................141
UNIFIED METER AND A/C AMP. .....................141
COMBINATION METER ...................................141
Schematic ............................................................142
Wiring Diagram — AFS — ...................................143
Terminals and Reference Values for AFS Control
Unit .......................................................................149
How to Proceed with Trouble Diagnosis ..............151
Preliminary Check ................................................151
CONSULT-II Function (ADAPTIVE LIGHT) ..........152
CONSULT-II BASIC OPERATION .....................152
WORK SUPPORT (STEERING ANGLE SEN-
SOR ADJUSTMENT) ........................................153
WORK SUPPORT (LEVELIZER ADJUSTMENT)
.153
SELF-DIAG RESULTS ......................................154
DATA MONITOR ...............................................158
ACTIVE TEST ...................................................160
Symptom Chart ....................................................161
DTC B2503 SWIVEL ACTUATOR RH .................162
DTC B2504 SWIVEL ACTUATOR LH ..................168
DTC B2514 HI SEN UNUSUAL RR .....................174
DTC B2521 ECU CIRC ........................................178
AFS Operation Check (Function Test) .................181
Auto Aiming Operation Check (Function Test) .....183
AFS Switch Does Not Operate .............................185
Auto Aiming Does Not Operate (Check Aiming
Motor System Circuit) ..........................................
.187
AFS OFF Indicator Does Not Operate .................190
Removal and Installation of Steering Angle Sensor .190
Removal and Installation of Front Combination
Lamp ....................................................................190
Removal and Installation of AFS Control Unit ......191
REMOVAL ........................................................
.191
INSTALLATION .................................................191
Removal and Installation of AFS Switch ..............191
REMOVAL ........................................................
.191
INSTALLATION .................................................191
Removal and Installation of Height Sensor ..........192
REMOVAL ........................................................
.192
INSTALLATION .................................................192
FRONT FOG LAMP ................................................193
Component Parts and Harness Connector Location .193
System Description ..............................................193OUTLINE ...........................................................194
COMBINATION SWITCH READING FUNCTION .195
EXTERIOR LAMP BATTERY SAVER CONTROL .195
CAN Communication System Description ............195
CAN Communication Unit .....................................195
Schematic .............................................................196
Wiring Diagram — F/FOG — ................................197
Terminals and Reference Values for BCM ............201
Terminals and Reference Values for IPDM E/R ....202
How to Perform Trouble Diagnoses .....................202
Preliminary Check ................................................202
CHECK POWER SUPPLY AND GROUND CIR-
CUIT ..................................................................202
CONSULT-II Functions (BCM) ..............................203
CONSULT-II Functions (IPDM E/R) ......................203
Front Fog Lamps Do Not Illuminate (Both Sides) . 204
Front Fog Lamp Does Not Illuminate (One Side) . 207
Front Fog Lamps Do Not Turn OFF ......................208
Aiming Adjustment ................................................209
Bulb Replacement ................................................210
Removal and Installation ......................................210
REMOVAL ........................................................
.210
INSTALLATION .................................................210
TURN SIGNAL AND HAZARD WARNING LAMPS .211
Component Parts and Harness Connector Location .211
System Description ...............................................211
TURN SIGNAL OPERATION ............................211
HAZARD LAMP OPERATION ...........................212
COMBINATION SWITCH READING FUNCTION .213
CAN Communication System Description ............213
CAN Communication Unit .....................................213
Schematic .............................................................214
Wiring Diagram — TURN — .................................215
Terminals and Reference Values for BCM ............219
How to Perform Trouble Diagnoses .....................220
Preliminary Check ................................................221
CHECK POWER SUPPLY AND GROUND CIR-
CUIT ..................................................................221
CONSULT-II Functions (BCM) ..............................223
CONSULT-II BASIC OPERATION .....................223
DATA MONITOR ...............................................224
ACTIVE TEST ...................................................224
Turn Signal Lamp Does Not Operate ...................225
H a z a r d W a r n i n g L a m p D o e s N o t O p e r a t e B u t T u r n
Signal Lamp Operate ............................................227
Turn Signal Indicator Lamp Does Not Operate ....228
Bulb Replacement/Removal and Installation of Side
Turn Signal Lamp .................................................229
REMOVAL ........................................................
.229
INSTALLATION .................................................229
Bulb Replacement (Front Turn Signal Lamp) .......229
Bulb Replacement (Rear Turn Signal Lamp) ........229
Removal and Installation of Front Turn Signal Lamp .229
Removal and Installation of Rear Turn Signal Lamp .229
LIGHTING AND TURN SIGNAL SWITCH ..............230
Removal and Installation ......................................230
REMOVAL ........................................................
.230
INSTALLATION .................................................230
Switch Circuit Inspection ......................................230
Page 4467 of 5621
LT-40
HEADLAMP (FOR USA) - CONVENTIONAL TYPE -
Revision: 2006 January2006 M35/M45
HEADLAMP (OUTER) LOW BEAM
1. Turn lighting switch OFF.
2. Disconnect negative battery cable or remove circuit fuse.
3. Remove fender protector (front). Refer to EI-20, "
Removal and Installation" .
4. Turn plastic cap counterclockwise and unlock it.
5. Unlock retaining spring and remove bulb from headlamp.
6. Remove the socket connected the bulb.
PARKING LAMP (CLEARANCE) LAMP
1. Turn bulb socket counterclockwise and unlock it.
2. Remove bulb from its socket.
FRONT TURN SIGNAL LAMP
1. Remove washer tank inlet when replaced bulb RH. Refer to WW-47, "Removal and Installation of Washer
Ta n k" .
Remove air cleaner case when replacing bulb LH. Refer to EM-17, "
Removal and Installation" (VQ35) or
EM-177, "
Removal and Installation" (VK45).
2. Turn bulb socket counterclockwise and unlock it.
3. Remove bulb from its socket.
FRONT SIDE MARKER LAMP
1. Remove fender protector (front) to obtain work space between the fender protector and fender.
2. Turn bulb socket counterclockwise and unlock it.
3. Remove bulb from its socket.
CAUTION:
After installing bulb, be sure to install plastic cap and socket securely to insure watertightness. Headlamp (outer) low beam : 12V - 55W (H1)
Parking lamp (Clearance lamps) : 12V - 5W
Front turn signal lamp : 12V - 21W
Front side marker lamp : 12V - 5W