2006 INFINITI M35 stop start
[x] Cancel search: stop startPage 5446 of 5621
![INFINITI M35 2006 Factory Service Manual TROUBLE DIAGNOSIS
STC-31
[RAS]
C
D
E
F
H
I
J
K
L
MA
B
STC
Revision: 2006 January2006 M35/M45
Diagnosis Procedure with Self-Diagnosis Function (Without CONSULT- I I )NGS000EL
DESCRIPTION
If a malfunc INFINITI M35 2006 Factory Service Manual TROUBLE DIAGNOSIS
STC-31
[RAS]
C
D
E
F
H
I
J
K
L
MA
B
STC
Revision: 2006 January2006 M35/M45
Diagnosis Procedure with Self-Diagnosis Function (Without CONSULT- I I )NGS000EL
DESCRIPTION
If a malfunc](/manual-img/42/57023/w960_57023-5445.png)
TROUBLE DIAGNOSIS
STC-31
[RAS]
C
D
E
F
H
I
J
K
L
MA
B
STC
Revision: 2006 January2006 M35/M45
Diagnosis Procedure with Self-Diagnosis Function (Without CONSULT- I I )NGS000EL
DESCRIPTION
If a malfunction is detected in the system, the RAS warning lamp turns on and indicates the malfunction. At
that time, fail-safe activates, and then stops the function.
SELF-DIAGNOSIS PROCEDURE
1. Start engine.
2. Turn steering wheel left and right at 20
or more and 5 times or more within 10 seconds. And then depress
the service brake 5 times or more.
3. RAS warning lamp blinks (displays normal/malfunction).
SELF-DIAGNOSIS DISPLAY
RAS warning lamp blinks and displays the self-diagnostic results.
Only DTCs are displayed as the pattern shown in the figure, and
then repeat the display.
If all items are normal, RAS warning lamp blinks at 4 Hz cycle.
SELF-DIAGNOSIS DISPLAY ITEMS
HOW TO ERASE SELF-DIAGNOSIS
If there is the history data for when the fail-safe has activated in the past, erase the memory with CONSULT-II.
Refer to STC-29, "
How to Erase Self-Diagnostic Results" .
CAN CommunicationNGS000EM
SYSTEM DESCRIPTION
CAN (Controller Area Network) is a serial communication line for real time application. It is an on-vehicle mul-
tiplex communication line with high data communication speed and excellent error detection ability. Many elec-
tronic control units are equipped onto a vehicle, and each control unit shares information and links with other
control units during operation (not independent). In CAN communication, control units are connected with 2
communication lines (CAN H line, CAN L line) allowing a high rate of information transmission with less wiring.
Each control unit transmits/receives data but selectively reads required data only. Refer to LAN-34, "
CAN
Communication Unit" .
SGIA1243E
DTC (warning lamp blinks) Diagnosis item Inspection item
11 RAS control unitSTC-35, "
Inspection 1: RAS Control Unit Malfunction"
12 Motor power supplySTC-35, "Inspection 2: Motor Power Supply System"
13 Motor outputSTC-37, "Inspection 3: RAS Motor Output Malfunction"
21 Vehicle speed signalSTC-38, "Inspection 4: Vehicle Speed Signal"
22 Steering angle signalSTC-38, "Inspection 5: Steering Angle Signal Malfunction"
24 Rear wheel steering angle (main)STC-40, "Inspection 6: Rear Main Signal and Rear Sub Signal
Malfunction"
25 Rear wheel steering angle (sub)STC-40, "Inspection 6: Rear Main Signal and Rear Sub Signal
Malfunction"
26 VDCSTC-42, "Inspection 7: VDC Malfunction"
33 Engine speed signalSTC-43, "Inspection 8: Engine Speed Signal Malfunction"
Page 5447 of 5621
![INFINITI M35 2006 Factory Service Manual STC-32
[RAS]
TROUBLE DIAGNOSIS
Revision: 2006 January2006 M35/M45
For Fast and Accurate Trouble DiagnosisNGS000EN
Check the following items with the vehicle stopped
Is air pressure and size of tires p INFINITI M35 2006 Factory Service Manual STC-32
[RAS]
TROUBLE DIAGNOSIS
Revision: 2006 January2006 M35/M45
For Fast and Accurate Trouble DiagnosisNGS000EN
Check the following items with the vehicle stopped
Is air pressure and size of tires p](/manual-img/42/57023/w960_57023-5446.png)
STC-32
[RAS]
TROUBLE DIAGNOSIS
Revision: 2006 January2006 M35/M45
For Fast and Accurate Trouble DiagnosisNGS000EN
Check the following items with the vehicle stopped
Is air pressure and size of tires proper?
Is the specified part used for the steering wheel?
Is control unit a genuine part?
Are there any fluid leakage from steering gear assembly, power steering oil pump, and hydraulic pipes,
etc? Refer to PS-8, "
POWER STEERING FLUID" .
Is the fluid level proper? Refer to PS-8, "POWER STEERING FLUID" .
Is the wheel alignment is adjusted properly? Refer to FSU-19, "SERVICE DATA AND SPECIFICATIONS
(SDS)" (2WD), FSU-36, "SERVICE DATA AND SPECIFICATIONS (SDS)" (AWD).
Are there any damage or modification to suspension or body resulting in increased weight or altered
ground clearance?
Check each link installation condition of suspension and axle.
Is the battery voltage proper?
Check each connector connection condition.
Check the following items while driving the vehicle
Conditions when the error occurred (5W 1H).
Is the engine is normal?
Basic InspectionNGS000EO
BASIC INSPECTION 1: POWER SUPPLY CIRCUIT TERMINAL LOOSENESS AND BATTERY
Check battery terminals for looseness on both positive and negative ones and ground connection. Also make
sure that battery voltage does not drop.
BASIC INSPECTION 2: RAS WARNING LAMP INSPECTION
1. Make sure RAS warning lamp turns on when ignition switch is turned ON.
If it does not turn on, refer to STC-33, "Trouble Diagnosis Chart" .
2. Make sure that RAS warning lamp turns off when the engine is started after ignition switch is turned ON. If
it does not turn off, perform self-diagnosis. Refer to STC-28, "
SELF-DIAG RESULT MODE" .
3. Always erase DTC memory after completing self-diagnosis. Refer to STC-29, "
How to Erase Self-Diag-
nostic Results" .
BASIC INSPECTION 3: RAS CONTROL UNIT POWER SUPPLY CIRCUIT AND GROUND CIR-
CUIT INSPECTION
1. CHECK RAS CONTROL UNIT CONNECTOR
Turn ignition switch OFF, disconnect RAS control unit harness connector, and check terminal for deformation,
disconnection, looseness, etc.
OK or NG
OK >> GO TO 2.
NG >> Poor connection of connector terminal. Repair or replace the terminal.
2. CHECK RAS CONTROL UNIT GROUND CIRCUIT
1. Disconnect RAS control unit harness connector B127, and then
check continuity between RAS control unit harness connector
B127 and ground.
OK or NG
OK >> GO TO 3.
NG >> Ground circuit open or shorted. Repair or replace any
inoperative parts. Terminal 34 – Ground : Continuity
SGIA1244E
Page 5449 of 5621
![INFINITI M35 2006 Factory Service Manual STC-34
[RAS]
TROUBLE DIAGNOSIS
Revision: 2006 January2006 M35/M45
DIAGNOSIS CHART BY SYMPTOM
Symptom Reference
It is not entering the self-diagnosis mode.STC-32, "
BASIC INSPECTION 3: RAS CONTROL INFINITI M35 2006 Factory Service Manual STC-34
[RAS]
TROUBLE DIAGNOSIS
Revision: 2006 January2006 M35/M45
DIAGNOSIS CHART BY SYMPTOM
Symptom Reference
It is not entering the self-diagnosis mode.STC-32, "
BASIC INSPECTION 3: RAS CONTROL](/manual-img/42/57023/w960_57023-5448.png)
STC-34
[RAS]
TROUBLE DIAGNOSIS
Revision: 2006 January2006 M35/M45
DIAGNOSIS CHART BY SYMPTOM
Symptom Reference
It is not entering the self-diagnosis mode.STC-32, "
BASIC INSPECTION 3: RAS CONTROL UNIT POWER
SUPPLY CIRCUIT AND GROUND CIRCUIT INSPECTION"
STC-44, "Inspection 10: Stop Lamp Switch Harness"
STC-44, "Inspection 11: RAS Warning Lamp Harness"
RAS warning lamp does not turn on with ignition switch ON.STC-32, "
BASIC INSPECTION 3: RAS CONTROL UNIT POWER
SUPPLY CIRCUIT AND GROUND CIRCUIT INSPECTION"
STC-44, "Inspection 11: RAS Warning Lamp Harness"
RAS warning lamp turns on with ignition switch ON. It does
not turn off even if the engine is started.STC-32, "
Basic Inspection"
STC-28, "SELF-DIAG RESULT MODE"
STC-31, "Diagnosis Procedure with Self-Diagnosis Function (With-
out CONSULT-II)"
RAS warning lamp may turn on after the engine is started.STC-28, "SELF-DIAG RESULT MODE"
The steering force does not change smoothly according to
the vehicle speed.STC-46, "Diagnosis Chart by Symptom 2"
Noise
STC-28, "SELF-DIAG RESULT MODE"
STC-31, "Diagnosis Procedure with Self-Diagnosis Function (With-
out CONSULT-II)"
STC-14, "INSPECTION AFTER DISASSEMBLY"
Malfunction other than aboveSTC-46, "Diagnosis Chart by Symptom 1"
Page 5461 of 5621
![INFINITI M35 2006 Factory Service Manual STC-46
[RAS]
TROUBLE DIAGNOSIS
Revision: 2006 January2006 M35/M45
Diagnosis Chart by Symptom 1NGS000F1
1. CHECK SELF-DIAGNOSTIC RESULTS
Perform RAS self-diagnosis.
With CONSULT-II: STC-28, "SELF-D INFINITI M35 2006 Factory Service Manual STC-46
[RAS]
TROUBLE DIAGNOSIS
Revision: 2006 January2006 M35/M45
Diagnosis Chart by Symptom 1NGS000F1
1. CHECK SELF-DIAGNOSTIC RESULTS
Perform RAS self-diagnosis.
With CONSULT-II: STC-28, "SELF-D](/manual-img/42/57023/w960_57023-5460.png)
STC-46
[RAS]
TROUBLE DIAGNOSIS
Revision: 2006 January2006 M35/M45
Diagnosis Chart by Symptom 1NGS000F1
1. CHECK SELF-DIAGNOSTIC RESULTS
Perform RAS self-diagnosis.
With CONSULT-II: STC-28, "SELF-DIAG RESULT MODE"
Without CONSULT-II: STC-31, "Diagnosis Procedure with Self-Diagnosis Function (Without CONSULT-
II)"
Are malfunctioning items displayed in self-diagnosis results?
YES >> Repair or replace any malfunctioning items.
NO >> GO TO 2.
2. CHECK RAS STATIC/DYNAMIC CHARACTERISTICS
Check RAS static/dynamic characteristics. Refer to STC-48, "
Check RAS Static/Dynamic Characteristics" .
Is the malfunction corrected?
YES >> INSPECTION END
NO >> Perform the following check, and then check the symptom again.
Adjust neutral position of steering angle sensor. Refer to BRC-6, "Adjustment of Steering Angle
Sensor Neutral Position" .
Steering angle sensor mounting condition. Refer to BRC-63, "Removal and Installation" .
Diagnosis Chart by Symptom 2NGS000F2
The steering force does not change smoothly according to the vehicle speed (Heavy steering force with the
vehicle stopped/Light handle operation during high-speed driving)
1. CHECK (1): POWER STEERING SOLENOID VALVE SIGNAL
1. Start engine.
2. Change the vehicle speed from 0 to 100 km/h (0 to 62 MPH)
slowly, and then check voltage RAS control unit harness con-
nector B127.
OK or NG
OK >> GO TO 2.
NG >> GO TO 7.
2. CHECK (2): POWER STEERING SOLENOID VALVE SIGNAL
1. Activate fail-safe function by running engine speed at 1,500 rpm or higher for 10 seconds with the vehicle
stopped.
2. Change the engine speed to the idling speed, approx. 1,600
rpm, and approximately 3,000 rpm slowly, and then check volt-
age RAS control unit harness connector B127.
OK or NG
OK >> GO TO 3.
NG >> GO TO 7.Terminal 36 – 34 : The voltage has changed from
approximately 4.4 - 6.6 V to approxi-
mately 2.4 - 3.6 V.
SGIA1281E
Terminal 36 – 34 : The voltage is changed from
approximately 5.5 V to approximately
2.1 V step-by-step.
SGIA1281E
Page 5474 of 5621

TRANSFER FLUID
TF-9
C
E
F
G
H
I
J
K
L
MA
B
TF
Revision: 2006 January2006 M35/M45
TRANSFER FLUIDPFP:31001
ReplacementNDS000D9
DRAINING
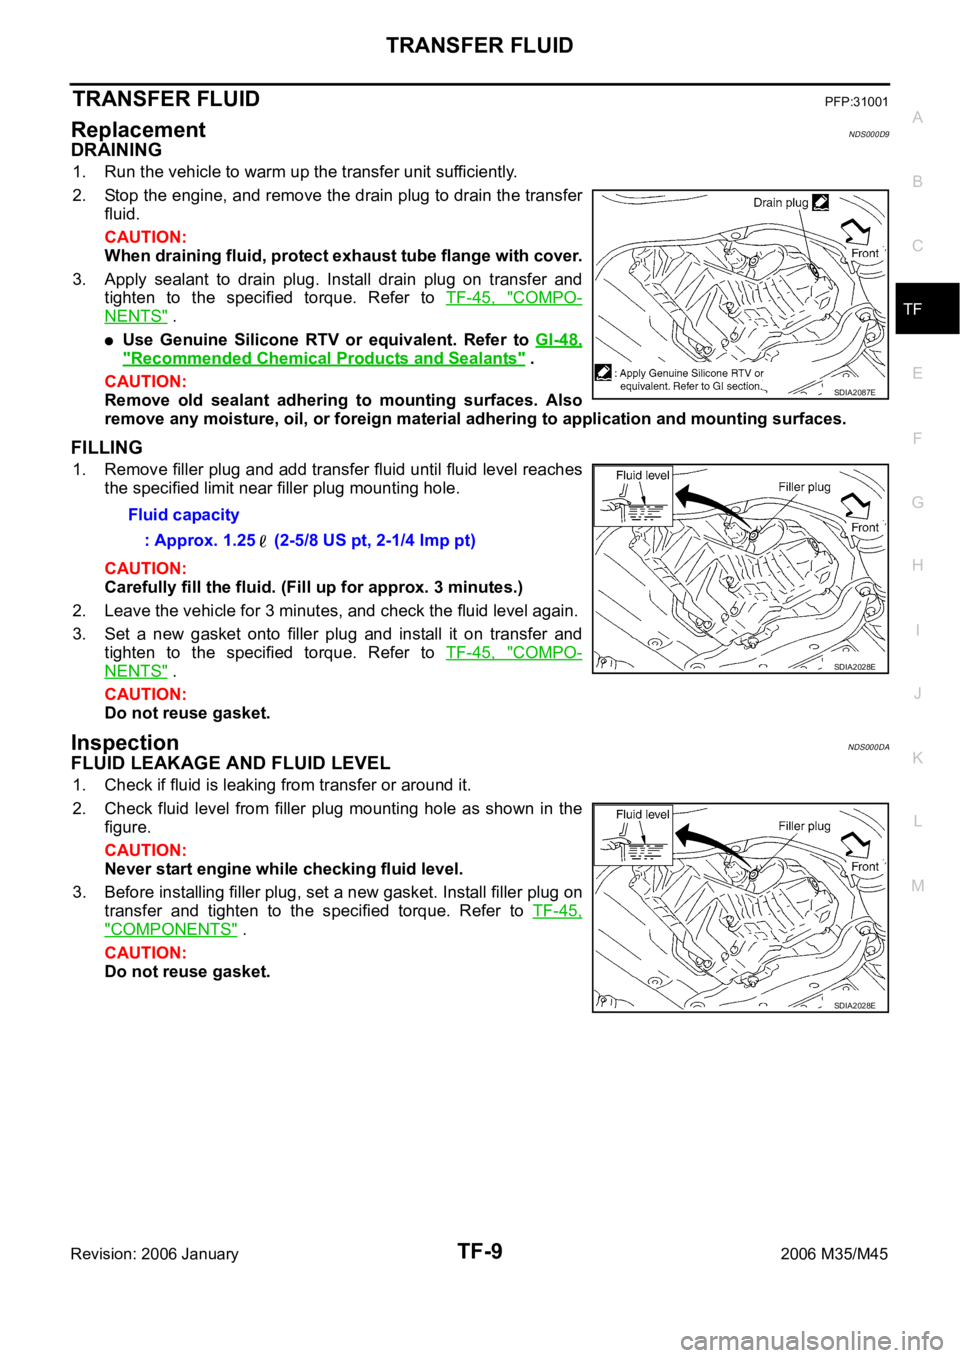
1. Run the vehicle to warm up the transfer unit sufficiently.
2. Stop the engine, and remove the drain plug to drain the transfer
fluid.
CAUTION:
When draining fluid, protect exhaust tube flange with cover.
3. Apply sealant to drain plug. Install drain plug on transfer and
tighten to the specified torque. Refer to TF-45, "
COMPO-
NENTS" .
Use Genuine Silicone RTV or equivalent. Refer to GI-48,
"Recommended Chemical Products and Sealants" .
CAUTION:
Remove old sealant adhering to mounting surfaces. Also
remove any moisture, oil, or foreign material adhering to application and mounting surfaces.
FILLING
1. Remove filler plug and add transfer fluid until fluid level reaches
the specified limit near filler plug mounting hole.
CAUTION:
Carefully fill the fluid. (Fill up for approx. 3 minutes.)
2. Leave the vehicle for 3 minutes, and check the fluid level again.
3. Set a new gasket onto filler plug and install it on transfer and
tighten to the specified torque. Refer to TF-45, "
COMPO-
NENTS" .
CAUTION:
Do not reuse gasket.
InspectionNDS000DA
FLUID LEAKAGE AND FLUID LEVEL
1. Check if fluid is leaking from transfer or around it.
2. Check fluid level from filler plug mounting hole as shown in the
figure.
CAUTION:
Never start engine while checking fluid level.
3. Before installing filler plug, set a new gasket. Install filler plug on
transfer and tighten to the specified torque. Refer to TF-45,
"COMPONENTS" .
CAUTION:
Do not reuse gasket.
SDIA2087E
Fluid capacity
: Approx. 1.25 (2-5/8 US pt, 2-1/4 lmp pt)
SDIA2028E
SDIA2028E
Page 5475 of 5621

TF-10
AWD SYSTEM
Revision: 2006 January2006 M35/M45
AWD SYSTEMPFP:41650
Power Transfer DiagramNDS000DB
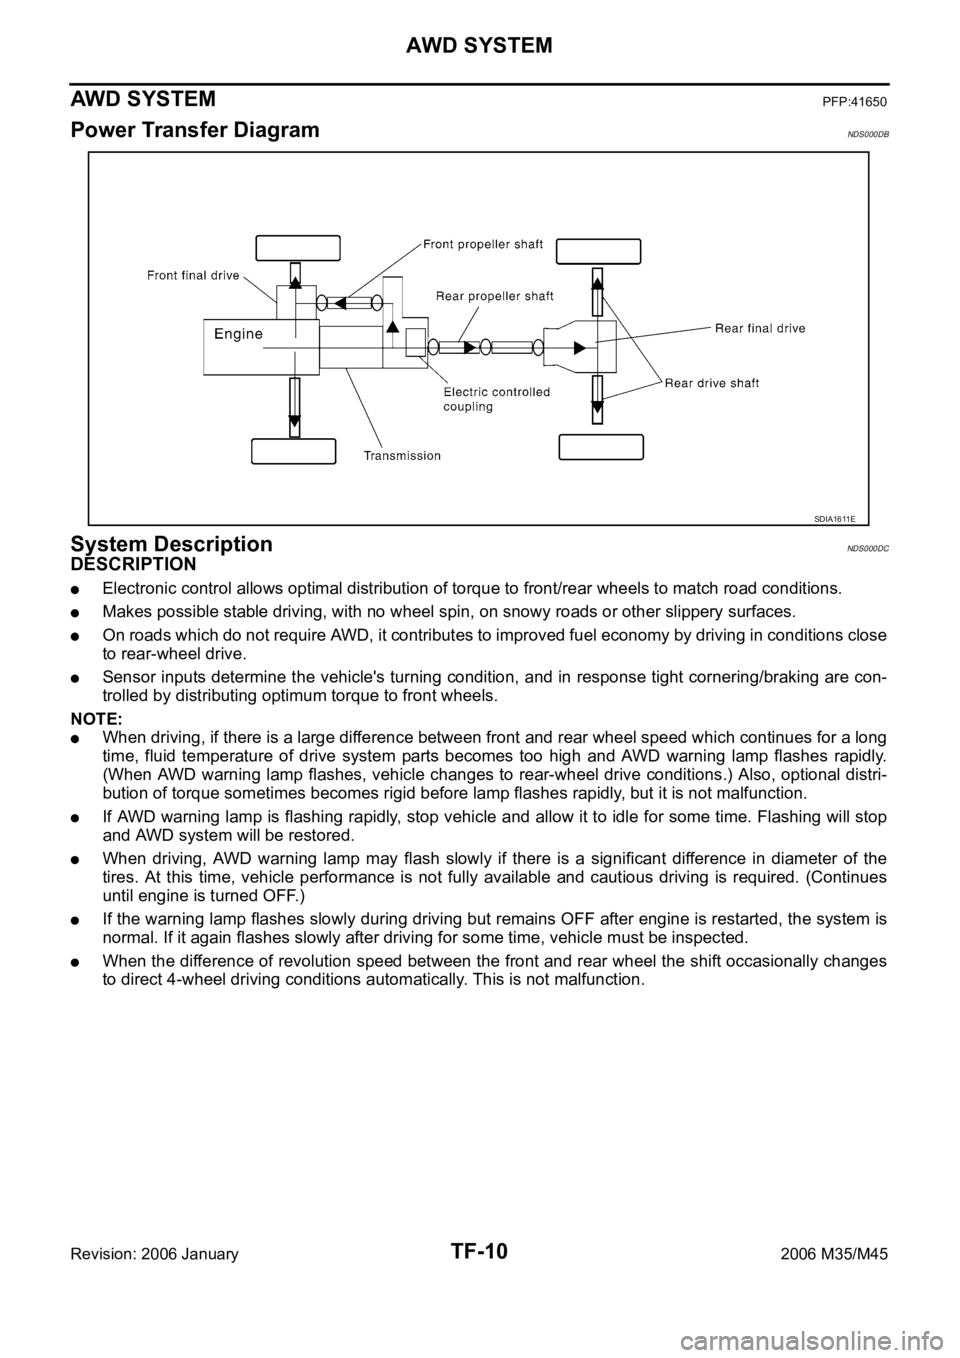
System DescriptionNDS000DC
DESCRIPTION
Electronic control allows optimal distribution of torque to front/rear wheels to match road conditions.
Makes possible stable driving, with no wheel spin, on snowy roads or other slippery surfaces.
On roads which do not require AWD, it contributes to improved fuel economy by driving in conditions close
to rear-wheel drive.
Sensor inputs determine the vehicle's turning condition, and in response tight cornering/braking are con-
trolled by distributing optimum torque to front wheels.
NOTE:
When driving, if there is a large difference between front and rear wheel speed which continues for a long
time, fluid temperature of drive system parts becomes too high and AWD warning lamp flashes rapidly.
(When AWD warning lamp flashes, vehicle changes to rear-wheel drive conditions.) Also, optional distri-
bution of torque sometimes becomes rigid before lamp flashes rapidly, but it is not malfunction.
If AWD warning lamp is flashing rapidly, stop vehicle and allow it to idle for some time. Flashing will stop
and AWD system will be restored.
When driving, AWD warning lamp may flash slowly if there is a significant difference in diameter of the
tires. At this time, vehicle performance is not fully available and cautious driving is required. (Continues
until engine is turned OFF.)
If the warning lamp flashes slowly during driving but remains OFF after engine is restarted, the system is
normal. If it again flashes slowly after driving for some time, vehicle must be inspected.
When the difference of revolution speed between the front and rear wheel the shift occasionally changes
to direct 4-wheel driving conditions automatically. This is not malfunction.
SDIA1611E
Page 5485 of 5621

TF-20
TROUBLE DIAGNOSIS
Revision: 2006 January2006 M35/M45
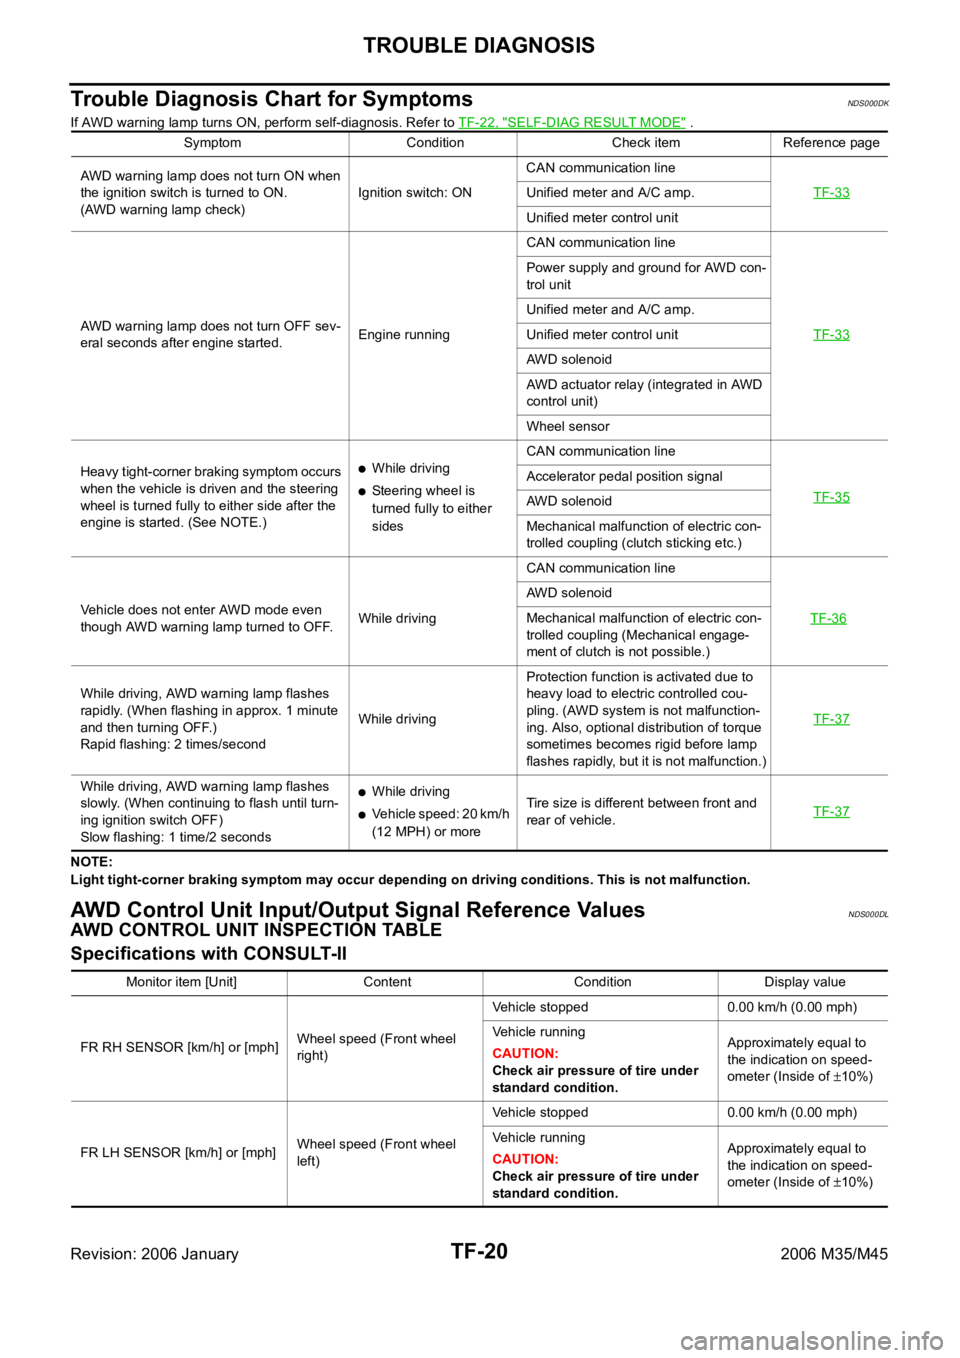
Trouble Diagnosis Chart for SymptomsNDS000DK
If AWD warning lamp turns ON, perform self-diagnosis. Refer to TF-22, "SELF-DIAG RESULT MODE" .
NOTE:
Light tight-corner braking symptom may occur depending on driving conditions. This is not malfunction.
AWD Control Unit Input/Output Signal Reference ValuesNDS000DL
AWD CONTROL UNIT INSPECTION TABLE
Specifications with CONSULT-II
Symptom Condition Check item Reference page
AWD warning lamp does not turn ON when
the ignition switch is turned to ON.
(AWD warning lamp check)Ignition switch: ONCAN communication line
TF-33
Unified meter and A/C amp.
Unified meter control unit
AWD warning lamp does not turn OFF sev-
eral seconds after engine started.Engine runningCAN communication line
TF-33
Power supply and ground for AWD con-
trol unit
Unified meter and A/C amp.
Unified meter control unit
AWD solenoid
AWD actuator relay (integrated in AWD
control unit)
Wheel sensor
Heavy tight-corner braking symptom occurs
when the vehicle is driven and the steering
wheel is turned fully to either side after the
engine is started. (See NOTE.)
While driving
Steering wheel is
turned fully to either
sidesCAN communication line
TF-35Accelerator pedal position signal
AWD solenoid
Mechanical malfunction of electric con-
trolled coupling (clutch sticking etc.)
Vehicle does not enter AWD mode even
though AWD warning lamp turned to OFF.While drivingCAN communication line
TF-36
AWD solenoid
Mechanical malfunction of electric con-
trolled coupling (Mechanical engage-
ment of clutch is not possible.)
While driving, AWD warning lamp flashes
rapidly. (When flashing in approx. 1 minute
and then turning OFF.)
Rapid flashing: 2 times/secondWhile drivingProtection function is activated due to
heavy load to electric controlled cou-
pling. (AWD system is not malfunction-
ing. Also, optional distribution of torque
sometimes becomes rigid before lamp
flashes rapidly, but it is not malfunction.)TF-37
While driving, AWD warning lamp flashes
slowly. (When continuing to flash until turn-
ing ignition switch OFF)
Slow flashing: 1 time/2 secondsWhile driving
Vehicle speed: 20 km/h
(12 MPH) or moreTire size is different between front and
rear of vehicle.TF-37
Monitor item [Unit] Content Condition Display value
FR RH SENSOR [km/h] or [mph]Wheel speed (Front wheel
right)Vehicle stopped 0.00 km/h (0.00 mph)
Vehicle running
CAUTION:
Check air pressure of tire under
standard condition.Approximately equal to
the indication on speed-
ometer (Inside of
10%)
FR LH SENSOR [km/h] or [mph]Wheel speed (Front wheel
left)Vehicle stopped 0.00 km/h (0.00 mph)
Vehicle running
CAUTION:
Check air pressure of tire under
standard condition.Approximately equal to
the indication on speed-
ometer (Inside of
10%)
Page 5487 of 5621

TF-22
TROUBLE DIAGNOSIS
Revision: 2006 January2006 M35/M45
CONSULT-II SETTING PROCEDURE
Refer to GI-39, "CONSULT-II Start Procedure" .
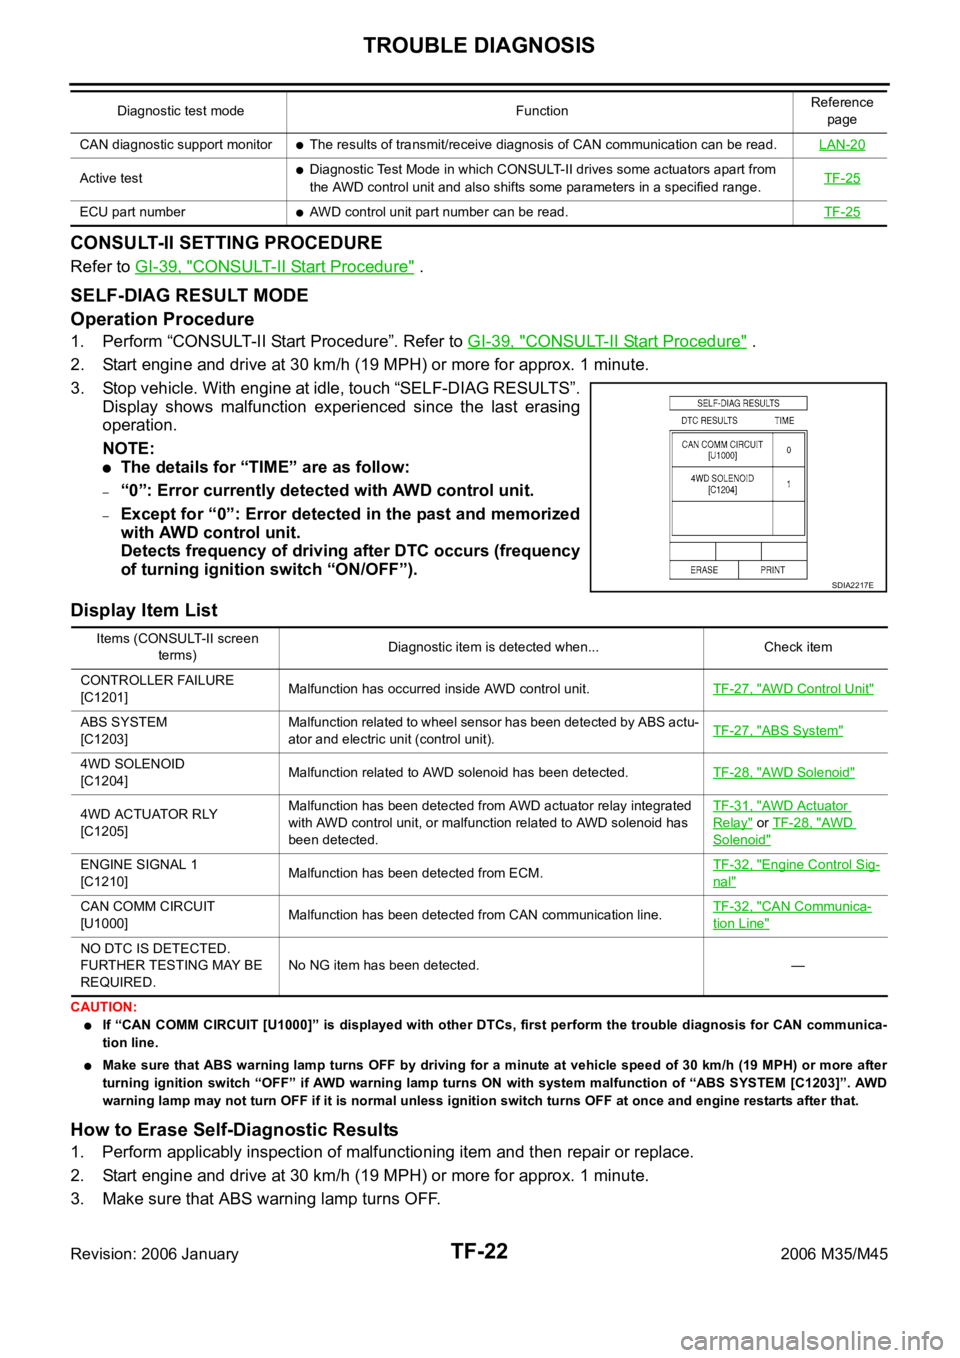
SELF-DIAG RESULT MODE
Operation Procedure
1. Perform “CONSULT-II Start Procedure”. Refer to GI-39, "CONSULT-II Start Procedure" .
2. Start engine and drive at 30 km/h (19 MPH) or more for approx. 1 minute.
3. Stop vehicle. With engine at idle, touch “SELF-DIAG RESULTS”.
Display shows malfunction experienced since the last erasing
operation.
NOTE:
The details for “TIME” are as follow:
–“0”: Error currently detected with AWD control unit.
–Except for “0”: Error detected in the past and memorized
with AWD control unit.
Detects frequency of driving after DTC occurs (frequency
of turning ignition switch “ON/OFF”).
Display Item List
CAUTION:
If “CAN COMM CIRCUIT [U1000]” is displayed with other DTCs, first perform the trouble diagnosis for CAN communica-
tion line.
Make sure that ABS warning lamp turns OFF by driving for a minute at vehicle speed of 30 km/h (19 MPH) or more after
turning ignition switch “OFF” if AWD warning lamp turns ON with system malfunction of “ABS SYSTEM [C1203]”. AWD
warning lamp may not turn OFF if it is normal unless ignition switch turns OFF at once and engine restarts after that.
How to Erase Self-Diagnostic Results
1. Perform applicably inspection of malfunctioning item and then repair or replace.
2. Start engine and drive at 30 km/h (19 MPH) or more for approx. 1 minute.
3. Make sure that ABS warning lamp turns OFF.
CAN diagnostic support monitorThe results of transmit/receive diagnosis of CAN communication can be read.LAN-20
Active testDiagnostic Test Mode in which CONSULT-II drives some actuators apart from
the AWD control unit and also shifts some parameters in a specified range.TF-25
ECU part numberAWD control unit part number can be read.TF-25
Diagnostic test mode FunctionReference
page
SDIA2217E
Items (CONSULT-II screen
terms)Diagnostic item is detected when... Check item
CONTROLLER FAILURE
[C1201]Malfunction has occurred inside AWD control unit.TF-27, "
AWD Control Unit"
ABS SYSTEM
[C1203]Malfunction related to wheel sensor has been detected by ABS actu-
ator and electric unit (control unit).TF-27, "ABS System"
4WD SOLENOID
[C1204]Malfunction related to AWD solenoid has been detected.TF-28, "AWD Solenoid"
4WD ACTUATOR RLY
[C1205]Malfunction has been detected from AWD actuator relay integrated
with AWD control unit, or malfunction related to AWD solenoid has
been detected.TF-31, "AWD Actuator
Relay" or TF-28, "AWD
Solenoid"
ENGINE SIGNAL 1
[C1210]Malfunction has been detected from ECM.TF-32, "Engine Control Sig-
nal"
CAN COMM CIRCUIT
[U1000]Malfunction has been detected from CAN communication line.TF-32, "CAN Communica-
tion Line"
NO DTC IS DETECTED.
FURTHER TESTING MAY BE
REQUIRED.No NG item has been detected. —