Page 3716 of 4462
LT-154
REAR COMBINATION LAMP
Revision: 2006 December 2006 FX35/FX45
REAR COMBINATION LAMPPFP:26554
Bulb ReplacementNKS003HK
REAR FENDER SIDE (REAR SIDE MARKER LAMP BULB)
1. Remove rear combination lamp.
2. Turn bulb socket counterclockwise and unlock it.
3. Remove bulb.
BACK DOOR SIDE (BACK-UP LAMP)
1. Remove rear combination lamp.
2. Turn bulb socket counterclockwise and unlock it.
3. Remove bulb.
Removal and InstallationNKS003HL
REMOVAL
Rear Fender Side
1. Remove bumper side cover A. Refer to EI-17, "Removal and
Installation" .
2. Disconnect rear combination lamp connector.
3. Remove rear combination lamp mounting bolts.
4. Pull rear combination lamp toward side of the vehicle and remove from the vehicle.
SKIA5569E
PKIB3634E
Stop/tail lamp and rear turn signal lamp
(rear fender side) : LED (Replace together with rear combination
lamp assembly.)
Rear side marker lamp (rear fender side) : 12 V - 3.8 W
Back-up lamp (back door side) : 12 V - 18 W
SKIA5571E
Page 3717 of 4462
REAR COMBINATION LAMP LT-155
C
D E
F
G H
I
J
L
M A
B
LT
Revision: 2006 December 2006 FX35/FX45
Trunk Lid Side
1. Remove back door finisher. Refer to EI-46, "Removal and Instal-
lation" .
2. Disconnect rear combination lamp connector.
3. Remove rear combination lamp mounting nuts.
4. Remove rear combination lamp from back door.
5. Remove seal packing from back door.
INSTALLATION
Installation is the reverse order of removal.
�Installation a new seal packing to the rear combination lamp.
CAUTION:
Seal packing cannot be reused.
PKIB3635E
Rear combination lamp (trunk lid side)
mounting nut : 5.5 N·m (0.56 kg-m, 49 in-lb)
Rear combination lamp (rear fender
side) mounting nut : 3.2 N·m (0.33 kg-m, 28 in-lb)
Page 3739 of 4462
INTERIOR ROOM LAMP LT-177
C
D E
F
G H
I
J
L
M A
B
LT
Revision: 2006 December 2006 FX35/FX45
NOTE:
Vehicle with intelligent key system display this item.
ACTIVE TEST (BATTERY SAVER)
Operation Procedure
1. Touch “BATTERY SAVER” on “SELECT TEST ITEM” screen.
2. Touch “ACTIVE TEST” on “SELECT DIAG MODE” screen.
3. Touch item to be tested and check operation of the selected item.
4. During the operation check, touching “OFF” deactivates the operation.
Display Item List
Interior Room Lamp Control Does Not OperateNKS002YU
1. CHECK EACH SWITCH
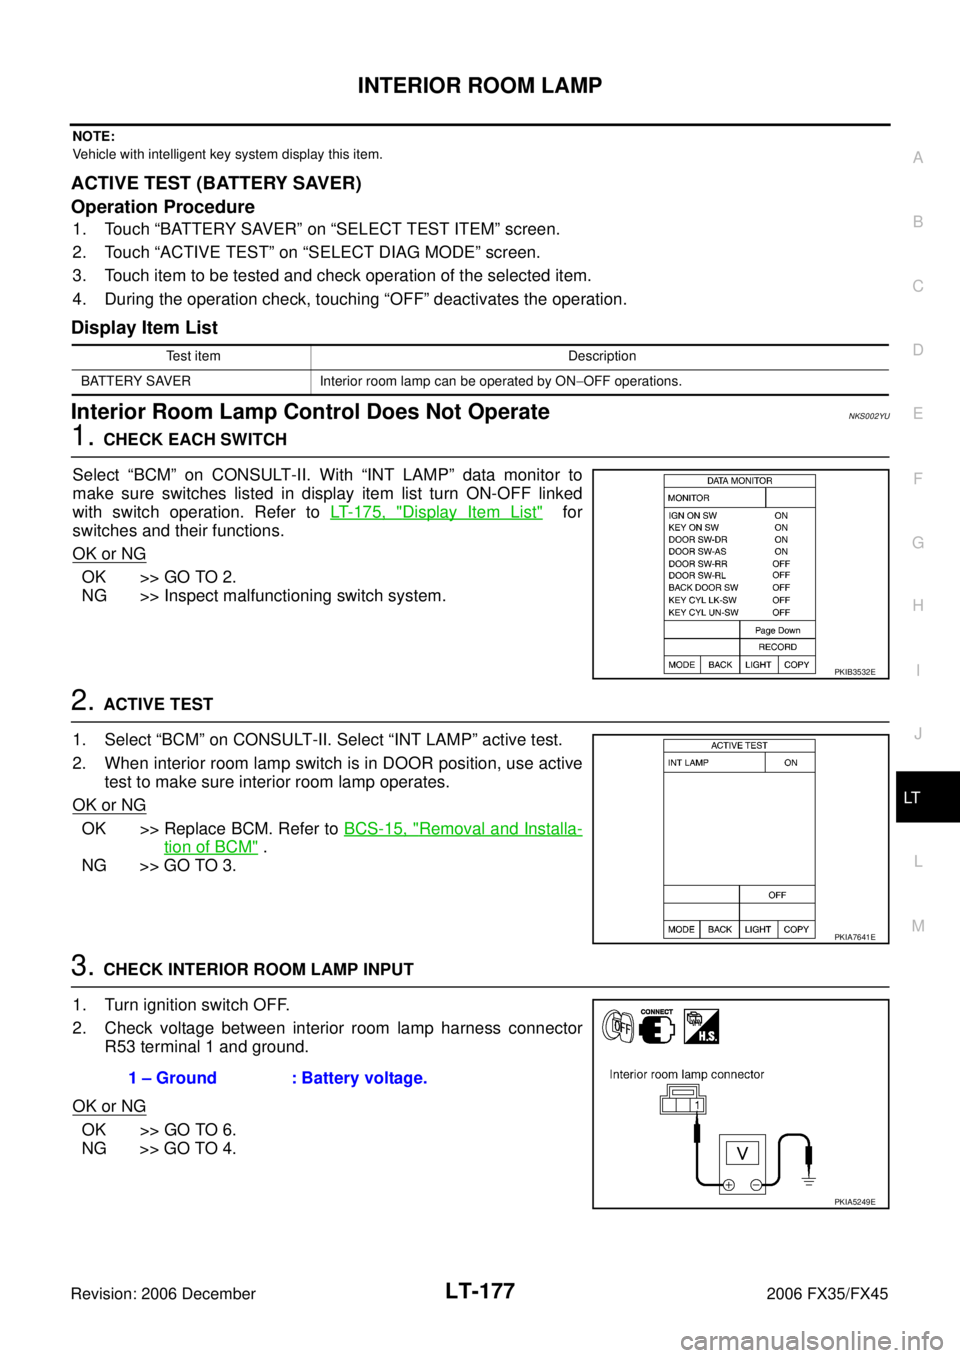
Select “BCM” on CONSULT-II. With “INT LAMP” data monitor to
make sure switches listed in display item list turn ON-OFF linked
with switch operation. Refer to LT- 1 7 5 , "
Display Item List" for
switches and their functions.
OK or NG
OK >> GO TO 2.
NG >> Inspect malfunctioning switch system.
2. ACTIVE TEST
1. Select “BCM” on CONSULT-II. Select “INT LAMP” active test.
2. When interior room lamp switch is in DOOR position, use active test to make sure interior room lamp operates.
OK or NG
OK >> Replace BCM. Refer to BCS-15, "Removal and Installa-
tion of BCM" .
NG >> GO TO 3.
3. CHECK INTERIOR ROOM LAMP INPUT
1. Turn ignition switch OFF.
2. Check voltage between interior room lamp harness connector R53 terminal 1 and ground.
OK or NG
OK >> GO TO 6.
NG >> GO TO 4.
Test item Description
BATTERY SAVER Interior room lamp can be operated by ON −OFF operations.
PKIB3532E
PKIA7641E
1 – Ground : Battery voltage.
PKIA5249E
Page 3740 of 4462
LT-178
INTERIOR ROOM LAMP
Revision: 2006 December 2006 FX35/FX45
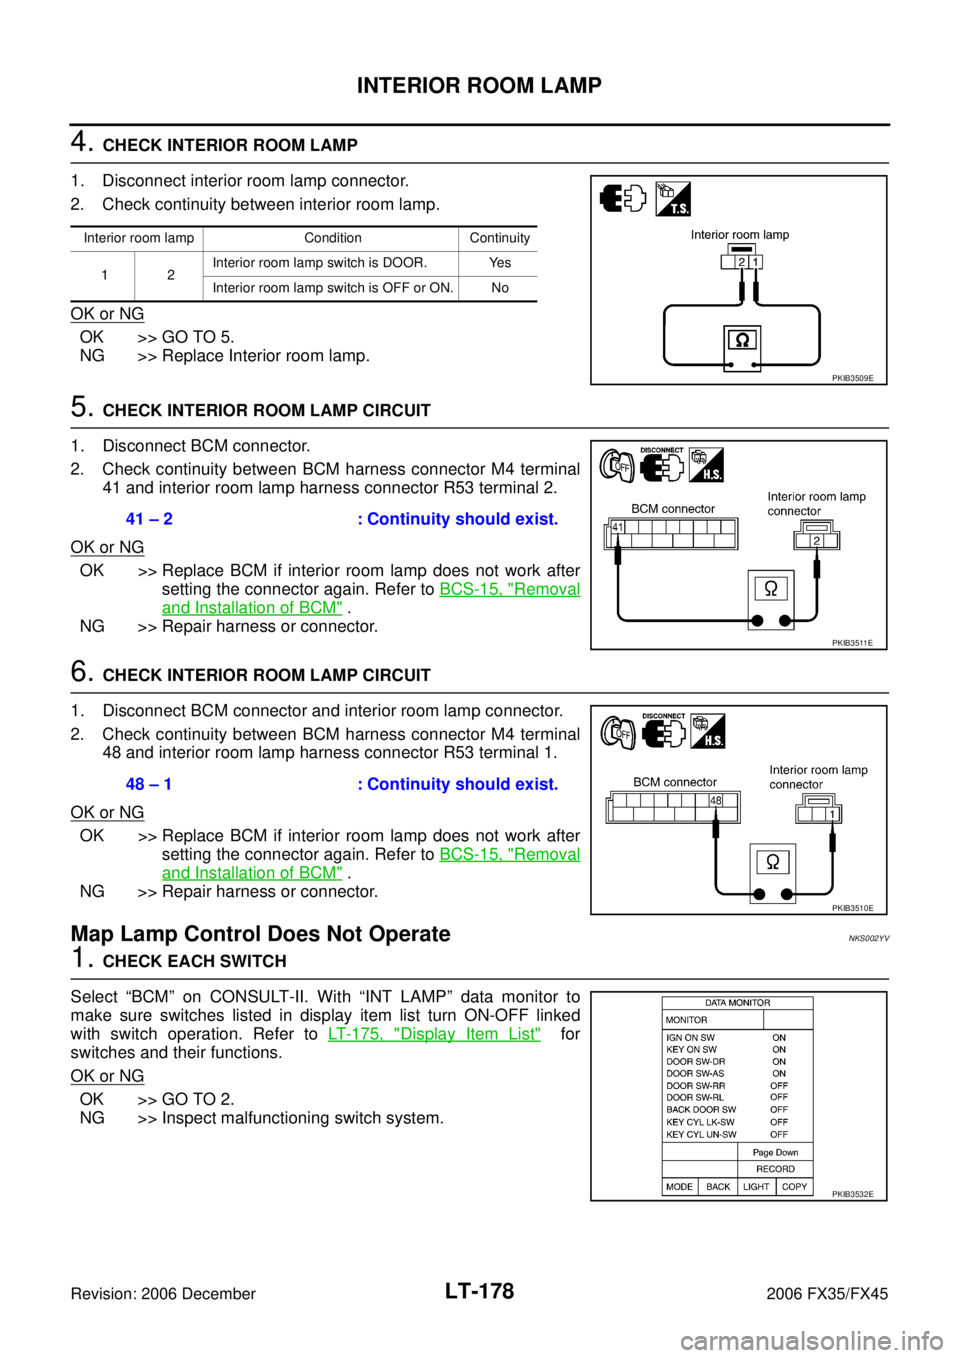
4. CHECK INTERIOR ROOM LAMP
1. Disconnect interior room lamp connector.
2. Check continuity between interior room lamp.
OK or NG
OK >> GO TO 5.
NG >> Replace Interior room lamp.
5. CHECK INTERIOR ROOM LAMP CIRCUIT
1. Disconnect BCM connector.
2. Check continuity between BCM harness connector M4 terminal 41 and interior room lamp harness connector R53 terminal 2.
OK or NG
OK >> Replace BCM if interior room lamp does not work after setting the connector again. Refer to BCS-15, "
Removal
and Installation of BCM" .
NG >> Repair harness or connector.
6. CHECK INTERIOR ROOM LAMP CIRCUIT
1. Disconnect BCM connector and interior room lamp connector.
2. Check continuity between BCM harness connector M4 terminal 48 and interior room lamp harness connector R53 terminal 1.
OK or NG
OK >> Replace BCM if interior room lamp does not work after setting the connector again. Refer to BCS-15, "
Removal
and Installation of BCM" .
NG >> Repair harness or connector.
Map Lamp Control Does Not OperateNKS002YV
1. CHECK EACH SWITCH
Select “BCM” on CONSULT-II. With “INT LAMP” data monitor to
make sure switches listed in display item list turn ON-OFF linked
with switch operation. Refer to LT- 1 7 5 , "
Display Item List" for
switches and their functions.
OK or NG
OK >> GO TO 2.
NG >> Inspect malfunctioning switch system.
Interior room lamp Condition Continuity
12 Interior room lamp switch is DOOR. Yes
Interior room lamp switch is OFF or ON. No
PKIB3509E
41 – 2 : Continuity should exist.
PKIB3511E
48 – 1 : Continuity should exist.
PKIB3510E
PKIB3532E
Page 3741 of 4462
INTERIOR ROOM LAMP LT-179
C
D E
F
G H
I
J
L
M A
B
LT
Revision: 2006 December 2006 FX35/FX45
2. ACTIVE TEST
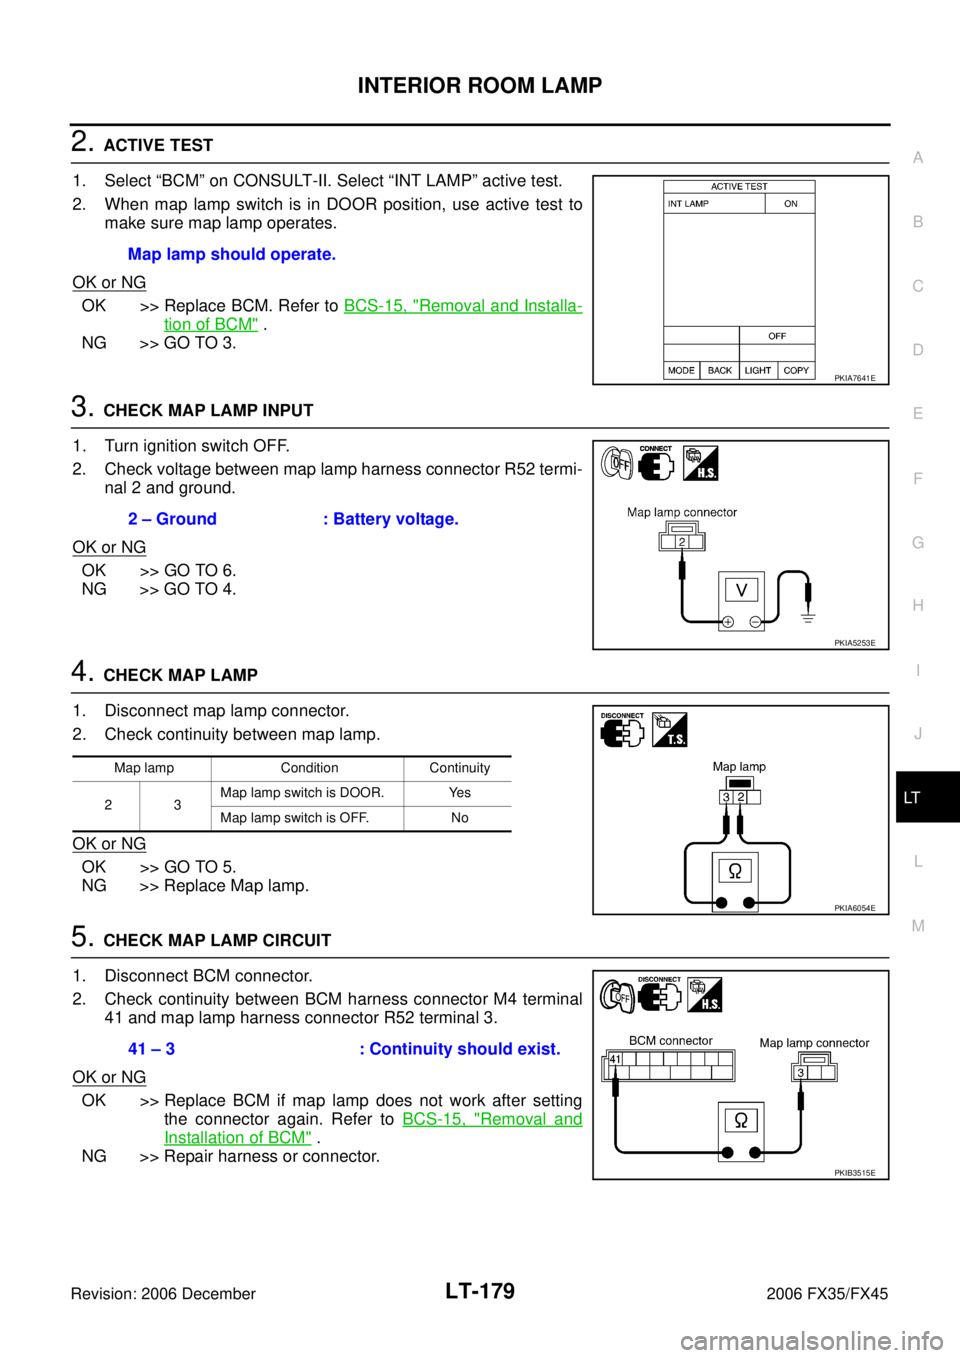
1. Select “BCM” on CONSULT-II. Select “INT LAMP” active test.
2. When map lamp switch is in DOOR position, use active test to make sure map lamp operates.
OK or NG
OK >> Replace BCM. Refer to BCS-15, "Removal and Installa-
tion of BCM" .
NG >> GO TO 3.
3. CHECK MAP LAMP INPUT
1. Turn ignition switch OFF.
2. Check voltage between map lamp harness connector R52 termi- nal 2 and ground.
OK or NG
OK >> GO TO 6.
NG >> GO TO 4.
4. CHECK MAP LAMP
1. Disconnect map lamp connector.
2. Check continuity between map lamp.
OK or NG
OK >> GO TO 5.
NG >> Replace Map lamp.
5. CHECK MAP LAMP CIRCUIT
1. Disconnect BCM connector.
2. Check continuity between BCM harness connector M4 terminal 41 and map lamp harness connector R52 terminal 3.
OK or NG
OK >> Replace BCM if map lamp does not work after setting the connector again. Refer to BCS-15, "
Removal and
Installation of BCM" .
NG >> Repair harness or connector. Map lamp should operate.
PKIA7641E
2 – Ground : Battery voltage.
PKIA5253E
Map lamp Condition Continuity
23 Map lamp switch is DOOR. Yes
Map lamp switch is OFF. No
PKIA6054E
41 – 3 : Continuity should exist.
PKIB3515E
Page 3742 of 4462
LT-180
INTERIOR ROOM LAMP
Revision: 2006 December 2006 FX35/FX45
6. CHECK MAP LAMP CIRCUIT
1. Disconnect BCM connector and map lamp connector.
2. Check continuity between BCM harness connector M4 terminal 48 and map lamp harness connector R52 terminal 2.
OK or NG
OK >> Replace BCM if map lamp does not work after setting the connector again. Refer to BCS-15, "
Removal and
Installation of BCM" .
NG >> Repair harness or connector. 48 – 2 : Continuity should exist.
PKIB3514E
Page 3744 of 4462
LT-182
INTERIOR ROOM LAMP
Revision: 2006 December 2006 FX35/FX45
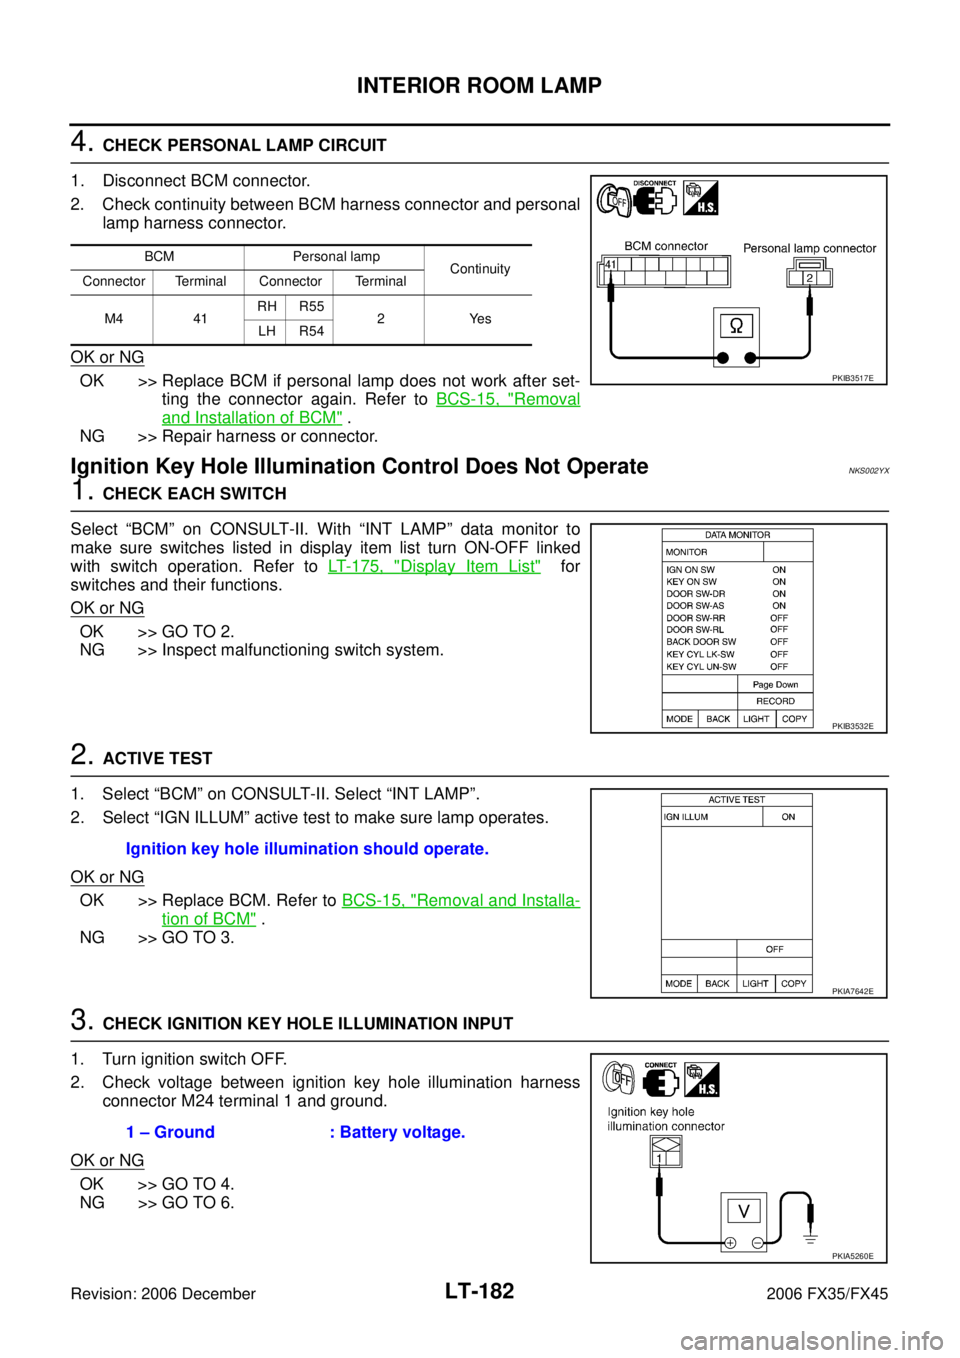
4. CHECK PERSONAL LAMP CIRCUIT
1. Disconnect BCM connector.
2. Check continuity between BCM harness connector and personal lamp harness connector.
OK or NG
OK >> Replace BCM if personal lamp does not work after set- ting the connector again. Refer to BCS-15, "
Removal
and Installation of BCM" .
NG >> Repair harness or connector.
Ignition Key Hole Illumination Control Does Not OperateNKS002YX
1. CHECK EACH SWITCH
Select “BCM” on CONSULT-II. With “INT LAMP” data monitor to
make sure switches listed in display item list turn ON-OFF linked
with switch operation. Refer to LT- 1 7 5 , "
Display Item List" for
switches and their functions.
OK or NG
OK >> GO TO 2.
NG >> Inspect malfunctioning switch system.
2. ACTIVE TEST
1. Select “BCM” on CONSULT-II. Select “INT LAMP”.
2. Select “IGN ILLUM” active test to make sure lamp operates.
OK or NG
OK >> Replace BCM. Refer to BCS-15, "Removal and Installa-
tion of BCM" .
NG >> GO TO 3.
3. CHECK IGNITION KEY HOLE ILLUMINATION INPUT
1. Turn ignition switch OFF.
2. Check voltage between ignition key hole illumination harness connector M24 terminal 1 and ground.
OK or NG
OK >> GO TO 4.
NG >> GO TO 6.
BCM Personal lamp Continuity
Connector Terminal Connector Terminal
M4 41 RH R55
2Yes
LH R54
PKIB3517E
PKIB3532E
Ignition key hole illumination should operate.
PKIA7642E
1 – Ground : Battery voltage.
PKIA5260E
Page 3745 of 4462
INTERIOR ROOM LAMP LT-183
C
D E
F
G H
I
J
L
M A
B
LT
Revision: 2006 December 2006 FX35/FX45
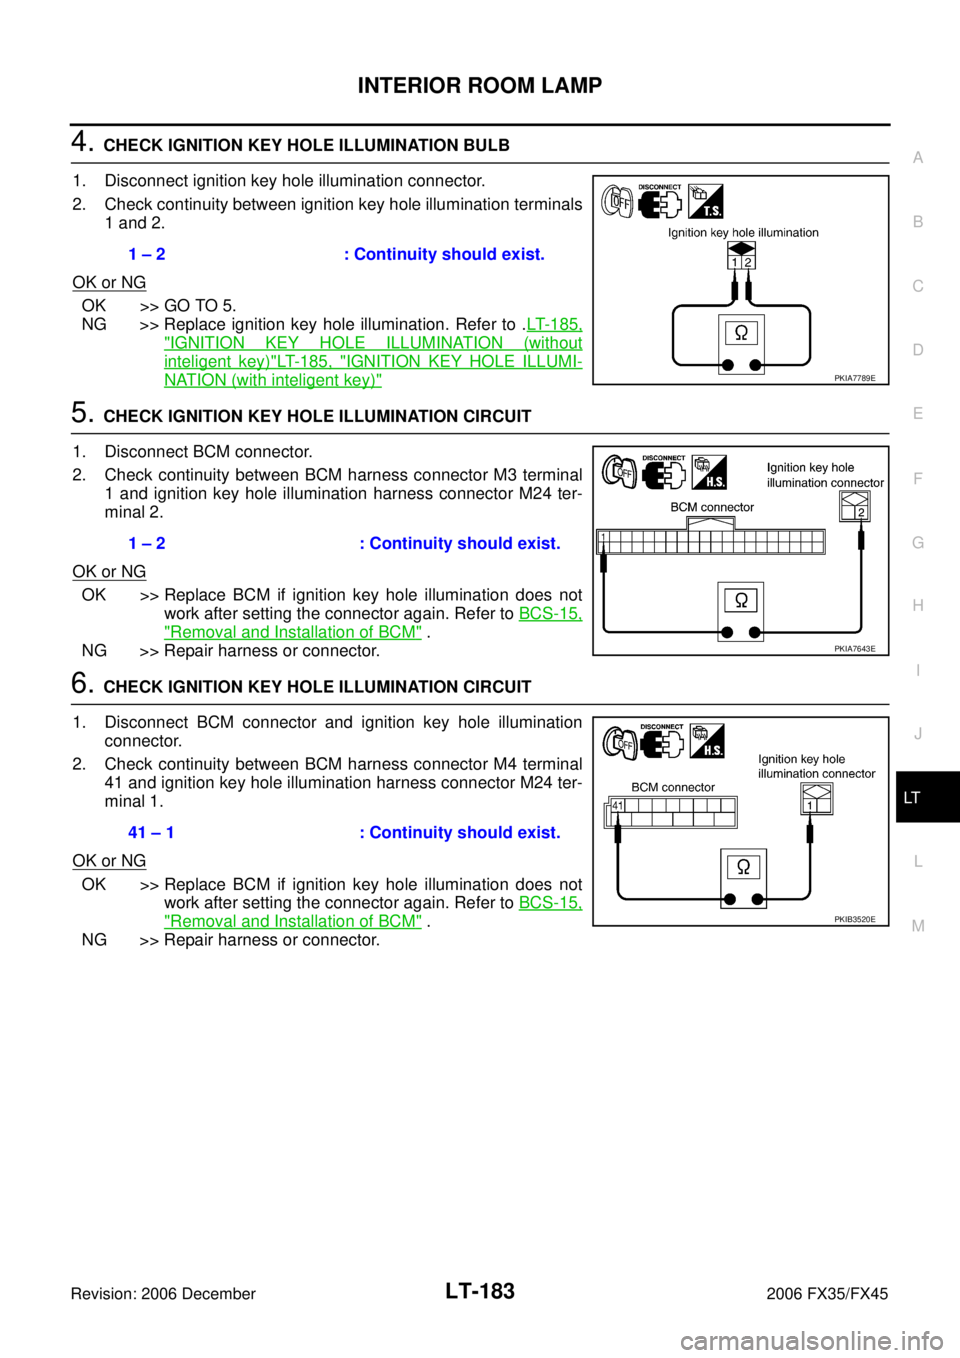
4. CHECK IGNITION KEY HOLE ILLUMINATION BULB
1. Disconnect ignition key hole illumination connector.
2. Check continuity between ignition key hole illumination terminals 1 and 2.
OK or NG
OK >> GO TO 5.
NG >> Replace ignition key hole illumination. Refer to . LT- 1 8 5 ,
"IGNITION KEY HOLE ILLUMINATION (without
inteligent key)"LT- 1 8 5 , "IGNITION KEY HOLE ILLUMI-
NATION (with inteligent key)"
5. CHECK IGNITION KEY HOLE ILLUMINATION CIRCUIT
1. Disconnect BCM connector.
2. Check continuity between BCM harness connector M3 terminal 1 and ignition key hole illumination harness connector M24 ter-
minal 2.
OK or NG
OK >> Replace BCM if ignition key hole illumination does not work after setting the connector again. Refer to BCS-15,
"Removal and Installation of BCM" .
NG >> Repair harness or connector.
6. CHECK IGNITION KEY HOLE ILLUMINATION CIRCUIT
1. Disconnect BCM connector and ignition key hole illumination connector.
2. Check continuity between BCM harness connector M4 terminal 41 and ignition key hole illumination harness connector M24 ter-
minal 1.
OK or NG
OK >> Replace BCM if ignition key hole illumination does not work after setting the connector again. Refer to BCS-15,
"Removal and Installation of BCM" .
NG >> Repair harness or connector. 1 – 2 : Continuity should exist.
PKIA7789E
1 – 2 : Continuity should exist.
PKIA7643E
41 – 1 : Continuity should exist.
PKIB3520E