Page 3639 of 4462
HEADLAMP AIMING CONTROL LT-77
C
D E
F
G H
I
J
L
M A
B
LT
Revision: 2006 December 2006 FX35/FX45
Removal and InstallationNKS002WU
REMOVAL
1. Remove combination meter. Refer to DI-25, "Removal and
Installation of Combination Meter" .
2. Remove screws for removing headlamp aiming switch from meter housing.
3. Remove screws and then remove headlamp aiming switch.
INSTALLATION
Installation is the reverse order of removal.
Switch Circuit InspectionNKS002WV
Using a circuit tester, check resistance between the headlamp aim-
ing switch connector terminals in each operation status of the aiming
switch.
PKIB3630E
PKIC1215E
Page 3647 of 4462
FRONT FOG LAMP LT-85
C
D E
F
G H
I
J
L
M A
B
LT
Revision: 2006 December 2006 FX35/FX45
Front Fog Lamps Do Not Illuminate (Both Sides)NKS002X7
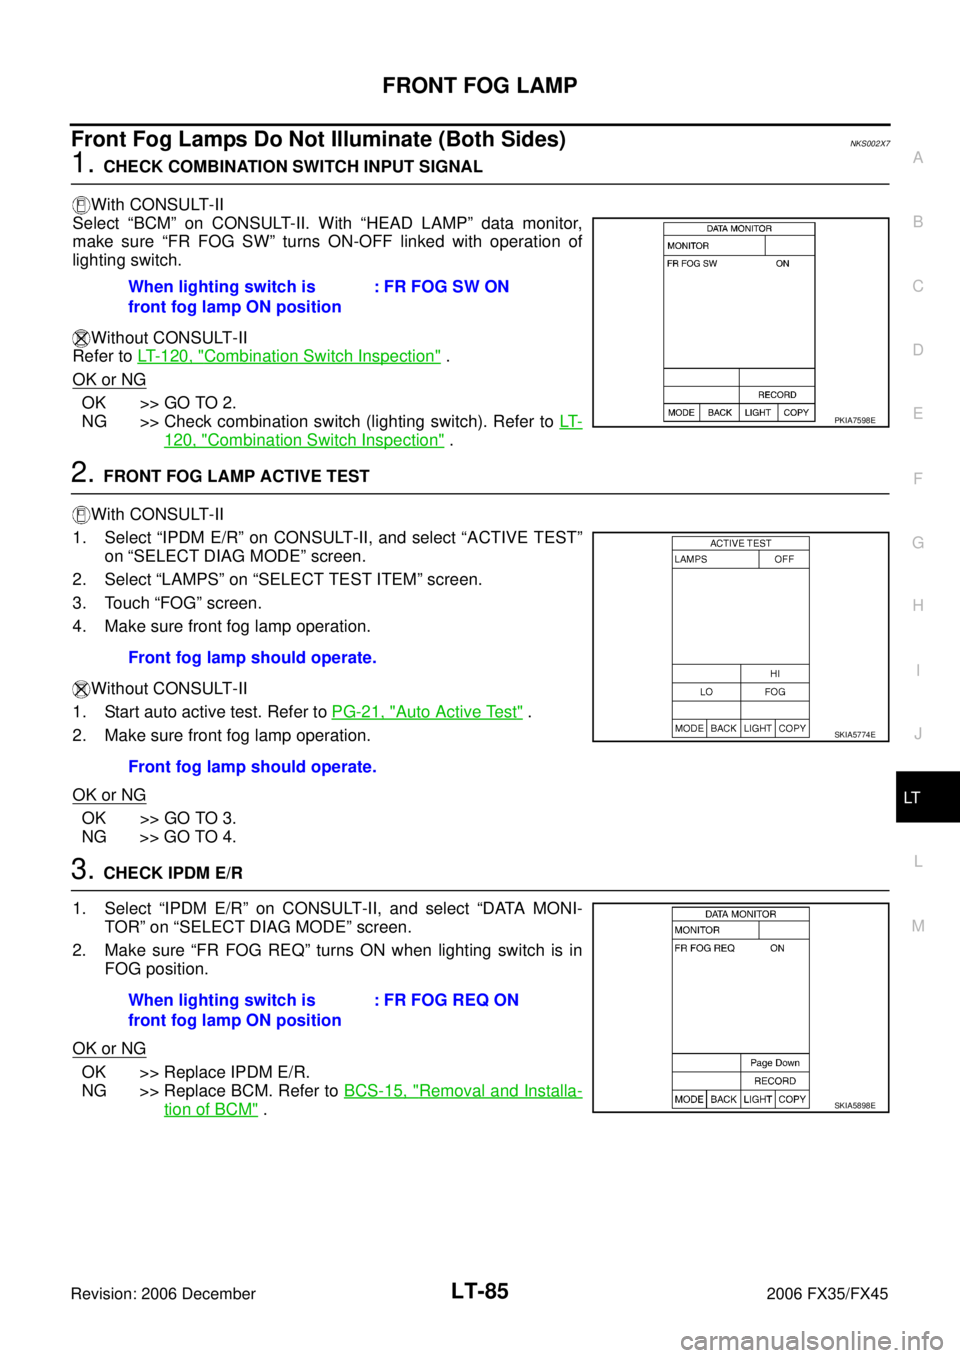
1. CHECK COMBINATION SWITCH INPUT SIGNAL
With CONSULT-II
Select “BCM” on CONSULT-II. With “HEAD LAMP” data monitor,
make sure “FR FOG SW” turns ON-OFF linked with operation of
lighting switch.
Without CONSULT-II
Refer to LT- 1 2 0 , "
Combination Switch Inspection" .
OK or NG
OK >> GO TO 2.
NG >> Check combination switch (lighting switch). Refer to LT-
120, "Combination Switch Inspection" .
2. FRONT FOG LAMP ACTIVE TEST
With CONSULT-II
1. Select “IPDM E/R” on CONSULT-II, and select “ACTIVE TEST” on “SELECT DIAG MODE” screen.
2. Select “LAMPS” on “SELECT TEST ITEM” screen.
3. Touch “FOG” screen.
4. Make sure front fog lamp operation.
Without CONSULT-II
1. Start auto active test. Refer to PG-21, "
Auto Active Test" .
2. Make sure front fog lamp operation.
OK or NG
OK >> GO TO 3.
NG >> GO TO 4.
3. CHECK IPDM E/R
1. Select “IPDM E/R” on CONSULT-II, and select “DATA MONI- TOR” on “SELECT DIAG MODE” screen.
2. Make sure “FR FOG REQ” turns ON when lighting switch is in FOG position.
OK or NG
OK >> Replace IPDM E/R.
NG >> Replace BCM. Refer to BCS-15, "
Removal and Installa-
tion of BCM" .
When lighting switch is
front fog lamp ON position : FR FOG SW ON
PKIA7598E
Front fog lamp should operate.
Front fog lamp should operate.
SKIA5774E
When lighting switch is
front fog lamp ON position : FR FOG REQ ON
SKIA5898E
Page 3648 of 4462
LT-86
FRONT FOG LAMP
Revision: 2006 December 2006 FX35/FX45
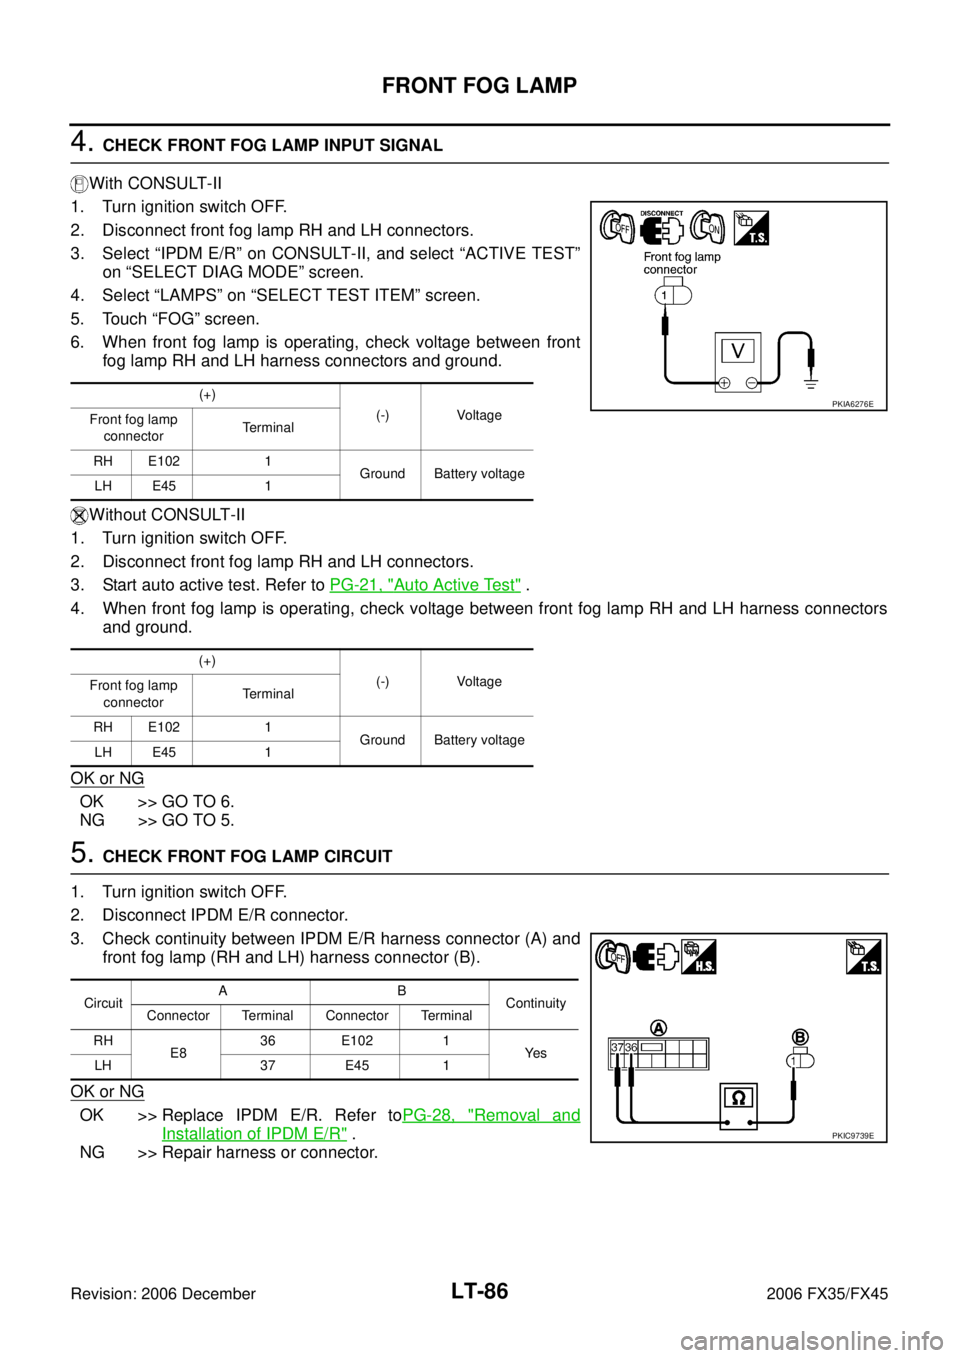
4. CHECK FRONT FOG LAMP INPUT SIGNAL
With CONSULT-II
1. Turn ignition switch OFF.
2. Disconnect front fog lamp RH and LH connectors.
3. Select “IPDM E/R” on CONSULT-II, and select “ACTIVE TEST” on “SELECT DIAG MODE” screen.
4. Select “LAMPS” on “SELECT TEST ITEM” screen.
5. Touch “FOG” screen.
6. When front fog lamp is operating, check voltage between front fog lamp RH and LH harness connectors and ground.
Without CONSULT-II
1. Turn ignition switch OFF.
2. Disconnect front fog lamp RH and LH connectors.
3. Start auto active test. Refer to PG-21, "
Auto Active Test" .
4. When front fog lamp is operating, check voltage between front fog lamp RH and LH harness connectors and ground.
OK or NG
OK >> GO TO 6.
NG >> GO TO 5.
5. CHECK FRONT FOG LAMP CIRCUIT
1. Turn ignition switch OFF.
2. Disconnect IPDM E/R connector.
3. Check continuity between IPDM E/R harness connector (A) and front fog lamp (RH and LH) harness connector (B).
OK or NG
OK >> Replace IPDM E/R. Refer to PG-28, "Removal and
Installation of IPDM E/R" .
NG >> Repair harness or connector.
(+)
(-) Voltage
Front fog lamp
connector Terminal
RH E102 1 Ground Battery voltage
LH E45 1
(+) (-) Voltage
Front fog lamp
connector Terminal
RH E102 1 Ground Battery voltage
LH E45 1PKIA6276E
Circuit AB
Continuity
Connector Terminal Connector Terminal
RH E8 36 E102 1
Ye s
LH 37 E45 1
PKIC9739E
Page 3651 of 4462
FRONT FOG LAMP LT-89
C
D E
F
G H
I
J
L
M A
B
LT
Revision: 2006 December 2006 FX35/FX45
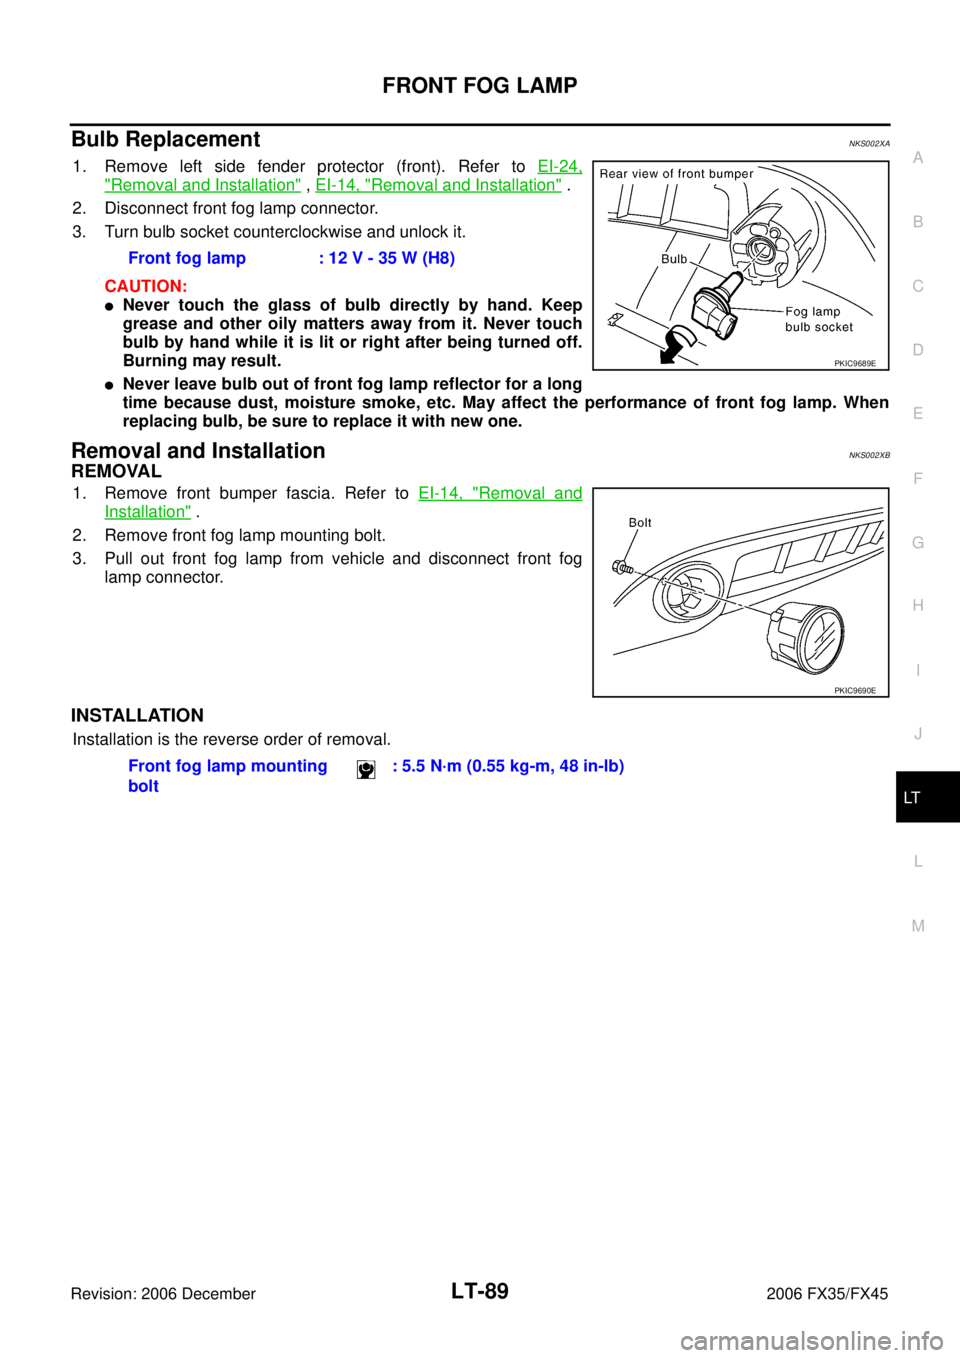
Bulb Replacement NKS002XA
1. Remove left side fender protector (front). Refer to EI-24,
"Removal and Installation" , EI-14, "Removal and Installation" .
2. Disconnect front fog lamp connector.
3. Turn bulb socket counterclockwise and unlock it.
CAUTION:
�Never touch the glass of bulb directly by hand. Keep
grease and other oily matters away from it. Never touch
bulb by hand while it is lit or right after being turned off.
Burning may result.
�Never leave bulb out of front fog lamp reflector for a long
time because dust, moisture smoke, etc. May affect the performance of front fog lamp. When
replacing bulb, be sure to replace it with new one.
Removal and Installation NKS002XB
REMOVAL
1. Remove front bumper fascia. Refer to EI-14, "Removal and
Installation" .
2. Remove front fog lamp mounting bolt.
3. Pull out front fog lamp from vehicle and disconnect front fog lamp connector.
INSTALLATION
Installation is the reverse order of removal. Front fog lamp : 12 V - 35 W (H8)
PKIC9689E
PKIC9690E
Front fog lamp mounting
bolt : 5.5 N·m (0.55 kg-m, 48 in-lb)
Page 3667 of 4462

TURN SIGNAL AND HAZARD WARNING LAMPS LT-105
C
D E
F
G H
I
J
L
M A
B
LT
Revision: 2006 December 2006 FX35/FX45
Turn Signal Lamp Does Not OperateNKS002XM
1. CHECK COMBINATION SWITCH INPUT SIGNAL
With CONSULT-II
Select “BCM” on CONSULT-II. With “FLASHER” data monitor, make
sure “TURN SIGNAL R” and “TURN SIGNAL L” turns ON-OFF
linked with operation of lighting switch.
Without CONSULT-II
Refer to LT- 1 2 0 , "
Combination Switch Inspection" .
OK or NG
OK >> GO TO 2.
NG >> Check combination switch (lighting switch). Refer to LT- 1 2 0 , "
Combination Switch Inspection" .
2. ACTIVE TEST
With CONSULT-II
1. Select “FLASHER” during active test. Refer to LT- 1 0 4 , "
ACTIVE
TEST" .
2. Make sure “FLASHER RIGHT” and “FLASHER LEFT” operate.
Without CONSULT-II
GO TO 3.
OK or NG
OK >> Replace BCM. Refer to BCS-15, "Removal and Installa-
tion of BCM" .
NG >> GO TO 3.
3. CHECK TURN SIGNAL LAMPS CIRCUIT
1. Turn ignition switch OFF.
2. Disconnect BCM connector and front combination lamp LH and RH connectors.
3. Check continuity between BCM harness connector M4 terminal 45 and front combination lamp LH harness connector E44 termi-
nal 4.
4. Check continuity between BCM harness connector M4 terminal 46 and front combination lamp RH harness connector E24 ter-
minal 4.
OK or NG
OK >> GO TO 4.
NG >> Repair harness or connector. When lighting switch is
TURN RH position : TURN SIGNAL R ON
When lighting switch is
TURN LH position : TURN SIGNAL L ON
PKIA7600E
PKIA5276E
45 – 4 : Continuity should exist.
46 – 4 : Continuity should exist.
PKIB3490E
Page 3668 of 4462
LT-106
TURN SIGNAL AND HAZARD WARNING LAMPS
Revision: 2006 December 2006 FX35/FX45
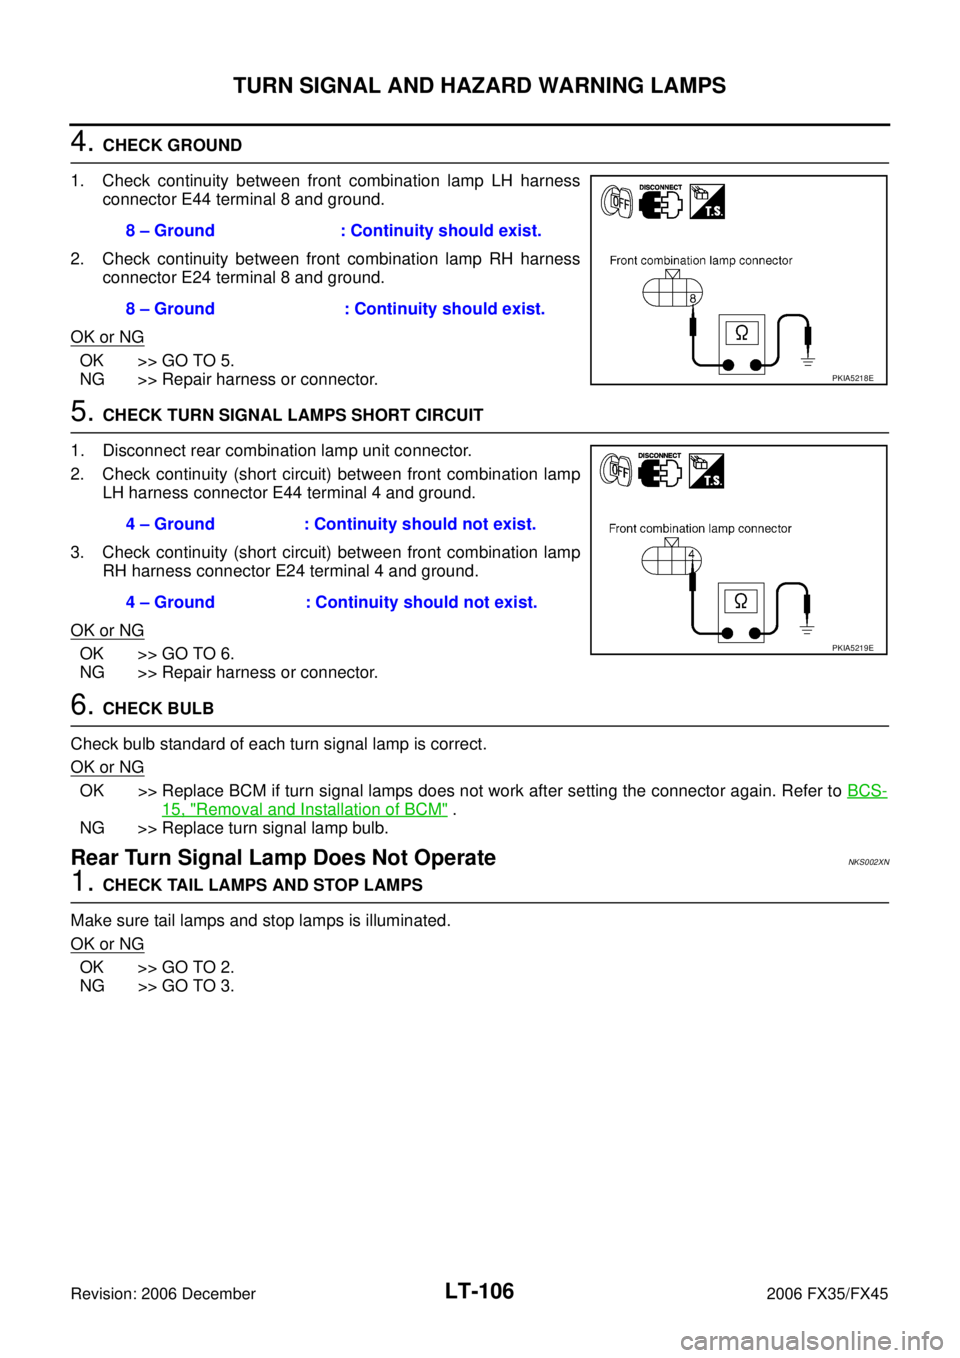
4. CHECK GROUND
1. Check continuity between front combination lamp LH harness connector E44 terminal 8 and ground.
2. Check continuity between front combination lamp RH harness connector E24 terminal 8 and ground.
OK or NG
OK >> GO TO 5.
NG >> Repair harness or connector.
5. CHECK TURN SIGNAL LAMPS SHORT CIRCUIT
1. Disconnect rear combination lamp unit connector.
2. Check continuity (short circuit) between front combination lamp LH harness connector E44 terminal 4 and ground.
3. Check continuity (short circuit) between front combination lamp RH harness connector E24 terminal 4 and ground.
OK or NG
OK >> GO TO 6.
NG >> Repair harness or connector.
6. CHECK BULB
Check bulb standard of each turn signal lamp is correct.
OK or NG
OK >> Replace BCM if turn signal lamps does not work after setting the connector again. Refer to BCS-
15, "Removal and Installation of BCM" .
NG >> Replace turn signal lamp bulb.
Rear Turn Signal Lamp Does Not OperateNKS002XN
1. CHECK TAIL LAMPS AND STOP LAMPS
Make sure tail lamps and stop lamps is illuminated.
OK or NG
OK >> GO TO 2.
NG >> GO TO 3. 8 – Ground : Continuity should exist.
8 – Ground : Continuity should exist.
PKIA5218E
4 – Ground : Continuity should not exist.
4 – Ground : Continuity should not exist.
PKIA5219E
Page 3671 of 4462
TURN SIGNAL AND HAZARD WARNING LAMPS LT-109
C
D E
F
G H
I
J
L
M A
B
LT
Revision: 2006 December 2006 FX35/FX45
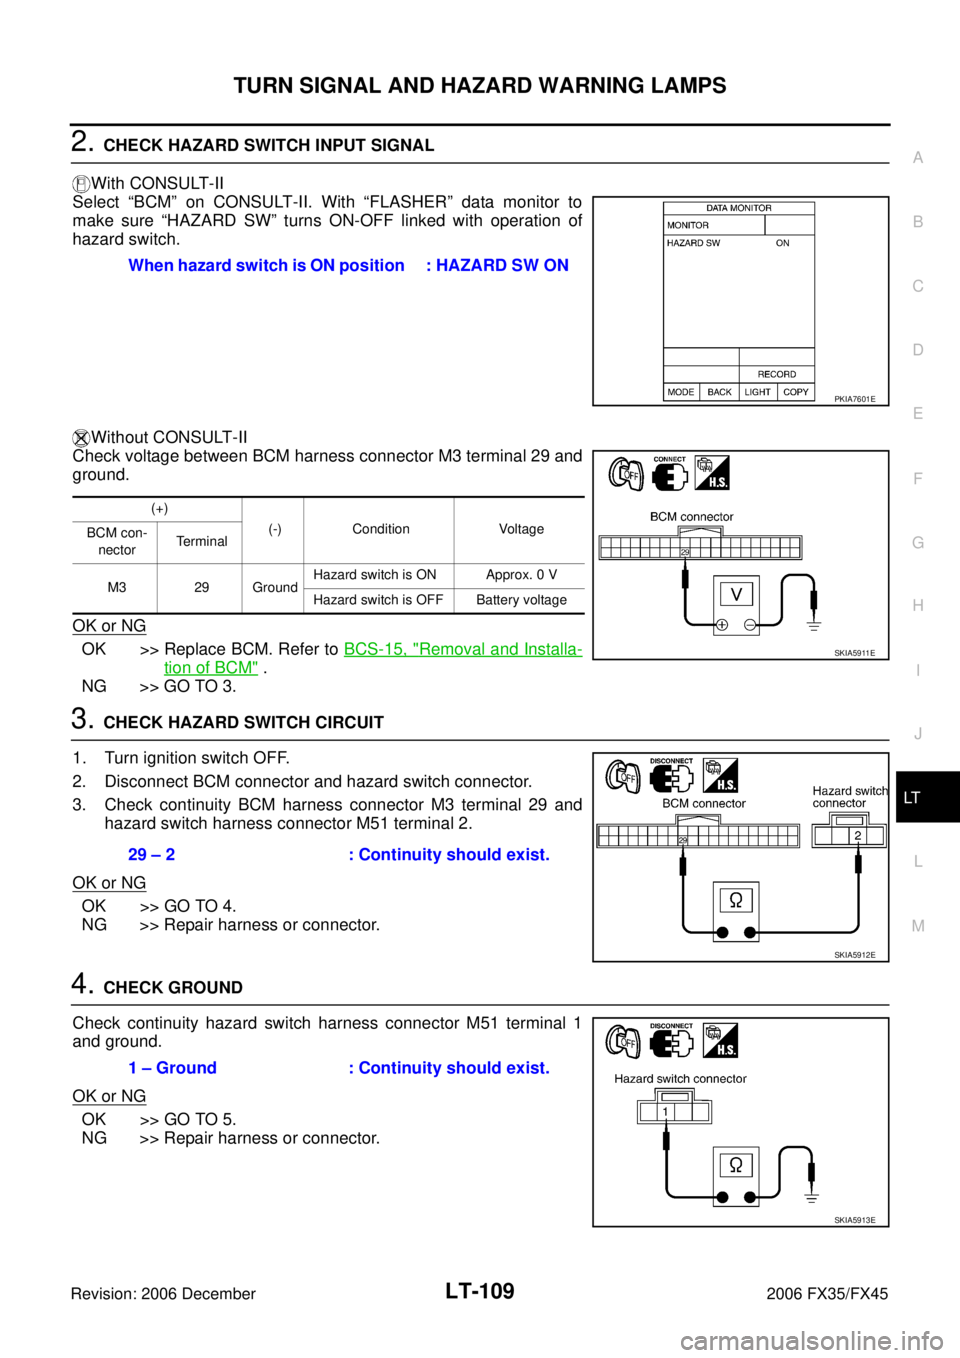
2. CHECK HAZARD SWITCH INPUT SIGNAL
With CONSULT-II
Select “BCM” on CONSULT-II. With “FLASHER” data monitor to
make sure “HAZARD SW” turns ON-OFF linked with operation of
hazard switch.
Without CONSULT-II
Check voltage between BCM harness connector M3 terminal 29 and
ground.
OK or NG
OK >> Replace BCM. Refer to BCS-15, "Removal and Installa-
tion of BCM" .
NG >> GO TO 3.
3. CHECK HAZARD SWITCH CIRCUIT
1. Turn ignition switch OFF.
2. Disconnect BCM connector and hazard switch connector.
3. Check continuity BCM harness connector M3 terminal 29 and hazard switch harness connector M51 terminal 2.
OK or NG
OK >> GO TO 4.
NG >> Repair harness or connector.
4. CHECK GROUND
Check continuity hazard switch harness connector M51 terminal 1
and ground.
OK or NG
OK >> GO TO 5.
NG >> Repair harness or connector. When hazard switch is ON position : HAZARD SW ON
PKIA7601E
(+)
(-) Condition Voltage
BCM con-
nector Te r m i n a l
M3 29 Ground Hazard switch is ON Approx. 0 V
Hazard switch is OFF Battery voltage
SKIA5911E
29 – 2 : Continuity should exist.
SKIA5912E
1 – Ground : Continuity should exist.
SKIA5913E
Page 3672 of 4462
LT-110
TURN SIGNAL AND HAZARD WARNING LAMPS
Revision: 2006 December 2006 FX35/FX45
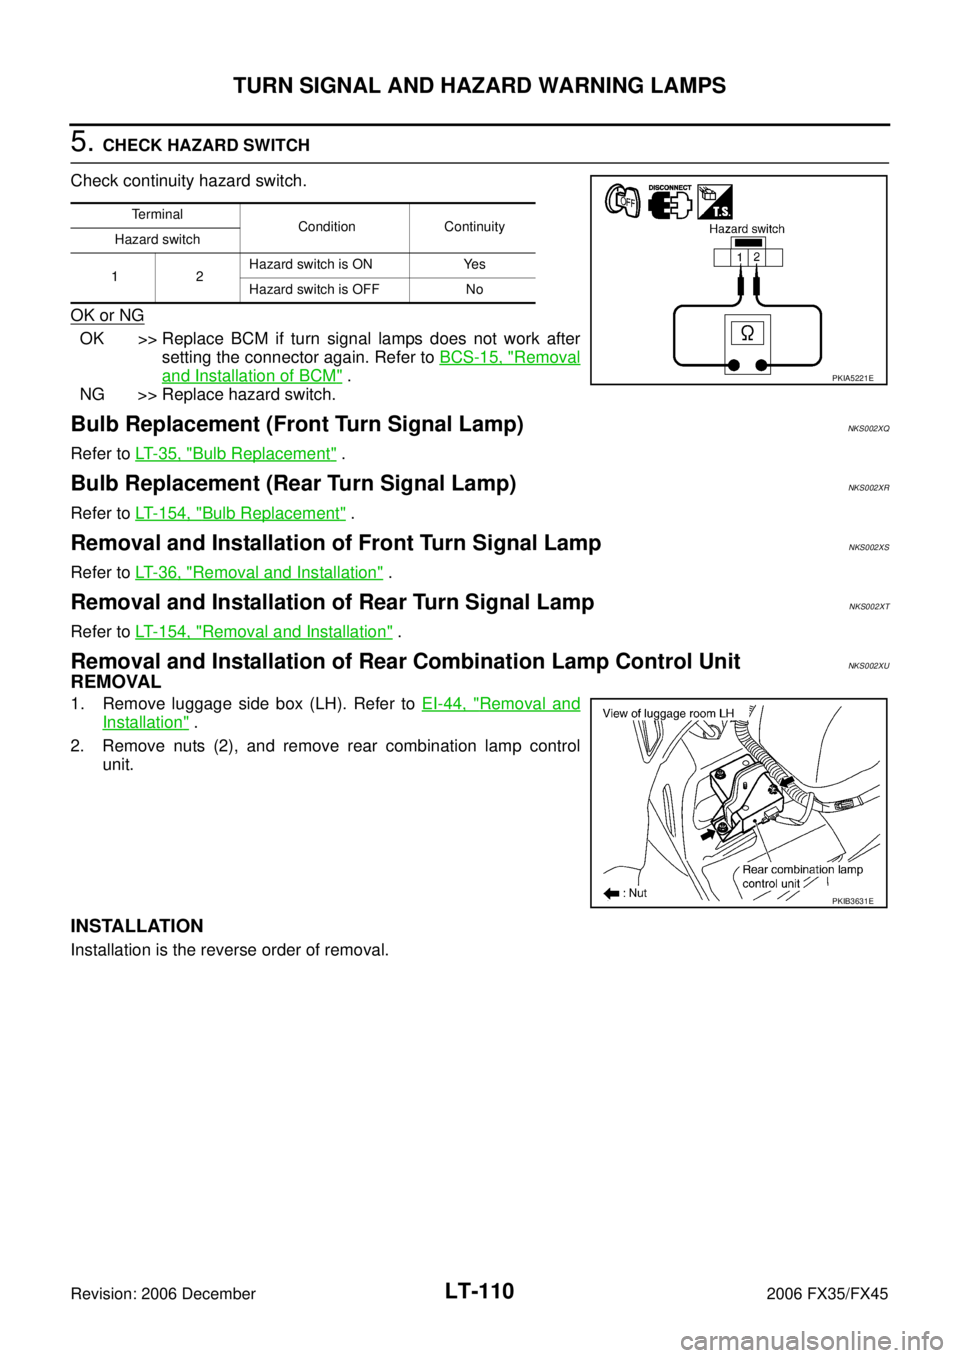
5. CHECK HAZARD SWITCH
Check continuity hazard switch.
OK or NG
OK >> Replace BCM if turn signal lamps does not work after setting the connector again. Refer to BCS-15, "
Removal
and Installation of BCM" .
NG >> Replace hazard switch.
Bulb Replacement (Front Turn Signal Lamp)NKS002XQ
Refer to LT- 3 5 , "Bulb Replacement" .
Bulb Replacement (Rear Turn Signal Lamp)NKS002XR
Refer to LT- 1 5 4 , "Bulb Replacement" .
Removal and Installation of Front Turn Signal LampNKS002XS
Refer to LT- 3 6 , "Removal and Installation" .
Removal and Installation of Rear Turn Signal Lamp NKS002XT
Refer to LT- 1 5 4 , "Removal and Installation" .
Removal and Installation of Rear Combination Lamp Control UnitNKS002XU
REMOVAL
1. Remove luggage side box (LH). Refer to EI-44, "Removal and
Installation" .
2. Remove nuts (2), and remove rear combination lamp control unit.
INSTALLATION
Installation is the reverse order of removal.
Terminal Condition Continuity
Hazard switch
12 Hazard switch is ON Yes
Hazard switch is OFF No
PKIA5221E
PKIB3631E