Page 3388 of 5267
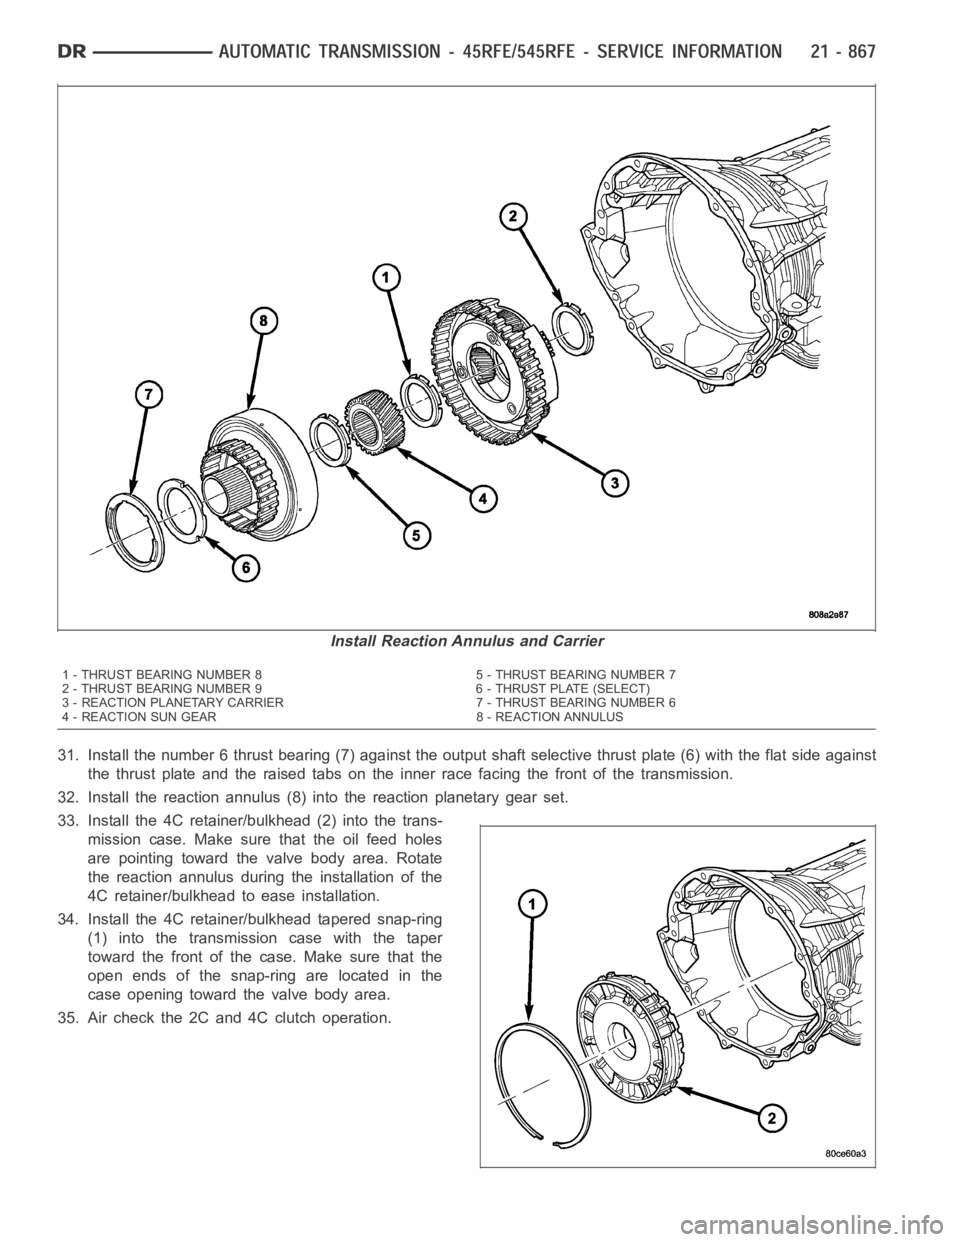
31. Install the number 6 thrust bearing (7) against the output shaft selective thrust plate (6) with the flat side against
the thrust plate and the raised tabs on the inner race facing the front of thetransmission.
32. Install the reaction annulus (8) into the reaction planetary gear set.
33. Install the 4C retainer/bulkhead (2) into the trans-
mission case. Make sure that the oil feed holes
are pointing toward the valve body area. Rotate
the reaction annulus during the installation of the
4C retainer/bulkhead to ease installation.
34. Install the 4C retainer/bulkhead tapered snap-ring
(1) into the transmission case with the taper
toward the front of the case. Make sure that the
open ends of the snap-ring are located in the
case opening toward the valve body area.
35. Air check the 2C and 4C clutch operation.
Install Reaction Annulus and Carrier
1 - THRUST BEARING NUMBER 8 5 - THRUST BEARING NUMBER 7
2 - THRUST BEARING NUMBER 9 6 - THRUST PLATE (SELECT)
3 - REACTION PLANETARY CARRIER 7 - THRUST BEARING NUMBER 6
4 - REACTION SUN GEAR 8 - REACTION ANNULUS
Page 3389 of 5267
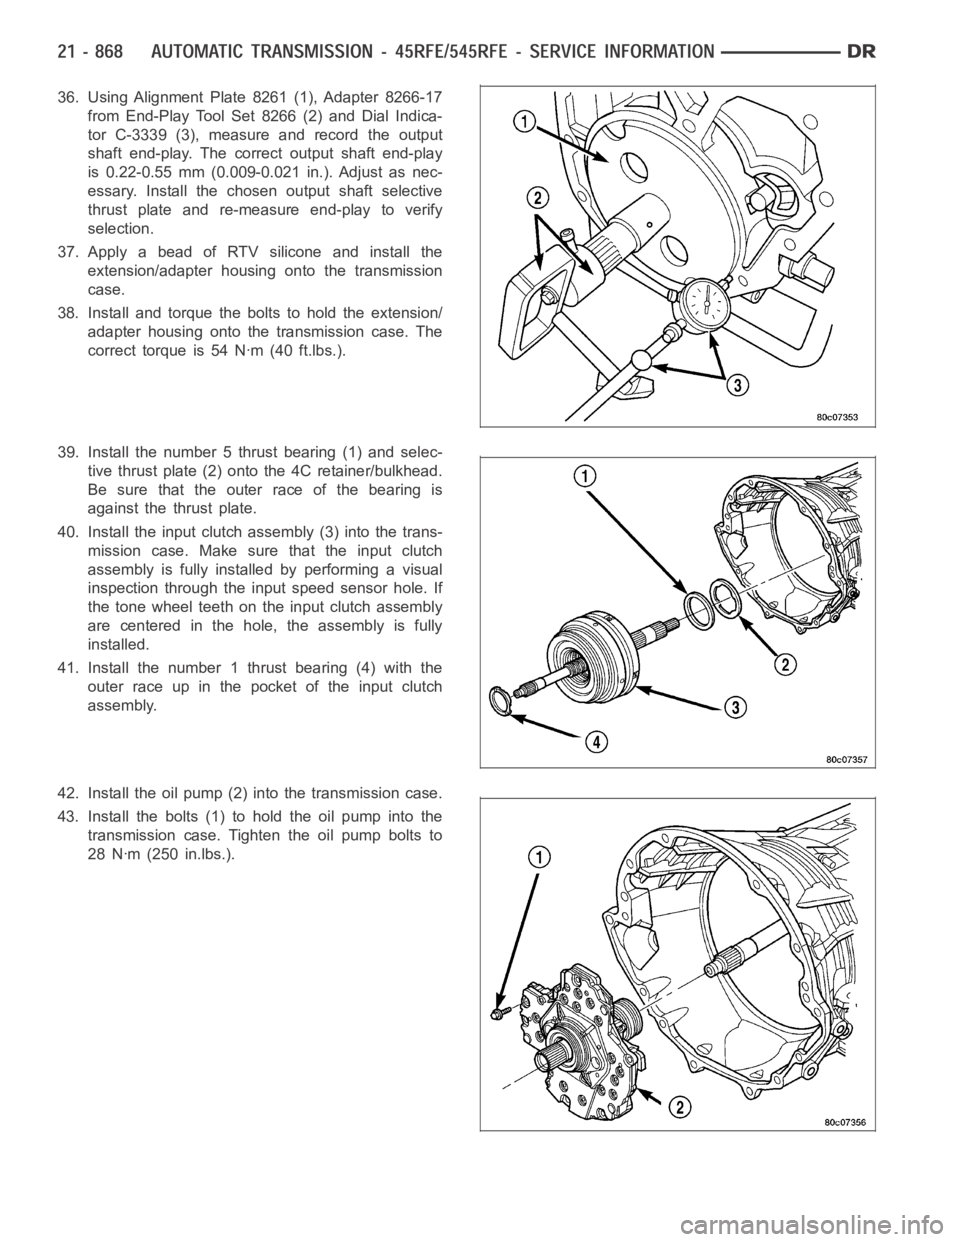
36. Using Alignment Plate 8261 (1), Adapter 8266-17
from End-Play Tool Set 8266 (2) and Dial Indica-
tor C-3339 (3), measure and record the output
shaft end-play. The correct output shaft end-play
is 0.22-0.55 mm (0.009-0.021 in.). Adjust as nec-
essary. Install the chosen output shaft selective
thrust plate and re-measure end-play to verify
selection.
37. Apply a bead of RTV silicone and install the
extension/adapter housing onto the transmission
case.
38. Install and torque the bolts to hold the extension/
adapter housing onto the transmission case. The
correct torque is 54 Nꞏm (40 ft.lbs.).
39. Install the number 5 thrust bearing (1) and selec-
tive thrust plate (2) onto the 4C retainer/bulkhead.
Be sure that the outer race of the bearing is
against the thrust plate.
40. Install the input clutch assembly (3) into the trans-
mission case. Make sure that the input clutch
assembly is fully installedbyperformingavisual
inspection through the input speed sensor hole. If
the tone wheel teeth on the input clutch assembly
are centered in the hole, the assembly is fully
installed.
41. Install the number 1 thrust bearing (4) with the
outer race up in the pocket of the input clutch
assembly.
42. Install the oil pump (2) into the transmission case.
43. Install the bolts (1) to hold the oil pump into the
transmission case. Tighten the oil pump bolts to
28 Nꞏm (250 in.lbs.).
Page 3390 of 5267
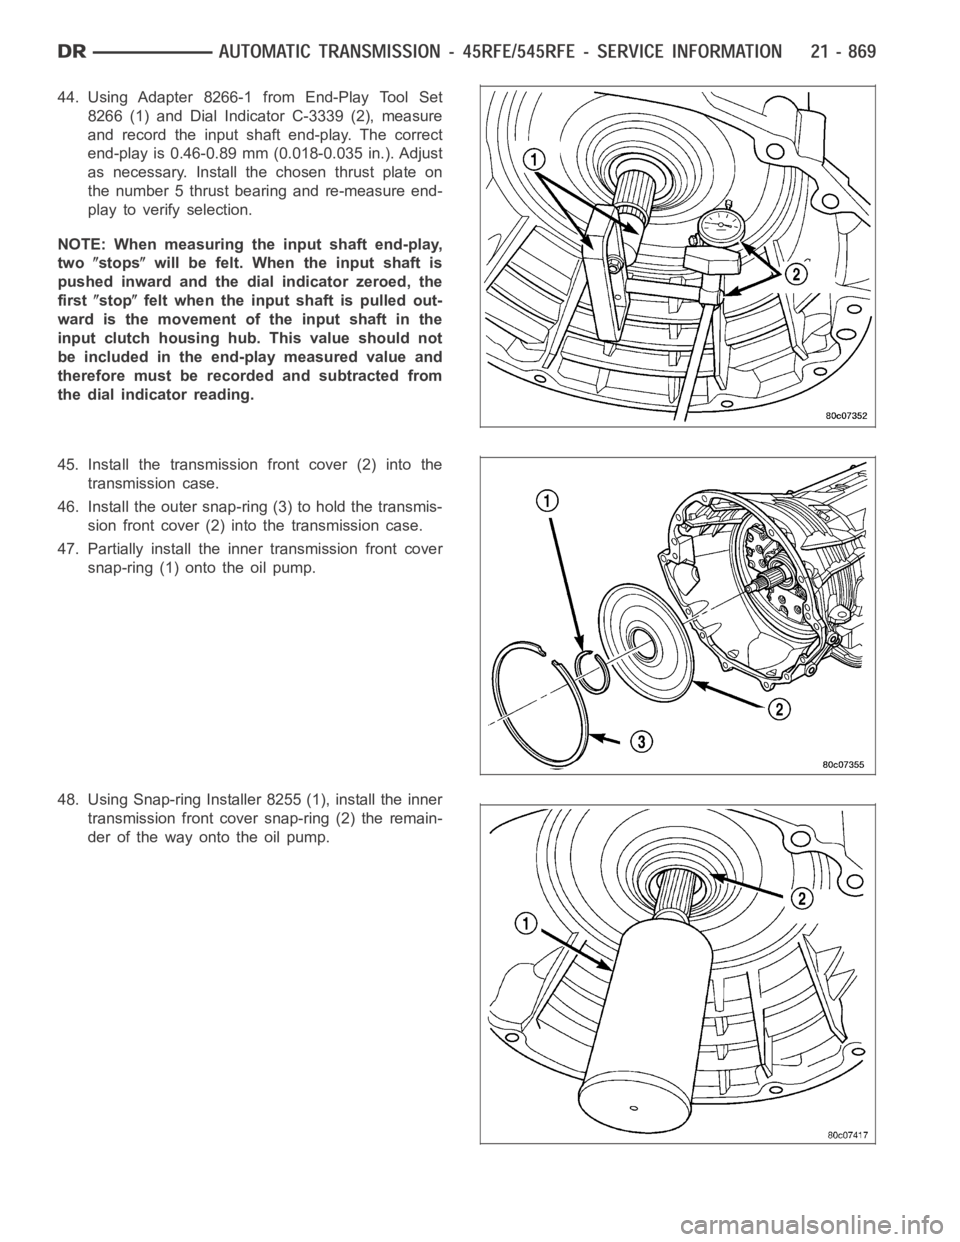
44. Using Adapter 8266-1 from End-Play Tool Set
8266 (1) and Dial Indicator C-3339 (2), measure
and record the input shaft end-play. The correct
end-play is 0.46-0.89 mm (0.018-0.035 in.). Adjust
as necessary. Install the chosen thrust plate on
the number 5 thrust bearing and re-measure end-
play to verify selection.
NOTE: When measuring the input shaft end-play,
two
stopswill be felt. When the input shaft is
pushed inward and the dial indicator zeroed, the
first
stopfelt when the input shaft is pulled out-
wardisthemovementoftheinputshaftinthe
input clutch housing hub. This value should not
be included in the end-play measured value and
therefore must be recorded and subtracted from
the dial indicator reading.
45. Install the transmission front cover (2) into the
transmission case.
46. Install the outer snap-ring (3) to hold the transmis-
sion front cover (2) into the transmission case.
47. Partially install the inner transmission front cover
snap-ring (1) onto the oil pump.
48. Using Snap-ring Installer 8255 (1), install the inner
transmission front cover snap-ring (2) the remain-
der of the way onto the oil pump.
Page 3391 of 5267

49. Install the valve body. Verify that the pin on the
manual lever has properly engaged the TRS
selector plate. Tighten the valve body to transmis-
sion case bolts (1) to 12 Nꞏm (105 in.lbs.).
CAUTION: The primary oil filter seal MUST be fully
installed flush against the oil pump body. DO NOT
install the seal onto the filter neck and attempt to
install the filter and seal as an assembly. Damage
to the transmission will result.
50. Install a new primary oil filter seal in the oil pump
inlet bore. Seat the seal in the bore with the butt
end of a hammer, or other suitable tool.
51. Install the primary oil filter (1) and the oil cooler
return filter (2). Tighten the screw to hold the pri-
mary oil filter to the valve body to 4.5 Nꞏm (40
in.lbs.). Using Filter Wrench 8321, tighten the
cooler return oil filter to the transmission case to
9.5 Nꞏm (7 ft.lbs.).
52. Apply RTV silicone to theoil pan and install the
transmission oil pan. Tighten the bolts to 12 Nꞏm (105 in.lbs.).
53. Install the input (3), output (1), and line pressure
sensors (2). Tighten the bolts to 12 Nꞏm (105
in.lbs.).
Page 3392 of 5267
INSTALLATION
1. Check torque converter hub and hub drive flats for
sharp edges burrs, scratches, or nicks. Polish the
hub and flats with 320/400 grit paper and crocus
cloth if necessary. Verify that the converter hub
o-ring is properly installed and is free of any debris.
The hub must be smooth to avoid damaging pump
seal at installation.
2. If a replacement transmission is being installed,
transfer any components necessary, such as the
manual shift lever and shift cable bracket, from the
original transmission onto the replacement trans-
mission.
3. Lubricate oil pump seal lip with transmission fluid.
4. Align converter and oil pump.
5. Carefully insert converter in oil pump. Then rotate
converter back and forth until fully seated in pump
gears.
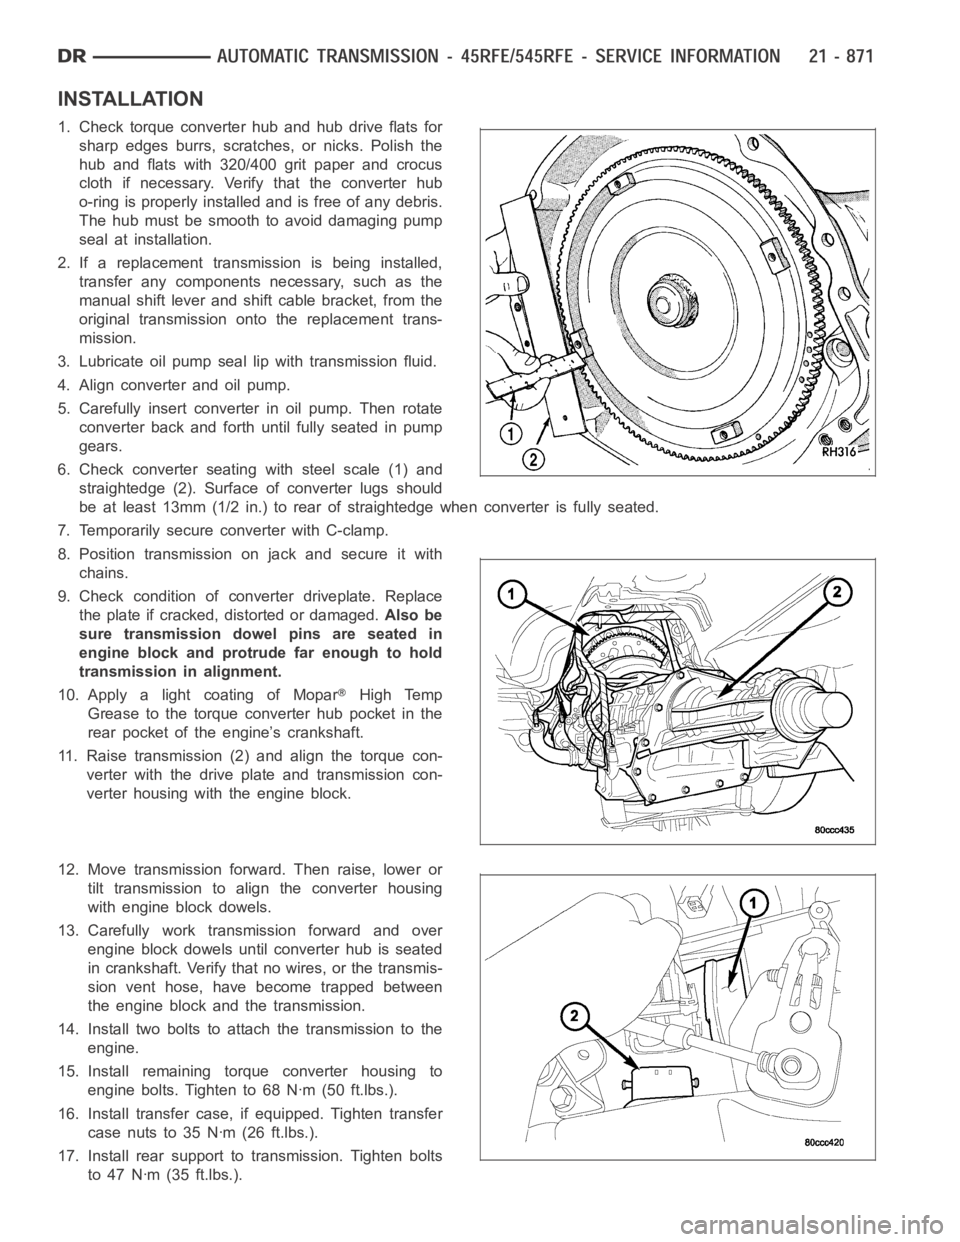
6. Check converter seating with steel scale (1) and
straightedge (2). Surface of converter lugs should
be at least 13mm (1/2 in.) to rear of straightedge when converter is fully seated.
7. Temporarily secure converter with C-clamp.
8. Position transmission on jack and secure it with
chains.
9. Check condition of converter driveplate. Replace
the plate if cracked, distorted or damaged.Also be
sure transmission dowel pins are seated in
engine block and protrude far enough to hold
transmission in alignment.
10. Apply a light coating of Mopar
High Temp
Grease to the torque converter hub pocket in the
rear pocket of the engine’s crankshaft.
11. Raise transmission (2) and align the torque con-
verter with the drive plate and transmission con-
verter housing with the engine block.
12. Move transmission forward. Then raise, lower or
tilt transmission to align the converter housing
with engine block dowels.
13. Carefully work transmission forward and over
engine block dowels until converter hub is seated
in crankshaft. Verify that no wires, or the transmis-
sion vent hose, have become trapped between
theengineblockandthetransmission.
14. Install two bolts to attach the transmission to the
engine.
15. Install remaining torque converter housing to
engine bolts. Tighten to 68 Nꞏm (50 ft.lbs.).
16. Install transfer case, if equipped. Tighten transfer
case nuts to 35 Nꞏm (26 ft.lbs.).
17. Install rear support to transmission. Tighten bolts
to 47 Nꞏm (35 ft.lbs.).
Page 3417 of 5267
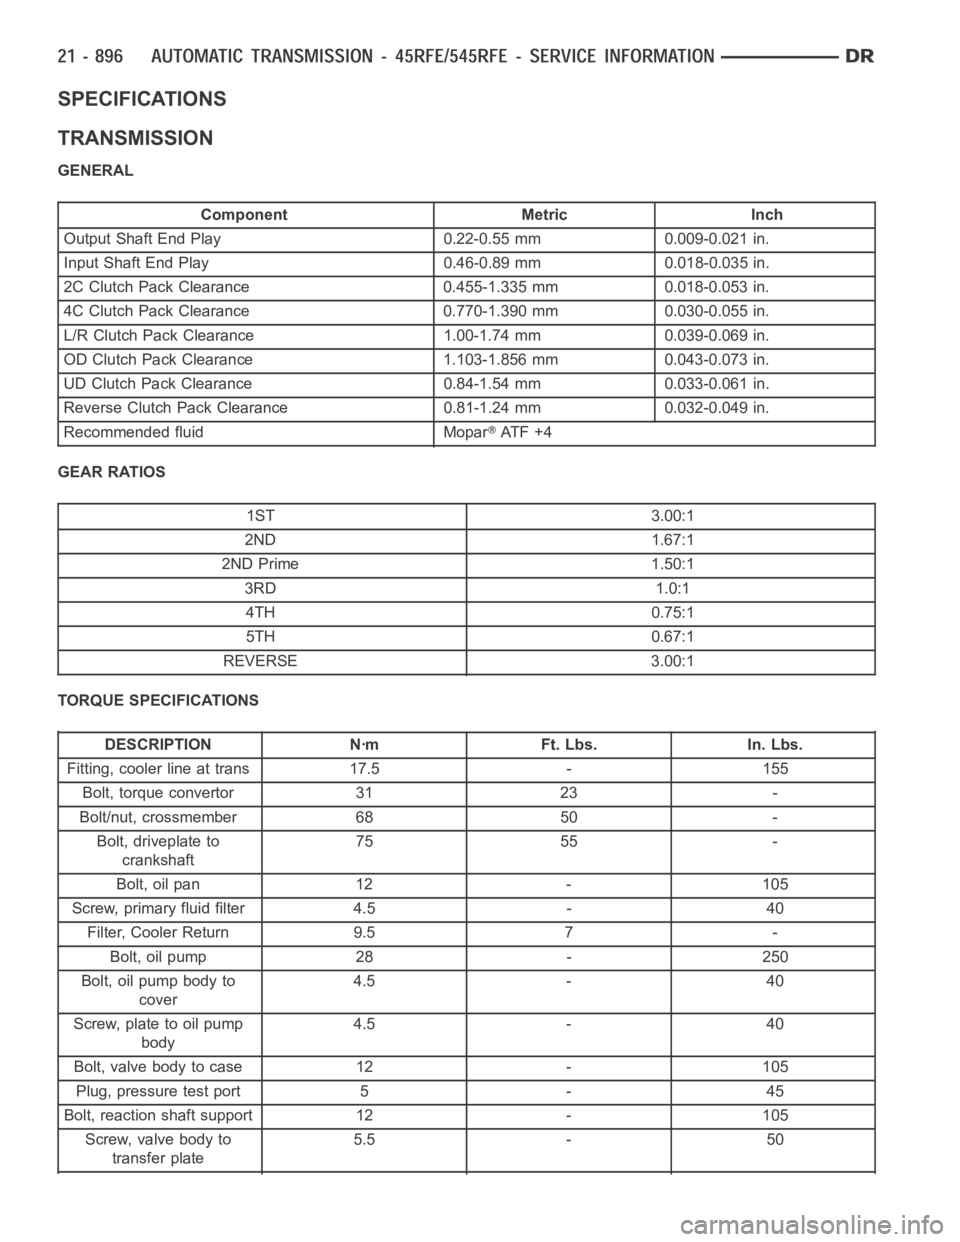
SPECIFICATIONS
TRANSMISSION
GENERAL
Component Metric Inch
Output Shaft End Play 0.22-0.55 mm 0.009-0.021 in.
Input Shaft End Play 0.46-0.89 mm 0.018-0.035 in.
2C Clutch Pack Clearance 0.455-1.335 mm 0.018-0.053 in.
4C Clutch Pack Clearance 0.770-1.390 mm 0.030-0.055 in.
L/R Clutch Pack Clearance 1.00-1.74 mm 0.039-0.069 in.
OD Clutch Pack Clearance 1.103-1.856 mm 0.043-0.073 in.
UD Clutch Pack Clearance 0.84-1.54 mm 0.033-0.061 in.
Reverse Clutch Pack Clearance 0.81-1.24 mm 0.032-0.049 in.
Recommended fluid Mopar
AT F + 4
GEAR RATIOS
1ST 3.00:1
2ND 1.67:1
2ND Prime 1.50:1
3RD 1.0:1
4TH 0.75:1
5TH 0.67:1
REVERSE 3.00:1
TORQUE SPECIFICATIONS
DESCRIPTION Nꞏm Ft. Lbs. In. Lbs.
Fitting, cooler line at trans 17.5 - 155
Bolt, torque convertor 31 23 -
Bolt/nut, crossmember 68 50 -
Bolt, driveplate to
crankshaft75 55 -
Bolt, oil pan 12 - 105
Screw, primary fluid filter 4.5 - 40
Filter, Cooler Return 9.5 7 -
Bolt, oil pump 28 - 250
Bolt, oil pump body to
cover4.5 - 40
Screw, plate to oil pump
body4.5 - 40
Bolt, valve body to case 12 - 105
Plug, pressure test port 5 - 45
Bolt, reaction shaft support 12 - 105
Screw, valve body to
transfer plate5.5 - 50
Page 3419 of 5267
SPECIAL TOOLS
AUTOMATIC TRANSMISSION - RFE
Gauge, Oil Pressure - C-3292
Gauge, Oil Pressure - C-3293SP
Dial Indicator - C-3339
Installer, Seal - C-3860-A
Compressor, Spring - 8249
Compressor, Spring - 8250
Compressor, Spring - 8251
Installer, Piston - 8252
Installer, Seal - 8253
Page 3427 of 5267
SEAL-ADAPTER HOUSING
REMOVAL
1. Remove the transfer case from the transmission.
2. Using a screw mounted on a slide hammer, remove the adapter housing seal.
INSTALLATION
1. Clean the adapter seal bore in the adapter housing
of any residue or particles remaining from the orig-
inal seal.
2. Install new oil seal in the adapter housing using
Seal Installer C-3860-A (1) . A properly installed
seal is flush to the face of the seal bore.
3. Install the transfer case onto the transmission.