Page 4561 of 5267

INSTALLATION
1. Before proceeding with the following repair proce-
dure, review all warnings and cautions. (Refer to
23 - BODY/SEATS - WARNING)
NOTE: Do not reuse the seat fasteners, always
replace with new ones.
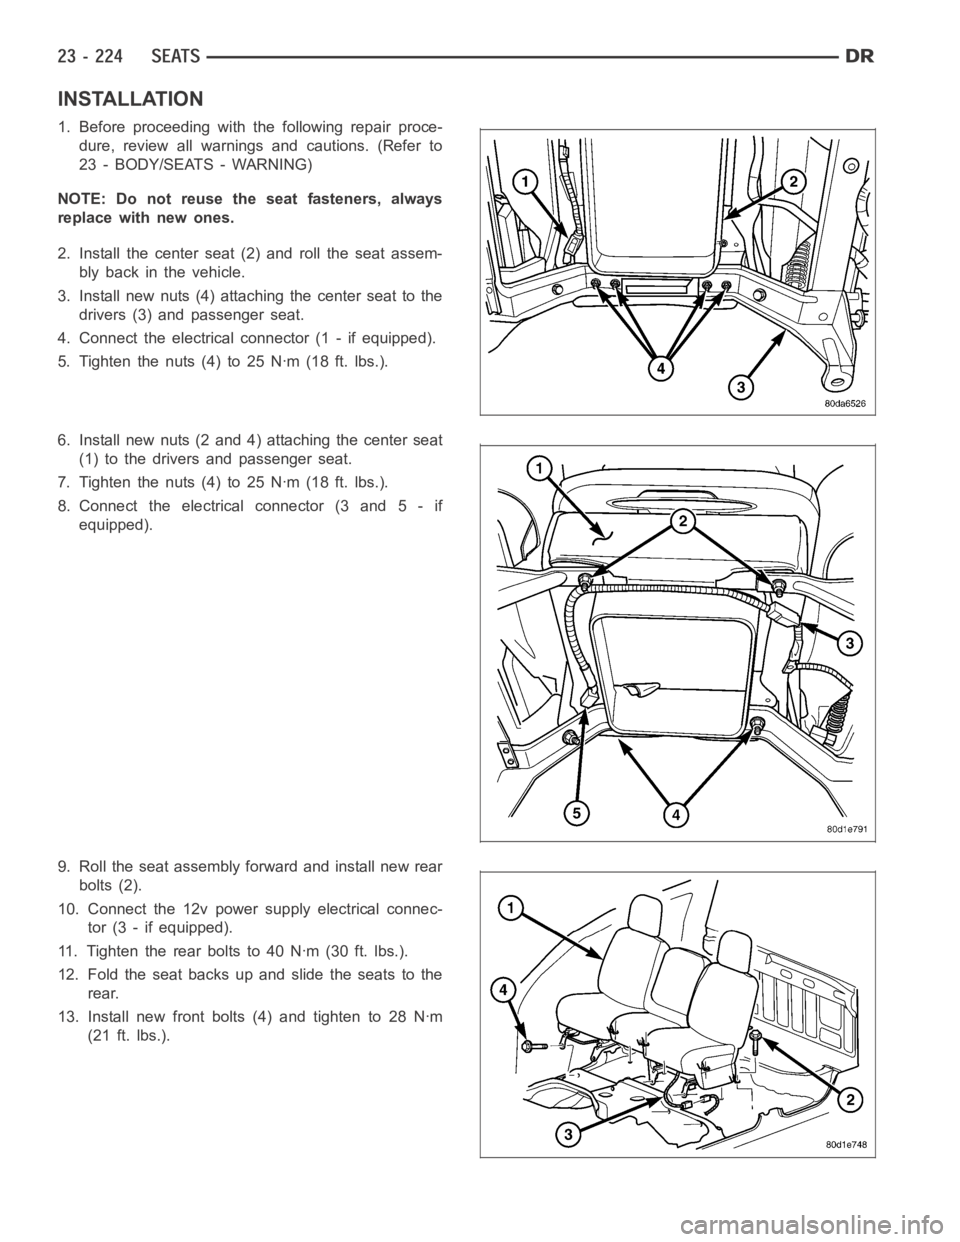
2. Install the center seat (2) and roll the seat assem-
bly back in the vehicle.
3. Install new nuts (4) attaching the center seat to the
drivers (3) and passenger seat.
4. Connect the electrical connector (1 - if equipped).
5. Tighten the nuts (4) to 25 Nꞏm (18 ft. lbs.).
6. Install new nuts (2 and 4) attaching the center seat
(1) to the drivers and passenger seat.
7. Tighten the nuts (4) to 25 Nꞏm (18 ft. lbs.).
8. Connect the electrical connector (3 and 5 - if
equipped).
9. Roll the seat assembly forward and install new rear
bolts (2).
10. Connect the 12v power supply electrical connec-
tor (3 - if equipped).
11. Tighten the rear bolts to 40 Nꞏm (30 ft. lbs.).
12. Fold the seat backs up and slide the seats to the
rear.
13. Install new front bolts (4) and tighten to 28 Nꞏm
(21 ft. lbs.).
Page 4575 of 5267
5. Fold the seat backs forward and roll the seat
assembly back in the vehicle.
6. Remove and discard the nuts (2 and 4) on either
the driver or passenger side.
7. Separate the seat assembly by removing and dis-
carding the nuts (4) on either the drivers or pas-
sengers seat.
8. Remove each section of the seat assembly from
the vehicle.
INSTALLATION
1. Before proceeding with the following repair proce-
dure, review all warnings and cautions. (Refer to
23 - BODY/SEATS - WARNING)
NOTE: Do not reuse the seat fasteners, always
replace with new ones.
2. Position each seat section into the vehicle and tip
back.
3. Install the nuts (4) attaching the center seat section
(2) to the other seat, and tighten to 25 Nꞏm (18 ft.
lbs.).
Page 4576 of 5267
4. Install the nuts (2 and 4) attaching the center seat
section to the other seat, and tighten to 25 Nꞏm (18
ft. lbs.).
5. Connect the electrical connectors (1).
6. Roll the seat assembly forward and install new rear
bolts (2). Tighten the bolts (2) to 40 Nꞏm (30 ft.
lbs.).
7. Fold the seat backs up and slide the seats (1) to
the rear.
8. Install new front bolts (4) and tighten to 28 Nꞏm (21
ft. lbs.).
Page 4582 of 5267
SEAT - REAR
REMOVAL
1. Remove the load floor (Refer to 23 - BODY/INTE-
RIOR/LOAD FLOOR - REMOVAL).
2. Fold the rear seat cushions up and remove the
rear bolts (1, 3, and 5).
3. Lift each seat assembly up and disengage the seat
back frame hooks (1 and 3) from the footmans
loops (2 and 4) bolted to the rear cab back.
4. Remove the seats from the vehicle.