2006 BMW MOTORRAD K 1200 R Rider's Manual (in English)
-
 1
1 -
 2
2 -
 3
3 -
 4
4 -
 5
5 -
 6
6 -
 7
7 -
 8
8 -
 9
9 -
 10
10 -
 11
11 -
 12
12 -
 13
13 -
 14
14 -
 15
15 -
 16
16 -
 17
17 -
 18
18 -
 19
19 -
 20
20 -
 21
21 -
 22
22 -
 23
23 -
 24
24 -
 25
25 -
 26
26 -
 27
27 -
 28
28 -
 29
29 -
 30
30 -
 31
31 -
 32
32 -
 33
33 -
 34
34 -
 35
35 -
 36
36 -
 37
37 -
 38
38 -
 39
39 -
 40
40 -
 41
41 -
 42
42 -
 43
43 -
 44
44 -
 45
45 -
 46
46 -
 47
47 -
 48
48 -
 49
49 -
 50
50 -
 51
51 -
 52
52 -
 53
53 -
 54
54 -
 55
55 -
 56
56 -
 57
57 -
 58
58 -
 59
59 -
 60
60 -
 61
61 -
 62
62 -
 63
63 -
 64
64 -
 65
65 -
 66
66 -
 67
67 -
 68
68 -
 69
69 -
 70
70 -
 71
71 -
 72
72 -
 73
73 -
 74
74 -
 75
75 -
 76
76 -
 77
77 -
 78
78 -
 79
79 -
 80
80 -
 81
81 -
 82
82 -
 83
83 -
 84
84 -
 85
85 -
 86
86 -
 87
87 -
 88
88 -
 89
89 -
 90
90 -
 91
91 -
 92
92 -
 93
93 -
 94
94 -
 95
95 -
 96
96 -
 97
97 -
 98
98 -
 99
99 -
 100
100 -
 101
101 -
 102
102 -
 103
103 -
 104
104 -
 105
105 -
 106
106 -
 107
107 -
 108
108 -
 109
109 -
 110
110 -
 111
111 -
 112
112 -
 113
113 -
 114
114 -
 115
115 -
 116
116 -
 117
117 -
 118
118 -
 119
119 -
 120
120 -
 121
121 -
 122
122 -
 123
123 -
 124
124 -
 125
125 -
 126
126 -
 127
127 -
 128
128 -
 129
129 -
 130
130 -
 131
131 -
 132
132 -
 133
133 -
 134
134 -
 135
135 -
 136
136 -
 137
137 -
 138
138 -
 139
139 -
 140
140 -
 141
141 -
 142
142 -
 143
143 -
 144
144 -
 145
145 -
 146
146 -
 147
147 -
 148
148 -
 149
149 -
 150
150 -
 151
151 -
 152
152 -
 153
153 -
 154
154 -
 155
155 -
 156
156 -
 157
157 -
 158
158 -
 159
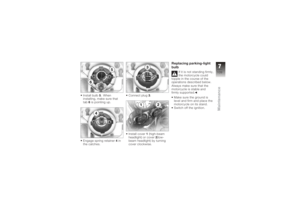
159
 Turn the key counter-clock-
wise in the seat lock.
Press the seat down at the
same time.Lift the rear of the seat.
The seat can be dam-
aged at the edges if it is
placed on a rough surface.
Lay the se")
 Push down firmly on the
seat, applying pressure to
the point above the latch.
The seat engages with an
audible click.
Helmet holderHelmet holder
underneath seatHelmet holder1is underneath
the seat.
A")
 hand side of the motorcycle
only.Use the wire rope available
as an optional extra to se-
cure the helmet to helmet
holder 1.Luggage loopsLuggage loops
underneath seatLoops 1for attaching luggage
strap")
 Adjusting mirror armPush the protective cap up
over the threaded fastener
on the mirror arm.
Slacken union nut1.
Turn the mirror arm to the
appropriate position.
Retighten the union nut.
Mirror to cla")
 direction indicated by the
LOW arrow.One click corresponds
to a half turn of the knob.
The range of adjustment com-
prises 15 turns.
Spring preload, basic
setting
Turn the knob as far as
it will go in")
 tion indicated by the H ar-
row.
If you want a softer damping
characteristic, use a screw-
driver to turn the adjusting
screw in the direction in-
dicted by the S arrow.The adjusting screw can
be turn")
 Adjust suspension
dampingSwitch on the ignition.You can adjust the
damping characteristic
while the motorcycle is on the
move.
Press button 1.
The current setting is dis-
played.
Press button 1once br")
 Two-up (with luggage)
The setting shown on the
display is automatically
accepted as the spring
preload if you allow a
certain length of time to
pass without pressing
button 1. During the setting
proce")